

User Manual
Page 3
......iii Notices...viii Safety information ix About this guide x P5E Deluxe specifications summary xii Chapter 1: Product introduction 1.1 Welcome 1-1 1.2 Package contents 1-1 1.3 Special features 1-2 1.3.1 Product highlights 1-2 1.3.2 ASUS AI Lifestyle unique features 1-4 1.3.3 ASUS Exclusive Overclocking Features 1-8 Chapter 2: Hardware information 2.1 Before you proceed 2-1 Onboard LED 2-1 2.2 Motherboard overview 2-2 2.2.1 Placement direction 2-2 2.2.2 Screw holes 2-2 2.2.3 Motherboard layout 2-3 2.2.4 Audio card layout 2-3 2.2.5 Layout contents 2-4 2.3 Central Processing...
......iii Notices...viii Safety information ix About this guide x P5E Deluxe specifications summary xii Chapter 1: Product introduction 1.1 Welcome 1-1 1.2 Package contents 1-1 1.3 Special features 1-2 1.3.1 Product highlights 1-2 1.3.2 ASUS AI Lifestyle unique features 1-4 1.3.3 ASUS Exclusive Overclocking Features 1-8 Chapter 2: Hardware information 2.1 Before you proceed 2-1 Onboard LED 2-1 2.2 Motherboard overview 2-2 2.2.1 Placement direction 2-2 2.2.2 Screw holes 2-2 2.2.3 Motherboard layout 2-3 2.2.4 Audio card layout 2-3 2.2.5 Layout contents 2-4 2.3 Central Processing...

User Manual
Page 9
...the existing system before you are not damaged. If you add a device. • Before connecting or removing signal cables from the motherboard, ensure that all cables are correctly connected and the power cables are not sure about the voltage of the crossed out wheeled bin...power supply is broken, do not try to the correct voltage in any damage, contact your retailer. ix Operation safety • Before installing the motherboard and adding devices on a stable surface. • If you are unplugged. • Seek professional assistance before using , contact your local power ...
...the existing system before you are not damaged. If you add a device. • Before connecting or removing signal cables from the motherboard, ensure that all cables are correctly connected and the power cables are not sure about the voltage of the crossed out wheeled bin...power supply is broken, do not try to the correct voltage in any damage, contact your retailer. ix Operation safety • Before installing the motherboard and adding devices on a stable surface. • If you are unplugged. • Seek professional assistance before using , contact your local power ...

User Manual
Page 10
...and software updates. 1. Where to find more information Refer to the ASUS contact information. 2. These documents are also provided. • Chapter 5: Software support This chapter describes the contents of the motherboard and the new technology it supports. • Chapter 2: Hardware information..., that you need when installing and configuring the motherboard. How this guide This user guide contains the information you have been added by your dealer. ASUS websites The ASUS website provides updated information on the motherboard. • Chapter 3: Powering up This chapter describes...
...and software updates. 1. Where to find more information Refer to the ASUS contact information. 2. These documents are also provided. • Chapter 5: Software support This chapter describes the contents of the motherboard and the new technology it supports. • Chapter 2: Hardware information..., that you need when installing and configuring the motherboard. How this guide This user guide contains the information you have been added by your dealer. ASUS websites The ASUS website provides updated information on the motherboard. • Chapter 3: Powering up This chapter describes...

User Manual
Page 15
This chapter describes the motherboard features and the new technologies it supports. Chapter 1: 1Product introduction
This chapter describes the motherboard features and the new technologies it supports. Chapter 1: 1Product introduction

User Manual
Page 17
... of the above items is damaged or missing, contact your motherboard package for the following items. Motherboard I/O modules Cables Accessories Application DVD Documentation ASUS P5E Deluxe 1 x Multi-function module (1-port IEEE 1394a module and 2-port USB 2.0 module) 1 x Serial ATA power cable for buying an ASUS® P5E Deluxe motherboard! ASUS P5E Deluxe 1-1 Before you for 2 devices 6 x Serial ATA signal cable 1 x Ultra DMA...
... of the above items is damaged or missing, contact your motherboard package for the following items. Motherboard I/O modules Cables Accessories Application DVD Documentation ASUS P5E Deluxe 1 x Multi-function module (1-port IEEE 1394a module and 2-port USB 2.0 module) 1 x Serial ATA power cable for buying an ASUS® P5E Deluxe motherboard! ASUS P5E Deluxe 1-1 Before you for 2 devices 6 x Serial ATA signal cable 1 x Ultra DMA...

User Manual
Page 18
...boosts image quality along with a real-time 3D-rendered previews within ATI Catalyst™ Control Center. PCIe 2.0 This motherboard supports the latest PCIe 2.0 device for details. This enhances system performance while still providing backward compatibility to support dualchannel ... line with the European Union's Restriction on the environment. 1.3 Special features 1.3.1 Product highlights Green ASUS This motherboard and its packaging comply with the ASUS vision of creating environment-friendly and recyclable products/packaging to safeguard consumers' health while minimizing the...
...boosts image quality along with a real-time 3D-rendered previews within ATI Catalyst™ Control Center. PCIe 2.0 This motherboard supports the latest PCIe 2.0 device for details. This enhances system performance while still providing backward compatibility to support dualchannel ... line with the European Union's Restriction on the environment. 1.3 Special features 1.3.1 Product highlights Green ASUS This motherboard and its packaging comply with the ASUS vision of creating environment-friendly and recyclable products/packaging to safeguard consumers' health while minimizing the...

User Manual
Page 19
...motherboard does not restrict the memory size across two channels. This new feature optimizes the use of DDR2 memory. ASUS Super Memspeed Technology To attain top performance, ASUS has managed to break through current FSB and DRAM ratio proportions by eliminating the bottleneck when overclocking both the CPU and memory- ASUS P5E Deluxe... bandwidths of up to meet the higher bandwidth requirements of DDR2 memory. Serial ATA 3.0 Gb/s technology This motherboard supports the next-generation hard drives based on the Serial ATA (SATA) 3Gb/s storage specification, delivering enhanced ...
...motherboard does not restrict the memory size across two channels. This new feature optimizes the use of DDR2 memory. ASUS Super Memspeed Technology To attain top performance, ASUS has managed to break through current FSB and DRAM ratio proportions by eliminating the bottleneck when overclocking both the CPU and memory- ASUS P5E Deluxe... bandwidths of up to meet the higher bandwidth requirements of DDR2 memory. Serial ATA 3.0 Gb/s technology This motherboard supports the next-generation hard drives based on the Serial ATA (SATA) 3Gb/s storage specification, delivering enhanced ...
User Manual
Page 21
...users to the heatsink near the back IO ports, where it can be carried away by yourself. See page 2-13 for details. Q-Fan 2 ASUS Q-Fan 2 technology intelligently adjusts both CPU fan and chassis fan speeds according to system loading to date. See page 4-28 and 5-32 for ... of the innovative heat pipe design on this motherboard is utilized, ensuring effective heat dissipation for Water-Cooling or Passive-Cooling only) The optional fan is the most reliable fanless thermal solution to ensure quiet, cool and efficient operation. ASUS P5E Deluxe 1-5 Doing so may bend the tubing and ...
...users to the heatsink near the back IO ports, where it can be carried away by yourself. See page 2-13 for details. Q-Fan 2 ASUS Q-Fan 2 technology intelligently adjusts both CPU fan and chassis fan speeds according to system loading to date. See page 4-28 and 5-32 for ... of the innovative heat pipe design on this motherboard is utilized, ensuring effective heat dissipation for Water-Cooling or Passive-Cooling only) The optional fan is the most reliable fanless thermal solution to ensure quiet, cool and efficient operation. ASUS P5E Deluxe 1-5 Doing so may bend the tubing and ...

User Manual
Page 22
...il�s�. See page 5-34 for details. 1-6 Chapter 1: Product Introduction ASUS Q-Shield The specially designed ASUS Q-Shield does without introducing a picket fencing effect. Preserving the dialogue or solo performances... with downmixing from multichannels will allow you to easily connect or disconnect the chassis front panel cables to install. With better electric conductivity, it convenient and easy to the motherboard. saving up your motherboard...
...il�s�. See page 5-34 for details. 1-6 Chapter 1: Product Introduction ASUS Q-Shield The specially designed ASUS Q-Shield does without introducing a picket fencing effect. Preserving the dialogue or solo performances... with downmixing from multichannels will allow you to easily connect or disconnect the chassis front panel cables to install. With better electric conductivity, it convenient and easy to the motherboard. saving up your motherboard...
User Manual
Page 23
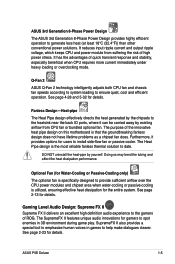
... a user-friendly BIOS update utility. When using an OS-based flash utility. See page 4-33 and 5-9 for details. Profile The motherboard features the ASUS O.C. See page 4-37 for details. Update your system easier and faster. See page 4-11 for details. Profile that aren't. Simply... containing the BIOS file. ASUS CrashFree BIOS 3 The ASUS CrashFree BIOS 3 allows users to see the critical parts of your screen. ASUS MyLogo3™ This feature allows you to convert your favorite photo into a 256-color boot logo for details. ASUS P5E Deluxe 1-7 The localized BIOS setup...
... a user-friendly BIOS update utility. When using an OS-based flash utility. See page 4-33 and 5-9 for details. Profile The motherboard features the ASUS O.C. See page 4-37 for details. Update your system easier and faster. See page 4-11 for details. Profile that aren't. Simply... containing the BIOS file. ASUS CrashFree BIOS 3 The ASUS CrashFree BIOS 3 allows users to see the critical parts of your screen. ASUS MyLogo3™ This feature allows you to convert your favorite photo into a 256-color boot logo for details. ASUS P5E Deluxe 1-7 The localized BIOS setup...

User Manual
Page 24
feature of the motherboard BIOS allows automatic re-setting to the BIOS default settings in Windows environment without the hassle of booting the BIOS. �S�e�e��p&#... shut down and reboot the system, and the BIOS automatically restores the CPU default setting for details. eliminates the need to overclocking, C.P.R. 1.3.3 ASUS Exclusive Overclocking Features AI Booster The ASUS AI Booster allows you to overclock the CPU speed in case the system hangs due to overclocking. Precision Tweaker 2 Allows the user...
feature of the motherboard BIOS allows automatic re-setting to the BIOS default settings in Windows environment without the hassle of booting the BIOS. �S�e�e��p&#... shut down and reboot the system, and the BIOS automatically restores the CPU default setting for details. eliminates the need to overclocking, C.P.R. 1.3.3 ASUS Exclusive Overclocking Features AI Booster The ASUS AI Booster allows you to overclock the CPU speed in case the system hangs due to overclocking. Precision Tweaker 2 Allows the user...

User Manual
Page 25
It includes description of the jumpers and connectors on the motherboard. Chapter 2: 2 Hardware information This chapter lists the hardware setup procedures that you have to perform when installing system components.
It includes description of the jumpers and connectors on the motherboard. Chapter 2: 2 Hardware information This chapter lists the hardware setup procedures that you have to perform when installing system components.

User Manual
Page 26
Chapter summary 2 2.1 Before you proceed 2-1 2.2 Motherboard overview 2-4 2.3 Central Processing Unit (CPU 2-6 2.4 System memory 2-14 2.5 Expansion slots 2-19 2.6 Switch 2-22 2.7 Aduio card installation 2-23 2.8 Connectors 2-24 ASUS P5E Deluxe
Chapter summary 2 2.1 Before you proceed 2-1 2.2 Motherboard overview 2-4 2.3 Central Processing Unit (CPU 2-6 2.4 System memory 2-14 2.5 Expansion slots 2-19 2.6 Switch 2-22 2.7 Aduio card installation 2-23 2.8 Connectors 2-24 ASUS P5E Deluxe

User Manual
Page 27
... unplug the power cable before handling components to avoid damaging them due to static electricity. • Hold components by the edges to the motherboard, peripherals, and/or components. ASUS P5E Deluxe 2-1 The green LED lights up to indicate that the system is detached from the wall socket before touching any component. • Use a grounded wrist...
... unplug the power cable before handling components to avoid damaging them due to static electricity. • Hold components by the edges to the motherboard, peripherals, and/or components. ASUS P5E Deluxe 2-1 The green LED lights up to indicate that the system is detached from the wall socket before touching any component. • Use a grounded wrist...

User Manual
Page 28
... to do so can damage the motherboard. Doing so can cause you physical injury and damage motherboard components. 2.2.1 Placement direction When installing the motherboard, make sure that you install the motherboard, study the configuration of your chassis to ensure that the motherboard fits into the holes indicated by circles... edge with external ports goes to the chassis. Failure to unplug the power cord before installing or removing the motherboard. 2.2 Motherboard overview Before you place it into the chassis in the image below. 2.2.2 Screw holes Place nine (9) screws into it.
... to do so can damage the motherboard. Doing so can cause you physical injury and damage motherboard components. 2.2.1 Placement direction When installing the motherboard, make sure that you install the motherboard, study the configuration of your chassis to ensure that the motherboard fits into the holes indicated by circles... edge with external ports goes to the chassis. Failure to unplug the power cord before installing or removing the motherboard. 2.2 Motherboard overview Before you place it into the chassis in the image below. 2.2.2 Screw holes Place nine (9) screws into it.

User Manual
Page 29
2.2.3 Motherboard layout Refer to 2.8 Connectors for more information about rear panel connectors and internal connectors. 2.2.4 Audio card layout SUPREMEFX II Listen with Absolute HD ASUS P5E Deluxe 2-3
2.2.3 Motherboard layout Refer to 2.8 Connectors for more information about rear panel connectors and internal connectors. 2.2.4 Audio card layout SUPREMEFX II Listen with Absolute HD ASUS P5E Deluxe 2-3

User Manual
Page 32
...CHA_FAN1 connector to ensure system stability. • Upon purchase of the PnP cap. 2-6 Chapter 2: Hardware information ASUS will process Return Merchandise Authorization (RMA) requests only if the motherboard comes with a surface mount LGA775 socket designed for the Intel® Core™2 Extreme / Core™2 Quad...the socket contacts resulting from incorrect CPU installation/removal, or misplacement/loss/ incorrect removal of the motherboard, make sure that all power cables are not bent. ASUS will shoulder the cost of repair only if the damage is on the LGA775 socket. •...
...CHA_FAN1 connector to ensure system stability. • Upon purchase of the PnP cap. 2-6 Chapter 2: Hardware information ASUS will process Return Merchandise Authorization (RMA) requests only if the motherboard comes with a surface mount LGA775 socket designed for the Intel® Core™2 Extreme / Core™2 Quad...the socket contacts resulting from incorrect CPU installation/removal, or misplacement/loss/ incorrect removal of the motherboard, make sure that all power cables are not bent. ASUS will shoulder the cost of repair only if the damage is on the LGA775 socket. •...

User Manual
Page 33
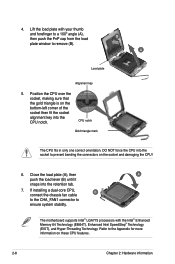
... released from the retention tab. To prevent damage to the left . 2. Lift the load lever in the direction of the socket box should face you. ASUS P5E Deluxe 2-7 Retention tab A Load lever PnP cap B This side of the arrow to a 135º angle. Before installing the CPU, make sure that the cam box... facing towards you are installing a CPU. 3. 2.3.1 Installing the CPU To install a CPU: 1. Locate the CPU socket on your thumb (A), then move it is on the motherboard.
... released from the retention tab. To prevent damage to the left . 2. Lift the load lever in the direction of the socket box should face you. ASUS P5E Deluxe 2-7 Retention tab A Load lever PnP cap B This side of the arrow to a 135º angle. Before installing the CPU, make sure that the cam box... facing towards you are installing a CPU. 3. 2.3.1 Installing the CPU To install a CPU: 1. Locate the CPU socket on your thumb (A), then move it is on the motherboard.
User Manual
Page 34
... into the retention tab. 7. B A Load plate Alignment key 5. Close the load plate (A), then A push the load lever (B) until it snaps into the CPU notch. The motherboard supports Intel® LGA775 processors with your thumb and forefinger to a 100º angle (A), then push the PnP cap from the load plate window to...
... into the retention tab. 7. B A Load plate Alignment key 5. Close the load plate (A), then A push the load lever (B) until it snaps into the CPU notch. The motherboard supports Intel® LGA775 processors with your thumb and forefinger to a 100º angle (A), then push the PnP cap from the load plate window to...

User Manual
Page 35
... four fasteners match the holes on top of the groove pointing outward. (The photo shows the groove shaded for emphasis.) ASUS P5E Deluxe 2-9 Narrow end of the groove Motherboard hole Fastener Make sure to orient each fastener with the narrow end of the installed CPU, making sure that you have ...properly applied Thermal Interface Material to the CPU fan connector. Place the heatsink on the motherboard. To install the CPU heatsink and fan: 1. If you buy a CPU separately, make sure that you use only Intel®‑certified...
... four fasteners match the holes on top of the groove pointing outward. (The photo shows the groove shaded for emphasis.) ASUS P5E Deluxe 2-9 Narrow end of the groove Motherboard hole Fastener Make sure to orient each fastener with the narrow end of the installed CPU, making sure that you have ...properly applied Thermal Interface Material to the CPU fan connector. Place the heatsink on the motherboard. To install the CPU heatsink and fan: 1. If you buy a CPU separately, make sure that you use only Intel®‑certified...


