

P4S8X-MX English User Manaul E1997
Page 3
Contents Notices vi Safety information vii P4S8X-MX specifications summary viii Chapter 1: Product introduction 1.1 Welcome 1-2 1.2 Package contents 1-2 1.3 Special features 1-2 1.4 Before you proceed 1-5 1.5 Motherboard overview 1-6 1.5.1 Motherboard layout 1-6 1.5.2 Placement direction 1-7 1.5.3 Screw holes 1-7 1.6 Central Processing Unit (CPU 1-8 1.6.1 Overview 1-8 1.6.2 Installing the CPU 1-8 1.6.3 Installing the heatsink and fan 1-11 1.7 System memory 1-14 1.7.1 Overview 1-14 1.7.2 Memory configurations 1-14 1.7.3 Installing a DIMM 1-16...
Contents Notices vi Safety information vii P4S8X-MX specifications summary viii Chapter 1: Product introduction 1.1 Welcome 1-2 1.2 Package contents 1-2 1.3 Special features 1-2 1.4 Before you proceed 1-5 1.5 Motherboard overview 1-6 1.5.1 Motherboard layout 1-6 1.5.2 Placement direction 1-7 1.5.3 Screw holes 1-7 1.6 Central Processing Unit (CPU 1-8 1.6.1 Overview 1-8 1.6.2 Installing the CPU 1-8 1.6.3 Installing the heatsink and fan 1-11 1.7 System memory 1-14 1.7.1 Overview 1-14 1.7.2 Memory configurations 1-14 1.7.3 Installing a DIMM 1-16...

P4S8X-MX English User Manaul E1997
Page 4
Contents Chapter 2: BIOS setup 2.1 Managing and updating your BIOS 2-2 2.1.1 Creating a bootable floppy disk 2-2 2.1.2 ASUS EZ Flash utility 2-3 2.1.3 AFUDOS utility 2-4 2.1.4 ASUS CrashFree BIOS 2 utility 2-6 2.1.5 ASUS Update utility 2-8 2.2 BIOS setup program 2-11 2.2.1 BIOS menu screen 2-12 2.2.2 Menu bar 2-12 2.2.3 ... OnChip SATA Controller 2-16 2.3.6 System Information 2-16 2.4 Advanced menu 2-17 2.4.1 JumperFree Configuration 2-18 2.4.2 CPU Configuration 2-20 2.4.3 Chipset 2-21 2.4.4 Onboard Devices Configuration 2-23 2.4.5 PCI PnP 2-24 2.4.6 USB Configuration 2-27 iv
Contents Chapter 2: BIOS setup 2.1 Managing and updating your BIOS 2-2 2.1.1 Creating a bootable floppy disk 2-2 2.1.2 ASUS EZ Flash utility 2-3 2.1.3 AFUDOS utility 2-4 2.1.4 ASUS CrashFree BIOS 2 utility 2-6 2.1.5 ASUS Update utility 2-8 2.2 BIOS setup program 2-11 2.2.1 BIOS menu screen 2-12 2.2.2 Menu bar 2-12 2.2.3 ... OnChip SATA Controller 2-16 2.3.6 System Information 2-16 2.4 Advanced menu 2-17 2.4.1 JumperFree Configuration 2-18 2.4.2 CPU Configuration 2-20 2.4.3 Chipset 2-21 2.4.4 Onboard Devices Configuration 2-23 2.4.5 PCI PnP 2-24 2.4.6 USB Configuration 2-27 iv

P4S8X-MX English User Manaul E1997
Page 8
... 400 MHz DDR memory, the motherboard runs at 400 MHz. P4S8X-MX specifications summary CPU Chipset Front Side Bus Memory Expansion slots Graphics Storage Audio LAN Overclocking USB Special features Socket 478 for Intel® Pentium® 4 / Celeron processors...Stepless Frequency Selection (SFS) from 100 MHz up to 200 MHz at 1 MHz increment AGP/PCI Asynchronous Mode with FSB ASUS C.P.R. (CPU Parameter Recall) Supports up to 8 USB 2.0 ports ASUS CrashFree BIOS 2 ASUS EZ Flash ASUS MyLogo2™ (continued on the next page) * The motherboard runs at 333 MHz by default. 2. viii When ...
... 400 MHz DDR memory, the motherboard runs at 400 MHz. P4S8X-MX specifications summary CPU Chipset Front Side Bus Memory Expansion slots Graphics Storage Audio LAN Overclocking USB Special features Socket 478 for Intel® Pentium® 4 / Celeron processors...Stepless Frequency Selection (SFS) from 100 MHz up to 200 MHz at 1 MHz increment AGP/PCI Asynchronous Mode with FSB ASUS C.P.R. (CPU Parameter Recall) Supports up to 8 USB 2.0 ports ASUS CrashFree BIOS 2 ASUS EZ Flash ASUS MyLogo2™ (continued on the next page) * The motherboard runs at 333 MHz by default. 2. viii When ...

P4S8X-MX English User Manaul E1997
Page 9
ix P4S8X-MX specifications summary BIOS features Rear panel Internal ... mouse port 6-channel audio ports 1 x Floppy disk drive connector 1 x Primary IDE connector 1 x Secondary IDE connector 2 x Serial ATA connectors 1 x CPU fan connector 1 x Chassis fan connector 2 x USB 2.0 connectors for four additional USB 2.0 ports 1 x Optical drive audio connector 1 x AUX connector 20...9.6 in x 9.6 in (24.5 cm x 24.5 cm) Device drivers ASUS PC Probe ASUS Live Update utility ASUS Screensaver Adobe Acrobat Reader Anti-virus software (OEM version) *Specifications are subject to change without notice.
ix P4S8X-MX specifications summary BIOS features Rear panel Internal ... mouse port 6-channel audio ports 1 x Floppy disk drive connector 1 x Primary IDE connector 1 x Secondary IDE connector 2 x Serial ATA connectors 1 x CPU fan connector 1 x Chassis fan connector 2 x USB 2.0 connectors for four additional USB 2.0 ports 1 x Optical drive audio connector 1 x AUX connector 20...9.6 in x 9.6 in (24.5 cm x 24.5 cm) Device drivers ASUS PC Probe ASUS Live Update utility ASUS Screensaver Adobe Acrobat Reader Anti-virus software (OEM version) *Specifications are subject to change without notice.
P4S8X-MX English User Manaul E1997
Page 14
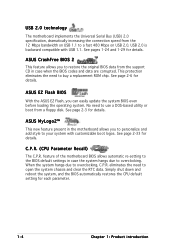
... the need to overclocking, C.P.R. C.P.R. (CPU Parameter Recall) The C.P.R. When the system hangs due to buy a replacement ROM chip. See page 2-33 for details. USB 2.0 is backward compatible with customizable boot logos. ASUS MyLogo2™ This new feature present in...CPU default setting for details. USB 2.0 technology The motherboard implements the Universal Serial Bus (USB) 2.0 specification, dramatically increasing the connection speed from a floppy disk. See pages 1-24 and 1-29 for each parameter. 1-4 Chapter 1: Product introduction ASUS EZ Flash BIOS With the ASUS...
... the need to overclocking, C.P.R. C.P.R. (CPU Parameter Recall) The C.P.R. When the system hangs due to buy a replacement ROM chip. See page 2-33 for details. USB 2.0 is backward compatible with customizable boot logos. ASUS MyLogo2™ This new feature present in...CPU default setting for details. USB 2.0 technology The motherboard implements the Universal Serial Bus (USB) 2.0 specification, dramatically increasing the connection speed from a floppy disk. See pages 1-24 and 1-29 for each parameter. 1-4 Chapter 1: Product introduction ASUS EZ Flash BIOS With the ASUS...

P4S8X-MX English User Manaul E1997
Page 18
...specific corner on the socket to install a CPU. 1. Locate the 478-pin ZIF socket on the CPU. Take note of the CPU into the socket can bend the pins and severely damage the CPU! 1.6.2 Installing the CPU Follow these steps to ensure correct installation. ... come with gold triangle) on the motherboard. 1.6 Central Processing Unit (CPU) 1.6.1 Overview The motherboard comes with a surface mount 478-pin Zero Insertion Force (ZIF) socket designed for the CPU, heatsink, and the retention mechanism. Gold Arrow P4S8X-MX P4S8X-MX CPU Socket 478 1-8 Chapter 1: Product introduction
...specific corner on the socket to install a CPU. 1. Locate the 478-pin ZIF socket on the CPU. Take note of the CPU into the socket can bend the pins and severely damage the CPU! 1.6.2 Installing the CPU Follow these steps to ensure correct installation. ... come with gold triangle) on the motherboard. 1.6 Central Processing Unit (CPU) 1.6.1 Overview The motherboard comes with a surface mount 478-pin Zero Insertion Force (ZIF) socket designed for the CPU, heatsink, and the retention mechanism. Gold Arrow P4S8X-MX P4S8X-MX CPU Socket 478 1-8 Chapter 1: Product introduction

P4S8X-MX English User Manaul E1997
Page 19
...up to 90°-100° angle; Gold mark The CPU fits only in completely. 3. Socket lever 90°-100° angle Make sure that its marked corner matches the base of the socket lever. 4. ASUS P4S8X-MX 1-9 DO NOT force the CPU into the socket until it up to a 90°-...100° angle. Carefully insert the CPU into the socket to prevent bending the pins and damaging the...
...up to 90°-100° angle; Gold mark The CPU fits only in completely. 3. Socket lever 90°-100° angle Make sure that its marked corner matches the base of the socket lever. 4. ASUS P4S8X-MX 1-9 DO NOT force the CPU into the socket until it up to a 90°-...100° angle. Carefully insert the CPU into the socket to prevent bending the pins and damaging the...

P4S8X-MX English User Manaul E1997
Page 20
... 2: BIOS setup). The item appears only if you install Windows® XP Service Pack 1. • Make sure to secure the CPU. When the CPU is set to the motherboard. Notes on Hyper-Threading Technology, visit www.intel.com/info/hyperthreading. If you are using any other operating...socket lever to enable the Hyper-Threading Technology item in BIOS to ensure system stability and performance. • We recommend that you installed a CPU that supports Hyper-Threading Technology. 2. Under the Advanced Menu, make sure to plug the 4-pin ATX power cable to Enabled. Reboot the computer...
... 2: BIOS setup). The item appears only if you install Windows® XP Service Pack 1. • Make sure to secure the CPU. When the CPU is set to the motherboard. Notes on Hyper-Threading Technology, visit www.intel.com/info/hyperthreading. If you are using any other operating...socket lever to enable the Hyper-Threading Technology item in BIOS to ensure system stability and performance. • We recommend that you installed a CPU that supports Hyper-Threading Technology. 2. Under the Advanced Menu, make sure to plug the 4-pin ATX power cable to Enabled. Reboot the computer...

P4S8X-MX English User Manaul E1997
Page 21
To install the CPU heatsink and fan: 1. CPU heatsink Retention module base ASUS P4S8X-MX 1-11 Place the heatsink on top of the installed CPU, making sure that the heatsink fits properly on the retention module base. • The retention module base is already ...heatsink, fan, and retention mechanism. • If you buy a CPU separately, make sure that you purchased a separate CPU heatsink and fan assembly, make sure that a Thermal Interface Material is properly applied to the CPU heatsink or CPU before installing the heatsink and fan assembly. 1.6.3 Installing the heatsink and...
To install the CPU heatsink and fan: 1. CPU heatsink Retention module base ASUS P4S8X-MX 1-11 Place the heatsink on top of the installed CPU, making sure that the heatsink fits properly on the retention module base. • The retention module base is already ...heatsink, fan, and retention mechanism. • If you buy a CPU separately, make sure that you purchased a separate CPU heatsink and fan assembly, make sure that a Thermal Interface Material is properly applied to the CPU heatsink or CPU before installing the heatsink and fan assembly. 1.6.3 Installing the heatsink and...

P4S8X-MX English User Manaul E1997
Page 23
3. Hardware monitoring errors can occur if you fail to opposite directions. P4S8X-MX GND +12V Rotation 4. ASUS P4S8X-MX 1-13 When the fan and heatsink assembly is in place, connect the CPU fan cable to the connector on the retention mechanism to secure the heatsink and fan to connect the CPU fan connector! When secure, the retention locks should point to plug this connector. Push down the locks on the motherboard labeled CPU_FAN1. CPU_FAN1 P4S8X-MX CPU fan connector Do not forget to the module base.
3. Hardware monitoring errors can occur if you fail to opposite directions. P4S8X-MX GND +12V Rotation 4. ASUS P4S8X-MX 1-13 When the fan and heatsink assembly is in place, connect the CPU fan cable to the connector on the retention mechanism to secure the heatsink and fan to connect the CPU fan connector! When secure, the retention locks should point to plug this connector. Push down the locks on the motherboard labeled CPU_FAN1. CPU_FAN1 P4S8X-MX CPU fan connector Do not forget to the module base.

P4S8X-MX English User Manaul E1997
Page 25
... • W942508CH-5 - •• K4H560838D-TCC4 3 •• NT5DS3232M8BT-5T 3 • • Legend: S S - When using an FSB533 CPU with 400 MHz DDR memory, the motherboard runs at 400 MHz. SS 256 MB CORSAIR VS256MB400 Value Select SS 512 MB CORSAIR VS512MB400 Value Select... configuration. * 1. CAS Latency A - When using an FSB800 CPU with 400 MHz DDR memory, the motherboard runs at 333 MHz by default. 2. DS 1G KINGSTON KHX3200ULK2/1G DDR400 1024MB - Double Sided C L - B - ASUS P4S8X-MX 1-15 DS 1 G CORSAIR TWINX2048-3200C2 DDR400 1024MB - Single ...
... • W942508CH-5 - •• K4H560838D-TCC4 3 •• NT5DS3232M8BT-5T 3 • • Legend: S S - When using an FSB533 CPU with 400 MHz DDR memory, the motherboard runs at 400 MHz. SS 256 MB CORSAIR VS256MB400 Value Select SS 512 MB CORSAIR VS512MB400 Value Select... configuration. * 1. CAS Latency A - When using an FSB800 CPU with 400 MHz DDR memory, the motherboard runs at 333 MHz by default. 2. DS 1G KINGSTON KHX3200ULK2/1G DDR400 1024MB - Double Sided C L - B - ASUS P4S8X-MX 1-15 DS 1 G CORSAIR TWINX2048-3200C2 DDR400 1024MB - Single ...

P4S8X-MX English User Manaul E1997
Page 30
... the battery. 5. Plug the power cord and turn ON the computer. 6. P4S8X-MX P4S8X-MX Clear RTC RAM CLRTC1 12 23 Clear CMOS Normal (Default) You do not need to clear the RTC when the system hangs due to overclocking, use the C.P.R. (CPU Parameter Recall) feature. Removing the cap will cause system boot failure! For...
... the battery. 5. Plug the power cord and turn ON the computer. 6. P4S8X-MX P4S8X-MX Clear RTC RAM CLRTC1 12 23 Clear CMOS Normal (Default) You do not need to clear the RTC when the system hangs due to overclocking, use the C.P.R. (CPU Parameter Recall) feature. Removing the cap will cause system boot failure! For...

P4S8X-MX English User Manaul E1997
Page 31
... device wake up +5V (Default) +5VSB • The USB device wake-up the computer from S3 and S4 sleep modes. 2 . ASUS P4S8X-MX 1-21 USB device wake-up (3-pin USBPW12, USBPW34, USBPW56, USBPW78) Set these jumpers to +5V to wake up feature requires a power supply that you can ... to additional USB ports. The USBPW12 and USBPW34 jumpers are for each USB port; otherwise, the system would not power up from S1 sleep mode (CPU stopped, DRAM refreshed, system running in sleep mode.
... device wake up +5V (Default) +5VSB • The USB device wake-up the computer from S3 and S4 sleep modes. 2 . ASUS P4S8X-MX 1-21 USB device wake-up (3-pin USBPW12, USBPW34, USBPW56, USBPW78) Set these jumpers to +5V to wake up feature requires a power supply that you can ... to additional USB ports. The USBPW12 and USBPW34 jumpers are for each USB port; otherwise, the system would not power up from S1 sleep mode (CPU stopped, DRAM refreshed, system running in sleep mode.

P4S8X-MX English User Manaul E1997
Page 38
...fan cables to the fan connectors on the fan connectors. Insufficient air flow inside the system may damage the motherboard components. P4S8X-MX GND +12V Rotation 4 . CPU_FAN1 P4S8X-MX CPU fan connector 5 . GAME/MIDI connector (16-1 pin GAME1) This connector supports a GAME/MIDI module. These are ...game pad for playing games, and MIDI devices for playing or editing audio files. P4S8X-MX +5V J1B2 J1CY GND GND J1CX J1B1 +5V MIDI_IN J2B2 J2CY MIDI_OUT J2CX J2B1 +5V GAME P4S8X-MX Game connector The GAME module is purchased separately. 1-28 Chapter 1: Product introduction ...
...fan cables to the fan connectors on the fan connectors. Insufficient air flow inside the system may damage the motherboard components. P4S8X-MX GND +12V Rotation 4 . CPU_FAN1 P4S8X-MX CPU fan connector 5 . GAME/MIDI connector (16-1 pin GAME1) This connector supports a GAME/MIDI module. These are ...game pad for playing games, and MIDI devices for playing or editing audio files. P4S8X-MX +5V J1B2 J1CY GND GND J1CX J1B1 +5V MIDI_IN J2B2 J2CY MIDI_OUT J2CX J2B1 +5V GAME P4S8X-MX Game connector The GAME module is purchased separately. 1-28 Chapter 1: Product introduction ...

P4S8X-MX English User Manaul E1997
Page 58
AMIBIOS Version : 0106 Build Date : 03/10/05 Processor Type Speed Count : Genuine Intel(R) CPU 2.04GHz : 2400 MHz : 1 System Memory Size : 224MB 2-16 Chapter 2: BIOS setup Configuration options: [Disabled] [Enabled] 2.3.5 OnChip SATA Controller [RAID Mode] Allows you an overview of ...
AMIBIOS Version : 0106 Build Date : 03/10/05 Processor Type Speed Count : Genuine Intel(R) CPU 2.04GHz : 2400 MHz : 1 System Memory Size : 224MB 2-16 Chapter 2: BIOS setup Configuration options: [Disabled] [Enabled] 2.3.5 OnChip SATA Controller [RAID Mode] Allows you an overview of ...

P4S8X-MX English User Manaul E1997
Page 59
Take caution when changing the settings of the Advanced menu items. Incorrect field values can cause the system to change the settings for the CPU and other system devices. JumperFree Configuration CPU Configuration Chipset Onboard Devices Configuration PCI PnP USB Configuration Adjust system frequency/voltage. System Memory Displays the auto-detected system memory. 2.4 Advanced menu The Advanced menu items allow you to malfunction. ASUS P4S8X-MX 2-17 Processor Displays the auto-detected CPU specification. AMI BIOS Displays the auto-detected BIOS information.
Take caution when changing the settings of the Advanced menu items. Incorrect field values can cause the system to change the settings for the CPU and other system devices. JumperFree Configuration CPU Configuration Chipset Onboard Devices Configuration PCI PnP USB Configuration Adjust system frequency/voltage. System Memory Displays the auto-detected system memory. 2.4 Advanced menu The Advanced menu items allow you to malfunction. ASUS P4S8X-MX 2-17 Processor Displays the auto-detected CPU specification. AMI BIOS Displays the auto-detected BIOS information.

P4S8X-MX English User Manaul E1997
Page 60
...If this item is auto-detected) Indicates the frequency sent by the bus multiple equals the CPU speed. If the system becomes unstable, return to achieve desired CPU internal frequency. You may cause the system to the system bus and PCI bus. Frequencies ...frequency) multiplied by the clock generator to become unstable! AI Overclock Tuner [Standard] Allows selection of CPU overclocking options to the default. 2.4.1 JumperFree Configuration Configure System Frequency AI Overclock Tuner CPU Frequency AGP/PCI Frequency Spread Spectrum DRAM Frequency [Manual] [133] [Auto] [Enabled] [Auto...
...If this item is auto-detected) Indicates the frequency sent by the bus multiple equals the CPU speed. If the system becomes unstable, return to achieve desired CPU internal frequency. You may cause the system to the system bus and PCI bus. Frequencies ...frequency) multiplied by the clock generator to become unstable! AI Overclock Tuner [Standard] Allows selection of CPU overclocking options to the default. 2.4.1 JumperFree Configuration Configure System Frequency AI Overclock Tuner CPU Frequency AGP/PCI Frequency Spread Spectrum DRAM Frequency [Manual] [133] [Auto] [Enabled] [Auto...
P4S8X-MX English User Manaul E1997
Page 62
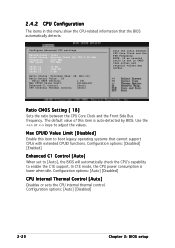
... consumption is auto-detected by BIOS. Configuration options: [Auto] [Disabled] 2-20 Chapter 2: BIOS setup Configure Advanced CPU settings Manufacturer: Intel Brand String: Genuine Intel (R) CPU 2.40 GHz Frequency : 2400 MHz FSB Speed : 533 MHz Cache L1 Cache L2 Cache L3 : 16 KB : 1024 KB : 0 KB Ratio Status: ...: If an invalid ratio is set to [Auto], the BIOS will automatically check the CPU's capability to enable the C1E support. The default value of this item is lower when idle. 2.4.2 CPU Configuration The items in CMOS then actual and setpoint values may differ. Use the or keys...
... consumption is auto-detected by BIOS. Configuration options: [Auto] [Disabled] 2-20 Chapter 2: BIOS setup Configure Advanced CPU settings Manufacturer: Intel Brand String: Genuine Intel (R) CPU 2.40 GHz Frequency : 2400 MHz FSB Speed : 533 MHz Cache L1 Cache L2 Cache L3 : 16 KB : 1024 KB : 0 KB Ratio Status: ...: If an invalid ratio is set to [Auto], the BIOS will automatically check the CPU's capability to enable the C1E support. The default value of this item is lower when idle. 2.4.2 CPU Configuration The items in CMOS then actual and setpoint values may differ. Use the or keys...

P4S8X-MX English User Manaul E1997
Page 71
...[3260RPM] [N/A] [ 1.504V] [ 3.360V] [ 5.160V] [11.328V] CPU Temperature CPU Temperature [xxxºC/xxxºF] MB Temperature [xxxºC/xxxºF] The onboard hardware monitor automatically detects and displays the motherboard and CPU temperatures. VCORE Voltage, +3.3V Voltage, +5V Voltage, +12V Voltage The onboard ...or [N/A] The onboard hardware monitor automatically detects and displays the CPU and chassis fan speeds in rotations per minute (RPM). If any of the fans is not connected to display the detected temperatures. ASUS P4S8X-MX 2-31 Select [Ignored] if you do not wish to the...
...[3260RPM] [N/A] [ 1.504V] [ 3.360V] [ 5.160V] [11.328V] CPU Temperature CPU Temperature [xxxºC/xxxºF] MB Temperature [xxxºC/xxxºF] The onboard hardware monitor automatically detects and displays the motherboard and CPU temperatures. VCORE Voltage, +3.3V Voltage, +5V Voltage, +12V Voltage The onboard ...or [N/A] The onboard hardware monitor automatically detects and displays the CPU and chassis fan speeds in rotations per minute (RPM). If any of the fans is not connected to display the detected temperatures. ASUS P4S8X-MX 2-31 Select [Ignored] if you do not wish to the...
P4S8X-MX English User Manaul E1997
Page 82
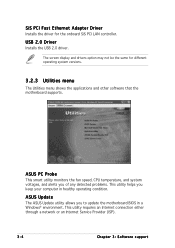
...® environment. The screen display and drivers option may not be the same for the onboard SiS PCI LAN controller. ASUS PC Probe This smart utility monitors the fan speed, CPU temperature, and system voltages, and alerts you of any detected problems. This utility helps you to update the motherboard BIOS in...
...® environment. The screen display and drivers option may not be the same for the onboard SiS PCI LAN controller. ASUS PC Probe This smart utility monitors the fan speed, CPU temperature, and system voltages, and alerts you of any detected problems. This utility helps you to update the motherboard BIOS in...


