
Motherboard DIY Troubleshooting Guide
Page 4
Safeguards Contents Chapter 2: BIOS information 2.1 Managing and updating your BIOS 2-2 2.1.1 Creating a bootable floppy disk 2-2 2.1.2 Updating the BIOS with EZ Flash feature 2-3 2.1.3 Recovering the BIOS with CrashFree BIOS .......... 2-4 2.1.4 ASUS Update 2-6 2.2 BIOS Setup program 2-8 2.2.1 BIOS menu screen 2-9 2.2.2 Menu bar 2-9 2.2.3 Legend bar 2-10 2.2.4 General help 2-10 2.2.5 Sub-... system 3-2 3.2 Support CD information 3-2 3.2.1 Running the support CD 3-2 3.2.2 Drivers menu 3-3 3.2.3 Utilities menu 3-3 3.2.4 ASUS Contact Information 3-4 3.3 Audio configuration 3-5 iv
Safeguards Contents Chapter 2: BIOS information 2.1 Managing and updating your BIOS 2-2 2.1.1 Creating a bootable floppy disk 2-2 2.1.2 Updating the BIOS with EZ Flash feature 2-3 2.1.3 Recovering the BIOS with CrashFree BIOS .......... 2-4 2.1.4 ASUS Update 2-6 2.2 BIOS Setup program 2-8 2.2.1 BIOS menu screen 2-9 2.2.2 Menu bar 2-9 2.2.3 Legend bar 2-10 2.2.4 General help 2-10 2.2.5 Sub-... system 3-2 3.2 Support CD information 3-2 3.2.1 Running the support CD 3-2 3.2.2 Drivers menu 3-3 3.2.3 Utilities menu 3-3 3.2.4 ASUS Contact Information 3-4 3.3 Audio configuration 3-5 iv
Motherboard DIY Troubleshooting Guide
Page 8
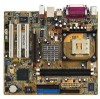
P4GE-MX specifications summary CPU Chipset Front System Bus Memory Expansion slots Storage Audio LAN USB Special features Rear Panel I/O Internal I/O connectors ` Socket 478 for Intel® ... Realtek® ALC655 6-channel CODEC Supports S/PDIF Out interface Realtek® RTL8100C integrated 10/100Mbps LAN controller Maximum of six (6) USB 2.0 ports ASUS JumperFree ASUS C.P.R. (CPU Parameter Recall) ASUS CrashFree BIOS 2 ASUS EZ Flash ASUS MyLogo™ STR (Suspend-to-RAM) 1 x Parallel port 1 x Serial port 1 x VGA port 1 x PS/2 Keyboard port 1 x PS/2 Mouse port 4 x USB 2.0 ports 1 x RJ...
P4GE-MX specifications summary CPU Chipset Front System Bus Memory Expansion slots Storage Audio LAN USB Special features Rear Panel I/O Internal I/O connectors ` Socket 478 for Intel® ... Realtek® ALC655 6-channel CODEC Supports S/PDIF Out interface Realtek® RTL8100C integrated 10/100Mbps LAN controller Maximum of six (6) USB 2.0 ports ASUS JumperFree ASUS C.P.R. (CPU Parameter Recall) ASUS CrashFree BIOS 2 ASUS EZ Flash ASUS MyLogo™ STR (Suspend-to-RAM) 1 x Parallel port 1 x Serial port 1 x VGA port 1 x PS/2 Keyboard port 1 x PS/2 Mouse port 4 x USB 2.0 ports 1 x RJ...
Motherboard DIY Troubleshooting Guide
Page 9
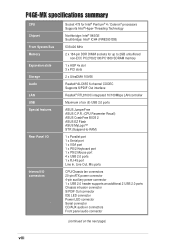
ix BIOS features Industry standard Form Factor Support CD contents 3Mb Flash ROM, Award BIOS, TCAV, PnP, DMI2.0, WfM2.0, SM BIOS 2.3 PCI 2.2, USB 2.0 MicroATX form factor: 9.6 in x 8.6 in Device drivers ASUS PC Probe ASUS Live Update Utility Anti-virus utility * Specifications are subject to change without notice.
ix BIOS features Industry standard Form Factor Support CD contents 3Mb Flash ROM, Award BIOS, TCAV, PnP, DMI2.0, WfM2.0, SM BIOS 2.3 PCI 2.2, USB 2.0 MicroATX form factor: 9.6 in x 8.6 in Device drivers ASUS PC Probe ASUS Live Update Utility Anti-virus utility * Specifications are subject to change without notice.
Motherboard DIY Troubleshooting Guide
Page 14
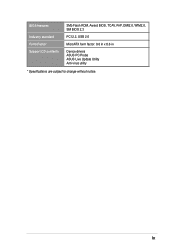
... to open the system chassis and clear the RTC data. C.P.R. (CPU Parameter Recall) The C.P.R. See page 2-4. ASUS EZ Flash BIOS The ASUS EZ Flash feature works through the Award BIOS Update utility. This protection eliminates the need to restore the original BIOS data from the motherboard support CD or a bootable floppy disk in case the...
... to open the system chassis and clear the RTC data. C.P.R. (CPU Parameter Recall) The C.P.R. See page 2-4. ASUS EZ Flash BIOS The ASUS EZ Flash feature works through the Award BIOS Update utility. This protection eliminates the need to restore the original BIOS data from the motherboard support CD or a bootable floppy disk in case the...

Motherboard DIY Troubleshooting Guide
Page 18
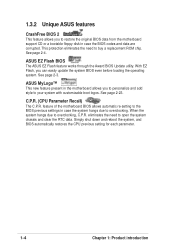
... Linux, use the Hyper-Threading compliler to ensure correct installation. Make sure to ensure system stability and performance. 3. Gold Arrow ® P4GE-MX P4GE-MX CPU Socket 478 Incorrect installation of the marked corner (with gold triangle) on the socket to compile the code. It is supported under ... Technology is recommended that you are using any other operating systems, disable the Hyper-Threading Technology item in BIOS to enable the Hyper-Threading Technology item in BIOS before installing a supported operating system. 5. Take note of the CPU into the socket may bend the ...
... Linux, use the Hyper-Threading compliler to ensure correct installation. Make sure to ensure system stability and performance. 3. Gold Arrow ® P4GE-MX P4GE-MX CPU Socket 478 Incorrect installation of the marked corner (with gold triangle) on the socket to compile the code. It is supported under ... Technology is recommended that you are using any other operating systems, disable the Hyper-Threading Technology item in BIOS to enable the Hyper-Threading Technology item in BIOS before installing a supported operating system. 5. Take note of the CPU into the socket may bend the ...
Motherboard DIY Troubleshooting Guide
Page 21
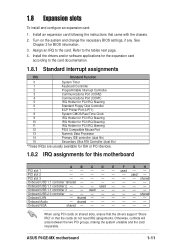
... - PCI slot 3 shared Onboard USB 1.1 controller 1shared Onboard USB 1.1 controller 2 - - - Install the drivers and/or software applications for BIOS information. 3. used - - used - - - - - Onboard USB 2.0 controller shared Onboard LAN - shared - - - - - - Onboard VGA shared When using PCI cards on the...BIOS settings, if any. used - - - - Install an expansion card following the instructions that the cards do not need IRQ assignments. used - 1.8 Expansion slots To install and configure an expansion card: 1. Assign an IRQ to the card. ASUS P4GE-MX...
... - PCI slot 3 shared Onboard USB 1.1 controller 1shared Onboard USB 1.1 controller 2 - - - Install the drivers and/or software applications for BIOS information. 3. used - - used - - - - - Onboard USB 2.0 controller shared Onboard LAN - shared - - - - - - Onboard VGA shared When using PCI cards on the...BIOS settings, if any. used - - - - Install an expansion card following the instructions that the cards do not need IRQ assignments. used - 1.8 Expansion slots To install and configure an expansion card: 1. Assign an IRQ to the card. ASUS P4GE-MX...

Motherboard DIY Troubleshooting Guide
Page 23
...RAM data. Except when clearing the RTC RAM, never remove the cap on pins 1-2 for about 5~10 seconds, then move the cap back to overclocking. ASUS P4GE-MX motherboard 1-13 Move the jumper cap from pins 2-3 (default) to re-enter data. You can automatically reset parameter settings to overclocking, use the C.P.R. (CPU... Parameter Recall) feature. The RAM data in CMOS. Hold down and reboot the system so BIOS can clear the CMOS memory of date, time, and system setup parameters by the onboard button cell battery.
...RAM data. Except when clearing the RTC RAM, never remove the cap on pins 1-2 for about 5~10 seconds, then move the cap back to overclocking. ASUS P4GE-MX motherboard 1-13 Move the jumper cap from pins 2-3 (default) to re-enter data. You can automatically reset parameter settings to overclocking, use the C.P.R. (CPU... Parameter Recall) feature. The RAM data in CMOS. Hold down and reboot the system so BIOS can clear the CMOS memory of date, time, and system setup parameters by the onboard button cell battery.
Motherboard DIY Troubleshooting Guide
Page 24
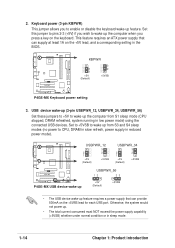
... computer from S3 and S4 sleep modes (no power to CPU, DRAM in slow refresh, power supply in the BIOS. ® P4GE-MX KBPWR 2 1 +5V (Default) 3 2 +5VSB P4GE-MX Keyboard power setting 3. Set this jumper to pins 2-3 (+5V) if you wish to wake up the computer when... system running in sleep mode. 1-14 Chapter 1: Product introduction USBPWR_12 3 2 2 1 +5V (Default) +5VSB USBPWR_34 3 2 2 1 +5V (Default) +5VSB ® P4GE-MX P4GE-MX USB device wake up USBPWR_56 12 23 +5V (Default) +5VSB • The USB device wake-up . • The total current consumed must NOT exceed the...
... computer from S3 and S4 sleep modes (no power to CPU, DRAM in slow refresh, power supply in the BIOS. ® P4GE-MX KBPWR 2 1 +5V (Default) 3 2 +5VSB P4GE-MX Keyboard power setting 3. Set this jumper to pins 2-3 (+5V) if you wish to wake up the computer when... system running in sleep mode. 1-14 Chapter 1: Product introduction USBPWR_12 3 2 2 1 +5V (Default) +5VSB USBPWR_34 3 2 2 1 +5V (Default) +5VSB ® P4GE-MX P4GE-MX USB device wake up USBPWR_56 12 23 +5V (Default) +5VSB • The USB device wake-up . • The total current consumed must NOT exceed the...

Motherboard DIY Troubleshooting Guide
Page 32
Power LED Power Button PLED+ PLEDPWR GND IDE_LED+ IDE_LED- 13. Ground Reset NC ® P4GE-MX F_PANEL IDE_LED Reset P4GE-MX Front panel audio connector • System Power LED Lead (2-pin PLED) This 2-pin connector connects to the hard disk activity LED. The LED lights up .... or write activities of any device connected to the primary or secondary IDE connector cause this LED to light up when you turn on the BIOS or OS settings. System panel connector (10-1 pin F_PANEL) This connector accommodates several system front panel functions. Pressing the power switch turns the ...
Power LED Power Button PLED+ PLEDPWR GND IDE_LED+ IDE_LED- 13. Ground Reset NC ® P4GE-MX F_PANEL IDE_LED Reset P4GE-MX Front panel audio connector • System Power LED Lead (2-pin PLED) This 2-pin connector connects to the hard disk activity LED. The LED lights up .... or write activities of any device connected to the primary or secondary IDE connector cause this LED to light up when you turn on the BIOS or OS settings. System panel connector (10-1 pin F_PANEL) This connector accommodates several system front panel functions. Pressing the power switch turns the ...

Motherboard DIY Troubleshooting Guide
Page 33
BIOS information ASUS P4GE-MX motherboard 2-1 Detailed descriptions of the BIOS parameters are also provided. Chapter 2 This chapter tells how to change system settings through the BIOS Setup menus.
BIOS information ASUS P4GE-MX motherboard 2-1 Detailed descriptions of the BIOS parameters are also provided. Chapter 2 This chapter tells how to change system settings through the BIOS Setup menus.
Motherboard DIY Troubleshooting Guide
Page 34
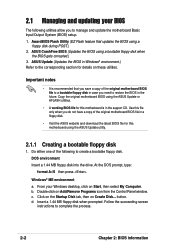
...Panel window. 2.1 Managing and updating your Windows desktop, click on these utilities. ASUS Update (Updates the BIOS in Windows® environment.) Refer to restore the BIOS in the future. Do either one of the original motherboard BIOS file to a bootable floppy disk in the support CD. Windows® ME ...save a copy of the following utilities allow you do not have a copy of the original motherboard BIOS file in a floppy disk. • Visit the ASUS website and download the latest BIOS file for details on Start, then select My Computer. DOS environment Insert a 1.44 MB floppy disk...
...Panel window. 2.1 Managing and updating your Windows desktop, click on these utilities. ASUS Update (Updates the BIOS in Windows® environment.) Refer to restore the BIOS in the future. Do either one of the original motherboard BIOS file to a bootable floppy disk in the support CD. Windows® ME ...save a copy of the following utilities allow you do not have a copy of the original motherboard BIOS file in a floppy disk. • Visit the ASUS website and download the latest BIOS file for details on Start, then select My Computer. DOS environment Insert a 1.44 MB floppy disk...
Motherboard DIY Troubleshooting Guide
Page 35
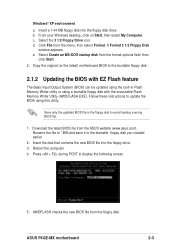
... built-in the floppy disk to the bootable floppy disk. 2.1.2 Updating the BIOS with EZ Flash feature The Basic Input/Output System (BIOS) can be updated using this utility. ASUS P4GE-MX motherboard 2-3 Windows® XP environment a. Insert the disk that contains the new BIOS file into the floppy disk drive. Select the 3 1/2 Floppy Drive icon...
... built-in the floppy disk to the bootable floppy disk. 2.1.2 Updating the BIOS with EZ Flash feature The Basic Input/Output System (BIOS) can be updated using this utility. ASUS P4GE-MX motherboard 2-3 Windows® XP environment a. Insert the disk that contains the new BIOS file into the floppy disk drive. Select the 3 1/2 Floppy Drive icon...

Motherboard DIY Troubleshooting Guide
Page 36
... is copied, the computer returns to POST. 2.1.3 Recovering the BIOS with CrashFree BIOS 2 The CrashFree BIOS 2 auto recovery tool allows you may also use this motherboard. When a corrupted BIOS is renamed as "P4GE-MX.ROM". 2-4 Chapter 2: BIOS information Checking for this disk to restore BIOS from the motherboard support CD, or from a floppy disk: 1. If all the necessary...
... is copied, the computer returns to POST. 2.1.3 Recovering the BIOS with CrashFree BIOS 2 The CrashFree BIOS 2 auto recovery tool allows you may also use this motherboard. When a corrupted BIOS is renamed as "P4GE-MX.ROM". 2-4 Chapter 2: BIOS information Checking for this disk to restore BIOS from the motherboard support CD, or from a floppy disk: 1. If all the necessary...
Motherboard DIY Troubleshooting Guide
Page 37
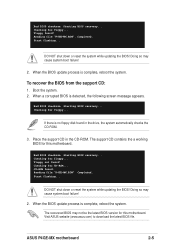
... in the CD-ROM. Boot the system. 2. Starting BIOS recovery... Checking for floppy... Reading file "P4GE-MX.ROM". Completed. Bad BIOS checksum. To recover the BIOS from the support CD: 1. DO NOT shut down or reset the system while updating the BIOS! ASUS P4GE-MX motherboard 2-5 Start flashing... When the BIOS update process is complete, reboot the system. Place the...
... in the CD-ROM. Boot the system. 2. Starting BIOS recovery... Checking for floppy... Reading file "P4GE-MX.ROM". Completed. Bad BIOS checksum. To recover the BIOS from the support CD: 1. DO NOT shut down or reset the system while updating the BIOS! ASUS P4GE-MX motherboard 2-5 Start flashing... When the BIOS update process is complete, reboot the system. Place the...
Motherboard DIY Troubleshooting Guide
Page 38
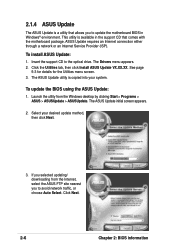
... traffic, or choose Auto Select. If you to the optical drive. The ASUS Update initial screen appears. 2. Select your system. Click Next. 2-6 Chapter 2: BIOS information ASUS Update requires an Internet connection either through a network or an Internet Service Provider (ISP). The ASUS Update utility is a utility that comes with the motherboard package. To install...
... traffic, or choose Auto Select. If you to the optical drive. The ASUS Update initial screen appears. 2. Select your system. Click Next. 2-6 Chapter 2: BIOS information ASUS Update requires an Internet connection either through a network or an Internet Service Provider (ISP). The ASUS Update utility is a utility that comes with the motherboard package. To install...
Motherboard DIY Troubleshooting Guide
Page 39
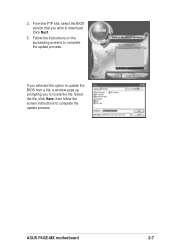
Follow the instructions on the succeeding screens to complete the update process. From the FTP site, select the BIOS version that you to download. ASUS P4GE-MX motherboard 2-7 2. Click Next. 5. Select the file, click Save, then follow the screen instructions to complete the update process. If you selected the option to update the BIOS from a file, a window pops up prompting you wish to locate the file.
Follow the instructions on the succeeding screens to complete the update process. From the FTP site, select the BIOS version that you to download. ASUS P4GE-MX motherboard 2-7 2. Click Next. 5. Select the file, click Save, then follow the screen instructions to complete the update process. If you selected the option to update the BIOS from a file, a window pops up prompting you wish to locate the file.
Motherboard DIY Troubleshooting Guide
Page 40
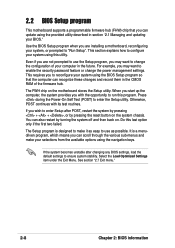
.... Do this utility. Select the Load Optimized Settings item under the Exit Menu. See section "2.7 Exit menu." 2-8 Chapter 2: BIOS information Use the BIOS Setup program when you with its test routines. When you start up the computer, the system provides you are not prompted to... to make your selections from the available options using the navigation keys. The FWH chip on the motherboard stores the Setup utility. 2.2 BIOS Setup program This motherboard supports a programmable firmware hub (FHW) chip that the computer can update using the provided utility described in section ...
.... Do this utility. Select the Load Optimized Settings item under the Exit Menu. See section "2.7 Exit menu." 2-8 Chapter 2: BIOS information Use the BIOS Setup program when you with its test routines. When you start up the computer, the system provides you are not prompted to... to make your selections from the available options using the navigation keys. The FWH chip on the motherboard stores the Setup utility. 2.2 BIOS Setup program This motherboard supports a programmable firmware hub (FHW) chip that the computer can update using the provided utility described in section ...

Motherboard DIY Troubleshooting Guide
Page 41
2.2.1 BIOS menu screen Menu items Menu bar Field settings General help Sub-menu items Legend bar 2.2.2 Menu bar The menu bar on top of the screen ... right or left arrow key on the keyboard until the desired item is highlighted. • The BIOS setup screens shown in this chapter are for reference purposes only, and may not exactly match what you see on your screen. • Visit the ASUS website (www.asus.com) to download the latest BIOS information. ASUS P4GE-MX motherboard 2-9
2.2.1 BIOS menu screen Menu items Menu bar Field settings General help Sub-menu items Legend bar 2.2.2 Menu bar The menu bar on top of the screen ... right or left arrow key on the keyboard until the desired item is highlighted. • The BIOS setup screens shown in this chapter are for reference purposes only, and may not exactly match what you see on your screen. • Visit the ASUS website (www.asus.com) to download the latest BIOS information. ASUS P4GE-MX motherboard 2-9

Motherboard DIY Troubleshooting Guide
Page 42
... values for the highlighted field Brings up or down between fields Page Down or - (minus) Scrolls backward through the values for that item. 2-10 Chapter 2: BIOS information The keys in the legend bar with their corresponding functions. 2.2.3 Legend bar At the bottom of the Setup screen is a brief description of the...
... values for the highlighted field Brings up or down between fields Page Down or - (minus) Scrolls backward through the values for that item. 2-10 Chapter 2: BIOS information The keys in the legend bar with their corresponding functions. 2.2.3 Legend bar At the bottom of the Setup screen is a brief description of the...
Motherboard DIY Troubleshooting Guide
Page 43
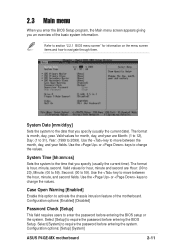
... feature of the basic system information. Case Open Warning [Enabled] Enable this option to move between the month, day, and year fields. Refer to section "2.2.1 BIOS menu screen" for information on the menu screen items and how to require the password before entering the system. The format is month, day, year... the or keys to the date that you specify (usually the current time). Use the or keys to change the values. Configuration options: [Setup] [System] ASUS P4GE-MX motherboard 2-11 The format is hour, minute, second.
... feature of the basic system information. Case Open Warning [Enabled] Enable this option to move between the month, day, and year fields. Refer to section "2.2.1 BIOS menu screen" for information on the menu screen items and how to require the password before entering the system. The format is month, day, year... the or keys to the date that you specify (usually the current time). Use the or keys to change the values. Configuration options: [Setup] [System] ASUS P4GE-MX motherboard 2-11 The format is hour, minute, second.


