MX239 Series User Guide for English Edition
Page 2
... base 2-1 2.2 Connecting cables 2-1 2.3 Detaching the base 2-2 2.4 Adjusting the monitor 2-3 3.1 OSD (On-Screen Display) menu 3-1 3.1.1 How to infringe. ii No part of this manual may or may be reproduced, transmitted, transcribed, stored in a retrieval system, or translated into any means, except documentation kept by ASUS; ASUS ASSUMES NO RESPONSIBILITY OR LIABILITY FOR ANY ERRORS...
... base 2-1 2.2 Connecting cables 2-1 2.3 Detaching the base 2-2 2.4 Adjusting the monitor 2-3 3.1 OSD (On-Screen Display) menu 3-1 3.1.1 How to infringe. ii No part of this manual may or may be reproduced, transmitted, transcribed, stored in a retrieval system, or translated into any means, except documentation kept by ASUS; ASUS ASSUMES NO RESPONSIBILITY OR LIABILITY FOR ANY ERRORS...

MX239 Series User Guide for English Edition
Page 4
...objects or spill liquid of any damage, contact your dealer immediately. • Slots and openings on the monitor cabinet. • To ensure satisfactory operation, use the monitor only with UL listed computers which complies with your retailer. iv Contact a qualified service technician or your ...retailer. • Before using the product, make sure all the documentation that came with the monitor, contact a qualified service technician or your local power standard. • Do not overload power strips and extension cords. Never place...
...objects or spill liquid of any damage, contact your dealer immediately. • Slots and openings on the monitor cabinet. • To ensure satisfactory operation, use the monitor only with UL listed computers which complies with your retailer. iv Contact a qualified service technician or your ...retailer. • Before using the product, make sure all the documentation that came with the monitor, contact a qualified service technician or your local power standard. • Do not overload power strips and extension cords. Never place...

MX239 Series User Guide for English Edition
Page 5
...to the components when trying to aid in this guide WARNING: Information to prevent injury to yourself when trying to the nature of the monitor. Turn your monitor off the Power Switch and turn off the Power Switch for hours. • When the screen becomes black or flashes, or cannot... the desktop pattern you use due to complete a task. Do not repair the screen by the stand or the cord. • Cleaning. Clean the monitor surface with the LCD. Turn off and unplug the power cord. v NOTE: Tips and additional information to complete a task. IMPORTANT: Information that the...
...to the components when trying to aid in this guide WARNING: Information to prevent injury to yourself when trying to the nature of the monitor. Turn your monitor off the Power Switch and turn off the Power Switch for hours. • When the screen becomes black or flashes, or cannot... the desktop pattern you use due to complete a task. Do not repair the screen by the stand or the cord. • Cleaning. Clean the monitor surface with the LCD. Turn off and unplug the power cord. v NOTE: Tips and additional information to complete a task. IMPORTANT: Information that the...
MX239 Series User Guide for English Edition
Page 7
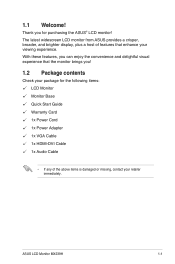
...-DVI Cable 1x Audio Cable • If any of features that the monitor brings you for purchasing the ASUS® LCD monitor! With these features, you can enjoy the convenience and delightful visual experience that... enhance your retailer immediately. The latest widescreen LCD monitor from ASUS provides a crisper, broader, and brighter display, plus a host of the above items is damaged or missing, contact your viewing experience. 1.1 Welcome! ASUS LCD Monitor MX239H...
...-DVI Cable 1x Audio Cable • If any of features that the monitor brings you for purchasing the ASUS® LCD monitor! With these features, you can enjoy the convenience and delightful visual experience that... enhance your retailer immediately. The latest widescreen LCD monitor from ASUS provides a crisper, broader, and brighter display, plus a host of the above items is damaged or missing, contact your viewing experience. 1.1 Welcome! ASUS LCD Monitor MX239H...
MX239 Series User Guide for English Edition
Page 8
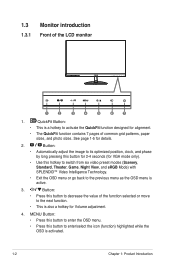
See page 1-5 for alignment. • The QuickFit function contains 7 pages of the LCD monitor 1 2 3 4 5 6 7 1. Button: • Press this button to the next function. • This is also a hotkey for Volume adjustment. 4. MENU Button: • Press this button to enter ... the QuickFit function designed for details. 2. QuickFit Button: • This is a hotkey to the previous menu as the OSD menu is activated. 1-2 Chapter 1: Product Introduction 1.3 Monitor introduction 1.3.1 Front of common grid patterns, paper sizes, and photo sizes.
See page 1-5 for alignment. • The QuickFit function contains 7 pages of the LCD monitor 1 2 3 4 5 6 7 1. Button: • Press this button to the next function. • This is also a hotkey for Volume adjustment. 4. MENU Button: • Press this button to enter ... the QuickFit function designed for details. 2. QuickFit Button: • This is a hotkey to the previous menu as the OSD menu is activated. 1-2 Chapter 1: Product Introduction 1.3 Monitor introduction 1.3.1 Front of common grid patterns, paper sizes, and photo sizes.
MX239 Series User Guide for English Edition
Page 9
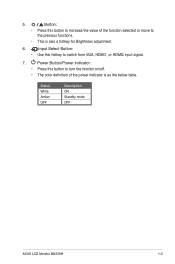
Power Button/Power Indicator: • Press this button to turn the monitor on/off. • The color definition of the function selected or move to switch from VGA, HDMI1, or HDMI2 input signal. 7. Status White Amber OFF Description ON Standby mode OFF ASUS LCD Monitor MX239H 1-3 5. Input Select Button: • Use this button to increase the value of the power indicator is also a hotkey for Brightness adjustment. 6. Button: • Press this hotkey to the previous functions. • This is as the below table.
Power Button/Power Indicator: • Press this button to turn the monitor on/off. • The color definition of the function selected or move to switch from VGA, HDMI1, or HDMI2 input signal. 7. Status White Amber OFF Description ON Standby mode OFF ASUS LCD Monitor MX239H 1-3 5. Input Select Button: • Use this button to increase the value of the power indicator is also a hotkey for Brightness adjustment. 6. Button: • Press this hotkey to the previous functions. • This is as the below table.
MX239 Series User Guide for English Edition
Page 10
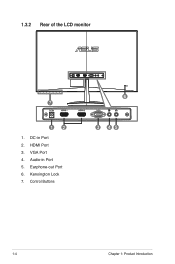
Audio-in Port 2. Earphone-out Port 6. Kensington Lock 7. Control Buttons 6 3 45 1-4 Chapter 1: Product Introduction VGA Port 4. DC-in Port 5. 1.3.2 Rear of the LCD monitor 7 12 1. HDMI Port 3.
Audio-in Port 2. Earphone-out Port 6. Kensington Lock 7. Control Buttons 6 3 45 1-4 Chapter 1: Product Introduction VGA Port 4. DC-in Port 5. 1.3.2 Rear of the LCD monitor 7 12 1. HDMI Port 3.
MX239 Series User Guide for English Edition
Page 11
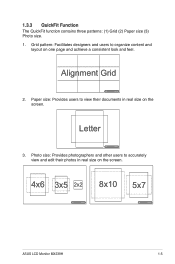
1.3.3 QuickFit Function The QuickFit function contains three patterns: (1) Grid (2) Paper size (3) Photo size. 1. Letter 3. Alignment Grid 2. Grid pattern: Facilitates designers and users to organize content and layout on the screen. Paper size: Provides users to accurately view and edit their documents in real size on the screen. 4x6 3x5 2x2 8x10 5x7 ASUS LCD Monitor MX239H 1-5 Photo size: Provides photographers and other users to view their photos in real size on one page and achieve a consistent look and feel.
1.3.3 QuickFit Function The QuickFit function contains three patterns: (1) Grid (2) Paper size (3) Photo size. 1. Letter 3. Alignment Grid 2. Grid pattern: Facilitates designers and users to organize content and layout on the screen. Paper size: Provides users to accurately view and edit their documents in real size on the screen. 4x6 3x5 2x2 8x10 5x7 ASUS LCD Monitor MX239H 1-5 Photo size: Provides photographers and other users to view their photos in real size on one page and achieve a consistent look and feel.
MX239 Series User Guide for English Edition
Page 12
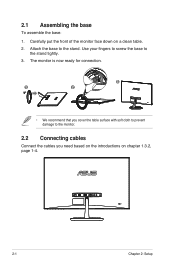
Carefully put the front of the monitor face down on chapter 1.3.2, page 1-4. 2-1 Chapter 2: Setup Attach the base to the stand tightly. 3. Use your fingers to screw the base to the stand. The monitor is now ready for connection. 3 1 2 • We recommend that you cover the table surface with soft cloth to prevent damage to the monitor. 2.2 Connecting cables Connect the cables you need based on the introductions on a clean table. 2. 2.1 Assembling the base To assemble the base: 1.
Carefully put the front of the monitor face down on chapter 1.3.2, page 1-4. 2-1 Chapter 2: Setup Attach the base to the stand tightly. 3. Use your fingers to screw the base to the stand. The monitor is now ready for connection. 3 1 2 • We recommend that you cover the table surface with soft cloth to prevent damage to the monitor. 2.2 Connecting cables Connect the cables you need based on the introductions on a clean table. 2. 2.1 Assembling the base To assemble the base: 1.
MX239 Series User Guide for English Edition
Page 13
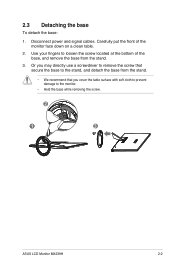
Disconnect power and signal cables. Carefully put the front of the base, and remove the base from the stand. • We recommend that you may directly use a screwdriver to remove the screw that secure the base to the monitor. • Hold the base while removing the screw. 2 21 3 ASUS LCD Monitor MX239H 2-2 Or you cover the table surface with soft cloth to prevent damage to the stand, and detach the base from the stand. 3. 2.3 Detaching the base To detach the base: 1. Use your fingers to loosen the screw located at the bottom of the monitor face down on a clean table. 2.
Disconnect power and signal cables. Carefully put the front of the base, and remove the base from the stand. • We recommend that you may directly use a screwdriver to remove the screw that secure the base to the monitor. • Hold the base while removing the screw. 2 21 3 ASUS LCD Monitor MX239H 2-2 Or you cover the table surface with soft cloth to prevent damage to the stand, and detach the base from the stand. 3. 2.3 Detaching the base To detach the base: 1. Use your fingers to loosen the screw located at the bottom of the monitor face down on a clean table. 2.
MX239 Series User Guide for English Edition
Page 14
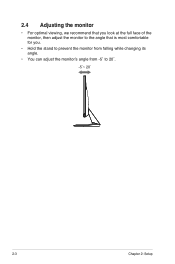
2.4 Adjusting the monitor • For optimal viewing, we recommend that you look at the full face of the monitor, then adjust the monitor to the angle that is most comfortable for you. • Hold the stand to prevent the monitor from falling while changing its angle. • You can adjust the monitor's angle from -5˚ to 20˚. -5 ~ 20 2-3 Chapter 2: Setup
2.4 Adjusting the monitor • For optimal viewing, we recommend that you look at the full face of the monitor, then adjust the monitor to the angle that is most comfortable for you. • Hold the stand to prevent the monitor from falling while changing its angle. • You can adjust the monitor's angle from -5˚ to 20˚. -5 ~ 20 2-3 Chapter 2: Setup
MX239 Series User Guide for English Edition
Page 15
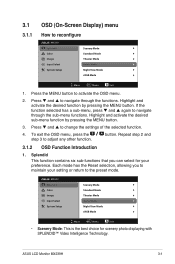
... the step 3 to navigate through the sub-menu functions. Press and to adjust any other function. Repeat step 2 and 3.1.2 OSD Function Introduction 1. ASUS LCD Monitor MX239H 3-1 3.1 3.1.1 OSD (On-Screen Display) menu How to reconfigure MX239 Splendid Color Image Input Select System Setup Scenery Mode Standard Mode Theater Mode Game Mode Night...
... the step 3 to navigate through the sub-menu functions. Press and to adjust any other function. Repeat step 2 and 3.1.2 OSD Function Introduction 1. ASUS LCD Monitor MX239H 3-1 3.1 3.1.1 OSD (On-Screen Display) menu How to reconfigure MX239 Splendid Color Image Input Select System Setup Scenery Mode Standard Mode Theater Mode Game Mode Night...
MX239 Series User Guide for English Edition
Page 17
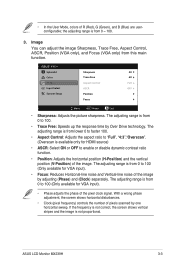
... is from 0 to 100 (Only available for HDMI source) • ASCR: Select ON or OFF to "Full", "4:3","Overscan". (Overscan is from this main function. ASUS LCD Monitor MX239H 3-3 • In the User Mode, colors of pixels scanned by Over Drive technology. the adjusting range is available only for VGA input). • Focus: Reduces...
... is from 0 to 100 (Only available for HDMI source) • ASCR: Select ON or OFF to "Full", "4:3","Overscan". (Overscan is from this main function. ASUS LCD Monitor MX239H 3-3 • In the User Mode, colors of pixels scanned by Over Drive technology. the adjusting range is available only for VGA input). • Focus: Reduces...

MX239 Series User Guide for English Edition
Page 19
ASUS LCD Monitor MX239H 3-5 • ECO Mode: Activate the ecology mode for power saving. • OSD Setup: Adjusts the horizontal postition (H-Position), vertical position (V-Position), OSD Timeout, DDC/CI, ..., Spanish, Italian, Dutch, Russian, Traditional Chinese, Simplified Chinese, Japanese, Persian, Thai, Indonesian, Poland, Turkey, Portugal, Czech, Croatia, Hungary, Romania, and Korean. • Information: Displays the monitor information. • All Reset: Selects "Yes" to revert all settings to the factory default mode.
ASUS LCD Monitor MX239H 3-5 • ECO Mode: Activate the ecology mode for power saving. • OSD Setup: Adjusts the horizontal postition (H-Position), vertical position (V-Position), OSD Timeout, DDC/CI, ..., Spanish, Italian, Dutch, Russian, Traditional Chinese, Simplified Chinese, Japanese, Persian, Thai, Indonesian, Poland, Turkey, Portugal, Czech, Croatia, Hungary, Romania, and Korean. • Information: Displays the monitor information. • All Reset: Selects "Yes" to revert all settings to the factory default mode.
MX239 Series User Guide for English Edition
Page 21
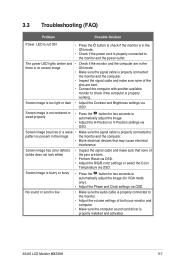
... or a wave • Make sure the signal cable is properly connected to pattern is present in the image the monitor and the computer. • Move electrical devices that none of the pins are bent. • Perform Reset via ...defects (white does not look white) • Inspect the signal cable and make sure none of both your monitor and computer. • Make sure the computer sound card driver is too light or dark • Adjust the... image. • Adjust the H-Position or V-Position settings via OSD. ASUS LCD Monitor MX239H 3-7 Screen image is properly installed and activated.
... or a wave • Make sure the signal cable is properly connected to pattern is present in the image the monitor and the computer. • Move electrical devices that none of the pins are bent. • Perform Reset via ...defects (white does not look white) • Inspect the signal cable and make sure none of both your monitor and computer. • Make sure the computer sound card driver is too light or dark • Adjust the... image. • Adjust the H-Position or V-Position settings via OSD. ASUS LCD Monitor MX239H 3-7 Screen image is properly installed and activated.


