

User Guide
Page 7
... immediately. Thank you ! 1.2 Package contents Check your package for the following items: LCD monitor Quick start guide Warranty card Power cord + power adapter VGA cable HDMI-DVI cable DVI cable(MS202N/MS208N) only for purchasing the ASUS® LCD monitor! ASUS M Series LCD Monitor 1-1 The latest widescreen LCD monitor from ASUS provides a crisper, broader, and brighter display, plus a host of the above...
... immediately. Thank you ! 1.2 Package contents Check your package for the following items: LCD monitor Quick start guide Warranty card Power cord + power adapter VGA cable HDMI-DVI cable DVI cable(MS202N/MS208N) only for purchasing the ASUS® LCD monitor! ASUS M Series LCD Monitor 1-1 The latest widescreen LCD monitor from ASUS provides a crisper, broader, and brighter display, plus a host of the above...
User Guide
Page 9
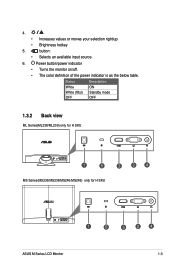
Power button/power indicator • Turns the monitor on/off. • The color definition of the power indicator is as the below table. Status White White (fitful) OFF Description ON Standby mode OFF 1.3.2 Back view ML Series(ML238/ML239) only for H SKU MS Series(MS236/MS238/MS246/MS248) only for H SKU ASUS M Series LCD Monitor 1-3 button: • Selects an available input source. 6. 4. • Increases values or moves your selection right/up. • Brightness hotkey 5.
Power button/power indicator • Turns the monitor on/off. • The color definition of the power indicator is as the below table. Status White White (fitful) OFF Description ON Standby mode OFF 1.3.2 Back view ML Series(ML238/ML239) only for H SKU MS Series(MS236/MS238/MS246/MS248) only for H SKU ASUS M Series LCD Monitor 1-3 button: • Selects an available input source. 6. 4. • Increases values or moves your selection right/up. • Brightness hotkey 5.

User Guide
Page 11
... the circular arm on the back of the monitor face down on the screw. 3. Attach the circular base to the arm by aligning the pins on the arm with soft cloth to prevent damage to the monitor. ML Series Arm Base ASUS M Series LCD Monitor 2-1 We recommend that you cover the table ...surface with the slots on the monitor. 2.1 Assembling the monitor arm/base To assemble the...
... the circular arm on the back of the monitor face down on the screw. 3. Attach the circular base to the arm by aligning the pins on the arm with soft cloth to prevent damage to the monitor. ML Series Arm Base ASUS M Series LCD Monitor 2-1 We recommend that you cover the table ...surface with the slots on the monitor. 2.1 Assembling the monitor arm/base To assemble the...

User Guide
Page 13
Connect the cables as the following instructions: ML Series(ML238/ML239) only for H SKU MS Series(MS236/MS238/MS246/MS248) only for H SKU M Series (20'' only of D SKU) M Series (20'' only of N SKU) ASUS M Series LCD Monitor 2-3 2.3 Connecting the cables 1.
Connect the cables as the following instructions: ML Series(ML238/ML239) only for H SKU MS Series(MS236/MS238/MS246/MS248) only for H SKU M Series (20'' only of D SKU) M Series (20'' only of N SKU) ASUS M Series LCD Monitor 2-3 2.3 Connecting the cables 1.

User Guide
Page 15
... function and tap the MENU button to reconfigure 1. Each mode has the Reset selection, allowing you can select for viewing photos and graphics from PCs. ASUS M Series LCD Monitor 3-1 Highlight the desired function and tap the MENU button to change the settings of the selected function. 4. In the Standard Mode, the ASCR, Saturation...
... function and tap the MENU button to reconfigure 1. Each mode has the Reset selection, allowing you can select for viewing photos and graphics from PCs. ASUS M Series LCD Monitor 3-1 Highlight the desired function and tap the MENU button to change the settings of the selected function. 4. In the Standard Mode, the ASCR, Saturation...

User Guide
Page 17
... the OSD from 0 to 100. * Adjusts the OSD timeout from 10 to 120 seconds. * Enables or disables the DDC/CI function. • Information: shows the monitor information. • Language: there are 1 languages for your desired input source. 5. ASUS M Series LCD Monitor 3-3 4. System Setup Allows you to restore the default settings.
... the OSD from 0 to 100. * Adjusts the OSD timeout from 10 to 120 seconds. * Enables or disables the DDC/CI function. • Information: shows the monitor information. • Language: there are 1 languages for your desired input source. 5. ASUS M Series LCD Monitor 3-3 4. System Setup Allows you to restore the default settings.

User Guide
Page 19
No sound or sound is low • Ensure that the HDMI cable is properly connected to check if the computer is properly working. ASUS M Series LCD Monitor 3-5 Screen image is not centered or sized properly • Touch the button for 2-4 seconds to automatically adjust the image (for VGA mode...• Adjust the Contrast and Brightness settings via OSD. The power LED lights amber and there is no screen image • Check if the monitor and the computer are bent. • Perform All Reset via OSD. • Adjust the R/G/B color settings or select the Color Temperature via...
No sound or sound is low • Ensure that the HDMI cable is properly connected to check if the computer is properly working. ASUS M Series LCD Monitor 3-5 Screen image is not centered or sized properly • Touch the button for 2-4 seconds to automatically adjust the image (for VGA mode...• Adjust the Contrast and Brightness settings via OSD. The power LED lights amber and there is no screen image • Check if the monitor and the computer are bent. • Perform All Reset via OSD. • Adjust the R/G/B color settings or select the Color Temperature via...


