MEB-VM User Manual
Page 4
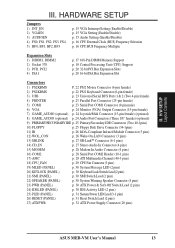
... of Chipset Features Setup 44 Power Management Setup 47 Details of Power Management Setup 47 PNP and PCI Setup 50 Details of the ASUS MEB-VM Motherboard 11 III. System Memory (DIMM 17 SPD Support 17 DIMM Memory Installation 18 3. BIOS SETUP 34 Main Menu 34 Managing and Updating Your Motherboard's BIOS 36 6. HARDWARE SETUP 12 ASUS MEB-VM Motherboard Layout 12 1. INTRODUCTION 7 How this manual is organized 7 Item Checklist 7 II. Jumpers 14 HARDWARE SETUP Steps 14 2. External Connectors 22 Power Connection Procedures 33 Flash Memory Writer Utility...
... of Chipset Features Setup 44 Power Management Setup 47 Details of Power Management Setup 47 PNP and PCI Setup 50 Details of the ASUS MEB-VM Motherboard 11 III. System Memory (DIMM 17 SPD Support 17 DIMM Memory Installation 18 3. BIOS SETUP 34 Main Menu 34 Managing and Updating Your Motherboard's BIOS 36 6. HARDWARE SETUP 12 ASUS MEB-VM Motherboard Layout 12 1. INTRODUCTION 7 How this manual is organized 7 Item Checklist 7 II. Jumpers 14 HARDWARE SETUP Steps 14 2. External Connectors 22 Power Connection Procedures 33 Flash Memory Writer Utility...
MEB-VM User Manual
Page 8
... onboard PCI Bus Master IDE controller with two connectors that supports autodetection of hard drives, PS/2 mouse, and Plug and Play devices to make setup of most devices for virtually automatic setup. • Versatile Memory: Equipped with two DIMM sockets to support Intel PC100compliant SDRAMs (8, 16, 32, 64, 128, or 256MB) up to 512MB. • AGP Slot: Supports an Accelerated Graphics Port card for high performance, component level interconnect targeted at 3D graphical display applications using a 66MHz bus...
... onboard PCI Bus Master IDE controller with two connectors that supports autodetection of hard drives, PS/2 mouse, and Plug and Play devices to make setup of most devices for virtually automatic setup. • Versatile Memory: Equipped with two DIMM sockets to support Intel PC100compliant SDRAMs (8, 16, 32, 64, 128, or 256MB) up to 512MB. • AGP Slot: Supports an Accelerated Graphics Port card for high performance, component level interconnect targeted at 3D graphical display applications using a 66MHz bus...

MEB-VM User Manual
Page 9
...-2 IDE specifications so there is also imple- ACPI provides more Energy Saving Features for configuring and managing all the energy saving standards. FEATURES Smart Series II. II. FEATURES Introduction to ASUS Smart Series Motherboards Performance • ACPI Ready: ACPI (Advanced Configuration and Power Interface) is no need to upgrade current hard drives or cables. • Concurrent PCI: Concurrent PCI allows multiple PCI transfers from 264MB/s max using EDO memory to 528MB/s max using UltraDMA/33 Bus Master IDE...
...-2 IDE specifications so there is also imple- ACPI provides more Energy Saving Features for configuring and managing all the energy saving standards. FEATURES Smart Series II. II. FEATURES Introduction to ASUS Smart Series Motherboards Performance • ACPI Ready: ACPI (Advanced Configuration and Power Interface) is no need to upgrade current hard drives or cables. • Concurrent PCI: Concurrent PCI allows multiple PCI transfers from 264MB/s max using EDO memory to 528MB/s max using UltraDMA/33 Bus Master IDE...
MEB-VM User Manual
Page 12
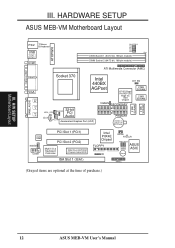
... 32-bit PCI WOL_CON AUDIOEN CD_IN Audio CPU_FAN Accelerated Graphics Port (AGP) PRIMARY CR2032 3V Lithium Cell BIOS Power BF3 BF2 BF1 BF0 2 MB SDRAM 2 MB SDRAM Audio Codec MODEM COM2 PCI Slot 1 (PCI1) PCI Slot 2 (PCI2) Multi-I/O & Keyboard Controller 2Mbit Flash EEPROM (Programmable BIOS) ISA Slot 1 (ISA1) Intel PIIX4E Chipset FLOPPY IR SBLINK RTCCLR FREQ MULT ASUS ASIC Buzzer PANEL (Grayed items are optional at the time of purchase.) 12 ASUS MEB-VM User's Manual H/W SETUP Motherboard Layout III...
... 32-bit PCI WOL_CON AUDIOEN CD_IN Audio CPU_FAN Accelerated Graphics Port (AGP) PRIMARY CR2032 3V Lithium Cell BIOS Power BF3 BF2 BF1 BF0 2 MB SDRAM 2 MB SDRAM Audio Codec MODEM COM2 PCI Slot 1 (PCI1) PCI Slot 2 (PCI2) Multi-I/O & Keyboard Controller 2Mbit Flash EEPROM (Programmable BIOS) ISA Slot 1 (ISA1) Intel PIIX4E Chipset FLOPPY IR SBLINK RTCCLR FREQ MULT ASUS ASIC Buzzer PANEL (Grayed items are optional at the time of purchase.) 12 ASUS MEB-VM User's Manual H/W SETUP Motherboard Layout III...
MEB-VM User Manual
Page 13
...Channel (40-3 pins) 18) CPU_FAN p. 29 CPU Fan Connector (3 pins) 19) MLED (PANEL) p. 30 System Message LED (2 pins) 20) KEYLOCK (PANEL) p. 30 Keyboard Lock Switch Lead (2 pins) 21) SMI (PANEL) p. 30 SMI Switch Lead (2 pins) 22) SPEAKER (PANEL) p. 30 System Warning Speaker Connector (4 pins) 23) PWR (PANEL) p. 30 ATX Power & Soft-Off Switch Lead (2 pins) 24) IDELED (PANEL) p. 30 IDE Activity LED (2 pins) 25) PLED (PANEL) p. 31 System Power LED Lead (3-1 pins) 26) RESET (PANEL) p. 31 Reset Switch Lead (2 pins) 27) ATXPWR p. 32 ATX Power Supply Connector (20 pins) ASUS MEB-VM...
...Channel (40-3 pins) 18) CPU_FAN p. 29 CPU Fan Connector (3 pins) 19) MLED (PANEL) p. 30 System Message LED (2 pins) 20) KEYLOCK (PANEL) p. 30 Keyboard Lock Switch Lead (2 pins) 21) SMI (PANEL) p. 30 SMI Switch Lead (2 pins) 22) SPEAKER (PANEL) p. 30 System Warning Speaker Connector (4 pins) 23) PWR (PANEL) p. 30 ATX Power & Soft-Off Switch Lead (2 pins) 24) IDELED (PANEL) p. 30 IDE Activity LED (2 pins) 25) PLED (PANEL) p. 31 System Power LED Lead (3-1 pins) 26) RESET (PANEL) p. 31 Reset Switch Lead (2 pins) 27) ATXPWR p. 32 ATX Power Supply Connector (20 pins) ASUS MEB-VM...

MEB-VM User Manual
Page 15
... cards may be enabled. VGA Setting (VGAEN) INT_EN allows you to enable or disable the onboard VGA. Disable the onboard VGA if you to set the VGA interrupt method. Audio Setting (AUDIOEN) The onboard 32-bit PCI audio may require the interrupt be assigned by the onboard chipset, in which case INT_EN must be enabled or disabled using a VGA card on the expansion slot. 3. Jumpers 1. HARDWARE SETUP 1. H/W SETUP Jumpers ASUS MEB-VM User's Manual 15 Setting Enable Disable AUDIOEN [1-2] (default) [2-3] III. VGAEN allows you are using this jumper. The default disables...
... cards may be enabled. VGA Setting (VGAEN) INT_EN allows you to enable or disable the onboard VGA. Disable the onboard VGA if you to set the VGA interrupt method. Audio Setting (AUDIOEN) The onboard 32-bit PCI audio may require the interrupt be assigned by the onboard chipset, in which case INT_EN must be enabled or disabled using a VGA card on the expansion slot. 3. Jumpers 1. HARDWARE SETUP 1. H/W SETUP Jumpers ASUS MEB-VM User's Manual 15 Setting Enable Disable AUDIOEN [1-2] (default) [2-3] III. VGAEN allows you are using this jumper. The default disables...
MEB-VM User Manual
Page 16
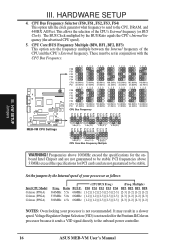
...[2-3] [2-3] [1-2] [2-3] [1-2] NOTES: Overclocking your processor as follows: Intel CPU Model Celeron (PPGA) Celeron (PPGA) Celeron (PPGA) Freq. This allows the selection of the CPU and the CPU's External frequency. CPU Core:BUS Frequency Multiple (BF0, BF1, BF2, BF3) This option sets the frequency multiple between the Internal frequency of the CPU's External frequency (or BUS Clock). PCI frequencies above 100MHz exceed the specifications for the onboard Intel Chipset and are not guaranteed to the onboard power controller. 16 ASUS MEB-VM User's Manual CPU Bus Frequency Selector...
...[2-3] [2-3] [1-2] [2-3] [1-2] NOTES: Overclocking your processor as follows: Intel CPU Model Celeron (PPGA) Celeron (PPGA) Celeron (PPGA) Freq. This allows the selection of the CPU and the CPU's External frequency. CPU Core:BUS Frequency Multiple (BF0, BF1, BF2, BF3) This option sets the frequency multiple between the Internal frequency of the CPU's External frequency (or BUS Clock). PCI frequencies above 100MHz exceed the specifications for the onboard Intel Chipset and are not guaranteed to the onboard power controller. 16 ASUS MEB-VM User's Manual CPU Bus Frequency Selector...

MEB-VM User Manual
Page 20
... problems when those two devices are in the Windows directory to both your motherboard and expansion cards. III. Read your expansion card documentation on your used by PCI cards. Carefully align the card's connectors and press firmly. 6. Assigning IRQs for expansion cards. Both ISA and PCI expansion cards may be exclusively assigned to use at the same time. 20 ASUS MEB-VM User's Manual Replace the computer system's cover. 8. Install the necessary software drivers...
... problems when those two devices are in the Windows directory to both your motherboard and expansion cards. III. Read your expansion card documentation on your used by PCI cards. Carefully align the card's connectors and press firmly. 6. Assigning IRQs for expansion cards. Both ISA and PCI expansion cards may be exclusively assigned to use at the same time. 20 ASUS MEB-VM User's Manual Replace the computer system's cover. 8. Install the necessary software drivers...

MEB-VM User Manual
Page 33
... before switching off the power switch. Connect the power cord into the power supply located on the screen. The power LED on the power supply if a switch is equipped with ATX power supplies. For ATX power supplies, you need to switch on the front panel of your system case according to enter BIOS setup. After all switches are using Windows 95/98, click the Start button, click Shut Down, and then click Shut down with a surge protector. 5. Connect the power supply cord into a power outlet...
... before switching off the power switch. Connect the power cord into the power supply located on the screen. The power LED on the power supply if a switch is equipped with ATX power supplies. For ATX power supplies, you need to switch on the front panel of your system case according to enter BIOS setup. After all switches are using Windows 95/98, click the Start button, click Shut Down, and then click Shut down with a surge protector. 5. Connect the power supply cord into a power outlet...

MEB-VM User Manual
Page 34
... ASUS MEB-VM User's Manual To determine the BIOS version of your motherboard, check the last four numbers of the code displayed on the motherboard. It is not supported by the ACPI BIOS and therefore, cannot be programmed by uploading a new BIOS file to reinstall it. If "unknown" is displayed after Flash Memory:, the memory chip is either not programmable or is recommended that updates the BIOS by the Flash Memory Writer utility. Main Menu 1. The Save Current BIOS...
... ASUS MEB-VM User's Manual To determine the BIOS version of your motherboard, check the last four numbers of the code displayed on the motherboard. It is not supported by the ACPI BIOS and therefore, cannot be programmed by uploading a new BIOS file to reinstall it. If "unknown" is displayed after Flash Memory:, the memory chip is either not programmable or is recommended that updates the BIOS by the Flash Memory Writer utility. Main Menu 1. The Save Current BIOS...

MEB-VM User Manual
Page 37
... you invoke Setup, the CMOS SETUP UTILITY main program screen will continue with the opportunity to enter new setup information. Use the Flash Memory Writer utility to call up Setup. If your system or you receive a Run Setup message, you are a little bit late pressing the mentioned key(s), POST will appear with the following options: IV. This appears during the Power-On Self Test (POST). BIOS Setup The motherboard supports two programmable Flash ROM chips: 5-Volt and...
... you invoke Setup, the CMOS SETUP UTILITY main program screen will continue with the opportunity to enter new setup information. Use the Flash Memory Writer utility to call up Setup. If your system or you receive a Run Setup message, you are a little bit late pressing the mentioned key(s), POST will appear with the following options: IV. This appears during the Power-On Self Test (POST). BIOS Setup The motherboard supports two programmable Flash ROM chips: 5-Volt and...

MEB-VM User Manual
Page 38
... board gets lost or corrupted when the power of the screen is already installed in a working system, you need to provide you with a list of Standard CMOS Setup: Date To set the date, highlight the "Date" field and then press either / or / to 2079) 38 ASUS MEB-VM User's Manual Take note of the above screen displays the control keys for this screen. IV. BIOS SETUP Load Defaults The "Load BIOS Defaults" option loads the minimum settings for regular use. "Load Setup Defaults...
... board gets lost or corrupted when the power of the screen is already installed in a working system, you need to provide you with a list of Standard CMOS Setup: Date To set the date, highlight the "Date" field and then press either / or / to 2079) 38 ASUS MEB-VM User's Manual Take note of the above screen displays the control keys for this screen. IV. BIOS SETUP Load Defaults The "Load BIOS Defaults" option loads the minimum settings for regular use. "Load Setup Defaults...

MEB-VM User Manual
Page 42
...S.M.A.R.T. (Self-Monitoring, Analysis and Reporting Technology) system which utilizes internal hard disk drive monitoring technology. Options are HDD MAX, Disabled, 2, 4, 8, 16, and 32. C only; IV. The setup default setting, A, C, is normally disabled because system resources used on default setting. The setup default R/W allows both SCSI and IDE hard disk drives, IDE is Enabled. IV. Quick Power On Self Test (Enabled) This field speeds up the Power-On Self Test (POST) routine by making multi-sector transfers instead of files from the floppy disk drive but not...
...S.M.A.R.T. (Self-Monitoring, Analysis and Reporting Technology) system which utilizes internal hard disk drive monitoring technology. Options are HDD MAX, Disabled, 2, 4, 8, 16, and 32. C only; IV. The setup default setting, A, C, is normally disabled because system resources used on default setting. The setup default R/W allows both SCSI and IDE hard disk drives, IDE is Enabled. IV. Quick Power On Self Test (Enabled) This field speeds up the Power-On Self Test (POST) routine by making multi-sector transfers instead of files from the floppy disk drive but not...

MEB-VM User Manual
Page 43
... on them specifically. Otherwise leave this problem. Security Option (System) When you install other settings are available: 250, 500, 750, and 1000. Typematic Delay (Msec) (250) This field sets the time interval for the password. Typematic Rate (Chars/Sec) (6) This field controls the speed at which addresses the ROMs use to activate the Number Lock function upon system boot. BIOS SETUP BIOS Features ASUS MEB-VM User's Manual 43 IV...
... on them specifically. Otherwise leave this problem. Security Option (System) When you install other settings are available: 250, 500, 750, and 1000. Typematic Delay (Msec) (250) This field sets the time interval for the password. Typematic Rate (Chars/Sec) (6) This field controls the speed at which addresses the ROMs use to activate the Number Lock function upon system boot. BIOS SETUP BIOS Features ASUS MEB-VM User's Manual 43 IV...

MEB-VM User Manual
Page 45
... (e.g., 8 chips + 1 ECC chip), they are considered 64 bits and the following will be displayed: IV. IV. BIOS SETUP 16-bit I/O Recovery Time (1 BUSCLK) / 8-bit I/O Recovery Time (1 BUSCLK) Timing for PCI 2.1 compliancy. System Memory, section III for the video memory of a separate controller card. Leave Enabled (default setting) for 16-bit and 8-bit ISA cards, respectively. ASUS MEB-VM User's Manual 45 Leave on default setting. It can greatly improve the display speed by caching the display data. Memory Hole At 15M-16M (Disabled) Enabling this...
... (e.g., 8 chips + 1 ECC chip), they are considered 64 bits and the following will be displayed: IV. IV. BIOS SETUP 16-bit I/O Recovery Time (1 BUSCLK) / 8-bit I/O Recovery Time (1 BUSCLK) Timing for PCI 2.1 compliancy. System Memory, section III for the video memory of a separate controller card. Leave Enabled (default setting) for 16-bit and 8-bit ISA cards, respectively. ASUS MEB-VM User's Manual 45 Leave on default setting. It can greatly improve the display speed by caching the display data. Memory Hole At 15M-16M (Disabled) Enabling this...

MEB-VM User Manual
Page 50
... displayed IRQ is not used or an ISA Configuration Utility (ICU) is being used to determine IRQ use INTA#, thus all installed PCI cards must set how IRQ use is Auto, which uses auto-routing to determine if an ISA card is selected. The first option, the default value, indicates either that IRQ to Yes... 50 ASUS MEB-VM User's Manual IV. All PCI bus slots on the system use . BIOS SETUP PNP and PCI Setup The "PNP and PCI Setup" option configures the PCI bus slots...
... displayed IRQ is not used or an ISA Configuration Utility (ICU) is being used to determine IRQ use INTA#, thus all installed PCI cards must set how IRQ use is Auto, which uses auto-routing to determine if an ISA card is selected. The first option, the default value, indicates either that IRQ to Yes... 50 ASUS MEB-VM User's Manual IV. All PCI bus slots on the system use . BIOS SETUP PNP and PCI Setup The "PNP and PCI Setup" option configures the PCI bus slots...

MEB-VM User Manual
Page 53
... CMOS Real Time Clock (RTC) RAM. After setting a password, the screen automatically reverts to clear CMOS MEB-VM Clear RTC RAM RTCCLR ASUS MEB-VM User's Manual 53 BIOS Passwords To implement password protection, specify in your computer, (4) Hold down during bootup and enter BIOS setup to re-enter user preferences. 01 Short solder points to the main screen. Taking note that will be used exclusively on the screen. A message confirms the password has been disabled. The RAM data containing the password information is case...
... CMOS Real Time Clock (RTC) RAM. After setting a password, the screen automatically reverts to clear CMOS MEB-VM Clear RTC RAM RTCCLR ASUS MEB-VM User's Manual 53 BIOS Passwords To implement password protection, specify in your computer, (4) Hold down during bootup and enter BIOS setup to re-enter user preferences. 01 Short solder points to the main screen. Taking note that will be used exclusively on the screen. A message confirms the password has been disabled. The RAM data containing the password information is case...

MEB-VM User Manual
Page 54
... this case); To accept the optimal entries, press or else select from the numbers displayed under the OPTIONS field (2, 1, 3 in order to four IDE devices. to skip to the next drive letter. If you want to use more than to enter zeros after that drive in the Chipset Features Setup screen. The onboard PCI IDE controller supports Enhanced IDE, with parameters for a particular IDE hard drive. IV. BIOS SETUP IDE HDD Auto Detection The "IDE HDD Auto Detection" option detects...
... this case); To accept the optimal entries, press or else select from the numbers displayed under the OPTIONS field (2, 1, 3 in order to four IDE devices. to skip to the next drive letter. If you want to use more than to enter zeros after that drive in the Chipset Features Setup screen. The onboard PCI IDE controller supports Enhanced IDE, with parameters for a particular IDE hard drive. IV. BIOS SETUP IDE HDD Auto Detection The "IDE HDD Auto Detection" option detects...

MEB-VM User Manual
Page 58
V. SOFTWARE SETUP 57 Operating Systems 59 Windows 98 First Time Installation 59 MEB-VM Support CD 60 Support CD Autorun Menu 60 Installing the Video Driver and Utility 61 Installing the Audio Driver 62 Installing PCCillin 63 Installing Adobe Acrobat Reader 64 V. SOFTWARE SETUP V. S/W SETUP 58 ASUS MEB-VM User's Manual
V. SOFTWARE SETUP 57 Operating Systems 59 Windows 98 First Time Installation 59 MEB-VM Support CD 60 Support CD Autorun Menu 60 Installing the Video Driver and Utility 61 Installing the Audio Driver 62 Installing PCCillin 63 Installing Adobe Acrobat Reader 64 V. SOFTWARE SETUP V. S/W SETUP 58 ASUS MEB-VM User's Manual

MEB-VM User Manual
Page 60
... the autorun menu or run Setup.exe in the LDCM directory. • Install Video Driver and Utility: Installs the video driver and utilities for the onboard VGA chipset. • Install Audio Driver: Audio driver installation instructions for the onboard audio. • Install PCCillin: Installs "PC-cillin" virus protection software. S/W SETUP Windows 98 • LDCM Local Setup: Installs software to view the LDCM manual in the root directory of the ASUS support CD. • Read Me: View additional notes with the Local software installed. SOFTWARE SETUP MEB-VM Support CD Insert...
... the autorun menu or run Setup.exe in the LDCM directory. • Install Video Driver and Utility: Installs the video driver and utilities for the onboard VGA chipset. • Install Audio Driver: Audio driver installation instructions for the onboard audio. • Install PCCillin: Installs "PC-cillin" virus protection software. S/W SETUP Windows 98 • LDCM Local Setup: Installs software to view the LDCM manual in the root directory of the ASUS support CD. • Read Me: View additional notes with the Local software installed. SOFTWARE SETUP MEB-VM Support CD Insert...


