

User Manual
Page 6
... EVO 4-10 4.4.1 Using ASUS TurboV 4-10 4.4.2 Using ASUS TurboV Auto Tuning Mode 4-11 4.4.3 Using CPU Level UP 4-12 4.4.4 Using ASUS Turbo Key 4-12 4.5 RAID configurations 4-13 4.5.1 RAID definitions 4-13 4.5.2 Installing Serial ATA hard disks 4-14 4.5.3 Setting the RAID item in BIOS 4-14 4.5.4 AMD® Option ROM Utility 4-15 4.6 Creating a RAID driver disk 4-18 4.6.1 Creating a RAID driver...
... EVO 4-10 4.4.1 Using ASUS TurboV 4-10 4.4.2 Using ASUS TurboV Auto Tuning Mode 4-11 4.4.3 Using CPU Level UP 4-12 4.4.4 Using ASUS Turbo Key 4-12 4.5 RAID configurations 4-13 4.5.1 RAID definitions 4-13 4.5.2 Installing Serial ATA hard disks 4-14 4.5.3 Setting the RAID item in BIOS 4-14 4.5.4 AMD® Option ROM Utility 4-15 4.6 Creating a RAID driver disk 4-18 4.6.1 Creating a RAID driver...

User Manual
Page 13
... PME, WOR by Ring, PXE Drivers ASUS Update ASUS utilities Anti-Virus software (OEM version) 2 x Serial ATA 6.0Gb/s cables 1 x 2-in (30.5 cm x 24.4 cm) *Specifications are subject to change without notice. M5A88-V EVO specifications summary Back panel I/O ports .../O shield 1 x User Manual 1 x Support DVD ATX form factor: 12.0 in x 9.6 in -1 Q-connector (retail version only) 1 x I /O ports 4 x USB 2.0/1.1 connectors support additional 8 USB 2.0/1.1 ports 1 x COM connector 1 x IDE connector 5 x SATA 6.0Gb/s connectors 1 x CPU fan connector 1 x Chassis fan connector 1 x Power fan connector 1...
... PME, WOR by Ring, PXE Drivers ASUS Update ASUS utilities Anti-Virus software (OEM version) 2 x Serial ATA 6.0Gb/s cables 1 x 2-in (30.5 cm x 24.4 cm) *Specifications are subject to change without notice. M5A88-V EVO specifications summary Back panel I/O ports .../O shield 1 x User Manual 1 x Support DVD ATX form factor: 12.0 in x 9.6 in -1 Q-connector (retail version only) 1 x I /O ports 4 x USB 2.0/1.1 connectors support additional 8 USB 2.0/1.1 ports 1 x COM connector 1 x IDE connector 5 x SATA 6.0Gb/s connectors 1 x CPU fan connector 1 x Chassis fan connector 1 x Power fan connector 1...
User Manual
Page 78
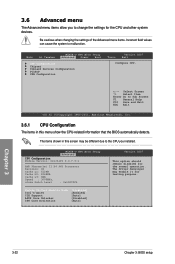
...M5A88-V EVO BIOS Setup Advanced CPU Configuration Module Version: OrochiPI 0.0.7.3-1 AMD Phenom(tm) II X4 945 Processor Revision: C2 Cache L1: 512KB Cache L2: 2048KB Cache L3: 6MB Speed : 3000MHz, uCode Patch Level : 0x10000C6 Secure Virtual Machine Mode Cool'n'Quiet C1E Support ASUS ...The items shown in this screen may enable it for testing purpose. Main Ai Tweaker M5A88-V EVO BIOS Setup Advanced Power Boot CPU Configuration Chipset Onboard Devices Configuration PCIPnP USB Configuration Tools Version 0207 Exit Configure CPU. ←→ Select Screen ↑↓ ...
...M5A88-V EVO BIOS Setup Advanced CPU Configuration Module Version: OrochiPI 0.0.7.3-1 AMD Phenom(tm) II X4 945 Processor Revision: C2 Cache L1: 512KB Cache L2: 2048KB Cache L3: 6MB Speed : 3000MHz, uCode Patch Level : 0x10000C6 Secure Virtual Machine Mode Cool'n'Quiet C1E Support ASUS ...The items shown in this screen may enable it for testing purpose. Main Ai Tweaker M5A88-V EVO BIOS Setup Advanced Power Boot CPU Configuration Chipset Onboard Devices Configuration PCIPnP USB Configuration Tools Version 0207 Exit Configure CPU. ←→ Select Screen ↑↓ ...
User Manual
Page 114
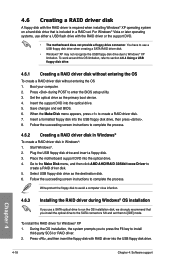
...6. Go to the Make Disk menu, and then click AMD AHCI/RAID 32/64bit xxxx Driver to section 4.6.4 Using a USB floppy disk drive. 4.6.1 Creating a RAID driver disk without entering the OS To create a RAID driver disk without entering the OS 1. Write-protect the floppy disk to avoid a computer virus infection...5/6 and set . To work around this OS limitation, refer to create a RAID driver disk. 5. Plug the USB floppy disk drive and insert a floppy disk. 3. Place the motherboard support DVD into the USB floppy disk drive. During the OS installation, the system prompts you to press the F6...
...6. Go to the Make Disk menu, and then click AMD AHCI/RAID 32/64bit xxxx Driver to section 4.6.4 Using a USB floppy disk drive. 4.6.1 Creating a RAID driver disk without entering the OS To create a RAID driver disk without entering the OS 1. Write-protect the floppy disk to avoid a computer virus infection...5/6 and set . To work around this OS limitation, refer to create a RAID driver disk. 5. Plug the USB floppy disk drive and insert a floppy disk. 3. Place the motherboard support DVD into the USB floppy disk drive. During the OS installation, the system prompts you to press the F6...

User Manual
Page 115
...-up window. The name of the device you to complete the installation. Chapter 4 ASUS M5A88-V EVO 4-19 From the Universal Serial Bus controllers, right-click xxxxxx USB Floppy, and then select Properties from the pop-up window. During the OS installation, click Load Driver to allow you 've inserted, go to install, select the RAID...
...-up window. The name of the device you to complete the installation. Chapter 4 ASUS M5A88-V EVO 4-19 From the Universal Serial Bus controllers, right-click xxxxxx USB Floppy, and then select Properties from the pop-up window. During the OS installation, click Load Driver to allow you 've inserted, go to install, select the RAID...

User Manual
Page 116
...7. A window appears, allowing you to open the file. 8. Browse the contents of the two sections: id = "USB\VID_xxxx&PID_xxxx", "usbstor" [HardwareIds.SCSI.Napa_i386_ahci8086] id= "PCI\VEN_1002&DEV_4392&CC_0104","ahcix86" id= "PCI\VEN_1002&DEV_4391&CC_0106...VEN_1002&DEV_4392&CC_0104","ahcix64" id= "PCI\VEN_1002&DEV_4391&CC_0106","ahcix64" id= "PCI\VEN_1002&DEV_4393&CC_0104","ahcix64" id= "USB\VID_03EE&PID_6901", "usbstor" Add the same line to locate the file txtsetup.oem. 6. Save and exit the file. ... the following line to the bottom of the RAID driver disk to both sections.
...7. A window appears, allowing you to open the file. 8. Browse the contents of the two sections: id = "USB\VID_xxxx&PID_xxxx", "usbstor" [HardwareIds.SCSI.Napa_i386_ahci8086] id= "PCI\VEN_1002&DEV_4392&CC_0104","ahcix86" id= "PCI\VEN_1002&DEV_4391&CC_0106...VEN_1002&DEV_4392&CC_0104","ahcix64" id= "PCI\VEN_1002&DEV_4391&CC_0106","ahcix64" id= "PCI\VEN_1002&DEV_4393&CC_0104","ahcix64" id= "USB\VID_03EE&PID_6901", "usbstor" Add the same line to locate the file txtsetup.oem. 6. Save and exit the file. ... the following line to the bottom of the RAID driver disk to both sections.


