

User Manual
Page 6
... ASUS Turbo Key 4-12 4.5 RAID configurations 4-13 4.5.1 RAID definitions 4-13 4.5.2 Installing Serial ATA hard disks 4-14 4.5.3 Setting the RAID item in BIOS 4-14 4.5.4 AMD® Option ROM Utility 4-15 4.6 Creating a RAID driver disk 4-18 4.6.1 Creating a RAID driver disk without entering the OS 4-18 4.6.2 Creating a RAID driver disk in Windows 4-18 4.6.3 Installing the RAID driver during Windows®...
... ASUS Turbo Key 4-12 4.5 RAID configurations 4-13 4.5.1 RAID definitions 4-13 4.5.2 Installing Serial ATA hard disks 4-14 4.5.3 Setting the RAID item in BIOS 4-14 4.5.4 AMD® Option ROM Utility 4-15 4.6 Creating a RAID driver disk 4-18 4.6.1 Creating a RAID driver disk without entering the OS 4-18 4.6.2 Creating a RAID driver disk in Windows 4-18 4.6.3 Installing the RAID driver during Windows®...

User Manual
Page 69
...want to use the Serial ATA hard disk drives as Parallel ATA physical storage devices. SATA Port5 - Chapter 3 ASUS M5A88-V EVO 3-13 Port6 [Auto] [Enabled] [IDE] [IDE] Version 0207 For the better HDD compatibility please set the... the SATA connectors 1-6 in AHCI mode under the OS environment or during POST. • For Windows® XP OS, you installed 3.0Gb/s SATA HDDs on random workloads by allowing the drive to... two items appear only when you set the OnChip SATA Channel item to install the AHCI driver, so that you could use a SATA optical drive to run the OS installation disk, we...
...want to use the Serial ATA hard disk drives as Parallel ATA physical storage devices. SATA Port5 - Chapter 3 ASUS M5A88-V EVO 3-13 Port6 [Auto] [Enabled] [IDE] [IDE] Version 0207 For the better HDD compatibility please set the... the SATA connectors 1-6 in AHCI mode under the OS environment or during POST. • For Windows® XP OS, you installed 3.0Gb/s SATA HDDs on random workloads by allowing the drive to... two items appear only when you set the OnChip SATA Channel item to install the AHCI driver, so that you could use a SATA optical drive to run the OS installation disk, we...
User Manual
Page 97
... select the items you install the Windows® XP Service Pack 3 or later versions before installing the drivers for reference only. Use the setup procedures presented in your hardware. • Motherboard settings and hardware options vary. Double-click the ASSETUP.EXE to install. Chapter 4 ASUS M5A88-V EVO 4-1 Visit the ASUS website at any time without notice...
... select the items you install the Windows® XP Service Pack 3 or later versions before installing the drivers for reference only. Use the setup procedures presented in your hardware. • Motherboard settings and hardware options vary. Double-click the ASSETUP.EXE to install. Chapter 4 ASUS M5A88-V EVO 4-1 Visit the ASUS website at any time without notice...

User Manual
Page 103
...UAJ® (Universal Audio Jack) technology for Windows® XP Configuration options Control settings window Information button Exit button Minimize button Chapter 4 Information button ASUS M5A88-V EVO 4-7 Realtek HD Audio Manager for Windows® Vista / 7 Set default device ...window Analog and digital connector status B. Realtek HD Audio Manager A. The software provides Jack-Detection function, S/PDIF Out support, and interrupt capability. 4.3.5 Audio configurations The Realtek® audio CODEC provides 8-channel audio capability to install the Realtek® Audio Driver...
...UAJ® (Universal Audio Jack) technology for Windows® XP Configuration options Control settings window Information button Exit button Minimize button Chapter 4 Information button ASUS M5A88-V EVO 4-7 Realtek HD Audio Manager for Windows® Vista / 7 Set default device ...window Analog and digital connector status B. Realtek HD Audio Manager A. The software provides Jack-Detection function, S/PDIF Out support, and interrupt capability. 4.3.5 Audio configurations The Realtek® audio CODEC provides 8-channel audio capability to install the Realtek® Audio Driver...

User Manual
Page 104
... kept on the next system boot. Install the ASUS TurboV EVO utility from the motherboard support DVD. 3. Install the ASUS GPU Boost driver from the motherboard support DVD. 2. Refer to restore all start > All Programs > ASUS > TurboV EVO > TurboV EVO. 4. Click More Settings from the motherboard support DVD... customized overclocking settings and manually load the profile after Windows starts. • When GPU Boost is available only when you to overclock the integrated GPU in WIndows® environment and takes effect in ASUS GPU Boost will not be saved to High Performance ...
... kept on the next system boot. Install the ASUS TurboV EVO utility from the motherboard support DVD. 3. Install the ASUS GPU Boost driver from the motherboard support DVD. 2. Refer to restore all start > All Programs > ASUS > TurboV EVO > TurboV EVO. 4. Click More Settings from the motherboard support DVD... customized overclocking settings and manually load the profile after Windows starts. • When GPU Boost is available only when you to overclock the integrated GPU in WIndows® environment and takes effect in ASUS GPU Boost will not be saved to High Performance ...

User Manual
Page 106
... Utility- Install ASUS TurboV EVO from the support DVD that allow you install the GPU Boost driver from the motherboard support DVD. • For advanced overclock ability, adjust first the BIOS items, and then proceed more settings Auto Tuning Mode Save ...and the integrated GPU voltage/frequency in Windows® environment and takes effect in real-time. Click on the icon to display the TurboV EVO control panel. • Refer to the software manual in ASUS TurboV (except for detailed software configuration. • When TurboV EVO is enabled, ASUS EPU will be set to High Performance...
... Utility- Install ASUS TurboV EVO from the support DVD that allow you install the GPU Boost driver from the motherboard support DVD. • For advanced overclock ability, adjust first the BIOS items, and then proceed more settings Auto Tuning Mode Save ...and the integrated GPU voltage/frequency in Windows® environment and takes effect in real-time. Click on the icon to display the TurboV EVO control panel. • Refer to the software manual in ASUS TurboV (except for detailed software configuration. • When TurboV EVO is enabled, ASUS EPU will be set to High Performance...
User Manual
Page 109
... section 4.6 Creating a RAID driver disk for this setup. Chapter 4 ASUS M5A88-V EVO 4-13 4.5 RAID configurations The motherboard comes with the total capacity over 2TB can only be of the same size or larger than the existing drive. A RAID array over 2TB cannot be calculated and written. The new drive must install Windows® XP Service...
... section 4.6 Creating a RAID driver disk for this setup. Chapter 4 ASUS M5A88-V EVO 4-13 4.5 RAID configurations The motherboard comes with the total capacity over 2TB can only be of the same size or larger than the existing drive. A RAID array over 2TB cannot be calculated and written. The new drive must install Windows® XP Service...
User Manual
Page 114
... and then click AMD AHCI/RAID 32/64bit xxxx Driver to complete the process. 4.6.2 Creating a RAID driver disk in Windows® To create a RAID driver disk in a RAID set them to enter the BIOS setup utility. 3. To install the RAID driver for Windows® XP 1. When the Make Disk menu appears...connector. Select USB floppy disk drive as the primary boot device. 4. Press , and then insert the floppy disk with the RAID driver is required when installing Windows® XP operating system on a hard disk drive that you install the optical dirve to the SATA connectors 5/6 and set . Write...
... and then click AMD AHCI/RAID 32/64bit xxxx Driver to complete the process. 4.6.2 Creating a RAID driver disk in Windows® To create a RAID driver disk in a RAID set them to enter the BIOS setup utility. 3. To install the RAID driver for Windows® XP 1. When the Make Disk menu appears...connector. Select USB floppy disk drive as the primary boot device. 4. Press , and then insert the floppy disk with the RAID driver is required when installing Windows® XP operating system on a hard disk drive that you install the optical dirve to the SATA connectors 5/6 and set . Write...

User Manual
Page 115
... Floppy, and then select Properties from the pop-up window. The name of the device you to install, select the RAID driver for Windows® Vista or later OS 1. 3. When prompted to select the SCSI adapter to select the installation media containing the RAID driver. 2. Chapter 4 ASUS M5A88-V EVO 4-19 Follow the succeeding screen instructions to the...
... Floppy, and then select Properties from the pop-up window. The name of the device you to install, select the RAID driver for Windows® Vista or later OS 1. 3. When prompted to select the SCSI adapter to select the installation media containing the RAID driver. 2. Chapter 4 ASUS M5A88-V EVO 4-19 Follow the succeeding screen instructions to the...

User Manual
Page 116
... file txtsetup.oem. 6. Save and exit the file. 4-20 Chapter 4: Software support Chapter 4 Type the following line to the bottom of the RAID driver disk to both sections. A window appears, allowing you to open the file. 8. Find the [HardwareIds.SCSI.Napa_i386_ahci8086] and [HardwareIds.SCSI.Napa_amd64_ahci] sections in the txtsetup.oem file. 9. Double...
... file txtsetup.oem. 6. Save and exit the file. 4-20 Chapter 4: Software support Chapter 4 Type the following line to the bottom of the RAID driver disk to both sections. A window appears, allowing you to open the file. 8. Find the [HardwareIds.SCSI.Napa_i386_ahci8086] and [HardwareIds.SCSI.Napa_amd64_ahci] sections in the txtsetup.oem file. 9. Double...
User Manual
Page 117
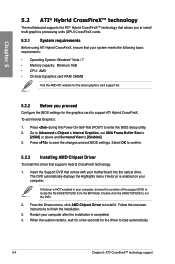
... your power supply unit (PSU) can provide at least the minimum power required by your computer. For Windows XP, select Add/Remove. Turn off your system. Select your graphics card driver supports the ATI CrossFireX technology. ASUS M5A88-V EVO 5-1 To uninstall all current applications. 2. Chapter 5 Chapter 5: Chapter 5 ATI® CrossFireX™ technology support 5.1 ATI®...
... your power supply unit (PSU) can provide at least the minimum power required by your computer. For Windows XP, select Add/Remove. Turn off your system. Select your graphics card driver supports the ATI CrossFireX technology. ASUS M5A88-V EVO 5-1 To uninstall all current applications. 2. Chapter 5 Chapter 5: Chapter 5 ATI® CrossFireX™ technology support 5.1 ATI®...
User Manual
Page 119
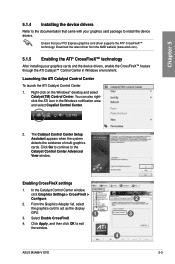
... multi-graphics cards. Enabling CrossFireX settings 1. In the Catalyst Control Center window, click Graphics Settings > CrossFireX > Configure. 2. Ensure that came with your graphics card package to exit the window. 2 3 4 ASUS M5A88-V EVO 5-3 Click Apply, and then click OK to install the device drivers. Download the latest driver from the AMD website (www.amd.com). 5.1.5 Enabling the ATI...
... multi-graphics cards. Enabling CrossFireX settings 1. In the Catalyst Control Center window, click Graphics Settings > CrossFireX > Configure. 2. Ensure that came with your graphics card package to exit the window. 2 3 4 ASUS M5A88-V EVO 5-3 Click Apply, and then click OK to install the device drivers. Download the latest driver from the AMD website (www.amd.com). 5.1.5 Enabling the ATI...
User Manual
Page 120
... support DVD to locate the file ASSETUP.EXE from the BIN folder. Restart your system meets the following basic requirements: • Operating System: Windows® Vista / 7 • Memory capacity: Minimum 1GB • CPU: AM3 • On-board graphics card RAM: 256MB Visit the...Graphics, set Internal Graphics: 1. Select OK to run the DVD. 2. Double-click the ASSETUP.EXE to confirm. 5.2.3 Installing AMD Chipset Driver To install the driver that comes with your motherboard into the optical drive. When the system restarts, wait for a few seconds for the graphics card to [Enabled...
... support DVD to locate the file ASSETUP.EXE from the BIN folder. Restart your system meets the following basic requirements: • Operating System: Windows® Vista / 7 • Memory capacity: Minimum 1GB • CPU: AM3 • On-board graphics card RAM: 256MB Visit the...Graphics, set Internal Graphics: 1. Select OK to run the DVD. 2. Double-click the ASSETUP.EXE to confirm. 5.2.3 Installing AMD Chipset Driver To install the driver that comes with your motherboard into the optical drive. When the system restarts, wait for a few seconds for the graphics card to [Enabled...

