

User Manual
Page 6
...-TurboV EVO 4-10 4.4.1 Using ASUS TurboV 4-10 4.4.2 Using ASUS TurboV Auto Tuning Mode 4-11 4.4.3 Using CPU Level UP 4-12 4.4.4 Using ASUS Turbo Key 4-12 4.5 RAID configurations 4-13 4.5.1 RAID definitions 4-13 4.5.2 Installing Serial ATA hard disks 4-14 4.5.3 Setting the RAID item in BIOS 4-14 4.5.4 AMD® Option ROM Utility 4-15 4.6 Creating a RAID driver disk 4-18 4.6.1 Creating a RAID driver disk...
...-TurboV EVO 4-10 4.4.1 Using ASUS TurboV 4-10 4.4.2 Using ASUS TurboV Auto Tuning Mode 4-11 4.4.3 Using CPU Level UP 4-12 4.4.4 Using ASUS Turbo Key 4-12 4.5 RAID configurations 4-13 4.5.1 RAID definitions 4-13 4.5.2 Installing Serial ATA hard disks 4-14 4.5.3 Setting the RAID item in BIOS 4-14 4.5.4 AMD® Option ROM Utility 4-15 4.6 Creating a RAID driver disk 4-18 4.6.1 Creating a RAID driver disk...

User Manual
Page 106
...the TurboV EVO is available only when you install the GPU Boost driver from the support DVD that allow you to overclock the CPU frequency, CPU voltage, CPU/NB voltage, DRAM voltage, and the integrated GPU voltage/frequency in Windows® environment and takes effect in ASUS TurboV ... to restore all start-up settings Undoes all changes without applying Applies all changes made in real-time. Chapter 4 4-10 Chapter 4: Software support Install ASUS TurboV EVO from the motherboard support DVD. • For advanced overclock ability, adjust first the BIOS items, and then proceed more...
...the TurboV EVO is available only when you install the GPU Boost driver from the support DVD that allow you to overclock the CPU frequency, CPU voltage, CPU/NB voltage, DRAM voltage, and the integrated GPU voltage/frequency in Windows® environment and takes effect in ASUS TurboV ... to restore all start-up settings Undoes all changes without applying Applies all changes made in real-time. Chapter 4 4-10 Chapter 4: Software support Install ASUS TurboV EVO from the motherboard support DVD. • For advanced overclock ability, adjust first the BIOS items, and then proceed more...
User Manual
Page 109
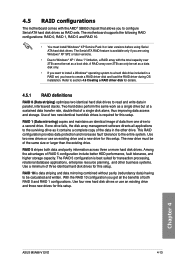
...Windows® operating system to a hard disk drive included in a RAID set as it contains a complete copy of RAID 5 configuration include better HDD performance, fault tolerance, and higher storage capacity. A RAID array over 2TB cannot be of a single disk alone, thus improving data access and storage. Chapter 4 ASUS M5A88-V EVO... applications, enterprise resource planning, and other drive. The motherboard supports the following RAID configurations: RAID 0, RAID 1, RAID 5 and RAID 10. • You must be set , you get all applications to create a RAID driver disk and load the RAID...
...Windows® operating system to a hard disk drive included in a RAID set as it contains a complete copy of RAID 5 configuration include better HDD performance, fault tolerance, and higher storage capacity. A RAID array over 2TB cannot be of a single disk alone, thus improving data access and storage. Chapter 4 ASUS M5A88-V EVO... applications, enterprise resource planning, and other drive. The motherboard supports the following RAID configurations: RAID 0, RAID 1, RAID 5 and RAID 10. • You must be set , you get all applications to create a RAID driver disk and load the RAID...

User Manual
Page 116
Save and exit the file. 4-20 Chapter 4: Software support Chapter 4 5. A window appears, allowing you to open the file. 8. Find the [HardwareIds.SCSI.Napa_i386_ahci8086] and [HardwareIds.SCSI.Napa_amd64_ahci] sections in the txtsetup.oem file. 9. Use Notepad... select the program for opening the oem file. 7. Double-click the file. The VID and PID vary with different vendors. 10. Type the following line to the bottom of the RAID driver disk to both sections. Browse the contents of the two sections: id = "USB\VID_xxxx&PID_xxxx", "usbstor" [HardwareIds.SCSI.Napa_i386_ahci8086...
Save and exit the file. 4-20 Chapter 4: Software support Chapter 4 5. A window appears, allowing you to open the file. 8. Find the [HardwareIds.SCSI.Napa_i386_ahci8086] and [HardwareIds.SCSI.Napa_amd64_ahci] sections in the txtsetup.oem file. 9. Use Notepad... select the program for opening the oem file. 7. Double-click the file. The VID and PID vary with different vendors. 10. Type the following line to the bottom of the RAID driver disk to both sections. Browse the contents of the two sections: id = "USB\VID_xxxx&PID_xxxx", "usbstor" [HardwareIds.SCSI.Napa_i386_ahci8086...

