User Guide
Page 9
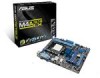
... the next page) ix resolution of 1GB Supports RGB with HD audio module in the front panel to support 8-channel audio output. M4A78LT-M LX specifications summary CPU Chipset Front side bus Memory Graphics Expansion slots Storage / RAID LAN Audio USB AMD® Socket AM3 AMD® Phenom™ II / Athlon™ II / Sempron™ 100 series processors Supports 45nm CPU AMD® Cool 'n' Quiet™ 2.0 Technology (depends on CPU type) Supports CPU up to 10 USB 2.0/1.1 ports (6 ports at mid-board, 4 ports at the back panel) (continued on the motherboard.
... the next page) ix resolution of 1GB Supports RGB with HD audio module in the front panel to support 8-channel audio output. M4A78LT-M LX specifications summary CPU Chipset Front side bus Memory Graphics Expansion slots Storage / RAID LAN Audio USB AMD® Socket AM3 AMD® Phenom™ II / Athlon™ II / Sempron™ 100 series processors Supports 45nm CPU AMD® Cool 'n' Quiet™ 2.0 Technology (depends on CPU type) Supports CPU up to 10 USB 2.0/1.1 ports (6 ports at mid-board, 4 ports at the back panel) (continued on the motherboard.
User Guide
Page 13
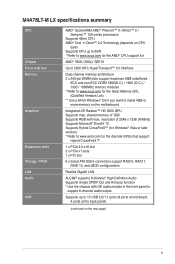
... ongoing work or games, simply through pressing the button. ASUS M4A78LT-M LX 1-3 ASUS Turbo Key ASUS Turbo Key allows you to personalize your system. ASUS Q-Fan ASUS Q-Fan technology intelligently adjusts the CPU fan speed according to system loading to update the BIOS from switching power supply (PSU). 1.3.2 12 Innovative ASUS features Core Unlocker ASUS Core Unlocker simplifies the activation of a latent AMD® CPUwith just pressing a key. ASUS EZ Flash 2 ASUS EZ Flash 2 allows you to restore a corrupted BIOS file using the bundled support DVD or a USB flash disk that...
... ongoing work or games, simply through pressing the button. ASUS M4A78LT-M LX 1-3 ASUS Turbo Key ASUS Turbo Key allows you to personalize your system. ASUS Q-Fan ASUS Q-Fan technology intelligently adjusts the CPU fan speed according to system loading to update the BIOS from switching power supply (PSU). 1.3.2 12 Innovative ASUS features Core Unlocker ASUS Core Unlocker simplifies the activation of a latent AMD® CPUwith just pressing a key. ASUS EZ Flash 2 ASUS EZ Flash 2 allows you to restore a corrupted BIOS file using the bundled support DVD or a USB flash disk that...
User Guide
Page 17
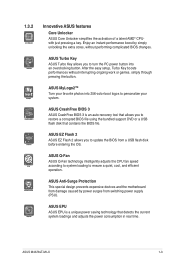
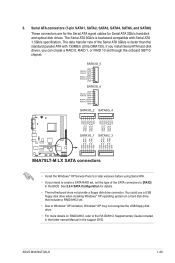
ATX power connectors (24-pin EATXPWR, 4-pin 1-22 10. CPU and chassis fan connectors (4-pin CPU_FAN and 3-pin CHA_FAN) 1-27 11. Digital audio connector (4-1 pin SPDIF_OUT) 1-26 5. Clear RTC RAM (CLRTC) 1-18 ASUS M4A78LT-M LX 1-7 USB device wake-up (3-pin USBPW1-4, USBPW5-10, ) 1-19 9. 1.5.3 Motherboard layout 123 4 5 6 20.3cm(8.0in) KBMS KBPWR EPU ATX12V COM1 DDR3 DIMM_A1 (64bit, 240-pin module) DDR3 DIMM_B1 (64bit, 240-pin module) EATXPWR USBPW1-4 LPT SOCKET AM3 VGA USB34 3 24.4cm(9.6in) LAN1_USB12 CPU_FAN SATA3G_5...
ATX power connectors (24-pin EATXPWR, 4-pin 1-22 10. CPU and chassis fan connectors (4-pin CPU_FAN and 3-pin CHA_FAN) 1-27 11. Digital audio connector (4-1 pin SPDIF_OUT) 1-26 5. Clear RTC RAM (CLRTC) 1-18 ASUS M4A78LT-M LX 1-7 USB device wake-up (3-pin USBPW1-4, USBPW5-10, ) 1-19 9. 1.5.3 Motherboard layout 123 4 5 6 20.3cm(8.0in) KBMS KBPWR EPU ATX12V COM1 DDR3 DIMM_A1 (64bit, 240-pin module) DDR3 DIMM_B1 (64bit, 240-pin module) EATXPWR USBPW1-4 LPT SOCKET AM3 VGA USB34 3 24.4cm(9.6in) LAN1_USB12 CPU_FAN SATA3G_5...
User Guide
Page 27
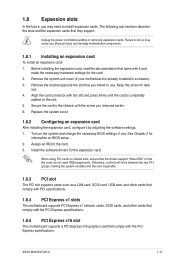
... the software settings. 1. Before installing the expansion card, read the documentation that the cards do so may need IRQ assignments. See Chapter 2 for the card. 2. Remove the system unit cover (if your motherboard is completely seated on shared slots, ensure that the drivers support "Share IRQ" or that came with the PCI Express specifications. Assign an IRQ to the card. 3. When using PCI cards on the slot. 5. Turn on BIOS setup. 2. Remove the...
... the software settings. 1. Before installing the expansion card, read the documentation that the cards do so may need IRQ assignments. See Chapter 2 for the card. 2. Remove the system unit cover (if your motherboard is completely seated on shared slots, ensure that the drivers support "Share IRQ" or that came with the PCI Express specifications. Assign an IRQ to the card. 3. When using PCI cards on the slot. 5. Turn on BIOS setup. 2. Remove the...
User Guide
Page 33
... Serial ATA 1.5Gb/s specification. You could use a USB floppy disk drive when installing Windows® XP operating system on a hard disk drive that includes a RAID/AHCI set. • Due to Windows® XP limitation, Windows® XP may not recognize the USB floppy disk drive. • For more details on RAID/AHCI, refer to the RA ID/AHCI Supplementary Guide included in the folder named Manual in the BIOS. If you install Serial ATA hard disk drives, you intend to [RAID] in the support DVD...
... Serial ATA 1.5Gb/s specification. You could use a USB floppy disk drive when installing Windows® XP operating system on a hard disk drive that includes a RAID/AHCI set. • Due to Windows® XP limitation, Windows® XP may not recognize the USB floppy disk drive. • For more details on RAID/AHCI, refer to the RA ID/AHCI Supplementary Guide included in the folder named Manual in the BIOS. If you install Serial ATA hard disk drives, you intend to [RAID] in the support DVD...
User Guide
Page 38
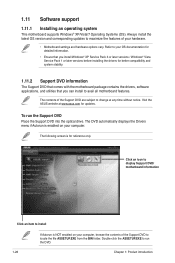
... an icon to display Support DVD/ motherboard information Click an item to run the Support DVD Place the Support DVD into the optical drive. Double-click the ASSETUP.EXE to install If Autorun is for updates. Always install the latest OS version and corresponding updates to maximize the features of the Support DVD to your hardware. • Motherboard settings and hardware options vary. Refer to locate the file ASSETUP.EXE from...
... an icon to display Support DVD/ motherboard information Click an item to run the Support DVD Place the Support DVD into the optical drive. Double-click the ASSETUP.EXE to install If Autorun is for updates. Always install the latest OS version and corresponding updates to maximize the features of the Support DVD to your hardware. • Motherboard settings and hardware options vary. Refer to locate the file ASSETUP.EXE from...
User Guide
Page 39
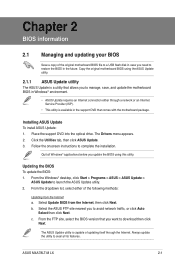
... ASUS Update. 3. From the dropdown list, select either through a network or an Internet Service Provider (ISP). • This utility is capable of updating itself through the Internet. The Drivers menu appears. 2. From the Windows® desktop, click Start > Programs > ASUS > ASUS Update > ASUS Update to restore the BIOS in the future. Chapter 2 BIOS information 2.1 Managing and updating your BIOS Save a copy of the original motherboard BIOS file to a USB flash disk in case you need to launch the ASUS Update utility...
... ASUS Update. 3. From the dropdown list, select either through a network or an Internet Service Provider (ISP). • This utility is capable of updating itself through the Internet. The Drivers menu appears. 2. From the Windows® desktop, click Start > Programs > ASUS > ASUS Update > ASUS Update to restore the BIOS in the future. Chapter 2 BIOS information 2.1 Managing and updating your BIOS Save a copy of the original motherboard BIOS file to a USB flash disk in case you need to launch the ASUS Update utility...
User Guide
Page 40
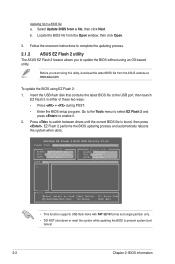
.... 2.1.2 ASUS EZ Flash 2 utility The ASUS EZ Flash 2 feature allows you start using this utility, download the latest BIOS file from a BIOS file a. Go to the Tools menu to select EZ Flash 2 and press to prevent system boot failure! 2-2 Chapter 2: BIOS information ASUSTek EZ Flash 2 BIOS ROM Utility V3.44 FLASH TYPE: EON 25P/F80 Current ROM BOARD: M4A78LT-M LX VER: 0306 (H:00 B:04) DATE: 01/06/2011 Update ROM BOARD: Unknown VER: Unknown DATE: Unknown PATH: C:\ C: Note [Enter] Select or Load [Tab] Switch...
.... 2.1.2 ASUS EZ Flash 2 utility The ASUS EZ Flash 2 feature allows you start using this utility, download the latest BIOS file from a BIOS file a. Go to the Tools menu to select EZ Flash 2 and press to prevent system boot failure! 2-2 Chapter 2: BIOS information ASUSTek EZ Flash 2 BIOS ROM Utility V3.44 FLASH TYPE: EON 25P/F80 Current ROM BOARD: M4A78LT-M LX VER: 0306 (H:00 B:04) DATE: 01/06/2011 Update ROM BOARD: Unknown VER: Unknown DATE: Unknown PATH: C:\ C: Note [Enter] Select or Load [Tab] Switch...
User Guide
Page 41
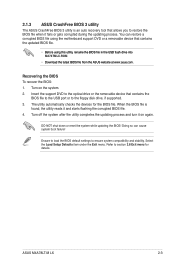
... the BIOS To recover the BIOS: 1. When the BIOS file is an auto recovery tool that allows you to section 2.8 Exit menu for the BIOS file. Turn on again. The utility automatically checks the devices for details. DO NOT shut down or reset the system while updating the BIOS! Ensure to load the BIOS default settings to the floppy disk drive, if supported. 3. You can cause system boot failure! Select the Load Setup Defaults item under the Exit menu.
... the BIOS To recover the BIOS: 1. When the BIOS file is an auto recovery tool that allows you to section 2.8 Exit menu for the BIOS file. Turn on again. The utility automatically checks the devices for details. DO NOT shut down or reset the system while updating the BIOS! Ensure to load the BIOS default settings to the floppy disk drive, if supported. 3. You can cause system boot failure! Select the Load Setup Defaults item under the Exit menu.

User Guide
Page 45
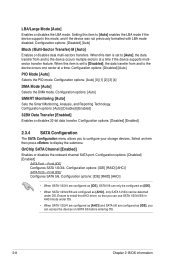
Use [+] or [-] to select a field. There is a separate submenu for information on the menu screen items and how to display the SATA device information. These values are specifically configuring a CD-ROM drive. Configuration options: [Not Installed] [Auto] [CDROM] [ARMD] This item only appears in the system. The BIOS automatically detects the values opposite the dimmed items (Device, Vendor, Size, LBA Mode, Block Mode, PIO Mode, Async DMA, Ultra DMA, and SMART monitoring). Select...
Use [+] or [-] to select a field. There is a separate submenu for information on the menu screen items and how to display the SATA device information. These values are specifically configuring a CD-ROM drive. Configuration options: [Not Installed] [Auto] [CDROM] [ARMD] This item only appears in the system. The BIOS automatically detects the values opposite the dimmed items (Device, Vendor, Size, LBA Mode, Block Mode, PIO Mode, Async DMA, Ultra DMA, and SMART monitoring). Select...
User Guide
Page 46
... options: [Auto] SMART Monitoring [Auto] Sets the Smart Monitoring, Analysis, and Reporting Technology. Configuration options: [IDE] [RAID] [AHCI] • When SATA 1/2/3/4 are configured as [IDE], SATA 5/6 can only be detected under OS. • When SATA 1/2/3/4 are configured as [AHCI] and SATA 5/6 are configured as [IDE], you to install the AHCI driver, so that you can use SATA 1/2/3/4/5/6 in AHCI mode under OS. When this mode, and if the device was not previously formatted with LBA mode disabled. OnChip SATA Channel [Enabled] Enables or disables the onboard channel SATA port...
... options: [Auto] SMART Monitoring [Auto] Sets the Smart Monitoring, Analysis, and Reporting Technology. Configuration options: [IDE] [RAID] [AHCI] • When SATA 1/2/3/4 are configured as [IDE], SATA 5/6 can only be detected under OS. • When SATA 1/2/3/4 are configured as [AHCI] and SATA 5/6 are configured as [IDE], you to install the AHCI driver, so that you can use SATA 1/2/3/4/5/6 in AHCI mode under OS. When this mode, and if the device was not previously formatted with LBA mode disabled. OnChip SATA Channel [Enabled] Enables or disables the onboard channel SATA port...
User Guide
Page 47
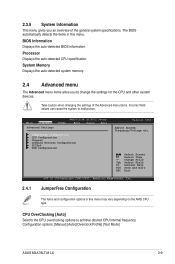
... when changing the settings of the general system specifications. Main Advanced Advanced Settings Power M4A78LT-M LX BIOS Setup Boot Tools Exit JumperFree Configuration CPU Configuration Chipset Onboard Devices Configuration PCIPnP USB Configuration Version 0306 Adjust System Frequency/Voltage etc. Change Field Tab Select Field F1 General Help F10 Save and Exit ESC Exit v02.61 (C)Copyright 1985-2011, American Megatrends, Inc. 2.4.1 JumperFree Configuration The items and configuration options in this menu may vary depending on the AMD CPU type. System Memory Displays the auto...
... when changing the settings of the general system specifications. Main Advanced Advanced Settings Power M4A78LT-M LX BIOS Setup Boot Tools Exit JumperFree Configuration CPU Configuration Chipset Onboard Devices Configuration PCIPnP USB Configuration Version 0306 Adjust System Frequency/Voltage etc. Change Field Tab Select Field F1 General Help F10 Save and Exit ESC Exit v02.61 (C)Copyright 1985-2011, American Megatrends, Inc. 2.4.1 JumperFree Configuration The items and configuration options in this menu may vary depending on the AMD CPU type. System Memory Displays the auto...
User Guide
Page 48
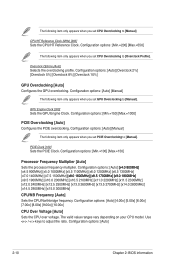
... you set CPU Overclocking to [Manual]. PCIE Clock [100] Sets the PCIE Clock. Overclock Options [Auto] Selects the overclocking profile. Configuration options: [Min.=150] [Max.=1000] PCIE Overclocking [Auto] Configures the PCIE overclocking. Configuration options: [Min.=100] [Max.=150] Processor Frequency Multiplier [Auto] Sets the processor frequency multiplier. The valid value ranges vary depending on your CPU model. Configuration options: [Auto] [4.00x] [5.00x] [6.00x] [7.00x] [8.00x] [9.00x] [10.00x] CPU Over Voltage [Auto] Sets the CPU over voltage. Use / keys to [Manual...
... you set CPU Overclocking to [Manual]. PCIE Clock [100] Sets the PCIE Clock. Overclock Options [Auto] Selects the overclocking profile. Configuration options: [Min.=150] [Max.=1000] PCIE Overclocking [Auto] Configures the PCIE overclocking. Configuration options: [Min.=100] [Max.=150] Processor Frequency Multiplier [Auto] Sets the processor frequency multiplier. The valid value ranges vary depending on your CPU model. Configuration options: [Auto] [4.00x] [5.00x] [6.00x] [7.00x] [8.00x] [9.00x] [10.00x] CPU Over Voltage [Auto] Sets the CPU over voltage. Use / keys to [Manual...
User Guide
Page 49
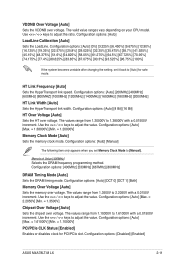
... for PCI/PCIe slot. Configuration options: [Auto] [DCT 0] [DCT 1] [Both] Memory Over Voltage [Auto] Sets the memory over voltage. The values range from 1.10000V to adjust the value. Use the / keys to adjust the value. Configuration options: [Disabled] [Enabled] ASUS M4A78LT-M LX 2-11 Configuration options: [Auto] [Max. = 1.38000V] [Min. = 1.20000V] Memory Clock Mode [Auto] Sets the memory clock mode. Use the / keys to adjust the value. VDDNB Over Voltage [Auto] Sets the VDDNB over voltage. The valid value ranges vary depending on your CPU model. Use / keys to...
... for PCI/PCIe slot. Configuration options: [Auto] [DCT 0] [DCT 1] [Both] Memory Over Voltage [Auto] Sets the memory over voltage. The values range from 1.10000V to adjust the value. Use the / keys to adjust the value. Configuration options: [Disabled] [Enabled] ASUS M4A78LT-M LX 2-11 Configuration options: [Auto] [Max. = 1.38000V] [Min. = 1.20000V] Memory Clock Mode [Auto] Sets the memory clock mode. Use the / keys to adjust the value. VDDNB Over Voltage [Auto] Sets the VDDNB over voltage. The valid value ranges vary depending on your CPU model. Use / keys to...
User Guide
Page 50
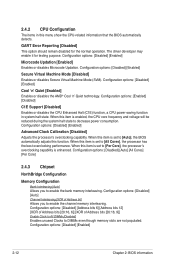
... 2: BIOS information Configuration options: [Disabled] [Address bits 6] [Address bits 12] [XOR of Address bits [20:16, 6]] [XOR of Address bit] Allows you to [Per Core], the processor's overclocking capability is enabled, the CPU core frequency and voltage will be reduced during the system halt state to DIMMs even though memory slots are not populated. Configuration options: [Disabled] [Enabled] Microcode Updation [Enabled] Enables or disables Microcode Updation. When this function. Configuration options: [Disabled] [Enabled] Secure Virtual Machine Mode [Disabled] Enables or disables...
... 2: BIOS information Configuration options: [Disabled] [Address bits 6] [Address bits 12] [XOR of Address bits [20:16, 6]] [XOR of Address bit] Allows you to [Per Core], the processor's overclocking capability is enabled, the CPU core frequency and voltage will be reduced during the system halt state to DIMMs even though memory slots are not populated. Configuration options: [Disabled] [Enabled] Microcode Updation [Enabled] Enables or disables Microcode Updation. When this function. Configuration options: [Disabled] [Enabled] Secure Virtual Machine Mode [Disabled] Enables or disables...
User Guide
Page 51
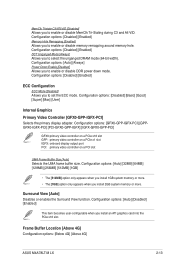
.... Configuration options: [Disabled] [Basic] [Good] [Super] [Max] [User] Internal Graphics Primary Video Controller [GFX0-GPP-IGFX-PCI] Selects the primary display adapter. Configuration options: [Disabled] [Enabled] DCT Unganged Mode [Always] Allows you to enable or disable MemClk Tri-Stating during C3 and Alt VID. MemClk Tristate C3/ATLVID [Disabled] Allows you to select the unganged DRAM mode (64-bit width). Frame Buffer Location [Above 4G] Configuration options: [Below 4G] [Above 4G] ASUS M4A78LT-M LX 2-13 Configuration options: [Disabled] [Enabled] Memory Hole Remapping [Enabled...
.... Configuration options: [Disabled] [Basic] [Good] [Super] [Max] [User] Internal Graphics Primary Video Controller [GFX0-GPP-IGFX-PCI] Selects the primary display adapter. Configuration options: [Disabled] [Enabled] DCT Unganged Mode [Always] Allows you to enable or disable MemClk Tri-Stating during C3 and Alt VID. MemClk Tristate C3/ATLVID [Disabled] Allows you to select the unganged DRAM mode (64-bit width). Frame Buffer Location [Above 4G] Configuration options: [Below 4G] [Above 4G] ASUS M4A78LT-M LX 2-13 Configuration options: [Disabled] [Enabled] Memory Hole Remapping [Enabled...
User Guide
Page 52
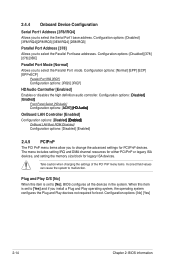
...;�] OnBoard LAN Boot ROM [Disabled] Configuration options: [Disabled] [Enabled] 2.4.5 PCIPnP The PCI PnP menu items allow you to change the advanced settings for PCI/PnP devices. Take caution when changing the settings of the PCI PnP menu items. Incorrect field values can cause the system to select the Serial Port1 base address. When this item is set to select the Parallel Port mode. Configuration options: [Disabled] [378] [278] [3BC] Parallel Port Mode [Normal] Allows you install a Plug and Play...
...;�] OnBoard LAN Boot ROM [Disabled] Configuration options: [Disabled] [Enabled] 2.4.5 PCIPnP The PCI PnP menu items allow you to change the advanced settings for PCI/PnP devices. Take caution when changing the settings of the PCI PnP menu items. Incorrect field values can cause the system to select the Serial Port1 base address. When this item is set to select the Parallel Port mode. Configuration options: [Disabled] [378] [278] [3BC] Parallel Port Mode [Normal] Allows you install a Plug and Play...

User Guide
Page 53
... for Legacy USB storage devices, including USB flash drives and USB hard drives. If no USB device is detected, the legacy USB support is detected, the item shows None. Configuration options: [10 Sec] [20 Sec] [30 Sec] [40 Sec] Emulation Type [Auto] Allows you to configure the USB 2.0 controller in HiSpeed (480Mbps) or Full Speed (12Mbps). Configuration options: [Disabled] [Enabled] [Auto] USB 2.0 Controller Mode [HiSpeed] Allows you to set the emulation type. Configuration options: [Auto] [Floppy] [Forced FDD] [Hard Disk] [CDROM] ASUS M4A78LT-M LX 2-15 Setting to Auto...
... for Legacy USB storage devices, including USB flash drives and USB hard drives. If no USB device is detected, the legacy USB support is detected, the item shows None. Configuration options: [10 Sec] [20 Sec] [30 Sec] [40 Sec] Emulation Type [Auto] Allows you to configure the USB 2.0 controller in HiSpeed (480Mbps) or Full Speed (12Mbps). Configuration options: [Disabled] [Enabled] [Auto] USB 2.0 Controller Mode [HiSpeed] Allows you to set the emulation type. Configuration options: [Auto] [Floppy] [Forced FDD] [Hard Disk] [CDROM] ASUS M4A78LT-M LX 2-15 Setting to Auto...
User Guide
Page 54
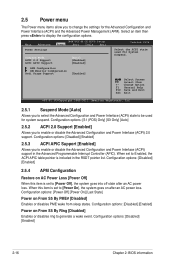
... disables PME wake from sleep states. Configuration options: [Disabled] [Enabled] 2.5.4 APM Configuration Restore on after an AC power loss. Configuration options: [Disabled] [Enabled] 2.5.3 ACPI APIC Support [Enabled] Allows you to change the settings for system suspend. 2.5 Power menu The Power menu items allow you to enable or disable the Advanced Configuration and Power Interface (ACPI) support in the RSDT pointer list. Main Advanced M4A78LT-M LX BIOS Setup Power Boot Tools Exit Version 0306 Power Settings Suspend Mode [Auto] ACPI 2.0 Support [Enabled] ACPI...
... disables PME wake from sleep states. Configuration options: [Disabled] [Enabled] 2.5.4 APM Configuration Restore on after an AC power loss. Configuration options: [Disabled] [Enabled] 2.5.3 ACPI APIC Support [Enabled] Allows you to change the settings for system suspend. 2.5 Power menu The Power menu items allow you to enable or disable the Advanced Configuration and Power Interface (ACPI) support in the RSDT pointer list. Main Advanced M4A78LT-M LX BIOS Setup Power Boot Tools Exit Version 0306 Power Settings Suspend Mode [Auto] ACPI 2.0 Support [Enabled] ACPI...
User Guide
Page 56
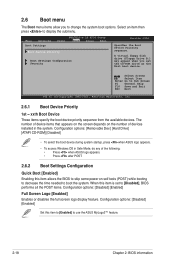
...Disabled] [Enabled] Full Screen Logo [Enabled] Enables or disables the full screen logo display feature. Main Advanced Boot Settings M4A78LT-M LX BIOS Setup Power Boot Tools Exit Boot Device Priority Boot Settings Configuration Security Version 0306 Specifies the Boot Device Priority sequence. Configuration options: [Removable Dev.] [Hard Drive] [ATAPI CD-ROM] [Disabled] • To select the boot device during system startup, press when ASUS logo appears. • To access Windows OS in Safe Mode, do any of devices installed in the system. Select an item then press to use...
...Disabled] [Enabled] Full Screen Logo [Enabled] Enables or disables the full screen logo display feature. Main Advanced Boot Settings M4A78LT-M LX BIOS Setup Power Boot Tools Exit Boot Device Priority Boot Settings Configuration Security Version 0306 Specifies the Boot Device Priority sequence. Configuration options: [Removable Dev.] [Hard Drive] [ATAPI CD-ROM] [Disabled] • To select the boot device during system startup, press when ASUS logo appears. • To access Windows OS in Safe Mode, do any of devices installed in the system. Select an item then press to use...


