
User Manual
Page 3
Contents Notices...v Safety information vi About this guide vi M4A78-VM IN/SI specifications summary viii Chapter 1: Product introduction 1.1 Before you proceed 1-1 1.2 Motherboard overview 1-2 1.2.1 Motherboard layout... 1-17 1.8.1 Installing an operating system 1-17 1.8.2 Support DVD information 1-17 Chapter 2: BIOS information 2.1 Managing and updating your BIOS 2-1 2.1.1 ASUS Update utility 2-1 2.1.2 ASUS EZ Flash 2 utility 2-2 2.1.3 ASUS CrashFree BIOS 3 utility 2-2 2.2 BIOS setup program 2-3 2.3 Main menu 2-4 2.3.1 System Time 2-4 2.3.2 System Date 2-4 iii
Contents Notices...v Safety information vi About this guide vi M4A78-VM IN/SI specifications summary viii Chapter 1: Product introduction 1.1 Before you proceed 1-1 1.2 Motherboard overview 1-2 1.2.1 Motherboard layout... 1-17 1.8.1 Installing an operating system 1-17 1.8.2 Support DVD information 1-17 Chapter 2: BIOS information 2.1 Managing and updating your BIOS 2-1 2.1.1 ASUS Update utility 2-1 2.1.2 ASUS EZ Flash 2 utility 2-2 2.1.3 ASUS CrashFree BIOS 3 utility 2-2 2.2 BIOS setup program 2-3 2.3 Main menu 2-4 2.3.1 System Time 2-4 2.3.2 System Date 2-4 iii

User Manual
Page 6
...About this guide is organized This guide contains the following parts: • Chapter 1: Product introduction This chapter describes the features of the BIOS parameters are also provided. If possible, disconnect all power cables from the existing system before you encounter technical problems with the package. ...contact your local power company. • If the power supply is broken, do not try to fix it supports. • Chapter 2: BIOS information This chapter tells how to the correct voltage in any damage, contact your dealer immediately. • To avoid short circuits, keep paper ...
...About this guide is organized This guide contains the following parts: • Chapter 1: Product introduction This chapter describes the features of the BIOS parameters are also provided. If possible, disconnect all power cables from the existing system before you encounter technical problems with the package. ...contact your local power company. • If the power supply is broken, do not try to fix it supports. • Chapter 2: BIOS information This chapter tells how to the correct voltage in any damage, contact your dealer immediately. • To avoid short circuits, keep paper ...
User Manual
Page 9
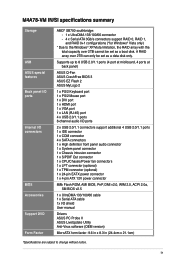
...BIOS Accessories Support DVD Form Factor AMD® SB700 southbridge: - 1 x UltraDMA 133/100/66 connector - 4 x Serial ATA 3Gb/s connectors support RAID 0, RAID 1, and RAID 0+1 configurations (*for Windows® Vista only) * Due to change without notice. M4A78-VM IN/SI specifications summary Storage USB ASUS... special features Back panel I/O ports Internal I /O shield User manual Drivers ASUS PC Probe II ASUS LiveUpdate Utility Anti-Virus software (OEM version) MicroATX form ...
...BIOS Accessories Support DVD Form Factor AMD® SB700 southbridge: - 1 x UltraDMA 133/100/66 connector - 4 x Serial ATA 3Gb/s connectors support RAID 0, RAID 1, and RAID 0+1 configurations (*for Windows® Vista only) * Due to change without notice. M4A78-VM IN/SI specifications summary Storage USB ASUS... special features Back panel I/O ports Internal I /O shield User manual Drivers ASUS PC Probe II ASUS LiveUpdate Utility Anti-Virus software (OEM version) MicroATX form ...
User Manual
Page 15
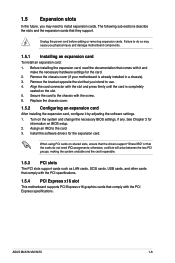
...settings for information on the slot. 5. See Chapter 2 for the card. 2. When using PCI cards on the system and change the necessary BIOS settings, if any. otherwise, conflicts will arise between the two PCI groups, making the system unstable and the card inoperable. 1.5.3 PCI slots ... Turn on shared slots, ensure that the drivers support "Share IRQ" or that they support. Install the software drivers for the expansion card. ASUS M4A78-VM IN/SI 1-6 Assign an IRQ to the card. 3. Unplug the power cord before adding or removing expansion cards. Align the card connector with it by...
...settings for information on the slot. 5. See Chapter 2 for the card. 2. When using PCI cards on the system and change the necessary BIOS settings, if any. otherwise, conflicts will arise between the two PCI groups, making the system unstable and the card inoperable. 1.5.3 PCI slots ... Turn on shared slots, ensure that the drivers support "Share IRQ" or that they support. Install the software drivers for the expansion card. ASUS M4A78-VM IN/SI 1-6 Assign an IRQ to the card. 3. Unplug the power cord before adding or removing expansion cards. Align the card connector with it by...
User Manual
Page 16
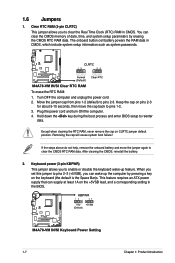
...Clock (RTC) RAM in CMOS, which include system setup information such as system passwords. Hold down the key during the boot process and enter BIOS setup to pins 2-3. Move the jumper cap from pins 1-2 (default) to reenter data. Keyboard power (3-pin KBPWR) This jumper allows you to...clear the CMOS memory of date, time, and system setup parameters by pressing a key on the +5VSB lead, and a corresponding setting in the BIOS. 1-7 Chapter 1: Product introduction You can wake up feature. Keep the cap on CLRTC jumper default position. Removing the cap will cause system boot ...
...Clock (RTC) RAM in CMOS, which include system setup information such as system passwords. Hold down the key during the boot process and enter BIOS setup to pins 2-3. Move the jumper cap from pins 1-2 (default) to reenter data. Keyboard power (3-pin KBPWR) This jumper allows you to...clear the CMOS memory of date, time, and system setup parameters by pressing a key on the +5VSB lead, and a corresponding setting in the BIOS. 1-7 Chapter 1: Product introduction You can wake up feature. Keep the cap on CLRTC jumper default position. Removing the cap will cause system boot ...
User Manual
Page 19
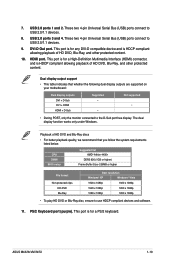
...11. DVI-D Out port. USB 2.0 ports 3 and 4. HDMI port. Playback of HD DVD, Blu-Ray, and other protected content. 10. ASUS M4A78-VM IN/SI 1-10 This port is for a High-Definition Multimedia Interface (HDMI) connector, and is for a PS/2 keyboard. This port is HDCP compliant allowing ... HDMI + D-Sub Supported • • Not supported • • During POST, only the monitor connected to USB 2.0/1.1 devices. 8. CPU DIMM BIOS setup Suggested list AMD® Athlon 4400+ DDR2 800 (1GB or higher) Frame Buffer Size--256MB or higher File format Non-protected clips HD-DVD...
...11. DVI-D Out port. USB 2.0 ports 3 and 4. HDMI port. Playback of HD DVD, Blu-Ray, and other protected content. 10. ASUS M4A78-VM IN/SI 1-10 This port is for a High-Definition Multimedia Interface (HDMI) connector, and is for a PS/2 keyboard. This port is HDCP compliant allowing ... HDMI + D-Sub Supported • • Not supported • • During POST, only the monitor connected to USB 2.0/1.1 devices. 8. CPU DIMM BIOS setup Suggested list AMD® Athlon 4400+ DDR2 800 (1GB or higher) Frame Buffer Size--256MB or higher File format Non-protected clips HD-DVD...

User Manual
Page 20
... in the Support DVD. • If you intend to create a Serial ATA RAID set using these connectors, set the OnChip SATA Type item in the BIOS to configure the setting. The numbers (1, 3, 2, 4) on the SATA ports only indicate the order that the audio device of the SATA devices. 2. See 2.3.4 SATA Configuration...
... in the Support DVD. • If you intend to create a Serial ATA RAID set using these connectors, set the OnChip SATA Type item in the BIOS to configure the setting. The numbers (1, 3, 2, 4) on the SATA ports only indicate the order that the audio device of the SATA devices. 2. See 2.3.4 SATA Configuration...
User Manual
Page 22
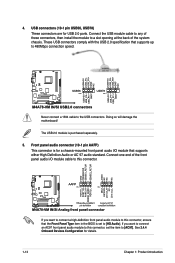
... USB 2.0 ports. If you want to connect a high-definition front panel audio module to this connector, ensure that the Front Panel Type item in the BIOS is purchased separately. 5. Doing so will damage the motherboard! Connect one end of these connectors, then install the module to the USB connectors. These USB...
... USB 2.0 ports. If you want to connect a high-definition front panel audio module to this connector, ensure that the Front Panel Type item in the BIOS is purchased separately. 5. Doing so will damage the motherboard! Connect one end of these connectors, then install the module to the USB connectors. These USB...
User Manual
Page 25
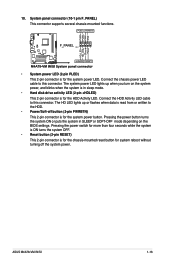
...LED lights up when you turn on the system power, and blinks when the system is in SLEEP or SOFT-OFF mode depending on the BIOS settings. Pressing the power switch for more than four seconds while the system is ON turns the system OFF. • Reset button (2-pin...is for the chassis-mounted reset button for system reboot without turning off button (2-pin PWRBTN) This 2-pin connector is for the system power button. ASUS M4A78-VM IN/SI 1-16 10. System panel connector (10-1 pin F_PANEL) This connector supports several chassis-mounted functions. • System power LED (2-pin PLED) This...
...LED lights up when you turn on the system power, and blinks when the system is in SLEEP or SOFT-OFF mode depending on the BIOS settings. Pressing the power switch for more than four seconds while the system is ON turns the system OFF. • Reset button (2-pin...is for the chassis-mounted reset button for system reboot without turning off button (2-pin PWRBTN) This 2-pin connector is for the system power button. ASUS M4A78-VM IN/SI 1-16 10. System panel connector (10-1 pin F_PANEL) This connector supports several chassis-mounted functions. • System power LED (2-pin PLED) This...
User Manual
Page 27
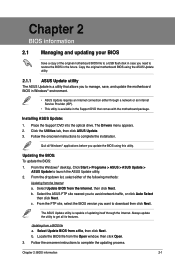
... onscreen instructions to complete the updating process. Select the ASUS FTP site nearest you update the BIOS using the ASUS Update utility. 2.1.1 ASUS Update utility The ASUS Update is available in the future. The ASUS Update utility is capable of updating itself through a network...the Windows® desktop, Click Start > Programs > ASUS > ASUS Update > ASUS Update to launch the ASUS Update utility. 2. Quit all its features. Chapter 2 BIOS information 2.1 Managing and updating your BIOS Save a copy of the original motherboard BIOS file to a USB flash disk in case you need...
... onscreen instructions to complete the updating process. Select the ASUS FTP site nearest you update the BIOS using the ASUS Update utility. 2.1.1 ASUS Update utility The ASUS Update is available in the future. The ASUS Update utility is capable of updating itself through a network...the Windows® desktop, Click Start > Programs > ASUS > ASUS Update > ASUS Update to launch the ASUS Update utility. 2. Quit all its features. Chapter 2 BIOS information 2.1 Managing and updating your BIOS Save a copy of the original motherboard BIOS file to a USB flash disk in case you need...
User Manual
Page 28
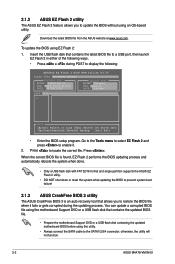
... EZ Flash 2 and press to locate the correct file. otherwise, the utility will not function. 2-2 ASUS M4A78-VM IN/SI Insert the USB flash disk that contains the updated BIOS file. • Prepare the motherboard Support DVD or a USB flash disk containing the updated motherboard BIOS before using an OS‑based utility. When the correct...
... EZ Flash 2 and press to locate the correct file. otherwise, the utility will not function. 2-2 ASUS M4A78-VM IN/SI Insert the USB flash disk that contains the updated BIOS file. • Prepare the motherboard Support DVD or a USB flash disk containing the updated motherboard BIOS before using an OS‑based utility. When the correct...

User Manual
Page 29
...smaller than 8GB. • DO NOT shut down or reset the system while updating the BIOS! Download the latest BIOS file from the ASUS website at www.asus.com. 2.2 BIOS setup program Use the BIOS Setup program when you are installing a motherboard, reconfiguring your data or system. This section ... process. • Only a USB flash disk with FAT 32/16 format and single partition supports ASUS CrashFree BIOS 3. Completed. Insert the Support DVD or USB flash disk containing the BIOS file to turn the system off then back on the system. 2. Restart the system after POST,...
...smaller than 8GB. • DO NOT shut down or reset the system while updating the BIOS! Download the latest BIOS file from the ASUS website at www.asus.com. 2.2 BIOS setup program Use the BIOS Setup program when you are installing a motherboard, reconfiguring your data or system. This section ... process. • Only a USB flash disk with FAT 32/16 format and single partition supports ASUS CrashFree BIOS 3. Completed. Insert the Support DVD or USB flash disk containing the BIOS file to turn the system off then back on the system. 2. Restart the system after POST,...
User Manual
Page 30
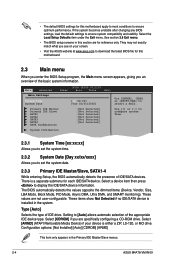
.../2002] Use [ENTER], [TAB] or [SHIFT-TAB] to display the IDE/SATA device information. There is installed in the Primary IDE Master/Slave menus. 2-4 ASUS M4A78-VM IN/SI The BIOS automatically detects the values opposite the dimmed items (Device, Vendor, Size, LBA Mode, Block Mode, PIO Mode, Async DMA, Ultra DMA, and SMART monitoring...
.../2002] Use [ENTER], [TAB] or [SHIFT-TAB] to display the IDE/SATA device information. There is installed in the Primary IDE Master/Slave menus. 2-4 ASUS M4A78-VM IN/SI The BIOS automatically detects the values opposite the dimmed items (Device, Vendor, Size, LBA Mode, Block Mode, PIO Mode, Async DMA, Ultra DMA, and SMART monitoring...
User Manual
Page 31
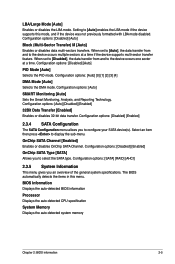
...AHCI] 2.3.5 System Information This menu gives you to [Auto] enables the LBA mode if the device supports this menu. BIOS Information Displays the auto-detected BIOS information Processor Displays the auto-detected CPU specification System Memory Displays the auto-detected system memory Chapter... Reporting Technology. Configuration options: [Auto] [Disabled] [Enabled] 32Bit Data Transfer [Enabled] Enables or disables 32-bit data transfer. The BIOS automatically detects the items in this mode, and if the device was not previously formatted with LBA mode disabled. When set to [Auto...
...AHCI] 2.3.5 System Information This menu gives you to [Auto] enables the LBA mode if the device supports this menu. BIOS Information Displays the auto-detected BIOS information Processor Displays the auto-detected CPU specification System Memory Displays the auto-detected system memory Chapter... Reporting Technology. Configuration options: [Auto] [Disabled] [Enabled] 32Bit Data Transfer [Enabled] Enables or disables 32-bit data transfer. The BIOS automatically detects the items in this mode, and if the device was not previously formatted with LBA mode disabled. When set to [Auto...
User Manual
Page 32
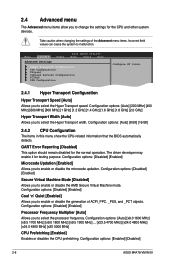
...developer may enable it for the normal operation. Configuration options: [Enabled] [Disabled] 2-6 ASUS M4A78-VM IN/SI Main Advanced Power BIOS SETUP UTILITY Boot Tools Exit Advanced Settings Hyper Transport Configuration CPU Configuration Chipset Onboard Devices Configuration... options: [Auto] [8 Bit] [16 Bit] 2.4.2 CPU Configuration The items in this menu show the CPU-related information that the BIOS automatically detects. Configuration options: [Disabled] [Enabled] Secure Virtual Machine Mode [Disabled] Allows you to select the Hyper Transport width. Configuration...
...developer may enable it for the normal operation. Configuration options: [Enabled] [Disabled] 2-6 ASUS M4A78-VM IN/SI Main Advanced Power BIOS SETUP UTILITY Boot Tools Exit Advanced Settings Hyper Transport Configuration CPU Configuration Chipset Onboard Devices Configuration... options: [Auto] [8 Bit] [16 Bit] 2.4.2 CPU Configuration The items in this menu show the CPU-related information that the BIOS automatically detects. Configuration options: [Disabled] [Enabled] Secure Virtual Machine Mode [Disabled] Allows you to select the Hyper Transport width. Configuration...

User Manual
Page 33
... remapping around memory hole. Configuration options: [Disabled] [Enabled] 2.4.3 Chipset The Chipset menu allows you to enable the bank memory interleaving. Configuration options: [Auto] [Both] Chapter 2: BIOS information 2-7 Select an item then press to enable or disable C1E Dual-Core related CPU power State. C1E Configuration [Disabled] Allows you to display the...
... remapping around memory hole. Configuration options: [Disabled] [Enabled] 2.4.3 Chipset The Chipset menu allows you to enable the bank memory interleaving. Configuration options: [Auto] [Both] Chapter 2: BIOS information 2-7 Select an item then press to enable or disable C1E Dual-Core related CPU power State. C1E Configuration [Disabled] Allows you to display the...

User Manual
Page 35
...for PCI/PnP devices. When set to [Yes] and if you to enable or disable the onboard HD Audio Controller. Configuration options: [Enabled] [Disabled] Chapter 2: BIOS information 2-9 Configuration options: [Disabled] [3F8/IRQ4][2F8/IRQ3] [3E8/IRQ4] [2E8/IRQ3] Onboard HD Audio Controller [Enabled] Allows you install a Plug and ...2.4.6 USB Configuration The items in the system. Configuration options: [Enabled] [Disabled] 2.4.5 PCI PnP The PCI PnP menu items allow you to set to [No], BIOS configures all the devices in this menu allows you to change the USB-related features.
...for PCI/PnP devices. When set to [Yes] and if you to enable or disable the onboard HD Audio Controller. Configuration options: [Enabled] [Disabled] Chapter 2: BIOS information 2-9 Configuration options: [Disabled] [3F8/IRQ4][2F8/IRQ3] [3E8/IRQ4] [2E8/IRQ3] Onboard HD Audio Controller [Enabled] Allows you install a Plug and ...2.4.6 USB Configuration The items in the system. Configuration options: [Enabled] [Disabled] 2.4.5 PCI PnP The PCI PnP menu items allow you to set to [No], BIOS configures all the devices in this menu allows you to change the USB-related features.
User Manual
Page 37
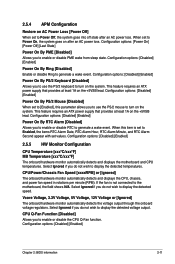
... disable RTC to turn on the system. Select Ignored if you do not wish to the motherboard, the field shows N/A. Configuration options: [Disabled] [Enabled] Chapter 2: BIOS information 2-11 Select Ignored if you to use the PS/2 mouse to generate a wake event. This feature requires an ATX power supply that provides at...
... disable RTC to turn on the system. Select Ignored if you do not wish to the motherboard, the field shows N/A. Configuration options: [Disabled] [Enabled] Chapter 2: BIOS information 2-11 Select Ignored if you to use the PS/2 mouse to generate a wake event. This feature requires an ATX power supply that provides at...
User Manual
Page 38
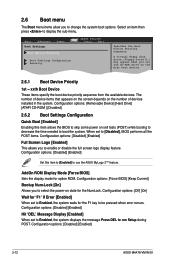
... displays the message Press DEL to display the sub-menu. AddOn ROM Display Mode [Force BIOS] Sets the display mode for option ROM. Configuration options: [Disabled] [Enabled] 2-12 ASUS M4A78-VM IN/SI The number of device items that appears on the screen depends on the number of devices ...installed in the system. Configuration options: [Disabled] [Enabled] Set this item allows the BIOS to skip some power on self tests (POST) ...
... displays the message Press DEL to display the sub-menu. AddOn ROM Display Mode [Force BIOS] Sets the display mode for option ROM. Configuration options: [Disabled] [Enabled] 2-12 ASUS M4A78-VM IN/SI The number of device items that appears on the screen depends on the number of devices ...installed in the system. Configuration options: [Disabled] [Enabled] Set this item allows the BIOS to skip some power on self tests (POST) ...
User Manual
Page 39
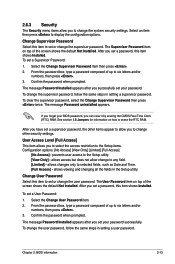
... fields in setting a supervisor password. Change User Password Select this item to set your password successfully. To change other security settings. Chapter 2: BIOS information 2-13 After you set a supervisor password, the other items appear to allow you to the Setup utility. [View Only] - Confirm...2.6.3 Security The Security menu items allow you to selected fields, such as Date and Time. [Full Access] - After you set your BIOS password, you to select the access restriction to six letters and/or numbers, then press . 3. allows changes only to change to display ...
... fields in setting a supervisor password. Change User Password Select this item to set your password successfully. To change other security settings. Chapter 2: BIOS information 2-13 After you set a supervisor password, the other items appear to allow you to the Setup utility. [View Only] - Confirm...2.6.3 Security The Security menu items allow you to selected fields, such as Date and Time. [Full Access] - After you set your BIOS password, you to select the access restriction to six letters and/or numbers, then press . 3. allows changes only to change to display ...


