
User Manual
Page 17
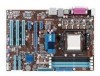
...Take note of the onboard LED. The illustration below shows the location of the following precautions before you install motherboard components or change any motherboard settings. • Unplug the power cord from the wall socket before removing or plugging in the bag that...ATX power supply and detach its power cord. Onboard LED The motherboard comes with the component. • Before you uninstall any component, place it on them. • Whenever you install or remove any motherboard component. M4A77TD SB_PWR ON OFF Standby Power Powered Off M4A77TD Onboard power LED ASUS M4A77TD...
...Take note of the onboard LED. The illustration below shows the location of the following precautions before you install motherboard components or change any motherboard settings. • Unplug the power cord from the wall socket before removing or plugging in the bag that...ATX power supply and detach its power cord. Onboard LED The motherboard comes with the component. • Before you uninstall any component, place it on them. • Whenever you install or remove any motherboard component. M4A77TD SB_PWR ON OFF Standby Power Powered Off M4A77TD Onboard power LED ASUS M4A77TD...
User Manual
Page 19
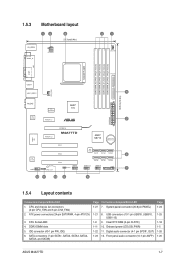
... AAFP) Page 1-24 1-25 1-18 1-5 1-26 1-26 ASUS M4A77TD 1-7 System panel connector (20-8 pin PANEL) 1-21 8. SATA connectors (7-pin SATA1, SATA2, SATA3, SATA4, SATA5, and SATA6) Page Connectors/Jumpers/Slots/LED 1-27 7. DDR3 DIMM slots 5. CPU and chassis fan connectors (4-pin CPU_FAN and 3-pin CHA_FAN) 2. 1.5.3 Motherboard layout 12 3 21.3cm(8.4in) KB_USB56 SPDIF_O...
... AAFP) Page 1-24 1-25 1-18 1-5 1-26 1-26 ASUS M4A77TD 1-7 System panel connector (20-8 pin PANEL) 1-21 8. SATA connectors (7-pin SATA1, SATA2, SATA3, SATA4, SATA5, and SATA6) Page Connectors/Jumpers/Slots/LED 1-27 7. DDR3 DIMM slots 5. CPU and chassis fan connectors (4-pin CPU_FAN and 3-pin CHA_FAN) 2. 1.5.3 Motherboard layout 12 3 21.3cm(8.4in) KB_USB56 SPDIF_O...


