User Manual
Page 6
... II 5-22 5.3.5 ASUS AI Suite 5-28 5.3.6 ASUS AI Gear 2 5-30 5.3.7 ASUS AI Nap 5-31 5.3.8 ASUS Q-Fan 2 5-32 5.3.9 ASUS AI Booster 5-33 5.3.10 ASUS Express Gate 5-34 5.4 RAID configurations 5-42 5.4.1 RAID definitions 5-42 5.4.2 NVIDIA® RAID configurations 5-43 5.5 Creating a RAID driver disk 5-50 5.5.1 Creating a RAID driver disk without entering the OS.... 5-50 5.5.2 Creating a RAID/SATA driver disk in Windows 5-50 Chapter...
... II 5-22 5.3.5 ASUS AI Suite 5-28 5.3.6 ASUS AI Gear 2 5-30 5.3.7 ASUS AI Nap 5-31 5.3.8 ASUS Q-Fan 2 5-32 5.3.9 ASUS AI Booster 5-33 5.3.10 ASUS Express Gate 5-34 5.4 RAID configurations 5-42 5.4.1 RAID definitions 5-42 5.4.2 NVIDIA® RAID configurations 5-43 5.5 Creating a RAID driver disk 5-50 5.5.1 Creating a RAID driver disk without entering the OS.... 5-50 5.5.2 Creating a RAID/SATA driver disk in Windows 5-50 Chapter...

User Manual
Page 22
... performance. eliminates the need to overclocking, C.P.R. See page 4-33 and 5-9 for details. When using ASUS PC Probe II, you to overclock the CPU speed in Windows environment without the hassle of the motherboard BIOS allows automatic re-setting to the BIOS default settings in case the system hangs due to... know which drivers are already installed, as well as those that are not. Smart Support ...
... performance. eliminates the need to overclocking, C.P.R. See page 4-33 and 5-9 for details. When using ASUS PC Probe II, you to overclock the CPU speed in Windows environment without the hassle of the motherboard BIOS allows automatic re-setting to the BIOS default settings in case the system hangs due to... know which drivers are already installed, as well as those that are not. Smart Support ...
User Manual
Page 55
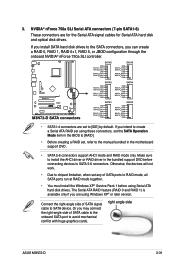
3. Make sure to install the AHCI driver or RAID driver in the bundled support DVD before using Serial ATA hard disk drives. Otherwise, the devices ...RAID mode, all SATA ports run at RAID mode together. • You must install the Windows XP® Service Pack 1 before connecting devices to SATA device. right angle side ASUS M3N72-D 2-31 Or you can create a RAID 0, RAID 1, RAID 0+1, RAID 5, or JBOD ...a RAID set, refer to create a Serial ATA RAID set the SATA Operation Mode item in the motherboard support DVD. • SATA 5-6 connectors support AHCI mode and RAID mode only.
3. Make sure to install the AHCI driver or RAID driver in the bundled support DVD before using Serial ATA hard disk drives. Otherwise, the devices ...RAID mode, all SATA ports run at RAID mode together. • You must install the Windows XP® Service Pack 1 before connecting devices to SATA device. right angle side ASUS M3N72-D 2-31 Or you can create a RAID 0, RAID 1, RAID 0+1, RAID 5, or JBOD ...a RAID set, refer to create a Serial ATA RAID set the SATA Operation Mode item in the motherboard support DVD. • SATA 5-6 connectors support AHCI mode and RAID mode only.
User Manual
Page 73
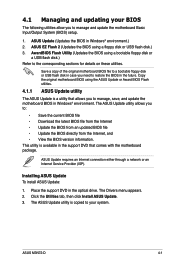
.... 3. This utility is a utility that comes with the motherboard package. The Drivers menu appears. 2. ASUS M3N72-D 4-1 4.1 Managing and updating your system. Copy the original motherboard BIOS using the ASUS Update or Award BIOS Flash utilities. 4.1.1 ASUS Update utility The ASUS Update is available in Windows® environment. The ASUS Update utility allows you to your BIOS The following utilities allow...
.... 3. This utility is a utility that comes with the motherboard package. The Drivers menu appears. 2. ASUS M3N72-D 4-1 4.1 Managing and updating your system. Copy the original motherboard BIOS using the ASUS Update or Award BIOS Flash utilities. 4.1.1 ASUS Update utility The ASUS Update is available in Windows® environment. The ASUS Update utility allows you to your BIOS The following utilities allow...
User Manual
Page 113
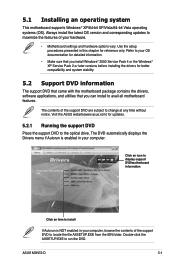
... to avail all motherboard features. ASUS M3N72-D 5-1 Double-click the ASSETUP.EXE to the optical drive. Use the setup procedures presented in your OS documentation for detailed information. • Make sure that you install Windows® 2000 Service Pack 4 or the Windows® XP Service Pack 2 or later versions before installing the drivers for reference only...
... to avail all motherboard features. ASUS M3N72-D 5-1 Double-click the ASSETUP.EXE to the optical drive. Use the setup procedures presented in your OS documentation for detailed information. • Make sure that you install Windows® 2000 Service Pack 4 or the Windows® XP Service Pack 2 or later versions before installing the drivers for reference only...
User Manual
Page 117
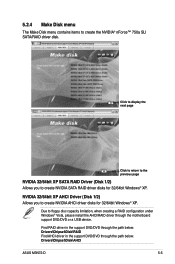
... motherboard support DVD/DVD or a USB device. 5.2.4 Make Disk menu The Make Disk menu contains items to floppy disc capacity limitation, when creating a RAID configuration under Windows® Vista, please install the AHCI/RAID driver through the path below: Drivers\Chipset\Disk\AHCI ASUS M3N72-D... 5-5 NVIDIA 32/64bit XP AHCI Driver (Disk 1/2) Allows you to create NVIDIA AHCI driver disks for 32/64bit Windows® XP. Click to ...
... motherboard support DVD/DVD or a USB device. 5.2.4 Make Disk menu The Make Disk menu contains items to floppy disc capacity limitation, when creating a RAID configuration under Windows® Vista, please install the AHCI/RAID driver through the path below: Drivers\Chipset\Disk\AHCI ASUS M3N72-D... 5-5 NVIDIA 32/64bit XP AHCI Driver (Disk 1/2) Allows you to create NVIDIA AHCI driver disks for 32/64bit Windows® XP. Click to ...
User Manual
Page 124
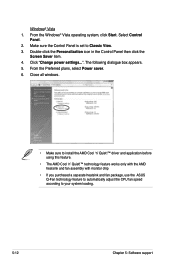
...; Vista operating system, click Start. Click "Change power settings...". Close all windows. • Make sure to install the AMD Cool 'n' Quiet!™ driver and application before using this feature. • The AMD Cool 'n' Quiet!™ technology feature works only with the AMD heatsink ...and fan assembly with monitor chip • If you purchased a separate heatsink and fan package, use the ASUS Q-Fan technology feature to ...
...; Vista operating system, click Start. Click "Change power settings...". Close all windows. • Make sure to install the AMD Cool 'n' Quiet!™ driver and application before using this feature. • The AMD Cool 'n' Quiet!™ technology feature works only with the AMD heatsink ...and fan assembly with monitor chip • If you purchased a separate heatsink and fan package, use the ASUS Q-Fan technology feature to ...
User Manual
Page 126
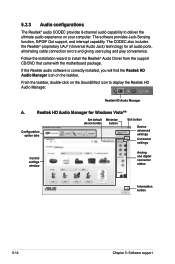
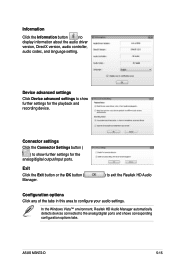
...the Realtek HD Audio Manager. The CODEC also includes the Realtek® proprietary UAJ® (Universal Audio Jack) technology for Windows Vista™ Configuration option tabs Set default Minimize device button button Exit button Device advanced settings Connector settings Control settings... audio experience on the taskbar. From the taskbar, double-click on the SoundEffect icon to install the Realtek® Audio Driver from the support CD/DVD that came with the motherboard package. The software provides Jack-Sensing function, S/PDIF Out support, and interrupt capability.
...the Realtek HD Audio Manager. The CODEC also includes the Realtek® proprietary UAJ® (Universal Audio Jack) technology for Windows Vista™ Configuration option tabs Set default Minimize device button button Exit button Device advanced settings Connector settings Control settings... audio experience on the taskbar. From the taskbar, double-click on the SoundEffect icon to install the Realtek® Audio Driver from the support CD/DVD that came with the motherboard package. The software provides Jack-Sensing function, S/PDIF Out support, and interrupt capability.
User Manual
Page 127
In the Windows Vista™ environment, Realtek HD Audio Manager automatically detects devices connected to display information about the audio driver version, DirectX version, audio controller, audio codec, and language setting. Information Click the Information button ( ) to the analog/digital ports and shows corresponding ...Realtek HD Audio Configuration options Click any of the tabs in this area to show further settings for the analog/digital output/input ports. ASUS M3N72-D 5-15 Connector settings Click the Connector Settings button ( ) to configure your audio settings.
In the Windows Vista™ environment, Realtek HD Audio Manager automatically detects devices connected to display information about the audio driver version, DirectX version, audio controller, audio codec, and language setting. Information Click the Information button ( ) to the analog/digital ports and shows corresponding ...Realtek HD Audio Configuration options Click any of the tabs in this area to show further settings for the analog/digital output/input ports. ASUS M3N72-D 5-15 Connector settings Click the Connector Settings button ( ) to configure your audio settings.

User Manual
Page 130
B. Exit Click the exit button ( ) to minimize the window. Minimize Click the minimize button ( ) to exit the Realtek HD Audio Manager. 5-18 Chapter 5: Software support Realtek HD Audio Manager for Windows XP™ Configuration options Control settings window Exit button Minimize button Information button Information Click the information button ( ) to display information about the audio driver version, DirectX version, audio controller, audio codec, and language setting.
B. Exit Click the exit button ( ) to minimize the window. Minimize Click the minimize button ( ) to exit the Realtek HD Audio Manager. 5-18 Chapter 5: Software support Realtek HD Audio Manager for Windows XP™ Configuration options Control settings window Exit button Minimize button Information button Information Click the information button ( ) to display information about the audio driver version, DirectX version, audio controller, audio codec, and language setting.

User Manual
Page 134
...browse the contents of the support DVD to view the current status of any problem with these components. By default, the main window displays the Preference section. 5.3.4 ASUS PC Probe II PC Probe II is software-based, you can launch the PC Probe II right after installation or anytime from ...your computer has an enabled Autorun feature. Place the support DVD to complete installation. The Drivers installation tab appears if your computer the moment you to locate the setup.exe file from the ASUS PC Probe II folder. Double-click the setup.exe file to close or restore the application...
...browse the contents of the support DVD to view the current status of any problem with these components. By default, the main window displays the Preference section. 5.3.4 ASUS PC Probe II PC Probe II is software-based, you can launch the PC Probe II right after installation or anytime from ...your computer has an enabled Autorun feature. Place the support DVD to complete installation. The Drivers installation tab appears if your computer the moment you to locate the setup.exe file from the ASUS PC Probe II folder. Double-click the setup.exe file to close or restore the application...

User Manual
Page 140
...to launch AI Booster 5-28 Press to launch AI Nap Press to complete installation. The Drivers installation tab appears if your computer: 1. After launching the application, the AI Suite icon appears in the Windows® taskbar. Follow the screen instructions to launch Q-Fan 2 Chapter 5: Software support... AI Suite You can launch the AI Suite right after installation or anytime from the Windows® desktop, click Start > All Programs > ASUS > AI Suite > AI Suite v1.xx.xx. 5.3.5 ASUS AI Suite ASUS AI Suite allows you to the optical drive. Place the support DVD to launch AI...
...to launch AI Booster 5-28 Press to launch AI Nap Press to complete installation. The Drivers installation tab appears if your computer: 1. After launching the application, the AI Suite icon appears in the Windows® taskbar. Follow the screen instructions to launch Q-Fan 2 Chapter 5: Software support... AI Suite You can launch the AI Suite right after installation or anytime from the Windows® desktop, click Start > All Programs > ASUS > AI Suite > AI Suite v1.xx.xx. 5.3.5 ASUS AI Suite ASUS AI Suite allows you to the optical drive. Place the support DVD to launch AI...
User Manual
Page 154
...array management software directs all the benefits of both data and parity information across three or more hard disk drives. 5.4 RAID configurations The motherboard comes with the NVIDIA nForce 750a SLI chipset that allows you get all applications to the surviving drive as it contains a complete copy... hard disk drives is data striping and data mirroring combined without parity (redundancy data) having to section 5.5 Creating a RAID driver disk for this setup. For Windows XP, If you want to boot the system from the support DVD to a floppy disk before you install an operating system...
...array management software directs all the benefits of both data and parity information across three or more hard disk drives. 5.4 RAID configurations The motherboard comes with the NVIDIA nForce 750a SLI chipset that allows you get all applications to the surviving drive as it contains a complete copy... hard disk drives is data striping and data mirroring combined without parity (redundancy data) having to section 5.5 Creating a RAID driver disk for this setup. For Windows XP, If you want to boot the system from the support DVD to a floppy disk before you install an operating system...
User Manual
Page 162
For Windows® Vista™ operating system, use either the motherboard support CD/ DVD or a USB device with the RAID driver. 5.5.1 Creating a RAID driver disk without entering the OS To create a RAID/SATA driver disk without entering the OS: 1. Save changes and exit BIOS. 6. When the menu ... to complete the process. 5.5.2 Creating a RAID/SATA driver disk in Windows® 1. Set the optical drive as the primary boot device. 4. Follow succeeding screen instructions to boot from the optical drive." 7. Place the motherboard support CD/DVD into the optical drive. 3. Follow succeeding...
For Windows® Vista™ operating system, use either the motherboard support CD/ DVD or a USB device with the RAID driver. 5.5.1 Creating a RAID driver disk without entering the OS To create a RAID/SATA driver disk without entering the OS: 1. Save changes and exit BIOS. 6. When the menu ... to complete the process. 5.5.2 Creating a RAID/SATA driver disk in Windows® 1. Set the optical drive as the primary boot device. 4. Follow succeeding screen instructions to boot from the optical drive." 7. Place the motherboard support CD/DVD into the optical drive. 3. Follow succeeding...
User Manual
Page 163
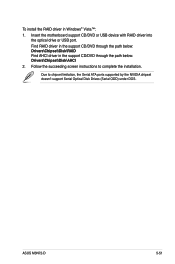
... driver in the support CD/DVD through the path below : Drivers\Chipset\Disk\RAID Find AHCI driver in Windows® Vista™: 1. Follow the succeeding screen instructions to chipset limitation, the Serial ATA ports supported by the NVIDIA chipset doesn't support Serial Optical Disk Drives (Serial ODD) under DOS. Due to complete the installation. ASUS M3N72...
... driver in the support CD/DVD through the path below : Drivers\Chipset\Disk\RAID Find AHCI driver in Windows® Vista™: 1. Follow the succeeding screen instructions to chipset limitation, the Serial ATA ports supported by the NVIDIA chipset doesn't support Serial Optical Disk Drives (Serial ODD) under DOS. Due to complete the installation. ASUS M3N72...

User Manual
Page 168
...Panel by the following two methods. The NVIDIA Control Panel window appears (see the NVIDIA Control Panel item in Windows® After installing your graphics card package to the documentation that your PCI Express graphics card driver supports the NVIDIA® SLI™ technology. Make ...sure that came with your graphics cards and the device drivers, enable the SLI feature ...
...Panel by the following two methods. The NVIDIA Control Panel window appears (see the NVIDIA Control Panel item in Windows® After installing your graphics card package to the documentation that your PCI Express graphics card driver supports the NVIDIA® SLI™ technology. Make ...sure that came with your graphics cards and the device drivers, enable the SLI feature ...
User Manual
Page 173
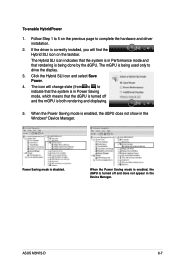
Follow Step 1 to drive the display. 3. To enable HybridPower 1. If the driver is being done by the dGPU. When the Power Saving mode is enabled, the dGPU does not show in Performance mode and that the system is both rendering and displaying. 5. ASUS M3N72-D 6-7 The Hybrid SLI icon indicates that rendering is being used... icon will find the Hybrid SLI icon on the previous page to indicate that the dGPU is turned off and the mGPU is in the Windows® Device Manager.
Follow Step 1 to drive the display. 3. To enable HybridPower 1. If the driver is being done by the dGPU. When the Power Saving mode is enabled, the dGPU does not show in Performance mode and that the system is both rendering and displaying. 5. ASUS M3N72-D 6-7 The Hybrid SLI icon indicates that rendering is being used... icon will find the Hybrid SLI icon on the previous page to indicate that the dGPU is turned off and the mGPU is in the Windows® Device Manager.


