User Manual
Page 69
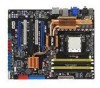
...on the screen. After making all switches are running, the BIOS beeps (see anything within 30 seconds from the time you press the ATX power button. ASUS M3N-HT Deluxe Series 3-1 System power 6. 3.1 Starting up when you turned on the power, the system may light up . While the tests are ... keyboard detected No memory detected No VGA detected Hardware component failure 7. Turn on self tests or POST. At power on the chain) c. Be sure that is equipped with ATX power supplies, the system LED lights up for assistance. After applying power, the system power LED...
...on the screen. After making all switches are running, the BIOS beeps (see anything within 30 seconds from the time you press the ATX power button. ASUS M3N-HT Deluxe Series 3-1 System power 6. 3.1 Starting up when you turned on the power, the system may light up . While the tests are ... keyboard detected No memory detected No VGA detected Hardware component failure 7. Turn on self tests or POST. At power on the chain) c. Be sure that is equipped with ATX power supplies, the system LED lights up for assistance. After applying power, the system power LED...
User Manual
Page 77
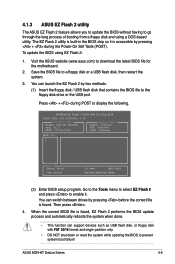
...reset the system while updating the BIOS to prevent system boot failure! Save the BIOS file to download the latest BIOS file for the motherboard. 2. ASUS M3N-HT Deluxe Series 4-5 Go to the Tools menu to select EZ Flash 2 and press to enable it is found . When the correct BIOS... Current ROM BOARD: M3N-HT DELUXE VER: 0110 DATE: 01/04/2008 Update ROM BOARD: Unknown VER: Unknown DATE: Unknown PATH: A:\ A: Note [Enter] Select [Tab] Switch [S] Save [ESC] Exit [Up/Down/Home/End] Move (2) Enter BIOS setup program. Press + during the Power-On Self Tests (POST). To update the ...
...reset the system while updating the BIOS to prevent system boot failure! Save the BIOS file to download the latest BIOS file for the motherboard. 2. ASUS M3N-HT Deluxe Series 4-5 Go to the Tools menu to select EZ Flash 2 and press to enable it is found . When the correct BIOS... Current ROM BOARD: M3N-HT DELUXE VER: 0110 DATE: 01/04/2008 Update ROM BOARD: Unknown VER: Unknown DATE: Unknown PATH: A:\ A: Note [Enter] Select [Tab] Switch [S] Save [ESC] Exit [Up/Down/Home/End] Move (2) Enter BIOS setup program. Press + during the Power-On Self Tests (POST). To update the ...
User Manual
Page 81
... settings, load the default settings to ensure optimum performance. Do this motherboard. Select the Load Default Settings item under the Exit Menu. ASUS M3N-HT Deluxe Series 4-9 If you with its test routines. You can also restart by pressing the reset button on . otherwise, POST continues with the opportunity to use as possible. Use the BIOS...
... settings, load the default settings to ensure optimum performance. Do this motherboard. Select the Load Default Settings item under the Exit Menu. ASUS M3N-HT Deluxe Series 4-9 If you with its test routines. You can also restart by pressing the reset button on . otherwise, POST continues with the opportunity to use as possible. Use the BIOS...
User Manual
Page 127
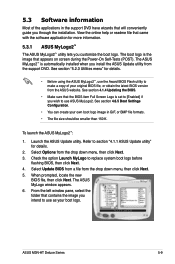
... Next. 3. ASUS M3N-HT Deluxe Series 5-9 Select Update BIOS from a file from the support DVD. When prompted, locate the new BIOS file, then click Next. To launch the ASUS MyLogo2™: 1. Select Options from the ASUS website. Check the option Launch MyLogo to section "4.1.1 ASUS Update utility" ... select the folder that contains the image you through the installation. The ASUS MyLogo2™ is the image that appears on screen during the Power‑On Self-Tests (POST). The ASUS MyLogo window appears. 6. 5.3 Software information Most of your own boot logo...
... Next. 3. ASUS M3N-HT Deluxe Series 5-9 Select Update BIOS from a file from the support DVD. When prompted, locate the new BIOS file, then click Next. To launch the ASUS MyLogo2™: 1. Select Options from the ASUS website. Check the option Launch MyLogo to section "4.1.1 ASUS Update utility" ... select the folder that contains the image you through the installation. The ASUS MyLogo2™ is the image that appears on screen during the Power‑On Self-Tests (POST). The ASUS MyLogo window appears. 6. 5.3 Software information Most of your own boot logo...
User Manual
Page 129
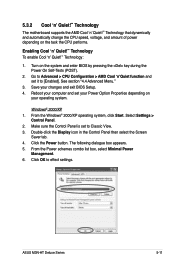
5.3.2 Cool 'n' Quiet!™ Technology The motherboard supports the AMD Cool 'n' Quiet!™ Technology that dynamically and automatically change the CPU speed, voltage, and amount of power depending on the system and enter BIOS by pressing the key during the Power On Self-Tests (POST). 2. Turn on the task the CPU performs. Enabling Cool.... 6. Select Settings > Control Panel. 2. From the Windows® 2000/XP operating system, click Start. Make sure the Control Panel is set it to effect settings. ASUS M3N-HT Deluxe Series 5-11
5.3.2 Cool 'n' Quiet!™ Technology The motherboard supports the AMD Cool 'n' Quiet!™ Technology that dynamically and automatically change the CPU speed, voltage, and amount of power depending on the system and enter BIOS by pressing the key during the Power On Self-Tests (POST). 2. Turn on the task the CPU performs. Enabling Cool.... 6. Select Settings > Control Panel. 2. From the Windows® 2000/XP operating system, click Start. Make sure the Control Panel is set it to effect settings. ASUS M3N-HT Deluxe Series 5-11

User Manual
Page 161
During POST, press to display the main menu of the screen are for reference only, ...® RAID User Guide" found in this section are the navigation keys. The RAID BIOS setup screens shown in your motherboard Support DVD. • When using Windows® XP operating system, make sure to install the Windows® XP Service.... Make sure to re-enter your computer. 2. These keys allow you to move through and select menu options. ASUS M3N-HT Deluxe Series 5-43 otherwise, the system will not recognize your screen. Boot up your NVRAID settings after the CMOS is cleared...
During POST, press to display the main menu of the screen are for reference only, ...® RAID User Guide" found in this section are the navigation keys. The RAID BIOS setup screens shown in your motherboard Support DVD. • When using Windows® XP operating system, make sure to install the Windows® XP Service.... Make sure to re-enter your computer. 2. These keys allow you to move through and select menu options. ASUS M3N-HT Deluxe Series 5-43 otherwise, the system will not recognize your screen. Boot up your NVRAID settings after the CMOS is cleared...
User Manual
Page 167
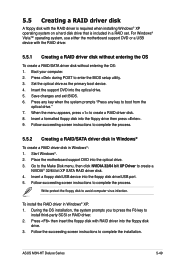
...174; XP: 1. ASUS M3N-HT Deluxe Series 5-49 Boot your computer. 2. During the OS installation, the system prompts you to press the F6 key to create a NVIDIA® 32/64 bit XP SATA RAID driver disk. 4. Insert the support DVD into the optical drive. 3. Place the motherboard support DVD into ...the RAID driver is required when installing Windows® XP operating system on a hard disk drive that is included in a RAID set. Press during POST to boot from the optical drive." 7. Insert a formatted floppy disk into the floppy disk drive/USB port. 5. Insert a floppy disk/USB ...
...174; XP: 1. ASUS M3N-HT Deluxe Series 5-49 Boot your computer. 2. During the OS installation, the system prompts you to press the F6 key to create a NVIDIA® 32/64 bit XP SATA RAID driver disk. 4. Insert the support DVD into the optical drive. 3. Place the motherboard support DVD into ...the RAID driver is required when installing Windows® XP operating system on a hard disk drive that is included in a RAID set. Press during POST to boot from the optical drive." 7. Insert a formatted floppy disk into the floppy disk drive/USB port. 5. Insert a floppy disk/USB ...


