User Manual
Page 3
......vii Safety information viii About this guide ix M3N-HT Deluxe Series specifications summary xi Chapter 1: Product introduction 1.1 Welcome 1-1 1.2 Package contents 1-1 1.3 Special features 1-2 1.3.1 Product highlights 1-2 1.3.2 ASUS AI Lifestyle unique features 1-5 1.3.3 ASUS intelligent performance and overclocking features 1-8 Chapter 2: Hardware information 2.1 Before you proceed 2-1 2.2 Motherboard overview 2-2 2.2.1 Placement direction 2-2 2.2.2 Screw holes 2-2 2.2.3 Motherboard layout 2-3 2.2.4 Layout contents 2-4 2.3 Central Processing Unit (CPU 2-6 2.3.1 Installing...
......vii Safety information viii About this guide ix M3N-HT Deluxe Series specifications summary xi Chapter 1: Product introduction 1.1 Welcome 1-1 1.2 Package contents 1-1 1.3 Special features 1-2 1.3.1 Product highlights 1-2 1.3.2 ASUS AI Lifestyle unique features 1-5 1.3.3 ASUS intelligent performance and overclocking features 1-8 Chapter 2: Hardware information 2.1 Before you proceed 2-1 2.2 Motherboard overview 2-2 2.2.1 Placement direction 2-2 2.2.2 Screw holes 2-2 2.2.3 Motherboard layout 2-3 2.2.4 Layout contents 2-4 2.3 Central Processing Unit (CPU 2-6 2.3.1 Installing...

User Manual
Page 12
M3N-HT Deluxe Series specifications summary LAN IEEE 1394 USB High Definition audio ASUS AI Lifestyle unique features NVIDIA Gigabit MAC Atheros F1 Gigabit PHY featuring AI NET2 LSI® FW322 controller supports 2 x IEEE 1394a connectors (at mid-board) 10 x USB 2.0 ports (6 at mid-board; 4 on ASUS websites - ASUS Fanless Design: Heat-pipe solution & Stack Cool 2 - ASUS...65533;b�a��c�k��I/�O� ASUS Express Gate: - ASUS AI Cool Mempipe (Mempipe edition only) - ASUS Q-Connector - Profile - Further free features upgradable ...
M3N-HT Deluxe Series specifications summary LAN IEEE 1394 USB High Definition audio ASUS AI Lifestyle unique features NVIDIA Gigabit MAC Atheros F1 Gigabit PHY featuring AI NET2 LSI® FW322 controller supports 2 x IEEE 1394a connectors (at mid-board) 10 x USB 2.0 ports (6 at mid-board; 4 on ASUS websites - ASUS Fanless Design: Heat-pipe solution & Stack Cool 2 - ASUS...65533;b�a��c�k��I/�O� ASUS Express Gate: - ASUS AI Cool Mempipe (Mempipe edition only) - ASUS Q-Connector - Profile - Further free features upgradable ...
User Manual
Page 17
...�e�s 6 x Serial ATA signal cables 1 x Ultra DMA 133/100/66 cable 1 x Floppy disk drive cable Accessories ASUS Cool Mempipe (Mempipe edition only) ASUS Q-Shield (I/O Shield) 1 x HDMI-to-DVI converter 1 x ASUS Q-Connector Kit (USB, 1394, system panel; ASUS M3N-HT Deluxe Series 1-1 The motherboard delivers a host of new features and latest technologies, making it , check the items in the long line...
...�e�s 6 x Serial ATA signal cables 1 x Ultra DMA 133/100/66 cable 1 x Floppy disk drive cable Accessories ASUS Cool Mempipe (Mempipe edition only) ASUS Q-Shield (I/O Shield) 1 x HDMI-to-DVI converter 1 x ASUS Q-Connector Kit (USB, 1394, system panel; ASUS M3N-HT Deluxe Series 1-1 The motherboard delivers a host of new features and latest technologies, making it , check the items in the long line...
User Manual
Page 21
... motherboard uses a special design on DIMM_A1 and DIMM_B1 sockets only. 8+2 Phase Power Design ASUS 8+2 Phase Power Design, �w�i�th��i�n�d�e��p�e�n��d�e�n�t��p�o�w��e�r��to suit your needs. ASUS M3N-HT Deluxe Series 1-5 ASUS Cool Mempipe (Mempipe Edition only) ASUS...
... motherboard uses a special design on DIMM_A1 and DIMM_B1 sockets only. 8+2 Phase Power Design ASUS 8+2 Phase Power Design, �w�i�th��i�n�d�e��p�e�n��d�e�n�t��p�o�w��e�r��to suit your needs. ASUS M3N-HT Deluxe Series 1-5 ASUS Cool Mempipe (Mempipe Edition only) ASUS...
User Manual
Page 45
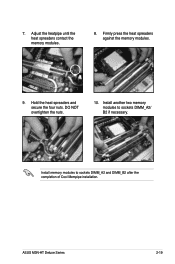
DO NOT overtighten the nuts. 10. 7. Firmly press the heat spreaders against the memory modules. 9. Install another two memory modules to sockets DIMM_A2 and DIMM_B2 after the completion of Cool Mempipe installation. ASUS M3N-HT Deluxe Series 2-19 Hold the heat spreaders and secure the four nuts. Adjust the heatpipe until the heat spreaders contact the memory modules. 8. Install memory modules to sockets DIMM_A2/ B2 if necessary.
DO NOT overtighten the nuts. 10. 7. Firmly press the heat spreaders against the memory modules. 9. Install another two memory modules to sockets DIMM_A2 and DIMM_B2 after the completion of Cool Mempipe installation. ASUS M3N-HT Deluxe Series 2-19 Hold the heat spreaders and secure the four nuts. Adjust the heatpipe until the heat spreaders contact the memory modules. 8. Install memory modules to sockets DIMM_A2/ B2 if necessary.


