
K8 series Quick Setup Guide
Page 2
English Installation WARNING! Align a DIMM on the socket such that the notch on the DIMM matches the break on the socket. 3. Do not connect any power cable to install additional modules. Unlock the DIMM socket by pressing the retaining clips outward. 2. Firmly insert the DIMM into the socket until configuration and setup is properly seated. 4. Memory module Memory socket Retaining clips 2 Follow steps 1-3 to live AC outlets until the retaining clips snap back in place and the DIMM is complete. 1 Install memory modules 1.
English Installation WARNING! Align a DIMM on the socket such that the notch on the DIMM matches the break on the socket. 3. Do not connect any power cable to install additional modules. Unlock the DIMM socket by pressing the retaining clips outward. 2. Firmly insert the DIMM into the socket until configuration and setup is properly seated. 4. Memory module Memory socket Retaining clips 2 Follow steps 1-3 to live AC outlets until the retaining clips snap back in place and the DIMM is complete. 1 Install memory modules 1.

K8 series Quick Setup Guide
Page 10
...make sure it is connected properly. • Check drive jumper setting. • Check the drive configuration in its expansion slot. • Check the memory modules and make sure they are corrected properly. • Make sure that the device drivers are installed. • Enter BIOS setup and load default... to the default value, press and select Yes. English Power Up 10 Turn on the power of the possible solutions before calling for the memory Qualified Vendors List (QVL). • Check the floppy drive configuration in the BIOS setup. • Check the floppy drive cable, make ...
...make sure it is connected properly. • Check drive jumper setting. • Check the drive configuration in its expansion slot. • Check the memory modules and make sure they are corrected properly. • Make sure that the device drivers are installed. • Enter BIOS setup and load default... to the default value, press and select Yes. English Power Up 10 Turn on the power of the possible solutions before calling for the memory Qualified Vendors List (QVL). • Check the floppy drive configuration in the BIOS setup. • Check the floppy drive cable, make ...

K8V User Manual
Page 3
... used in this guide viii Typography viii K8V specifications summary ix Chapter 1: Product introduction 1.1 Welcome 1-2 1.2 Package contents 1-2 1.3 Special features 1-3 1.3.1 Product Highlights 1-3 1.3.2 Unique ASUS features 1-4 1.4 Before you proceed 1-5 ...1.5 Motherboard overview 1-6 1.5.1 Motherboard layout 1-6 1.5.2 Placement direction 1-7 1.5.3 Screw holes 1-7 1.6 Central Processing Unit (CPU 1-8 1.6.1 Overview 1-8 1.6.2 Installing the CPU 1-9 1.7 System memory 1-10 1.7.1 DIMM sockets location 1-10 1.7.2 Memory ...
... used in this guide viii Typography viii K8V specifications summary ix Chapter 1: Product introduction 1.1 Welcome 1-2 1.2 Package contents 1-2 1.3 Special features 1-3 1.3.1 Product Highlights 1-3 1.3.2 Unique ASUS features 1-4 1.4 Before you proceed 1-5 ...1.5 Motherboard overview 1-6 1.5.1 Motherboard layout 1-6 1.5.2 Placement direction 1-7 1.5.3 Screw holes 1-7 1.6 Central Processing Unit (CPU 1-8 1.6.1 Overview 1-8 1.6.2 Installing the CPU 1-9 1.7 System memory 1-10 1.7.1 DIMM sockets location 1-10 1.7.2 Memory ...

K8V User Manual
Page 9
...174; 20376 RAID controller - 1 x UltraDMA133/100/66 connector - 2 x Serial ATA connectors - K8V specifications summary CPU Chipset System Bus Memory Expansion slots Storage Audio LAN USB Overclocking Features Special features Socket 754 for AMD Athlon™ 64 processor...Memory and VLink voltage adjustable SFS (Stepless Frequency Selection) from 200 MHz up to 300 MHz at 1 MHz increment Adjustable FSB/DDR ratio ASUS JumperFree ASUS C.P.R. (CPU Parameter Recall) ASUS AI NET ASUS C.P.R. (CPU Parameter Recall) ASUS EZ Flash ASUS CrashFree BIOS2 ASUS MyLogo2™ ASUS Instant Music Lite ASUS...
...174; 20376 RAID controller - 1 x UltraDMA133/100/66 connector - 2 x Serial ATA connectors - K8V specifications summary CPU Chipset System Bus Memory Expansion slots Storage Audio LAN USB Overclocking Features Special features Socket 754 for AMD Athlon™ 64 processor...Memory and VLink voltage adjustable SFS (Stepless Frequency Selection) from 200 MHz up to 300 MHz at 1 MHz increment Adjustable FSB/DDR ratio ASUS JumperFree ASUS C.P.R. (CPU Parameter Recall) ASUS AI NET ASUS C.P.R. (CPU Parameter Recall) ASUS EZ Flash ASUS CrashFree BIOS2 ASUS MyLogo2™ ASUS Instant Music Lite ASUS...

K8V User Manual
Page 12
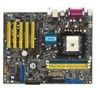
... combines the powers of power computing! 1.1 Welcome! Supporting up to 3GB of system memory with the list below. 1.2 Package contents Check your motherboard package for buying the ASUS® K8V motherboard! Before you start installing the motherboard, and hardware devices on it another standout ...graphics via an AGP 8X slot, Dual Serial ATA RAID, USB 2.0, and 6-channel audio features, the motherboard takes you for the following items. ASUS K8V motherboard ASUS motherboard support CD 2 x Ultra DMA 133/100/66 cables 2 x Serial ATA cables 1 x IDE cable 1 x Floppy disk cable I/O ...
... combines the powers of power computing! 1.1 Welcome! Supporting up to 3GB of system memory with the list below. 1.2 Package contents Check your motherboard package for buying the ASUS® K8V motherboard! Before you start installing the motherboard, and hardware devices on it another standout ...graphics via an AGP 8X slot, Dual Serial ATA RAID, USB 2.0, and 6-channel audio features, the motherboard takes you for the following items. ASUS K8V motherboard ASUS motherboard support CD 2 x Ultra DMA 133/100/66 cables 2 x Serial ATA cables 1 x IDE cable 1 x Floppy disk cable I/O ...

K8V User Manual
Page 20
... 64MB, 128MB, 256MB, 512MB, and 1GB DDR DIMMs into the DIMM sockets using the memory configurations in Table 1. • For optimum compatibility, obtain memory modules from the same vendors. DIMM1 DIMM2 DIMM3 104 Pins 80 Pins K8V ® K8V 184-Pin DDR DIMM Sockets • It is recommended to unplug the power supply before...
... 64MB, 128MB, 256MB, 512MB, and 1GB DDR DIMMs into the DIMM sockets using the memory configurations in Table 1. • For optimum compatibility, obtain memory modules from the same vendors. DIMM1 DIMM2 DIMM3 104 Pins 80 Pins K8V ® K8V 184-Pin DDR DIMM Sockets • It is recommended to unplug the power supply before...

K8V User Manual
Page 21
Single Side - Table 1 Recommended memory configurations Number of DIMMs DIMM1 1 Single Side 1 - 1 - 1 Double Side 1 - 1 - 2 Single Side 2 Single Side 2 Single Side 2 Single Side 2 Double Side 2 Double Side 2 Double Side 2 - 2 - 2 - 2 - 2 Double Side 3 ... 333 DDR 200 DDR 200 DDR 200 DDR 400 DDR 333 DDR 200 DDR 200 DDR 200 DDR 333 DDR 200 DDR 200 DDR 200 ASUS K8V motherboard 1-11 Single Side - Double Side -
Single Side - Table 1 Recommended memory configurations Number of DIMMs DIMM1 1 Single Side 1 - 1 - 1 Double Side 1 - 1 - 2 Single Side 2 Single Side 2 Single Side 2 Single Side 2 Double Side 2 Double Side 2 Double Side 2 - 2 - 2 - 2 - 2 Double Side 3 ... 333 DDR 200 DDR 200 DDR 200 DDR 400 DDR 333 DDR 200 DDR 200 DDR 200 DDR 333 DDR 200 DDR 200 DDR 200 ASUS K8V motherboard 1-11 Single Side - Double Side -

K8V User Manual
Page 22
Obtain DDR DIMMs only from ASUS qualified vendors for better system performance. 1-12 Chapter 1: Product introduction Table 2 DDR400 Qualified Vendor List (QVL) Size Vendor Model Chip Brand SS/DS Chip 256M...K4H560838D-TCC4 K4H560838D-TCC4 NT5DS16M16BT-5T NT5DS32M8BT-5T HY5DU56822BT-D43 HY5DV56822BT-D43 HY5DV56822BT-D43 W942508CH-5 W942508BH-5 W942508BH-5 TMD7608F8E50D A2S56D30ATP KDL388P4EA-50 KDL388P4EA-50A Visit the ASUS website (www.asus.com) for the latest DDR 400 Qualified Vendor List for this motherboard. DDR Qualified Vendor List The following table lists the PC3200 (DDR400...
Obtain DDR DIMMs only from ASUS qualified vendors for better system performance. 1-12 Chapter 1: Product introduction Table 2 DDR400 Qualified Vendor List (QVL) Size Vendor Model Chip Brand SS/DS Chip 256M...K4H560838D-TCC4 K4H560838D-TCC4 NT5DS16M16BT-5T NT5DS32M8BT-5T HY5DU56822BT-D43 HY5DV56822BT-D43 HY5DV56822BT-D43 W942508CH-5 W942508BH-5 W942508BH-5 TMD7608F8E50D A2S56D30ATP KDL388P4EA-50 KDL388P4EA-50A Visit the ASUS website (www.asus.com) for the latest DDR 400 Qualified Vendor List for this motherboard. DDR Qualified Vendor List The following table lists the PC3200 (DDR400...

K8V User Manual
Page 26
... Recall) feature. Plug the power cord and turn ON the computer. 4. For system failure due to pins 2-3. Keep the cap on the jumper default position. K8V ® K8V Clear RTC RAM CLRTC 2 1 Normal (Default) 3 2 Clear CMOS You do not need to clear the RTC when the system hangs due to re-enter... data. The RAM data in CMOS. Hold down and reboot the system so BIOS can clear the CMOS memory of date, time, and system setup parameters by...
... Recall) feature. Plug the power cord and turn ON the computer. 4. For system failure due to pins 2-3. Keep the cap on the jumper default position. K8V ® K8V Clear RTC RAM CLRTC 2 1 Normal (Default) 3 2 Clear CMOS You do not need to clear the RTC when the system hangs due to re-enter... data. The RAM data in CMOS. Hold down and reboot the system so BIOS can clear the CMOS memory of date, time, and system setup parameters by...

K8V User Manual
Page 49
... the auto-detected BIOS information. Configuration options: [Auto] [Disabled] [Enabled] 32Bit Data Transfer [Disabled] Enables or disables 32-bit data transfer. ASUS K8V motherboard 2-13 System Memory Displays the auto-detected system memory. The items in this menu are auto-detected by BIOS. Configuration options: [Disabled] [Enabled] 2.3.6 System Information This menu gives you an...
... the auto-detected BIOS information. Configuration options: [Auto] [Disabled] [Enabled] 32Bit Data Transfer [Disabled] Enables or disables 32-bit data transfer. ASUS K8V motherboard 2-13 System Memory Displays the auto-detected system memory. The items in this menu are auto-detected by BIOS. Configuration options: [Disabled] [Enabled] 2.3.6 System Information This menu gives you an...

K8V User Manual
Page 50
... settings of an LDTSTOP. Configuration options: [Disabled] [Enabled] 2-14 Chapter 2: BIOS Setup 2.4 Advanced menu The Advanced menu items allow you to malfunction. HyperTransport(HT) Configuration Memory Configuration AMD Cool & Quiet Configuration Processor Type : AMD Athlon(tm) 64 Processor 3200+ Speed : 2000MHz HyperTransport Configuration Options HyperTransport Configuration HyperTransport Configuration HT Tristate Enabled...
... settings of an LDTSTOP. Configuration options: [Disabled] [Enabled] 2-14 Chapter 2: BIOS Setup 2.4 Advanced menu The Advanced menu items allow you to malfunction. HyperTransport(HT) Configuration Memory Configuration AMD Cool & Quiet Configuration Processor Type : AMD Athlon(tm) 64 Processor 3200+ Speed : 2000MHz HyperTransport Configuration Options HyperTransport Configuration HyperTransport Configuration HT Tristate Enabled...

K8V User Manual
Page 51
Configuration options: [Auto] [Limit] ASUS K8V motherboard 2-15 Configuration options: [16 BIT] [8 BIT] Memory Configuration Memory Configuration Memory Configuration ECC Configuration Memory Configuration The Memory configuration menu item allows you to set the memory clock mode. Set by the code using one of HyperTransport downstream data width. Configuration options: [Disabled] [Enabled] HT Frequency [800 MHz] Allows frequency selection of...
Configuration options: [Auto] [Limit] ASUS K8V motherboard 2-15 Configuration options: [16 BIT] [8 BIT] Memory Configuration Memory Configuration Memory Configuration ECC Configuration Memory Configuration The Memory configuration menu item allows you to set the memory clock mode. Set by the code using one of HyperTransport downstream data width. Configuration options: [Disabled] [Enabled] HT Frequency [800 MHz] Allows frequency selection of...

K8V User Manual
Page 52
... [Auto] Sets the TRP. Configuration options: [1:1 (DDR 200)] [4:3 (DDR 266)] [3:2] [5:3 (DDR 333)] [2:1 (DDR 400)] Bank Interleaving [ Auto] Sets whether to allow memory accesses to CPU ratio. Memclock to CPU Ratio [1:1 (DDR 200)] Sets the memory clock to be spread out over BANKS on the same node or across nodes, decreasing access contention.
... [Auto] Sets the TRP. Configuration options: [1:1 (DDR 200)] [4:3 (DDR 266)] [3:2] [5:3 (DDR 333)] [2:1 (DDR 400)] Bank Interleaving [ Auto] Sets whether to allow memory accesses to CPU ratio. Memclock to CPU Ratio [1:1 (DDR 200)] Sets the memory clock to be spread out over BANKS on the same node or across nodes, decreasing access contention.

K8V User Manual
Page 53
... set to be corrected when idle. DRAM ECC Enable [Disabled] Enables or disables the DRAM ECC that allows hardware to report and correct memory errors automatically to be corrected when idle. Master ECC Enable [Disabled] Enables or disables support on all nodes for ECC error detect and ... [20.5us] [41.0us] [81.9us] [163.8us] [327.7us] [655.4us] [1.31ms] [2.62ms] [5.24ms] [10.49ms] [20.97ms] [42.00ms] [84.00ms] ASUS K8V motherboard 2-17 DDR Clock Delay [Auto] Sets the DDR clock delay. Configuration options: [Disabled] [Enabled] L2 Cache BG Scrub [Disabled] Disables or sets the L2...
... set to be corrected when idle. DRAM ECC Enable [Disabled] Enables or disables the DRAM ECC that allows hardware to report and correct memory errors automatically to be corrected when idle. Master ECC Enable [Disabled] Enables or disables support on all nodes for ECC error detect and ... [20.5us] [41.0us] [81.9us] [163.8us] [327.7us] [655.4us] [1.31ms] [2.62ms] [5.24ms] [10.49ms] [20.97ms] [42.00ms] [84.00ms] ASUS K8V motherboard 2-17 DDR Clock Delay [Auto] Sets the DDR clock delay. Configuration options: [Disabled] [Enabled] L2 Cache BG Scrub [Disabled] Disables or sets the L2...

K8V User Manual
Page 54
...function. Processor Displays the processor type and speed. 2-18 Chapter 2: BIOS Setup Configuration options: [Enabled] [Disabled] • Make sure that corrects and rewrites memory errors so later reads are correct. Configuration options: [Disabled] [40ns] [80ns] [160ns] [320ns] [640ns] [1.28us] [2.56us] [5.12us] [10....Enabled]. Cool N' Quiet [Disabled] Allows you want to use the ASUS Q-Fan Technology feature to automatically adjust your CPU fan speed according to your system loading. Doing this while the memory is set to enable or disable the AMD Cool 'n' Quiet!™...
...function. Processor Displays the processor type and speed. 2-18 Chapter 2: BIOS Setup Configuration options: [Enabled] [Disabled] • Make sure that corrects and rewrites memory errors so later reads are correct. Configuration options: [Disabled] [40ns] [80ns] [160ns] [320ns] [640ns] [1.28us] [2.56us] [5.12us] [10....Enabled]. Cool N' Quiet [Disabled] Allows you want to use the ASUS Q-Fan Technology feature to automatically adjust your CPU fan speed according to your system loading. Doing this while the memory is set to enable or disable the AMD Cool 'n' Quiet!™...

K8V User Manual
Page 55
...the configuration options are as follows: [8X] [4X] or if you to select the type of Primary VGA in case of mapped memory for AGP graphic data. The default and configuration options vary depending on the speed of your AGP graphics card. If you installed an AGP...: [4X] [2X]. Select an item then press to select the size of multiple video controllers. Configuration options: [32MB] [64MB] [128MB] [256MB] ASUS K8V motherboard 2-19 This motherboard supports the AGP 8X interface that transfers video data at 2.12GB/s. Configuration options: [Yes] [No] AGP Mode [AGP 8X] Allows...
...the configuration options are as follows: [8X] [4X] or if you to select the type of Primary VGA in case of mapped memory for AGP graphic data. The default and configuration options vary depending on the speed of your AGP graphics card. If you installed an AGP...: [4X] [2X]. Select an item then press to select the size of multiple video controllers. Configuration options: [32MB] [64MB] [128MB] [256MB] ASUS K8V motherboard 2-19 This motherboard supports the AGP 8X interface that transfers video data at 2.12GB/s. Configuration options: [Yes] [No] AGP Mode [AGP 8X] Allows...

K8V User Manual
Page 59
...[Available] NO: Lets the BIOS configure all the devices in the system so that the latter can function correctly. Configuration options: [Available] [Reserved] ASUS K8V Motherboard 2-23 Plug And Play O/S PCI Lantency Timer Allocate IRQ to malfunction. When set to [Reserved], the IRQ is installed in the system. The ...menu includes setting IRQ and DMA channel resources for either PCI/PnP or legacy ISA devices, and setting the memory size block for boot if your system has a Plug and Play operating system. YES: Lets the operating system configure Plug and Play...
...[Available] NO: Lets the BIOS configure all the devices in the system so that the latter can function correctly. Configuration options: [Available] [Reserved] ASUS K8V Motherboard 2-23 Plug And Play O/S PCI Lantency Timer Allocate IRQ to malfunction. When set to [Reserved], the IRQ is installed in the system. The ...menu includes setting IRQ and DMA channel resources for either PCI/PnP or legacy ISA devices, and setting the memory size block for boot if your system has a Plug and Play operating system. YES: Lets the operating system configure Plug and Play...


