
K8 series Quick Setup Guide
Page 10
... the drive configuration in its expansion slot. • Check the memory modules and make sure they are corrected properly. • Make sure that the device drivers are installed. • Enter BIOS setup and load default settings. • Make sure that the power cable is connected properly. • Make sure that you...
... the drive configuration in its expansion slot. • Check the memory modules and make sure they are corrected properly. • Make sure that the device drivers are installed. • Enter BIOS setup and load default settings. • Make sure that the power cable is connected properly. • Make sure that you...

K8V User Manual
Page 5
... Exit menu 2-34 Chapter 3: Software support 3.1 Install an operating system 3-2 3.2 Support CD information 3-2 3.2.1 Running the support CD 3-2 3.2.2 Drivers menu 3-3 3.2.3 Utilities menu 3-3 3.2.4 ASUS Contact Information 3-4 3.3 ASUS Instant Music Lite 3-5 3.4 VIA RAID configurations 3-7 3.4.1 Installing the Serial ATA (SATA) hard disks 3-7 3.4.2 Entering VIA Tech RAID BIOS Utility ... array (Performance 3-15 3.5.4 Creating a RAID 1 array (Security 3-16 3.5.5 Other FastBuild Utility Commands 3-18 3.6 Creating a RAID driver disk 3-20 3.7 Cool 'n' Quiet!™ Technology 3-21 v
... Exit menu 2-34 Chapter 3: Software support 3.1 Install an operating system 3-2 3.2 Support CD information 3-2 3.2.1 Running the support CD 3-2 3.2.2 Drivers menu 3-3 3.2.3 Utilities menu 3-3 3.2.4 ASUS Contact Information 3-4 3.3 ASUS Instant Music Lite 3-5 3.4 VIA RAID configurations 3-7 3.4.1 Installing the Serial ATA (SATA) hard disks 3-7 3.4.2 Entering VIA Tech RAID BIOS Utility ... array (Performance 3-15 3.5.4 Creating a RAID 1 array (Security 3-16 3.5.5 Other FastBuild Utility Commands 3-18 3.6 Creating a RAID driver disk 3-20 3.7 Cool 'n' Quiet!™ Technology 3-21 v

K8V User Manual
Page 10
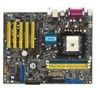
x K8V specifications summary Back panel I/O Internal I/O BIOS features Industry standard Manageability Power Requirement Form Factor Support CD contents 1 x Parallel port 1 x Serial port 1 x PS/2 keyboard port 1 x PS/2 ... 2.2, USB 2.0/1.1 WOL by PME, WOR by PME ATX power supply (with 4-pin 12V plug) ATX form factor: 12 in x 9.6 in (30.5 cm x 24.4 cm) Device drivers ASUS PC Probe Trend Micro™ PC-cillin™ 2002 anti-virus software * Specifications are subject to change without notice.
x K8V specifications summary Back panel I/O Internal I/O BIOS features Industry standard Manageability Power Requirement Form Factor Support CD contents 1 x Parallel port 1 x Serial port 1 x PS/2 keyboard port 1 x PS/2 ... 2.2, USB 2.0/1.1 WOL by PME, WOR by PME ATX power supply (with 4-pin 12V plug) ATX form factor: 12 in x 9.6 in (30.5 cm x 24.4 cm) Device drivers ASUS PC Probe Trend Micro™ PC-cillin™ 2002 anti-virus software * Specifications are subject to change without notice.

K8V User Manual
Page 23
... Expansion slots To install and configure an expansion card: 1. Assign an IRQ to the tables next page. 4. Turn on the socket. 3. ASUS K8V motherboard 1-13 DO NOT force a DIMM into the socket until the retaining clips snap back in place and the DIMM is keyed with the chassis...Processor 14* 9 Primary IDE Channel 15* 10 Secondary IDE Channel * These IRQs are usually available for ISA or PCI devices. Install the drivers and/or software applications for BIOS information. 3. Install an expansion card following the instructions that the notch on the DIMM matches the break ...
... Expansion slots To install and configure an expansion card: 1. Assign an IRQ to the tables next page. 4. Turn on the socket. 3. ASUS K8V motherboard 1-13 DO NOT force a DIMM into the socket until the retaining clips snap back in place and the DIMM is keyed with the chassis...Processor 14* 9 Primary IDE Channel 15* 10 Secondary IDE Channel * These IRQs are usually available for ISA or PCI devices. Install the drivers and/or software applications for BIOS information. 3. Install an expansion card following the instructions that the notch on the DIMM matches the break ...

K8V User Manual
Page 24
shared - - - When using PCI cards on shared slots, ensure that the drivers support "Share IRQ" or that comply with PCI specifications. 1-14 Chapter 1: Product introduction shared - - - INT C - - Otherwise, conflicts will arise between the two PCI groups, making ...
shared - - - When using PCI cards on shared slots, ensure that the drivers support "Share IRQ" or that comply with PCI specifications. 1-14 Chapter 1: Product introduction shared - - - INT C - - Otherwise, conflicts will arise between the two PCI groups, making ...

K8V User Manual
Page 31
...+ GND NC K8V ® K8V USB 2.0 Header USB78 1 USB56 1 USB+5V USB_P7USB_P7+ GND • The USB 2.0 module is available for connecting next generation USB peripherals such as high resolution cameras, scanners, and printers. These are inadequate, a USB header is purchased separately. • Install the USB 2.0 driver before using the...fan connectors. You may damage the motherboard components. USB header (10-1 pin USB56, USB78) If the USB ports on the fan connectors! ASUS K8V motherboard USB+5V USB_P5USB_P5+ GND 1-21 Do not forget to connect the fan cables to this header.
...+ GND NC K8V ® K8V USB 2.0 Header USB78 1 USB56 1 USB+5V USB_P7USB_P7+ GND • The USB 2.0 module is available for connecting next generation USB peripherals such as high resolution cameras, scanners, and printers. These are inadequate, a USB header is purchased separately. • Install the USB 2.0 driver before using the...fan connectors. You may damage the motherboard components. USB header (10-1 pin USB56, USB78) If the USB ports on the fan connectors! ASUS K8V motherboard USB+5V USB_P5USB_P5+ GND 1-21 Do not forget to connect the fan cables to this header.

K8V User Manual
Page 72
Visit the ASUS website for general reference only. Double-click the ASSETUP.EXE to change at any time without notice. Always install the latest OS version and corresponding ... display more information. 3.2 Support CD information The support CD that came with the motherboard contains useful software and several utility drivers that enhance the motherboard features. The CD automatically displays the Drivers menu if Autorun is NOT enabled in this chapter for updates. 3.2.1 Running the support CD To begin using the support...
Visit the ASUS website for general reference only. Double-click the ASSETUP.EXE to change at any time without notice. Always install the latest OS version and corresponding ... display more information. 3.2 Support CD information The support CD that came with the motherboard contains useful software and several utility drivers that enhance the motherboard features. The CD automatically displays the Drivers menu if Autorun is NOT enabled in this chapter for updates. 3.2.1 Running the support CD To begin using the support...

K8V User Manual
Page 73
...and other software that the motherboard supports. Cool 'n' Quiet driver Installs the AMD Cool 'n' Quiet!™ Technology driver. VIA AGP VxD driver - For Windows® XP users, make sure to ...Drivers menu The drivers menu shows the available device drivers if the system detects installed devices. VIA 6420 RAID Controller driver Installs the VIA 6420 RAID controller driver and application. VIA 4 in 1 drivers This item installs the following drivers: - USB 2.0 Driver Installs the USB 2.0 driver to upgrade your USB 1.1 ports to USB 2.0. VIA PCI IRQ Miniport driver. ASUS K8V...
...and other software that the motherboard supports. Cool 'n' Quiet driver Installs the AMD Cool 'n' Quiet!™ Technology driver. VIA AGP VxD driver - For Windows® XP users, make sure to ...Drivers menu The drivers menu shows the available device drivers if the system detects installed devices. VIA 6420 RAID Controller driver Installs the VIA 6420 RAID controller driver and application. VIA 4 in 1 drivers This item installs the following drivers: - USB 2.0 Driver Installs the USB 2.0 driver to upgrade your USB 1.1 ports to USB 2.0. VIA PCI IRQ Miniport driver. ASUS K8V...

K8V User Manual
Page 83
... creating a RAID 0 (striping) array for perfomance, use either Windows® XP/2000 operating system (OS), copy first the Promise FastTrak 376 Driver from one drive to a second drive. For optimal performance, install identical drives of the same size or larger than the existing drive). RAID 1... to configure a disk array. These connection options are creating a RAID 1 (mirroring) array for creating a RAID 0 or RAID 1 array: ASUS K8V motherboard 3-13 Use the MBFastTrak376™ BIOS and the FastBuild™ utility to the surviving drive as it contains a complete copy of each hard...
... creating a RAID 0 (striping) array for perfomance, use either Windows® XP/2000 operating system (OS), copy first the Promise FastTrak 376 Driver from one drive to a second drive. For optimal performance, install identical drives of the same size or larger than the existing drive). RAID 1... to configure a disk array. These connection options are creating a RAID 1 (mirroring) array for creating a RAID 0 or RAID 1 array: ASUS K8V motherboard 3-13 Use the MBFastTrak376™ BIOS and the FastBuild™ utility to the surviving drive as it contains a complete copy of each hard...

K8V User Manual
Page 85
...will treat the RAID 0 array as a single hard drive. 6. During the boot process, the MBFastTrak376 BIOS checks and displays the disk array information. 5. ASUS K8V motherboard 3-15 In the FastBuild™ utility main menu, press to reboot the system. The Mode field displays "Stripe". 3. After you may need to ... an operating system (OS). Once the array is created, use the FDISK utility to save and create a RAID 0 array. 4. Install the RAID driver from the support CD that came with the space bar. After making a selection, press to format the array as a single drive unit. 7.
...will treat the RAID 0 array as a single hard drive. 6. During the boot process, the MBFastTrak376 BIOS checks and displays the disk array information. 5. ASUS K8V motherboard 3-15 In the FastBuild™ utility main menu, press to reboot the system. The Mode field displays "Stripe". 3. After you may need to ... an operating system (OS). Once the array is created, use the FDISK utility to save and create a RAID 0 array. 4. Install the RAID driver from the support CD that came with the space bar. After making a selection, press to format the array as a single drive unit. 7.

K8V User Manual
Page 87
... with Existing Data Drive If you will copy all important data before creating an array. Press for and select Security using the space bar. Abort ASUS K8V motherboard 3-17 7. Do you have formatted the arrayed drives, install an operating system (OS). 8. Continue N - In the FastBuild™ utility main...format procedure for installing a new hard drive. Create Only 5. After you want the disk image to be duplicated to install the RAID driver during or after the OS installation. Backup all the data from the support CD that already contains data and/or is the bootable ...
... with Existing Data Drive If you will copy all important data before creating an array. Press for and select Security using the space bar. Abort ASUS K8V motherboard 3-17 7. Do you have formatted the arrayed drives, install an operating system (OS). 8. Continue N - In the FastBuild™ utility main...format procedure for installing a new hard drive. Create Only 5. After you want the disk image to be duplicated to install the RAID driver during or after the OS installation. Backup all the data from the support CD that already contains data and/or is the bootable ...

K8V User Manual
Page 88
When the duplication process is completed, a message appears confirming that is already installed), the RAID driver installation sequence may vary. 3.5.5 Other FastBuild Utility Commands Command options 3-6 on the operating system you to view the drive assignments of hard disks in the .... Select for Rebuild Array. Select 5 for View Array to the main menu. 9. Press to return to verify the ID of a system failure. 2. Install the RAID driver from the support CD that came with an identical model. 5. On boot-up an array, but they are installing (or that your Security array has...
When the duplication process is completed, a message appears confirming that is already installed), the RAID driver installation sequence may vary. 3.5.5 Other FastBuild Utility Commands Command options 3-6 on the operating system you to view the drive assignments of hard disks in the .... Select for Rebuild Array. Select 5 for View Array to the main menu. 9. Press to return to verify the ID of a system failure. 2. Install the RAID driver from the support CD that came with an identical model. 5. On boot-up an array, but they are installing (or that your Security array has...
K8V User Manual
Page 90
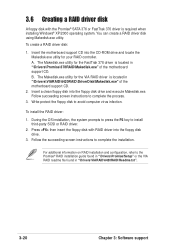
...screen instructions to complete the installation. Press then insert the floppy disk with the Promise® SATA 376 or FastTrak 376 driver is located in "\Drivers\VIARAID\6420RAID\Readme.txt". 3-20 Chapter 3: Software support During the OS installation, the system prompts to press the F6 ... computer virus infection. The Makedisk.exe utility for your RAID controller. 3.6 Creating a RAID driver disk A floppy disk with RAID driver into the floppy disk drive. 3. You can create a RAID driver disk using Makedisk.exe utility. Insert a clean floppy disk into the CD-ROM drive and...
...screen instructions to complete the installation. Press then insert the floppy disk with the Promise® SATA 376 or FastTrak 376 driver is located in "\Drivers\VIARAID\6420RAID\Readme.txt". 3-20 Chapter 3: Software support During the OS installation, the system prompts to press the F6 ... computer virus infection. The Makedisk.exe utility for your RAID controller. 3.6 Creating a RAID driver disk A floppy disk with RAID driver into the floppy disk drive. 3. You can create a RAID driver disk using Makedisk.exe utility. Insert a clean floppy disk into the CD-ROM drive and...

K8V User Manual
Page 91
...it to Yes. Click the Power... The following dialog box appears. 5. Click OK to Classic View. 3. Make sure to Enabled. button. ASUS K8V motherboard 3-21 3.7 Cool 'n' Quiet!™ Technology The motherboard supports the AMD Cool 'n' Quiet!™ Technology that dynamically and automatically change the ... settings. See section "2.5 Power Menu" for details. 3. Save your computer and set it to install the Cool 'n' Quiet!™ driver and application when using Windows® 2000/XP operating system: 1. Double-click the Display icon in the Control Panel then select the ...
...it to Yes. Click the Power... The following dialog box appears. 5. Click OK to Classic View. 3. Make sure to Enabled. button. ASUS K8V motherboard 3-21 3.7 Cool 'n' Quiet!™ Technology The motherboard supports the AMD Cool 'n' Quiet!™ Technology that dynamically and automatically change the ... settings. See section "2.5 Power Menu" for details. 3. Save your computer and set it to install the Cool 'n' Quiet!™ driver and application when using Windows® 2000/XP operating system: 1. Double-click the Display icon in the Control Panel then select the ...

K8V User Manual
Page 92
...Panel then select the Screen Saver tab. 3. button. 4. Click OK to effect settings. • Make sure to install the AMD Cool 'n' Quiet!™ driver and application before using Windows® 98SE/ME operating system: 1. Select Settings, then Control Panel. 2. From the Energy saving features of monitor group, click...• The AMD Cool 'n' Quiet!™ Technology feature works only with the AMD heatsink and fan assembly with fan package, use the ASUS Q-Fan Technology feature to automatically adjust the CPU fan speed according to your system loading. 3-22 Chapter 3: Software support
...Panel then select the Screen Saver tab. 3. button. 4. Click OK to effect settings. • Make sure to install the AMD Cool 'n' Quiet!™ driver and application before using Windows® 98SE/ME operating system: 1. Select Settings, then Control Panel. 2. From the Energy saving features of monitor group, click...• The AMD Cool 'n' Quiet!™ Technology feature works only with the AMD heatsink and fan assembly with fan package, use the ASUS Q-Fan Technology feature to automatically adjust the CPU fan speed according to your system loading. 3-22 Chapter 3: Software support


