
K8V-X user's manual
Page 4
... a bootable floppy disk 2-2 2.1.2 Using AFUDOS to update the BIOS 2-3 2.1.3 Using AFUDOS to copy BIOS from PC 2-4 2.1.4 Using ASUS EZ Flash to update the BIOS 2-5 2.1.5 Recovering the BIOS with CrashFree BIOS 2 ....... 2-6 2.2 BIOS Setup program 2-8 2.2.1 BIOS menu screen 2-9 2.2.2 Menu bar 2-9 2.2.3 Navigation keys 2-9 2.2.4 Menu items 2-10 2.2.5 Sub-menu items 2-10 2.2.6 Configuration fields 2-10 2.2.7 Pop-up window 2-10 2.2.8 Scroll bar 2-10 2.2.9 General...
... a bootable floppy disk 2-2 2.1.2 Using AFUDOS to update the BIOS 2-3 2.1.3 Using AFUDOS to copy BIOS from PC 2-4 2.1.4 Using ASUS EZ Flash to update the BIOS 2-5 2.1.5 Recovering the BIOS with CrashFree BIOS 2 ....... 2-6 2.2 BIOS Setup program 2-8 2.2.1 BIOS menu screen 2-9 2.2.2 Menu bar 2-9 2.2.3 Navigation keys 2-9 2.2.4 Menu items 2-10 2.2.5 Sub-menu items 2-10 2.2.6 Configuration fields 2-10 2.2.7 Pop-up window 2-10 2.2.8 Scroll bar 2-10 2.2.9 General...
K8V-X user's manual
Page 10
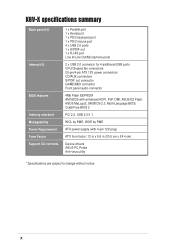
x K8V-X specifications summary Back panel I/O Internal I/O BIOS features Industry standard Manageability Power Requirement Form Factor Support CD contents 1 x Parallel port 1 x Serial port 1 x PS/2 keyboard port 1 x PS/2 mouse port 4 x USB 2.0 ports 1 x S/PDIF ... power connectors CD/AUX connectors S/PDIF out connector GAME/MIDI connector Front panel audio connector 4Mb Flash EEPROM AMI BIOS with enhanced ACPI, PnP, DMI, ASUS EZ Flash, ASUS MyLogo2, SM BIOS 2.3, Multi-Language BIOS, CrashFree BIOS 2 PCI 2.2, USB 2.0/1.1 WOL by PME, WOR by PME ATX power supply (with 4-pin 12V plug) ATX form...
x K8V-X specifications summary Back panel I/O Internal I/O BIOS features Industry standard Manageability Power Requirement Form Factor Support CD contents 1 x Parallel port 1 x Serial port 1 x PS/2 keyboard port 1 x PS/2 mouse port 4 x USB 2.0 ports 1 x S/PDIF ... power connectors CD/AUX connectors S/PDIF out connector GAME/MIDI connector Front panel audio connector 4Mb Flash EEPROM AMI BIOS with enhanced ACPI, PnP, DMI, ASUS EZ Flash, ASUS MyLogo2, SM BIOS 2.3, Multi-Language BIOS, CrashFree BIOS 2 PCI 2.2, USB 2.0/1.1 WOL by PME, WOR by PME ATX power supply (with 4-pin 12V plug) ATX form...
K8V-X user's manual
Page 14
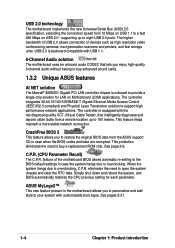
...solution to open the system chassis and clear the RTC data. CrashFree BIOS 2 This feature allows you to restore the original BIOS data from a remote location up to buy advanced sound cards. 1.3.2 Unique ASUS features AI NET solution The Marvell® 88E8001 Gigabit PCI LAN ... extending the connection speed from 12 Mbps on USB 1.1 to a fast 480 Mbps on Motherboard (LOM) applications. ASUS MyLogo2™ This new feature present in case when the BIOS codes and data are corrupted. This feature helps maintain a more stable network connection. supporting up to 100 meters. USB...
...solution to open the system chassis and clear the RTC data. CrashFree BIOS 2 This feature allows you to restore the original BIOS data from a remote location up to buy advanced sound cards. 1.3.2 Unique ASUS features AI NET solution The Marvell® 88E8001 Gigabit PCI LAN ... extending the connection speed from 12 Mbps on USB 1.1 to a fast 480 Mbps on Motherboard (LOM) applications. ASUS MyLogo2™ This new feature present in case when the BIOS codes and data are corrupted. This feature helps maintain a more stable network connection. supporting up to 100 meters. USB...

K8V-X user's manual
Page 15
...system. The illustration below shows the location of the following precautions before touching any component. 2. ASUS EZ Flash BIOS With the ASUS EZ Flash, you can easily update the system BIOS even before removing or plugging in any motherboard component. See page 2-5. When lit, this ...green LED indicates that the system is detached from a floppy disk. No need to Windows®. K8V-X ® K8V-X Onboard LED SB_PWR ON Standby Power OFF Powered Off ASUS K8V-X motherboard...
...system. The illustration below shows the location of the following precautions before touching any component. 2. ASUS EZ Flash BIOS With the ASUS EZ Flash, you can easily update the system BIOS even before removing or plugging in any motherboard component. See page 2-5. When lit, this ...green LED indicates that the system is detached from a floppy disk. No need to Windows®. K8V-X ® K8V-X Onboard LED SB_PWR ON Standby Power OFF Powered Off ASUS K8V-X motherboard...

K8V-X user's manual
Page 16
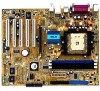
... CD ADI AD1980 AUX FP_AUDIO FLOPPY Accelerated Graphics Port (AGP) PCI1 PCI2 PCI3 CR2032 3V Lithium Cell CMOS Power VIA VT8237 SATA2 SATA1 PCI4 ® K8V-X PCI5 USBPWR56 USBPWR78 USB78 USB56 CLRTC Super 4Mbit I/O BIOS CHASSIS SB_PWR GAME PANEL SEC_IDE 30.5cm (12.0in) CHA_FAN 1-6 Chapter 1: Product introduction
... CD ADI AD1980 AUX FP_AUDIO FLOPPY Accelerated Graphics Port (AGP) PCI1 PCI2 PCI3 CR2032 3V Lithium Cell CMOS Power VIA VT8237 SATA2 SATA1 PCI4 ® K8V-X PCI5 USBPWR56 USBPWR78 USB78 USB56 CLRTC Super 4Mbit I/O BIOS CHASSIS SB_PWR GAME PANEL SEC_IDE 30.5cm (12.0in) CHA_FAN 1-6 Chapter 1: Product introduction

K8V-X user's manual
Page 23
... an expansion card following the instructions that it fits in place and the DIMM is keyed with a notch so that came with the chassis. 2. ASUS K8V-X motherboard 1-13 1.7.3 Installing a DIMM Follow these steps to the card. DDR DIMM Unlocked A DDR DIMM is properly seated. Turn on the socket... Compatible Mouse Port 13 8 Numeric Data Processor 14* 9 Primary IDE Channel 15* 10 Secondary IDE Channel * These IRQs are usually available for BIOS information. 3. See Chapter 2 for ISA or PCI devices. Align a DIMM on the socket such that the notch on the DIMM matches the break...
... an expansion card following the instructions that it fits in place and the DIMM is keyed with a notch so that came with the chassis. 2. ASUS K8V-X motherboard 1-13 1.7.3 Installing a DIMM Follow these steps to the card. DDR DIMM Unlocked A DDR DIMM is properly seated. Turn on the socket... Compatible Mouse Port 13 8 Numeric Data Processor 14* 9 Primary IDE Channel 15* 10 Secondary IDE Channel * These IRQs are usually available for BIOS information. 3. See Chapter 2 for ISA or PCI devices. Align a DIMM on the socket such that the notch on the DIMM matches the break...

K8V-X user's manual
Page 26
...CMOS memory of date, time, and system setup parameters by the onboard button cell battery. Removing the cap will cause system boot failure! ® K8V-X K8V-X Clear RTC RAM CLRTC 12 Normal (Default) 23 Clear CMOS You do not need to clear the RTC when the system hangs due to pins... 5~10 seconds, then move the cap back to its previous values. 1-16 Chapter 1: Product introduction Shut down the key during the boot process and enter BIOS setup to overclocking, use the C.P.R. (CPU Parameter Recall) feature. Plug the power cord and turn ON the computer. 4. Move the jumper cap from pins ...
...CMOS memory of date, time, and system setup parameters by the onboard button cell battery. Removing the cap will cause system boot failure! ® K8V-X K8V-X Clear RTC RAM CLRTC 12 Normal (Default) 23 Clear CMOS You do not need to clear the RTC when the system hangs due to pins... 5~10 seconds, then move the cap back to its previous values. 1-16 Chapter 1: Product introduction Shut down the key during the boot process and enter BIOS setup to overclocking, use the C.P.R. (CPU Parameter Recall) feature. Plug the power cord and turn ON the computer. 4. Move the jumper cap from pins ...
K8V-X user's manual
Page 27
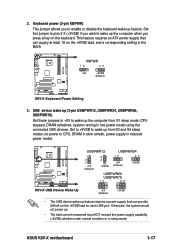
Otherwise, the system would not power up feature. ASUS K8V-X motherboard 1-17 KBPWR 12 23 +5V +5VSB (Default) K8V-X ® K8V-X Keyboard Power Setting 3. Keyboard power (3-pin KBPWR) This jumper allows you press a key on the keyboard. This feature requires an ATX power supply that ...power mode) using the connected USB devices. USB device wake-up the computer from S1 sleep mode (CPU stopped, DRAM refreshed, system running in the BIOS. Set to +5VSB to wake up from S3 and S4 sleep modes (no power to wake up (3-pin USBPWR12, USBPWR34, USBPWR56, USBPWR78) Set these...
Otherwise, the system would not power up feature. ASUS K8V-X motherboard 1-17 KBPWR 12 23 +5V +5VSB (Default) K8V-X ® K8V-X Keyboard Power Setting 3. Keyboard power (3-pin KBPWR) This jumper allows you press a key on the keyboard. This feature requires an ATX power supply that ...power mode) using the connected USB devices. USB device wake-up the computer from S1 sleep mode (CPU stopped, DRAM refreshed, system running in the BIOS. Set to +5VSB to wake up from S3 and S4 sleep modes (no power to wake up (3-pin USBPWR12, USBPWR34, USBPWR56, USBPWR78) Set these...

K8V-X user's manual
Page 36
... connector supplies power to light up. Pressing the power switch turns the system between ON and SLEEP, or ON and SOFT OFF, depending on the BIOS or OS settings. Take note of an IDE device cause this LED to the hard disk activity LED. The System Panel connector is color-coded...
... connector supplies power to light up. Pressing the power switch turns the system between ON and SLEEP, or ON and SOFT OFF, depending on the BIOS or OS settings. Take note of an IDE device cause this LED to the hard disk activity LED. The System Panel connector is color-coded...

K8V-X user's manual
Page 37
Chapter 2 This chapter tells how to change system settings through the BIOS Setup menus. BIOS information ASUS K8V-X motherboard 2-1 Detailed descriptions of the BIOS parameters are also provided.
Chapter 2 This chapter tells how to change system settings through the BIOS Setup menus. BIOS information ASUS K8V-X motherboard 2-1 Detailed descriptions of the BIOS parameters are also provided.

K8V-X user's manual
Page 38
...updating your Windows desktop, click on these utilities. ASUS AFUDOS - Updates the BIOS using Windows® 98SE/ME, select Full option button from the format type, then click Start. ASUS EZ Flash - ASUS CrashFree BIOS 2 - Refer to restore the BIOS in DOS mode. 2. Important notes •...corresponding sections for this motherboard using AFUDOS (refer to section "2.1.3 Using AFUDOS to copy BIOS from the format options field, then click Start. Copy the original motherboard BIOS using the ASUS Update utility. 2.1.1 Creating a bootable floppy disk 1. Insert a 1.44 MB floppy ...
...updating your Windows desktop, click on these utilities. ASUS AFUDOS - Updates the BIOS using Windows® 98SE/ME, select Full option button from the format type, then click Start. ASUS EZ Flash - ASUS CrashFree BIOS 2 - Refer to restore the BIOS in DOS mode. 2. Important notes •...corresponding sections for this motherboard using AFUDOS (refer to section "2.1.3 Using AFUDOS to copy BIOS from the format options field, then click Start. Copy the original motherboard BIOS using the ASUS Update utility. 2.1.1 Creating a bootable floppy disk 1. Insert a 1.44 MB floppy ...

K8V-X user's manual
Page 39
... [filename] means the latest (or original) BIOS file that contains the BIOS file. 3. Reading file ..... Visit the ASUS website (www.asus.com) to update the BIOS To update the BIOS using the AFUDOS.EXE utility: 1. done Writing flash .... 0x0008CC00 (9%) DO NOT shutdown or reset the system while updating the BIOS! ASUS K8V-X motherboard 2-3 Doing so may not be exactly...
... [filename] means the latest (or original) BIOS file that contains the BIOS file. 3. Reading file ..... Visit the ASUS website (www.asus.com) to update the BIOS To update the BIOS using the AFUDOS.EXE utility: 1. done Writing flash .... 0x0008CC00 (9%) DO NOT shutdown or reset the system while updating the BIOS! ASUS K8V-X motherboard 2-3 Doing so may not be exactly...

K8V-X user's manual
Page 40
...Inc. Version 1.10 Copyright (C) 2002 American Megatrends, Inc. done Erasing flash .... done Writing flash .... 0x0008CC00 (9%) Verifying flash .. done A:\> 5. The BIOS information on your PC using AFUDOS.EXE: 1. All rights reserved. All rights reserved. Press . Reading file ..... What you see on the screen is complete... returns to a floppy or hard disk and use it as shown. Reading flash ..... 0x0008CC00 (9%) 2-4 Chapter 2: BIOS Setup When the BIOS update process is for the extension name. 2. A:\>afudos /iK8VX.ROM AMI Firmware Update Utility - To copy the...
...Inc. Version 1.10 Copyright (C) 2002 American Megatrends, Inc. done Erasing flash .... done Writing flash .... 0x0008CC00 (9%) Verifying flash .. done A:\> 5. The BIOS information on your PC using AFUDOS.EXE: 1. All rights reserved. All rights reserved. Press . Reading file ..... What you see on the screen is complete... returns to a floppy or hard disk and use it as shown. Reading flash ..... 0x0008CC00 (9%) 2-4 Chapter 2: BIOS Setup When the BIOS update process is for the extension name. 2. A:\>afudos /iK8VX.ROM AMI Firmware Update Utility - To copy the...

K8V-X user's manual
Page 41
... floppy disk that the floppy disk has at least 600KB of booting from a diskette and using ASUS EZ Flash: 1. User recovery requested. ASUS K8V-X motherboard 2-5 done A:\> When the copy process is no floppy disk in the floppy disk, EZ Flash performs the BIOS update process and automatically reboots the system when done. Save the...
... floppy disk that the floppy disk has at least 600KB of booting from a diskette and using ASUS EZ Flash: 1. User recovery requested. ASUS K8V-X motherboard 2-5 done A:\> When the copy process is no floppy disk in the floppy disk, EZ Flash performs the BIOS update process and automatically reboots the system when done. Save the...
K8V-X user's manual
Page 42
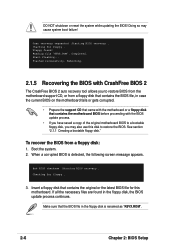
... detected, the following screen message appears. User recovery requested. Completed. Rebooting. 2.1.5 Recovering the BIOS with CrashFree BIOS 2 The CrashFree BIOS 2 auto recovery tool allows you may cause system boot failure! Bad BIOS checksum. Insert a floppy disk that contains the motherboard BIOS before proceeding with the motherboard or a floppy disk that contains the original or the...
... detected, the following screen message appears. User recovery requested. Completed. Rebooting. 2.1.5 Recovering the BIOS with CrashFree BIOS 2 The CrashFree BIOS 2 auto recovery tool allows you may cause system boot failure! Bad BIOS checksum. Insert a floppy disk that contains the motherboard BIOS before proceeding with the motherboard or a floppy disk that contains the original or the...

K8V-X user's manual
Page 43
... found ! Boot the system. 2. If there is complete, reboot the system. Starting BIOS recovery... CD-ROM found ! Start flashing... When the BIOS update process is detected, the following screen message appears. ASUS K8V-X motherboard 2-7 Checking for floppy... Floppy found . To recover the BIOS from the support CD: 1. Checking for floppy... Doing so may not be...
... found ! Boot the system. 2. If there is complete, reboot the system. Starting BIOS recovery... CD-ROM found ! Start flashing... When the BIOS update process is detected, the following screen message appears. ASUS K8V-X motherboard 2-7 Checking for floppy... Floppy found . To recover the BIOS from the support CD: 1. Checking for floppy... Doing so may not be...

K8V-X user's manual
Page 44
..., which means you may want to enable the security password feature or change the configuration of the firmware hub. The BIOS setup screens shown in the future. Visit the ASUS website (www.asus.com) to reconfigure your screen. The firmware hub on your system using the provided utility described in the CMOS RAM...
..., which means you may want to enable the security password feature or change the configuration of the firmware hub. The BIOS setup screens shown in the future. Visit the ASUS website (www.asus.com) to reconfigure your screen. The firmware hub on your system using the provided utility described in the CMOS RAM...
K8V-X user's manual
Page 45
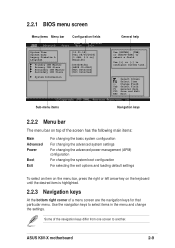
Some of a menu screen are the navigation keys for that particular menu. 2.2.1 BIOS menu screen Menu items Menu bar Configuration fields General help System Time System Date Legacy ...44M, 3.5 in the menu and change the settings. Select Screen Select Item +- Use the navigation keys to select items in ] [English] :[ST320413A] :[ASUS CD-S340] :[Not Detected] :[Not Detected] Use [ENTER], [TAB] or [SHIFT-TAB] to select a field. Use [+] or [-] to another... the bottom right corner of the navigation keys differ from one screen to configure system time. ASUS K8V-X motherboard 2-9
Some of a menu screen are the navigation keys for that particular menu. 2.2.1 BIOS menu screen Menu items Menu bar Configuration fields General help System Time System Date Legacy ...44M, 3.5 in the menu and change the settings. Select Screen Select Item +- Use the navigation keys to select items in ] [English] :[ST320413A] :[ASUS CD-S340] :[Not Detected] :[Not Detected] Use [ENTER], [TAB] or [SHIFT-TAB] to select a field. Use [+] or [-] to another... the bottom right corner of the navigation keys differ from one screen to configure system time. ASUS K8V-X motherboard 2-9

K8V-X user's manual
Page 46
...fields show the values for the menu items. If an item is not user-configurable. To change the value of the selected item. 2-10 Chapter 2: BIOS Setup You can not select an item that item. 2.2.8 Scroll bar A scroll bar appears on the right side of a field, select it then ...pop-up window Scroll bar At the top right corner of the menu screen is highlighted when selected. A configurable field is enclosed in ] [English] :[ST320413A] :[ASUS CD-S340] :[Not Detected] :[Not Detected] The other items (Advanced, Power, Boot, and Exit) on the menu bar have their respective menu items. Main ...
...fields show the values for the menu items. If an item is not user-configurable. To change the value of the selected item. 2-10 Chapter 2: BIOS Setup You can not select an item that item. 2.2.8 Scroll bar A scroll bar appears on the right side of a field, select it then ...pop-up window Scroll bar At the top right corner of the menu screen is highlighted when selected. A configurable field is enclosed in ] [English] :[ST320413A] :[ASUS CD-S340] :[Not Detected] :[Not Detected] The other items (Advanced, Power, Boot, and Exit) on the menu bar have their respective menu items. Main ...

K8V-X user's manual
Page 47
... System Information [11:51:19] [Thu 08/05/2003] [1.44M, 3.5 in .] 2.3.4 Language [English] Allows you to choose the BIOS language version from the available options. Configuration options: [Français] [German] [English] ASUS K8V-X motherboard 2-11 Use [+] or [-] to configure system time. 2.3.1 System Time [xx:xx:xxxx] Allows you to set the system...
... System Information [11:51:19] [Thu 08/05/2003] [1.44M, 3.5 in .] 2.3.4 Language [English] Allows you to choose the BIOS language version from the available options. Configuration options: [Français] [German] [English] ASUS K8V-X motherboard 2-11 Use [+] or [-] to configure system time. 2.3.1 System Time [xx:xx:xxxx] Allows you to set the system...


