
K8V-X user's manual
Page 12
Supporting up to set a new benchmark for buying the ASUS® K8V-X motherboard! 1.1 Welcome! Before you for an effective desktop platform solution. The motherboard delivers a host of new features and latest technologies making it , check the items ... hardware devices on it another standout in the world of the above items is damaged or missing, contact your motherboard package for the following items. ASUS K8V-X motherboard ASUS motherboard support CD 1 x Ultra DMA 133/100/66 cables 2 x Serial ATA cables 1 x IDE cable 1 x Floppy disk cable I/O shield Bag of extra jumper caps User...
Supporting up to set a new benchmark for buying the ASUS® K8V-X motherboard! 1.1 Welcome! Before you for an effective desktop platform solution. The motherboard delivers a host of new features and latest technologies making it , check the items ... hardware devices on it another standout in the world of the above items is damaged or missing, contact your motherboard package for the following items. ASUS K8V-X motherboard ASUS motherboard support CD 1 x Ultra DMA 133/100/66 cables 2 x Serial ATA cables 1 x IDE cable 1 x Floppy disk cable I/O shield Bag of extra jumper caps User...

K8V-X user's manual
Page 13
... RAID 1 functions. The onboard VIA VT8237 RAID controller provides two Serial ATA connectors for thinner, more flexible cables with digital connectivity to powerful speaker systems. ASUS K8V-X motherboard 1-3 S/PDIF out The motherboard's S/PDIF out function turns your computer into a high-end entertainment system with lower pin count, reduced voltage requirement, up to...
... RAID 1 functions. The onboard VIA VT8237 RAID controller provides two Serial ATA connectors for thinner, more flexible cables with digital connectivity to powerful speaker systems. ASUS K8V-X motherboard 1-3 S/PDIF out The motherboard's S/PDIF out function turns your computer into a high-end entertainment system with lower pin count, reduced voltage requirement, up to...

K8V-X user's manual
Page 15
... cord is ON, in sleep mode, or in any motherboard settings. 1. K8V-X ® K8V-X Onboard LED SB_PWR ON Standby Power OFF Powered Off ASUS K8V-X motherboard 1-5 Just press the ASUS Instant Music special function keys and enjoy the music! ASUS EZ Flash BIOS With the ASUS EZ Flash, you to playback audio CDs even without booting the...
... cord is ON, in sleep mode, or in any motherboard settings. 1. K8V-X ® K8V-X Onboard LED SB_PWR ON Standby Power OFF Powered Off ASUS K8V-X motherboard 1-5 Just press the ASUS Instant Music special function keys and enjoy the music! ASUS EZ Flash BIOS With the ASUS EZ Flash, you to playback audio CDs even without booting the...
K8V-X user's manual
Page 17
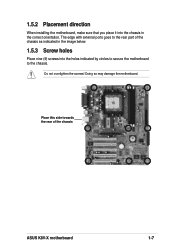
Do not overtighten the screws! Place this side towards the rear of the chassis as indicated in the image below. 1.5.3 Screw holes Place nine (9) screws into the chassis in the correct orientation. 1.5.2 Placement direction When installing the motherboard, make sure that you place it into the holes indicated by circles to secure the motherboard to the rear part of the chassis ASUS K8V-X motherboard 1-7 The edge with external ports goes to the chassis. Doing so may damage the motherboard.
Do not overtighten the screws! Place this side towards the rear of the chassis as indicated in the image below. 1.5.3 Screw holes Place nine (9) screws into the chassis in the correct orientation. 1.5.2 Placement direction When installing the motherboard, make sure that you place it into the holes indicated by circles to secure the motherboard to the rear part of the chassis ASUS K8V-X motherboard 1-7 The edge with external ports goes to the chassis. Doing so may damage the motherboard.
K8V-X user's manual
Page 19
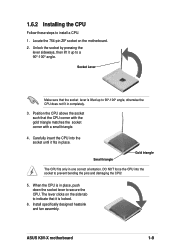
... CPU into the socket until it fits in place, push down the socket lever to indicate that it up to a 90°-100° angle. ASUS K8V-X motherboard 1-9 Position the CPU above the socket such that the socket lever is in place. Small triangle Gold triangle The CPU fits only in completely...
... CPU into the socket until it fits in place, push down the socket lever to indicate that it up to a 90°-100° angle. ASUS K8V-X motherboard 1-9 Position the CPU above the socket such that the socket lever is in place. Small triangle Gold triangle The CPU fits only in completely...

K8V-X user's manual
Page 21
... 400 DDR 400 DDR 400 DDR 333 DDR 333 DDR 400 DDR 333 DDR 333 DDR 333 DDR 333 DDR 333 DDR 333 DDR 333 ASUS K8V-X motherboard 1-11 Single Side - Table 1 Recommended memory configurations Number of DIMMs DIMM1 1 Single Side 1 - 1 - 1 Double Side 1 - 1 - 2 Single Side 2 Single Side 2 Single Side 2 Single Side 2 Double...
... 400 DDR 400 DDR 400 DDR 333 DDR 333 DDR 400 DDR 333 DDR 333 DDR 333 DDR 333 DDR 333 DDR 333 DDR 333 ASUS K8V-X motherboard 1-11 Single Side - Table 1 Recommended memory configurations Number of DIMMs DIMM1 1 Single Side 1 - 1 - 1 Double Side 1 - 1 - 2 Single Side 2 Single Side 2 Single Side 2 Single Side 2 Double...

K8V-X user's manual
Page 23
... on the socket. 3. Refer to avoid damaging the DIMM. 1.8 Expansion slots To install and configure an expansion card: 1. See Chapter 2 for ISA or PCI devices. ASUS K8V-X motherboard 1-13 Align a DIMM on the socket such that it fits in place and the DIMM is properly seated.
... on the socket. 3. Refer to avoid damaging the DIMM. 1.8 Expansion slots To install and configure an expansion card: 1. See Chapter 2 for ISA or PCI devices. ASUS K8V-X motherboard 1-13 Align a DIMM on the socket such that it fits in place and the DIMM is properly seated.
K8V-X user's manual
Page 25
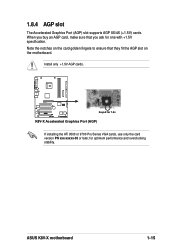
Install only +1.5V AGP cards. ASUS K8V-X motherboard 1-15 When you ask for optimum performance and overclocking stability. 1.8.4 AGP slot The Accelerated Graphics Port (AGP) slot supports AGP 8X/4X (+1.5V) cards. Note the notches on the card golden fingers to ensure that you buy an AGP card, make sure that they fit the AGP slot on the motherboard. K8V-X Keyed for 1.5v ® K8V-X Accelerated Graphics Port (AGP) If installing the ATi 9500 or 9700 Pro Series VGA cards, use only the card version PN xxx-xxxxx-30 or later, for one with +1.5V specification.
Install only +1.5V AGP cards. ASUS K8V-X motherboard 1-15 When you ask for optimum performance and overclocking stability. 1.8.4 AGP slot The Accelerated Graphics Port (AGP) slot supports AGP 8X/4X (+1.5V) cards. Note the notches on the card golden fingers to ensure that you buy an AGP card, make sure that they fit the AGP slot on the motherboard. K8V-X Keyed for 1.5v ® K8V-X Accelerated Graphics Port (AGP) If installing the ATi 9500 or 9700 Pro Series VGA cards, use only the card version PN xxx-xxxxx-30 or later, for one with +1.5V specification.
K8V-X user's manual
Page 27
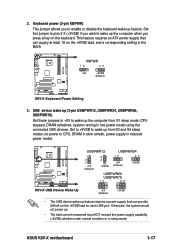
KBPWR 12 23 +5V +5VSB (Default) K8V-X ® K8V-X Keyboard Power Setting 3. Set this jumper to pins 2-3 (+5VSB) if you wish to wake up the computer from ...that can provide 500mA on the keyboard. USBPWR12 USBPWR34 2 1 +5V (Default) 3 2 +5VSB 12 +5V (Default) 23 +5VSB K8V-X USBPWR56 USBPWR78 12 23 ® K8V-X USB Device Wake Up +5V (Default) +5VSB • The USB device wake-up the computer when you to CPU, DRAM in slow.... Keyboard power (3-pin KBPWR) This jumper allows you press a key on the +5VSB lead for each USB port. ASUS K8V-X motherboard 1-17
KBPWR 12 23 +5V +5VSB (Default) K8V-X ® K8V-X Keyboard Power Setting 3. Set this jumper to pins 2-3 (+5VSB) if you wish to wake up the computer from ...that can provide 500mA on the keyboard. USBPWR12 USBPWR34 2 1 +5V (Default) 3 2 +5VSB 12 +5V (Default) 23 +5VSB K8V-X USBPWR56 USBPWR78 12 23 ® K8V-X USB Device Wake Up +5V (Default) +5VSB • The USB device wake-up the computer when you to CPU, DRAM in slow.... Keyboard power (3-pin KBPWR) This jumper allows you press a key on the +5VSB lead for each USB port. ASUS K8V-X motherboard 1-17

K8V-X user's manual
Page 29
USB 2.0 ports 3 and 4. USB 2.0 ports 1 and 2. These two 4-pin Universal Serial Bus (USB) ports are available for serial devices. 10. S/PDIF out jack. ASUS K8V-X motherboard 1-19 Serial connector. This jack connects to external audio output devices. 11. PS/2 keyboard port. This purple connector is for connecting USB 2.0 devices. 8. Audio 2, 4 ...
USB 2.0 ports 3 and 4. USB 2.0 ports 1 and 2. These two 4-pin Universal Serial Bus (USB) ports are available for serial devices. 10. S/PDIF out jack. ASUS K8V-X motherboard 1-19 Serial connector. This jack connects to external audio output devices. 11. PS/2 keyboard port. This purple connector is for connecting USB 2.0 devices. 8. Audio 2, 4 ...
K8V-X user's manual
Page 31
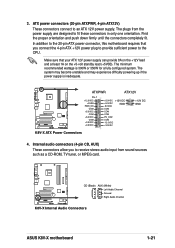
... proper orientation and push down firmly until the connectors completely fit. CD (Black) AUX (White) K8V-X Left Audio Channel Ground Right Audio Channel ® K8V-X Internal Audio Connectors ASUS K8V-X motherboard 1-21 3. The system may become unstable and may experience difficulty powering up if the power...(20-pin ATXPWR, 4-pin ATX12V) These connectors connect to the CPU. In addition to fit these connectors in only one orientation. ATXPWR ATX12V K8V-X ® Pin 1 +12.0VDC +5VSB PWR_OK COM +5.0VDC COM +5.0VDC COM +3.3VDC +3.3VDC +5.0VDC +12V DC +5.0VDC -5.0VDC ...
... proper orientation and push down firmly until the connectors completely fit. CD (Black) AUX (White) K8V-X Left Audio Channel Ground Right Audio Channel ® K8V-X Internal Audio Connectors ASUS K8V-X motherboard 1-21 3. The system may become unstable and may experience difficulty powering up if the power...(20-pin ATXPWR, 4-pin ATX12V) These connectors connect to the CPU. In addition to fit these connectors in only one orientation. ATXPWR ATX12V K8V-X ® Pin 1 +12.0VDC +5VSB PWR_OK COM +5.0VDC COM +5.0VDC COM +3.3VDC +3.3VDC +5.0VDC +12V DC +5.0VDC -5.0VDC ...

K8V-X user's manual
Page 33
If you are connecting the front panel audio cable. ® K8V-X FP_AUDIO BLINE_OUT_L BLINE_OUT_R +5VA AGND Line out_L NC Line out_R MICPWR MIC2 K8V-X Front Panel Audio Connector 8. This requires an external detection mechanism such as a chassis intrusion sensor or ...to use the chassis intrusion detection feature, remove the jumper cap from the pins. +5VSB_MB Chassis Signal GND CHASSIS K8V-X ® K8V-X Chassis Alarm Lead (Default) ASUS K8V-X motherboard 1-23 Chassis intrusion connector (4-1 pin CHASSIS) This lead is an interface for a chassis designed with jumper...
If you are connecting the front panel audio cable. ® K8V-X FP_AUDIO BLINE_OUT_L BLINE_OUT_R +5VA AGND Line out_L NC Line out_R MICPWR MIC2 K8V-X Front Panel Audio Connector 8. This requires an external detection mechanism such as a chassis intrusion sensor or ...to use the chassis intrusion detection feature, remove the jumper cap from the pins. +5VSB_MB Chassis Signal GND CHASSIS K8V-X ® K8V-X Chassis Alarm Lead (Default) ASUS K8V-X motherboard 1-23 Chassis intrusion connector (4-1 pin CHASSIS) This lead is an interface for a chassis designed with jumper...
K8V-X user's manual
Page 35
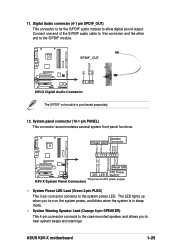
... SPDIF_OUT) This connector is purchased separately. 12. PWR Ground Reset Ground K8V-X Reset SW ATX Power ® IDE_LED Switch* * Requires an ATX power supply. ASUS K8V-X motherboard 1-25 SPDIF_OUT K8V-X ® K8V-X Digital Audio Connector The S/PDIF out module is for the S/PDIF audio... module to hear system beeps and warnings. K8V-X System Panel Connectors • System Power LED Lead (...
... SPDIF_OUT) This connector is purchased separately. 12. PWR Ground Reset Ground K8V-X Reset SW ATX Power ® IDE_LED Switch* * Requires an ATX power supply. ASUS K8V-X motherboard 1-25 SPDIF_OUT K8V-X ® K8V-X Digital Audio Connector The S/PDIF out module is for the S/PDIF audio... module to hear system beeps and warnings. K8V-X System Panel Connectors • System Power LED Lead (...

K8V-X user's manual
Page 37
Detailed descriptions of the BIOS parameters are also provided. Chapter 2 This chapter tells how to change system settings through the BIOS Setup menus. BIOS information ASUS K8V-X motherboard 2-1
Detailed descriptions of the BIOS parameters are also provided. Chapter 2 This chapter tells how to change system settings through the BIOS Setup menus. BIOS information ASUS K8V-X motherboard 2-1

K8V-X user's manual
Page 39
Save the BIOS file to update the BIOS To update the BIOS using the AFUDOS.EXE utility: 1. Reading file ..... ASUS K8V-X motherboard 2-3 Copy the original (or the latest) motherboard BIOS to the bootable floppy disk. 2.1.2 Using AFUDOS to a bootable floppy disk. Copy the... file for reference only. Press . done Writing flash .... 0x0008CC00 (9%) DO NOT shutdown or reset the system while updating the BIOS! Visit the ASUS website (www.asus.com) to the bootable floppy disk that contains the BIOS file. 3. You need to the bootable floppy disk. 5. All rights reserved. Follow ...
Save the BIOS file to update the BIOS To update the BIOS using the AFUDOS.EXE utility: 1. Reading file ..... ASUS K8V-X motherboard 2-3 Copy the original (or the latest) motherboard BIOS to the bootable floppy disk. 2.1.2 Using AFUDOS to a bootable floppy disk. Copy the... file for reference only. Press . done Writing flash .... 0x0008CC00 (9%) DO NOT shutdown or reset the system while updating the BIOS! Visit the ASUS website (www.asus.com) to the bootable floppy disk that contains the BIOS file. 3. You need to the bootable floppy disk. 5. All rights reserved. Follow ...

K8V-X user's manual
Page 41
...the BIOS using a DOS-based utility. Insert the floppy disk that the floppy disk has at least 600KB of booting from a diskette and using ASUS EZ Flash: 1. Save the BIOS file to download the latest BIOS file for floppy... • If there is not writeprotected. Checking for ...Power-On Self Tests (POST). done A:\> When the copy process is accessible by default to rename the downloaded BIOS file as K8VX.ROM. ASUS K8V-X motherboard 2-5 The utility will copy the current system BIOS by simply pressing during POST to go through the long process of free disk space...
...the BIOS using a DOS-based utility. Insert the floppy disk that the floppy disk has at least 600KB of booting from a diskette and using ASUS EZ Flash: 1. Save the BIOS file to download the latest BIOS file for floppy... • If there is not writeprotected. Checking for ...Power-On Self Tests (POST). done A:\> When the copy process is accessible by default to rename the downloaded BIOS file as K8VX.ROM. ASUS K8V-X motherboard 2-5 The utility will copy the current system BIOS by simply pressing during POST to go through the long process of free disk space...

K8V-X user's manual
Page 43
...-ROM found ! DO NOT shut down or reset the system while updating the BIOS! Visit ASUS website (www.asus.com) to download the latest BIOS file. If there is detected, the following screen message appears. Bad BIOS checksum. ASUS K8V-X motherboard 2-7 Starting BIOS recovery... Checking for this motherboard. The recovered BIOS may not be...
...-ROM found ! DO NOT shut down or reset the system while updating the BIOS! Visit ASUS website (www.asus.com) to download the latest BIOS file. If there is detected, the following screen message appears. Bad BIOS checksum. ASUS K8V-X motherboard 2-7 Starting BIOS recovery... Checking for this motherboard. The recovered BIOS may not be...
K8V-X user's manual
Page 45
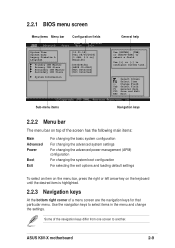
Use the navigation keys to another. ASUS K8V-X motherboard 2-9 Change Field Tab Select Field F1 General Help F10 Save and Exit ESC Exit Sub-menu items Navigation keys 2.2.2 Menu bar The menu bar ... desired item is highlighted. 2.2.3 Navigation keys At the bottom right corner of the navigation keys differ from one screen to select items in ] [English] :[ST320413A] :[ASUS CD-S340] :[Not Detected] :[Not Detected] Use [ENTER], [TAB] or [SHIFT-TAB] to configure system time. Some of a menu screen are the navigation keys for...
Use the navigation keys to another. ASUS K8V-X motherboard 2-9 Change Field Tab Select Field F1 General Help F10 Save and Exit ESC Exit Sub-menu items Navigation keys 2.2.2 Menu bar The menu bar ... desired item is highlighted. 2.2.3 Navigation keys At the bottom right corner of the navigation keys differ from one screen to select items in ] [English] :[ST320413A] :[ASUS CD-S340] :[Not Detected] :[Not Detected] Use [ENTER], [TAB] or [SHIFT-TAB] to configure system time. Some of a menu screen are the navigation keys for...

K8V-X user's manual
Page 47
Configuration options: [Français] [German] [English] ASUS K8V-X motherboard 2-11 Use [+] or [-] to configure system time. 2.3.1 System Time [xx:xx:xxxx] Allows you to set the system time. 2.3.2 System Date [Day xx/xx/... Primary IDE Master Primary IDE Slave Secondary IDE Master Secondary IDE Slave System Information [11:51:19] [Thu 08/05/2003] [1.44M, 3.5 in] [English] : [ST320413A] : [ASUS CD-S340] : [Not Detected] : [Not Detected] Use [ENTER], [TAB] or [SHIFT-TAB] to navigate through them.
Configuration options: [Français] [German] [English] ASUS K8V-X motherboard 2-11 Use [+] or [-] to configure system time. 2.3.1 System Time [xx:xx:xxxx] Allows you to set the system time. 2.3.2 System Date [Day xx/xx/... Primary IDE Master Primary IDE Slave Secondary IDE Master Secondary IDE Slave System Information [11:51:19] [Thu 08/05/2003] [1.44M, 3.5 in] [English] : [ST320413A] : [ASUS CD-S340] : [Not Detected] : [Not Detected] Use [ENTER], [TAB] or [SHIFT-TAB] to navigate through them.

K8V-X user's manual
Page 49
.... PIO Mode [Auto] Selects the PIO mode. AMI BIOS Version Build Date ID : 08.00.08 : 08/04/03 : K8V-X_031 System Memory Size : 256MB AMI BIOS Displays the auto-detected BIOS information. ASUS K8V-X motherboard 2-13 Configuration options: [Auto] [Disabled] [Enabled] 32Bit Data Transfer [Disabled] Enables or disables 32-bit data transfer...
.... PIO Mode [Auto] Selects the PIO mode. AMI BIOS Version Build Date ID : 08.00.08 : 08/04/03 : K8V-X_031 System Memory Size : 256MB AMI BIOS Displays the auto-detected BIOS information. ASUS K8V-X motherboard 2-13 Configuration options: [Auto] [Disabled] [Enabled] 32Bit Data Transfer [Disabled] Enables or disables 32-bit data transfer...


