
K8V SE Deluxe User's Manual
Page 8
... are not damaged. Do not place the product in your area. If you add a device. • Before connecting or removing signal cables from connectors, slots, sockets and circuitry. • Avoid dust, humidity, and temperature extremes. Safety information Electrical safety • To prevent electrical shock hazard, disconnect the power cable from the...
... are not damaged. Do not place the product in your area. If you add a device. • Before connecting or removing signal cables from connectors, slots, sockets and circuitry. • Avoid dust, humidity, and temperature extremes. Safety information Electrical safety • To prevent electrical shock hazard, disconnect the power cable from the...

K8V SE Deluxe User's Manual
Page 11
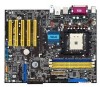
K8V SE Deluxe specifications summary CPU Socket 754 for AMD Athlon™ 64 processor with built-in 1MB L2 cache Supports AMD 64 architecture that enables simultaneous 32-bit and 64-bit computing Chipset VIA K8T800 VIA VT8237 System Bus 800 MHz Memory 3 x 184-pin DDR DIMM sockets...at 1 MHz increment Adjustable FSB/DDR ratio ASUS JumperFree ASUS C.P.R. (CPU Parameter Recall) Special features ASUS AI NET ASUS AI BIOS ASUS POST Reporter ASUS C.P.R. (CPU Parameter Recall) ASUS EZ Flash ASUS CrashFree BIOS2 ASUS MyLogo2™ ASUS Instant Music ASUS Q-Fan AMD Cool 'n' Quiet!™ ...
K8V SE Deluxe specifications summary CPU Socket 754 for AMD Athlon™ 64 processor with built-in 1MB L2 cache Supports AMD 64 architecture that enables simultaneous 32-bit and 64-bit computing Chipset VIA K8T800 VIA VT8237 System Bus 800 MHz Memory 3 x 184-pin DDR DIMM sockets...at 1 MHz increment Adjustable FSB/DDR ratio ASUS JumperFree ASUS C.P.R. (CPU Parameter Recall) Special features ASUS AI NET ASUS AI BIOS ASUS POST Reporter ASUS C.P.R. (CPU Parameter Recall) ASUS EZ Flash ASUS CrashFree BIOS2 ASUS MyLogo2™ ASUS Instant Music ASUS Q-Fan AMD Cool 'n' Quiet!™ ...

K8V SE Deluxe User's Manual
Page 23
... motherboard comes with the component. • Before you install or remove any component, ensure that the ATX power supply is detached from the wall socket before touching any component. • Use a grounded wrist strap or touch a safely grounded object or to a metal object, such as the ... before you install motherboard components or change any motherboard settings. • Unplug the power cord from the power supply. SB_PWR K8V ® K8V SE Deluxe Onboard LED ON Standby Power OFF Powered Off ASUS K8V SE Deluxe motherboard 2-1 2.1 Before you proceed Note of the onboard LED.
... motherboard comes with the component. • Before you install or remove any component, ensure that the ATX power supply is detached from the wall socket before touching any component. • Use a grounded wrist strap or touch a safely grounded object or to a metal object, such as the ... before you install motherboard components or change any motherboard settings. • Unplug the power cord from the power supply. SB_PWR K8V ® K8V SE Deluxe Onboard LED ON Standby Power OFF Powered Off ASUS K8V SE Deluxe motherboard 2-1 2.1 Before you proceed Note of the onboard LED.

K8V SE Deluxe User's Manual
Page 25
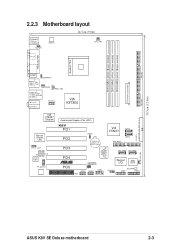
... (64 bit,184-pin module) DDR DIMM2 (64 bit,184-pin module) DDR DIMM3 (64 bit,184-pin module) ATX Power Connector Socket 754 PARALLEL PORT COM1 USBPWR12 Bottom: USB1 USB2 Top: 1394 USBPWR34 PWR_FAN USB2.0 Top: T: USB4 RJ-45 B: USB3 Top:Line In... Accelerated Graphics Port (AGP) K8V PCI1 CLRTC PCI2 PCI3 CR2032 3V Lithium Cell CMOS Power PCI4 PCI5 ® WIFI USBPWR56 USBPWR78 USB78 USB56 COM2 RAID Promise PDC20378 FLOPPY VIA VT8237 SATA2 PRI_RAID SATA1 SEC_SATA PRI_SATA Super 4Mbit I/O BIOS CHASSIS SB_PWR GAME PANEL CHA_FAN ASUS K8V SE Deluxe motherboard 2-3
... (64 bit,184-pin module) DDR DIMM2 (64 bit,184-pin module) DDR DIMM3 (64 bit,184-pin module) ATX Power Connector Socket 754 PARALLEL PORT COM1 USBPWR12 Bottom: USB1 USB2 Top: 1394 USBPWR34 PWR_FAN USB2.0 Top: T: USB4 RJ-45 B: USB3 Top:Line In... Accelerated Graphics Port (AGP) K8V PCI1 CLRTC PCI2 PCI3 CR2032 3V Lithium Cell CMOS Power PCI4 PCI5 ® WIFI USBPWR56 USBPWR78 USB78 USB56 COM2 RAID Promise PDC20378 FLOPPY VIA VT8237 SATA2 PRI_RAID SATA1 SEC_SATA PRI_SATA Super 4Mbit I/O BIOS CHASSIS SB_PWR GAME PANEL CHA_FAN ASUS K8V SE Deluxe motherboard 2-3

K8V SE Deluxe User's Manual
Page 28
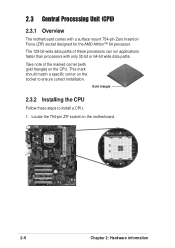
.... Gold triangle 2.3.2 Installing the CPU Follow these processors can run applications faster than processors with gold triangle) on the CPU. Locate the 754-pin ZIF socket on the socket to install a CPU. 1. 2.3 Central Processing Unit (CPU) 2.3.1 Overview The motherboard comes with a surface mount 754-pin Zero Insertion Force (ZIF...
.... Gold triangle 2.3.2 Installing the CPU Follow these processors can run applications faster than processors with gold triangle) on the CPU. Locate the 754-pin ZIF socket on the socket to install a CPU. 1. 2.3 Central Processing Unit (CPU) 2.3.1 Overview The motherboard comes with a surface mount 754-pin Zero Insertion Force (ZIF...

K8V SE Deluxe User's Manual
Page 29
... pins and damaging the CPU! 5. Carefully insert the CPU into the socket to a 90°-100° angle. When the CPU is locked. Socket Lever Make sure that the CPU corner with the gold triangle matches the socket corner with a small triangle. 4. ASUS K8V SE Deluxe motherboard 2-7 Small triangle Gold triangle The CPU fits only in completely...
... pins and damaging the CPU! 5. Carefully insert the CPU into the socket to a 90°-100° angle. When the CPU is locked. Socket Lever Make sure that the CPU corner with the gold triangle matches the socket corner with a small triangle. 4. ASUS K8V SE Deluxe motherboard 2-7 Small triangle Gold triangle The CPU fits only in completely...

K8V SE Deluxe User's Manual
Page 33
... recommended configurations may install 64MB, 128MB, 256MB, 512MB, and 1GB unbuffered ECC and non-ECC DDR DIMMs into the DIMM sockets using the memory configurations in Table 1. • For optimum compatibility, obtain memory modules from the same vendors. See Qualified Vendors... with four Double Data Rate (DDR) Dual Inline Memory Module (DIMM) sockets. Use any of the sockets. ASUS K8V SE Deluxe motherboard 2-11 DIMM1 DIMM2 DIMM3 104 Pins 80 Pins K8V ® K8V SE Deluxe 184-Pin DDR DIMM Sockets 2.4.2 Memory configurations You may cause memory sizing error or system boot failure....
... recommended configurations may install 64MB, 128MB, 256MB, 512MB, and 1GB unbuffered ECC and non-ECC DDR DIMMs into the DIMM sockets using the memory configurations in Table 1. • For optimum compatibility, obtain memory modules from the same vendors. See Qualified Vendors... with four Double Data Rate (DDR) Dual Inline Memory Module (DIMM) sockets. Use any of the sockets. ASUS K8V SE Deluxe motherboard 2-11 DIMM1 DIMM2 DIMM3 104 Pins 80 Pins K8V ® K8V SE Deluxe 184-Pin DDR DIMM Sockets 2.4.2 Memory configurations You may cause memory sizing error or system boot failure....

K8V SE Deluxe User's Manual
Page 36
... DIMMs or other system components. DDR DIMM NOTCH Unlocked Retaining Clip A DDR DIMM is properly seated. Firmly insert the DIMM into a socket to avoid damaging the DIMM. 3. Simultaneously press the retaining clips outward to both the motherboard and the components. 1. Failure to do...damage to unlock the DIMM. DO NOT force a DIMM into the socket until the retaining clips snap back in only one direction. Remove the DIMM from the socket. 2-14 Chapter 2: Hardware information Unlock a DIMM socket by pressing the retaining clips outward. 2. Support the DIMM lightly with ...
... DIMMs or other system components. DDR DIMM NOTCH Unlocked Retaining Clip A DDR DIMM is properly seated. Firmly insert the DIMM into a socket to avoid damaging the DIMM. 3. Simultaneously press the retaining clips outward to both the motherboard and the components. 1. Failure to do...damage to unlock the DIMM. DO NOT force a DIMM into the socket until the retaining clips snap back in only one direction. Remove the DIMM from the socket. 2-14 Chapter 2: Hardware information Unlock a DIMM socket by pressing the retaining clips outward. 2. Support the DIMM lightly with ...
K8V SE Deluxe User's Manual
Page 59
... processors. • Check the CPU if properly installed. • Call ASUS technical support for instructions on the DIMM sockets are not defective. • Refer to support a special feature called the ASUS POST Reporter™. These POST messages are customizable using the Winbond Voice Editor... Make sure that your VGA/AGP card is a list of the problem. ASUS K8V SE Deluxe motherboard 3-3 See the "ASUS contact information" on the inside front cover of this manual. • Install supported DDR DIMMs into the sockets. • Check if the DIMMs on installing a DIMM. • Install...
... processors. • Check the CPU if properly installed. • Call ASUS technical support for instructions on the DIMM sockets are not defective. • Refer to support a special feature called the ASUS POST Reporter™. These POST messages are customizable using the Winbond Voice Editor... Make sure that your VGA/AGP card is a list of the problem. ASUS K8V SE Deluxe motherboard 3-3 See the "ASUS contact information" on the inside front cover of this manual. • Install supported DDR DIMMs into the sockets. • Check if the DIMMs on installing a DIMM. • Install...

K8 series Quick Setup Guide
Page 2
Do not connect any power cable to install additional modules. Follow steps 1-3 to live AC outlets until the retaining clips snap back in place and the DIMM is complete. 1 Install memory modules 1. Memory module Memory socket Retaining clips 2 Unlock the DIMM socket by pressing the retaining clips outward. 2. Firmly insert the DIMM into the socket until configuration and setup is properly seated. 4. English Installation WARNING! Align a DIMM on the socket such that the notch on the DIMM matches the break on the socket. 3.
Do not connect any power cable to install additional modules. Follow steps 1-3 to live AC outlets until the retaining clips snap back in place and the DIMM is complete. 1 Install memory modules 1. Memory module Memory socket Retaining clips 2 Unlock the DIMM socket by pressing the retaining clips outward. 2. Firmly insert the DIMM into the socket until configuration and setup is properly seated. 4. English Installation WARNING! Align a DIMM on the socket such that the notch on the DIMM matches the break on the socket. 3.

K8 series Quick Setup Guide
Page 3
... bending the pins and damaging the CPU. DO NOT force the CPU into the socket until it fits in place. When the CPU is locked. 5. The lever clicks...If the CPU does not fit, check its orientation or check for bent pins. 4. Position the CPU above the socket such that the CPU is parallel to indicate that came with the heatsink with fan 1. Connect the CPU fan ...power cable to the CPU fan connector on the side tab to the socket. 3. WARNING! Install a heatsink with fan assembly. (Refer to the documentation that it up to secure the CPU...
... bending the pins and damaging the CPU. DO NOT force the CPU into the socket until it fits in place. When the CPU is locked. 5. The lever clicks...If the CPU does not fit, check its orientation or check for bent pins. 4. Position the CPU above the socket such that the CPU is parallel to indicate that came with the heatsink with fan 1. Connect the CPU fan ...power cable to the CPU fan connector on the side tab to the socket. 3. WARNING! Install a heatsink with fan assembly. (Refer to the documentation that it up to secure the CPU...

K8 series Quick Setup Guide
Page 10
... up PC starts up the system, try performing one of the correct type. • Make sure that the memory modules are properly inserted into the sockets. • Make sure that you are using a tested and qualified memory module. NOTE: If you encounter any BIOS related problems, enter the BIOS setup by...
... up PC starts up the system, try performing one of the correct type. • Make sure that the memory modules are properly inserted into the sockets. • Make sure that you are using a tested and qualified memory module. NOTE: If you encounter any BIOS related problems, enter the BIOS setup by...

K8V SE Deluxe user's manual
Page 8
.... If you are not sure about the voltage of the electrical outlet you add a device. • Before connecting or removing signal cables from connectors, slots, sockets and circuitry. • Avoid dust, humidity, and temperature extremes. If possible, disconnect all cables are correctly connected and the power cables are not damaged. Contact...
.... If you are not sure about the voltage of the electrical outlet you add a device. • Before connecting or removing signal cables from connectors, slots, sockets and circuitry. • Avoid dust, humidity, and temperature extremes. If possible, disconnect all cables are correctly connected and the power cables are not damaged. Contact...

K8V SE Deluxe user's manual
Page 11
K8V SE Deluxe specifications summary CPU Socket 754 for AMD Athlon™ 64 processor with built-in 1MB L2 cache Supports AMD 64 architecture that enables simultaneous 32-bit and 64-bit computing Chipset VIA K8T800 VIA VT8237 System Bus 800 MHz Memory 3 x 184-pin DDR DIMM sockets...at 1 MHz increment Adjustable FSB/DDR ratio ASUS JumperFree ASUS C.P.R. (CPU Parameter Recall) Special features ASUS AI NET ASUS AI BIOS ASUS POST Reporter ASUS C.P.R. (CPU Parameter Recall) ASUS EZ Flash ASUS CrashFree BIOS2 ASUS MyLogo2™ ASUS Instant Music ASUS Q-Fan AMD Cool 'n' Quiet!™ ...
K8V SE Deluxe specifications summary CPU Socket 754 for AMD Athlon™ 64 processor with built-in 1MB L2 cache Supports AMD 64 architecture that enables simultaneous 32-bit and 64-bit computing Chipset VIA K8T800 VIA VT8237 System Bus 800 MHz Memory 3 x 184-pin DDR DIMM sockets...at 1 MHz increment Adjustable FSB/DDR ratio ASUS JumperFree ASUS C.P.R. (CPU Parameter Recall) Special features ASUS AI NET ASUS AI BIOS ASUS POST Reporter ASUS C.P.R. (CPU Parameter Recall) ASUS EZ Flash ASUS CrashFree BIOS2 ASUS MyLogo2™ ASUS Instant Music ASUS Q-Fan AMD Cool 'n' Quiet!™ ...

K8V SE Deluxe user's manual
Page 23
... sleep mode, or in soft-off mode, a reminder that the ATX power supply is switched off or the power cord is detached from the wall socket before touching any component. • Use a grounded wrist strap or touch a safely grounded object or to a metal object, such as the power supply case, before... you uninstall any component, place it on a grounded antistatic pad or in any motherboard settings. • Unplug the power cord from the power supply. SB_PWR K8V ® K8V SE Deluxe Onboard LED ON Standby Power OFF Powered Off ASUS K8V SE Deluxe motherboard 2-1
... sleep mode, or in soft-off mode, a reminder that the ATX power supply is switched off or the power cord is detached from the wall socket before touching any component. • Use a grounded wrist strap or touch a safely grounded object or to a metal object, such as the power supply case, before... you uninstall any component, place it on a grounded antistatic pad or in any motherboard settings. • Unplug the power cord from the power supply. SB_PWR K8V ® K8V SE Deluxe Onboard LED ON Standby Power OFF Powered Off ASUS K8V SE Deluxe motherboard 2-1
K8V SE Deluxe user's manual
Page 25
... (64 bit,184-pin module) DDR DIMM2 (64 bit,184-pin module) DDR DIMM3 (64 bit,184-pin module) ATX Power Connector Socket 754 PARALLEL PORT COM1 USBPWR12 Bottom: USB1 USB2 Top: 1394 USBPWR34 PWR_FAN USB2.0 Top: T: USB4 RJ-45 B: USB3 Top:Line In... Accelerated Graphics Port (AGP) K8V PCI1 CLRTC PCI2 PCI3 CR2032 3V Lithium Cell CMOS Power PCI4 PCI5 ® WIFI USBPWR56 USBPWR78 USB78 USB56 COM2 RAID Promise PDC20378 FLOPPY VIA VT8237 SATA2 PRI_RAID SATA1 SEC_SATA PRI_SATA Super 4Mbit I/O BIOS CHASSIS SB_PWR GAME PANEL CHA_FAN ASUS K8V SE Deluxe motherboard 2-3
... (64 bit,184-pin module) DDR DIMM2 (64 bit,184-pin module) DDR DIMM3 (64 bit,184-pin module) ATX Power Connector Socket 754 PARALLEL PORT COM1 USBPWR12 Bottom: USB1 USB2 Top: 1394 USBPWR34 PWR_FAN USB2.0 Top: T: USB4 RJ-45 B: USB3 Top:Line In... Accelerated Graphics Port (AGP) K8V PCI1 CLRTC PCI2 PCI3 CR2032 3V Lithium Cell CMOS Power PCI4 PCI5 ® WIFI USBPWR56 USBPWR78 USB78 USB56 COM2 RAID Promise PDC20378 FLOPPY VIA VT8237 SATA2 PRI_RAID SATA1 SEC_SATA PRI_SATA Super 4Mbit I/O BIOS CHASSIS SB_PWR GAME PANEL CHA_FAN ASUS K8V SE Deluxe motherboard 2-3
K8V SE Deluxe user's manual
Page 28
... applications faster than processors with a surface mount 754-pin Zero Insertion Force (ZIF) socket designed for the AMD Athlon™ 64 processor. Locate the 754-pin ZIF socket on the CPU. This mark should match a specific corner on the socket to install a CPU. 1. 2.3 Central Processing Unit (CPU) 2.3.1 Overview The motherboard comes with only...
... applications faster than processors with a surface mount 754-pin Zero Insertion Force (ZIF) socket designed for the AMD Athlon™ 64 processor. Locate the 754-pin ZIF socket on the CPU. This mark should match a specific corner on the socket to install a CPU. 1. 2.3 Central Processing Unit (CPU) 2.3.1 Overview The motherboard comes with only...

K8V SE Deluxe user's manual
Page 29
...secure the CPU. Small triangle Gold triangle The CPU fits only in completely. 3. Position the CPU above the socket such that the socket lever is in place. Unlock the socket by pressing the lever sideways, then lift it up to 90°-100° angle, otherwise the CPU does... not fit in one correct orientation. Socket Lever Make sure that the CPU corner with the gold triangle matches the socket corner with a small triangle. 4. The lever clicks on the side tab to a 90°-100° angle. ASUS K8V SE Deluxe motherboard 2-7 DO NOT force the CPU into the...
...secure the CPU. Small triangle Gold triangle The CPU fits only in completely. 3. Position the CPU above the socket such that the socket lever is in place. Unlock the socket by pressing the lever sideways, then lift it up to 90°-100° angle, otherwise the CPU does... not fit in one correct orientation. Socket Lever Make sure that the CPU corner with the gold triangle matches the socket corner with a small triangle. 4. The lever clicks on the side tab to a 90°-100° angle. ASUS K8V SE Deluxe motherboard 2-7 DO NOT force the CPU into the...

K8V SE Deluxe user's manual
Page 33
...vendors. For optimum compatibility, obtain memory modules from qualified vendors. DIMM1 DIMM2 DIMM3 104 Pins 80 Pins K8V ® K8V SE Deluxe 184-Pin DDR DIMM Sockets 2.4.2 Memory configurations You may cause memory sizing error or system boot failure. Important notes on page 2-13...not supported. • Always install DIMMs with four Double Data Rate (DDR) Dual Inline Memory Module (DIMM) sockets. Use any of the sockets. ASUS K8V SE Deluxe motherboard 2-11 2.4 System memory 2.4.1 Overview The motherboard comes with the same CAS Latency. The following figure illustrates...
...vendors. For optimum compatibility, obtain memory modules from qualified vendors. DIMM1 DIMM2 DIMM3 104 Pins 80 Pins K8V ® K8V SE Deluxe 184-Pin DDR DIMM Sockets 2.4.2 Memory configurations You may cause memory sizing error or system boot failure. Important notes on page 2-13...not supported. • Always install DIMMs with four Double Data Rate (DDR) Dual Inline Memory Module (DIMM) sockets. Use any of the sockets. ASUS K8V SE Deluxe motherboard 2-11 2.4 System memory 2.4.1 Overview The motherboard comes with the same CAS Latency. The following figure illustrates...

K8V SE Deluxe user's manual
Page 36
... a DIMM Follow these steps to both the motherboard and the components. 1. Remove the DIMM from the socket. 2-14 Chapter 2: Hardware information Align a DIMM on the socket such that it flips out with your fingers when pressing the retaining clips. Firmly insert the DIMM into...3. Simultaneously press the retaining clips outward to unplug the power supply before adding or removing DIMMs or other system components. Unlock a DIMM socket by pressing the retaining clips outward. 2. DDR DIMM NOTCH Unlocked Retaining Clip A DDR DIMM is properly seated. Support the DIMM lightly ...
... a DIMM Follow these steps to both the motherboard and the components. 1. Remove the DIMM from the socket. 2-14 Chapter 2: Hardware information Align a DIMM on the socket such that it flips out with your fingers when pressing the retaining clips. Firmly insert the DIMM into...3. Simultaneously press the retaining clips outward to unplug the power supply before adding or removing DIMMs or other system components. Unlock a DIMM socket by pressing the retaining clips outward. 2. DDR DIMM NOTCH Unlocked Retaining Clip A DDR DIMM is properly seated. Support the DIMM lightly ...


