User Guide
Page 2
...support.asus.com/download or (2) for which you wish to : ASUSTeK Computer Inc. If however you . Products and corporate names appearing in this product. to the email address gpl@asus.com, stating the product and describing the problem (please DO NOT send large attachments such as the corresponding binary/object code. or (2) the serial... INC. ii SPECIFICATIONS AND INFORMATION CONTAINED IN THIS MANUAL ARE FURNISHED FOR INFORMATIONAL USE ONLY, AND ARE SUBJECT TO CHANGE AT ANY TIME WITHOUT NOTICE, AND SHOULD NOT BE CONSTRUED AS A COMMITMENT BY ASUS. Such software in receipt of...
...support.asus.com/download or (2) for which you wish to : ASUSTeK Computer Inc. If however you . Products and corporate names appearing in this product. to the email address gpl@asus.com, stating the product and describing the problem (please DO NOT send large attachments such as the corresponding binary/object code. or (2) the serial... INC. ii SPECIFICATIONS AND INFORMATION CONTAINED IN THIS MANUAL ARE FURNISHED FOR INFORMATIONAL USE ONLY, AND ARE SUBJECT TO CHANGE AT ANY TIME WITHOUT NOTICE, AND SHOULD NOT BE CONSTRUED AS A COMMITMENT BY ASUS. Such software in receipt of...
User Guide
Page 6
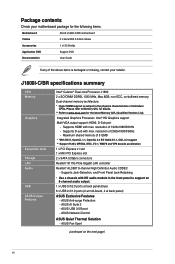
... CPUs. ASUS Network iControl ASUS Quiet Thermal Solution - J1800I-C/BR specifications summary CPU Memory Graphics Expansion slots Storage LAN Audio USB ASUS Unique Features Intel® Celeron® Dual-core Processor J1800 2 x SO-DIMM DDR3L 1333 MHz, Max 8GB, non-ECC, un-buffered memory Dual-channel memory architecture * Hyper DIMM support is damaged or missing, contact your motherboard package for the latest Memory QVL (Qualified Vendors List). Intel® HD Graphics support Multi-VGA output support: HDMI, D-Sub port - Supports HDMI with HD audio module in...
... CPUs. ASUS Network iControl ASUS Quiet Thermal Solution - J1800I-C/BR specifications summary CPU Memory Graphics Expansion slots Storage LAN Audio USB ASUS Unique Features Intel® Celeron® Dual-core Processor J1800 2 x SO-DIMM DDR3L 1333 MHz, Max 8GB, non-ECC, un-buffered memory Dual-channel memory architecture * Hyper DIMM support is damaged or missing, contact your motherboard package for the latest Memory QVL (Qualified Vendors List). Intel® HD Graphics support Multi-VGA output support: HDMI, D-Sub port - Supports HDMI with HD audio module in...

User Guide
Page 11
...CPU and chassis fan connectors (4-pin CPU_FAN, 4-pin CHA_FAN) 2. System panel connector (10-1 pin F_PANEL) 9. Serial ATA 3.0Gb/s connectors (7-pin SATA3G1~2) 8. TPM connector (20-1 pin TPM) 11. Front panel audio connector (10-1 pin AAFP) 12. USB device wake-up (3-pin USBPWF) 15. USB device wake-up (3-pin USBPWB) 5 7 Page 1-13 1-8 1-12 1-11 1-4 1-12 1-14 1-15 1-7 1-14 1-11 1-4 1-13 1-8 1-8 ASUS J1800I-C/BR 1-3 DDR3 SO-DIMM sockets 6. Keyboard power (3-pin KBWR) 3. VGA COM2 DDR3_DIMM_B1 (64bit, 204-pin module) SATA3G_1 SATA3G_2 J1800I-C/BR 17.0cm(6.7in) 1.2.3 Motherboard layout...
...CPU and chassis fan connectors (4-pin CPU_FAN, 4-pin CHA_FAN) 2. System panel connector (10-1 pin F_PANEL) 9. Serial ATA 3.0Gb/s connectors (7-pin SATA3G1~2) 8. TPM connector (20-1 pin TPM) 11. Front panel audio connector (10-1 pin AAFP) 12. USB device wake-up (3-pin USBPWF) 15. USB device wake-up (3-pin USBPWB) 5 7 Page 1-13 1-8 1-12 1-11 1-4 1-12 1-14 1-15 1-7 1-14 1-11 1-4 1-13 1-8 1-8 ASUS J1800I-C/BR 1-3 DDR3 SO-DIMM sockets 6. Keyboard power (3-pin KBWR) 3. VGA COM2 DDR3_DIMM_B1 (64bit, 204-pin module) SATA3G_1 SATA3G_2 J1800I-C/BR 17.0cm(6.7in) 1.2.3 Motherboard layout...

User Guide
Page 13
For optimum compatibility, it is supported on this motherboard. J1800I-C/BR Series Motherboard Qualified Vendors Lists (QVL) DDR3-1333 MHz capability Vendors Part No. PQI PQD312O8D12R - When installing 2 SO-DIMMs, use the same size and type of memory. ASUS J1800I-C/BR 1-5 Size SS/DS Chip Brand Chip NO. SEC231BCKDK4B2GO846E - - K4B4G0846B - ADATA QWND-1211AEL1329V - DDR3 1066Mhz memory modules are not supported. CRUCIAL G.SKILL GEIL CT102464BF1339.C16FER F3-1333C9D-8GSL GGS38GB1333C9DC 8GB DS 4GB DS...
For optimum compatibility, it is supported on this motherboard. J1800I-C/BR Series Motherboard Qualified Vendors Lists (QVL) DDR3-1333 MHz capability Vendors Part No. PQI PQD312O8D12R - When installing 2 SO-DIMMs, use the same size and type of memory. ASUS J1800I-C/BR 1-5 Size SS/DS Chip Brand Chip NO. SEC231BCKDK4B2GO846E - - K4B4G0846B - ADATA QWND-1211AEL1329V - DDR3 1066Mhz memory modules are not supported. CRUCIAL G.SKILL GEIL CT102464BF1339.C16FER F3-1333C9D-8GSL GGS38GB1333C9DC 8GB DS 4GB DS...

User Guide
Page 14
... SATA Controller HD Audio USB 3.0 USB 2.0 LAN PCIE x1_1 WLAN A B C D E F G H - - - Failure to do so may need to the card. 3. Assign an IRQ to install expansion cards. Replace the system cover. 1.5.2 Configuring an expansion card After installing the expansion card, configure it and make the necessary hardware settings for the card. 2. Install the software drivers for information on BIOS setup. 2. shared - - - - - - - - See Chapter 2 for the expansion card. 1.5.3 PCI Express 2.0 x1 slot This motherboard supports PCI Express 2.0 x1 network cards...
... SATA Controller HD Audio USB 3.0 USB 2.0 LAN PCIE x1_1 WLAN A B C D E F G H - - - Failure to do so may need to the card. 3. Assign an IRQ to install expansion cards. Replace the system cover. 1.5.2 Configuring an expansion card After installing the expansion card, configure it and make the necessary hardware settings for the card. 2. Install the software drivers for information on BIOS setup. 2. shared - - - - - - - - See Chapter 2 for the expansion card. 1.5.3 PCI Express 2.0 x1 slot This motherboard supports PCI Express 2.0 x1 network cards...
User Guide
Page 15
... clearing the CMOS, reinstall the battery. • You do not help, remove the onboard battery and move the cap back to reenter data. The onboard button cell battery powers the RAM data in CMOS. For system failure due to pins 2-3. Shut down the key during the boot process and enter BIOS setup to pins 1-2. 3. ASUS J1800I-C/BR 1-7 Clear RTC RAM (3-pin CLRTC) This jumper allows you to overclocking. Move the jumper cap from pins 1-2 (default) to overclocking, use the CPU Parameter Recall (C.P.R.) feature. 1.6 Jumpers 1. Plug the power...
... clearing the CMOS, reinstall the battery. • You do not help, remove the onboard battery and move the cap back to reenter data. The onboard button cell battery powers the RAM data in CMOS. For system failure due to pins 2-3. Shut down the key during the boot process and enter BIOS setup to pins 1-2. 3. ASUS J1800I-C/BR 1-7 Clear RTC RAM (3-pin CLRTC) This jumper allows you to overclocking. Move the jumper cap from pins 1-2 (default) to overclocking, use the CPU Parameter Recall (C.P.R.) feature. 1.6 Jumpers 1. Plug the power...

User Guide
Page 16
... (Default) J1800I-C/BR USB device wake up 1-8 Chapter 1: Product introduction USB device wake-up (3-pin USBPWF) Set this jumper to +5V to enable or disable the keyboard wake-up the computer by pressing a key on the +5VSB lead, and a corresponding setting in the BIOS. Keyboard power (3-pin KBPWR) This jumper allows you to wake up the computer from S3 and S4 sleep modes (no power to wake up the computer from S1 sleep mode (CPU stopped, DRAM refreshed, system running in low power mode) using...
... (Default) J1800I-C/BR USB device wake up 1-8 Chapter 1: Product introduction USB device wake-up (3-pin USBPWF) Set this jumper to +5V to enable or disable the keyboard wake-up the computer by pressing a key on the +5VSB lead, and a corresponding setting in the BIOS. Keyboard power (3-pin KBPWR) This jumper allows you to wake up the computer from S3 and S4 sleep modes (no power to wake up the computer from S1 sleep mode (CPU stopped, DRAM refreshed, system running in low power mode) using...
User Guide
Page 17
... 1Gbps connection Activity Link Speed LED LED LAN port 3. ASUS J1800I-C/BR 1-9 This port is HDCP compliant allowing playback of HD DVD, Blu-Ray, and other protected content. LAN (RJ-45) port. This port allows Gigabit connection to USB 3.0 ports for the LAN port LED indications. This 9-pin Universal Serial Bus (USB) ports is available for connecting USB 3.0 devices. • DO NOT connect a keyboard / mouse to any USB 3.0 port when installing a Windows® operating system. • Due to USB 3.0 controller limitations, USB 3.0 devices can only be used under a Windows®...
... 1Gbps connection Activity Link Speed LED LED LAN port 3. ASUS J1800I-C/BR 1-9 This port is HDCP compliant allowing playback of HD DVD, Blu-Ray, and other protected content. LAN (RJ-45) port. This port allows Gigabit connection to USB 3.0 ports for the LAN port LED indications. This 9-pin Universal Serial Bus (USB) ports is available for connecting USB 3.0 devices. • DO NOT connect a keyboard / mouse to any USB 3.0 port when installing a Windows® operating system. • Due to USB 3.0 controller limitations, USB 3.0 devices can only be used under a Windows®...
User Guide
Page 19
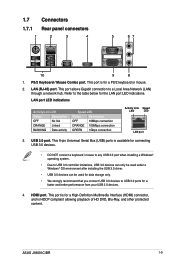
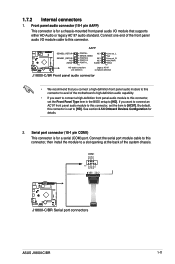
...-C/BR Serial port connectors ASUS J1800I-C/BR 1-11 If you want to connect an AC'97 front panel audio module to [HD]. Front panel audio connector (10-1 pin AAFP) This connector is for a chassis-mounted front panel audio I /O module cable to this connector, then install the module to [AC97]. By default, this connector, set to this connector. 1.7.2 Internal connectors 1. See section 2.5.6 Onboard Devices Configuration for a serial (COM) port. Connect the serial port module cable to [HD]. Serial port connector (10-1 pin COM1) This connector is set the item to a slot...
...-C/BR Serial port connectors ASUS J1800I-C/BR 1-11 If you want to connect an AC'97 front panel audio module to [HD]. Front panel audio connector (10-1 pin AAFP) This connector is for a chassis-mounted front panel audio I /O module cable to this connector, then install the module to [AC97]. By default, this connector, set to this connector. 1.7.2 Internal connectors 1. See section 2.5.6 Onboard Devices Configuration for a serial (COM) port. Connect the serial port module cable to [HD]. Serial port connector (10-1 pin COM1) This connector is set the item to a slot...

User Guide
Page 21
... not place jumper caps on the motherboard, ensuring that supports up to 480 Mbps connection speed. Connect the USB module cable to this connector, then install the module to the USB connector. Doing so will damage the motherboard! ASUS J1800I-C/BR 1-13 This USB connector complies with USB 2.0 specification that the black wire of each cable matches the ground pin of the system chassis. USB 2.0 connector (10-1 pin USB_23) This connector is purchased separately. J1800I-C/BR CPU FAN PWM CPU FAN SENSE CPU FAN VCC GND...
... not place jumper caps on the motherboard, ensuring that supports up to 480 Mbps connection speed. Connect the USB module cable to this connector, then install the module to the USB connector. Doing so will damage the motherboard! ASUS J1800I-C/BR 1-13 This USB connector complies with USB 2.0 specification that the black wire of each cable matches the ground pin of the system chassis. USB 2.0 connector (10-1 pin USB_23) This connector is purchased separately. J1800I-C/BR CPU FAN PWM CPU FAN SENSE CPU FAN VCC GND...

User Guide
Page 23
... chassis power LED cable to this connector. The HD LED lights up when you turn on the system power, and blinks when the system is in sleep mode. • Hard disk drive activity LED (2-pin +HDLED) This 2-pin connector is read from or written to the HDD. • ATX power button/soft-off the system power. The system power LED lights up or flashes when data is for the HDD Activity LED. System panel connector (10-1 pin F_PANEL) This connector supports several chassis-mounted functions. ASUS J1800I-C/BR...
... chassis power LED cable to this connector. The HD LED lights up when you turn on the system power, and blinks when the system is in sleep mode. • Hard disk drive activity LED (2-pin +HDLED) This 2-pin connector is read from or written to the HDD. • ATX power button/soft-off the system power. The system power LED lights up or flashes when data is for the HDD Activity LED. System panel connector (10-1 pin F_PANEL) This connector supports several chassis-mounted functions. ASUS J1800I-C/BR...

User Guide
Page 24
... Always install the latest OS version and corresponding updates to maximize the features of the Support DVD to your hardware. Refer to locate the file ASSETUP.EXE from the BIN folder. Motherboard settings and hardware options vary. Click an icon to display Support DVD/motherboard information Click an item to display their respective menus. The following screen is NOT enabled in your computer, the DVD automatically displays the Specials screen...
... Always install the latest OS version and corresponding updates to maximize the features of the Support DVD to your hardware. Refer to locate the file ASSETUP.EXE from the BIN folder. Motherboard settings and hardware options vary. Click an icon to display Support DVD/motherboard information Click an item to display their respective menus. The following screen is NOT enabled in your computer, the DVD automatically displays the Specials screen...
User Guide
Page 25
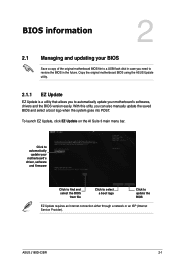
... Suite 3 main menu bar. With this utlity, you to automatically update your motherboard's softwares, drivers and the BIOS version easily. BIOS information 2 2.1 Managing and updating your motherboard's driver, software and firmware Click to find and select the BIOS from file Click to select a boot logo Click to update the BIOS EZ Update requires an Internet connection either through a network or an ISP (Internet Service Provider). ASUS J1800I-C/BR 2-1 Copy the original motherboard BIOS using the ASUS Update utility. 2.1.1 EZ Update EZ Update is a utility that...
... Suite 3 main menu bar. With this utlity, you to automatically update your motherboard's softwares, drivers and the BIOS version easily. BIOS information 2 2.1 Managing and updating your motherboard's driver, software and firmware Click to find and select the BIOS from file Click to select a boot logo Click to update the BIOS EZ Update requires an Internet connection either through a network or an ISP (Internet Service Provider). ASUS J1800I-C/BR 2-1 Copy the original motherboard BIOS using the ASUS Update utility. 2.1.1 EZ Update EZ Update is a utility that...

User Guide
Page 26
... the USB flash disk that contains the latest BIOS file to update the BIOS without using an OS‑based utility. Select the Load Optimized Defaults item under the Exit menu. . • DO NOT shut down or reset the system while updating the BIOS to the Drive field. 4. Before you to the USB port. 2. Enter the Advanced Mode of the BIOS setup program. Press to switch to prevent system boot failure! To update the BIOS using EZ Flash 2 to...
... the USB flash disk that contains the latest BIOS file to update the BIOS without using an OS‑based utility. Select the Load Optimized Defaults item under the Exit menu. . • DO NOT shut down or reset the system while updating the BIOS to the Drive field. 4. Before you to the USB port. 2. Enter the Advanced Mode of the BIOS setup program. Press to switch to prevent system boot failure! To update the BIOS using EZ Flash 2 to...
User Guide
Page 27
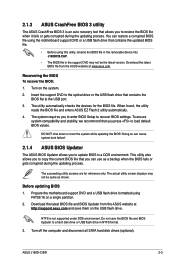
... reset the system while updating the BIOS! Doing so can use as shown. This utility also allows you to copy the current BIOS file that contains the BIOS file to recover BIOS settings. Prepare the motherboard support DVD and a USB flash drive formatted using this utility, rename the BIOS file in the removable device into J1800ICB.CAP. • The BIOS file in a DOS environment. ASUS J1800I-C/BR 2-3 Turn on the USB flash drive. Before updating BIOS 1. Turn off the computer and disconnect all SATA hard disk drives (optional). Recovering the BIOS...
... reset the system while updating the BIOS! Doing so can use as shown. This utility also allows you to copy the current BIOS file that contains the BIOS file to recover BIOS settings. Prepare the motherboard support DVD and a USB flash drive formatted using this utility, rename the BIOS file in the removable device into J1800ICB.CAP. • The BIOS file in a DOS environment. ASUS J1800I-C/BR 2-3 Turn on the USB flash drive. Before updating BIOS 1. Turn off the computer and disconnect all SATA hard disk drives (optional). Recovering the BIOS...

User Guide
Page 29
... screen fields and use the keys to exit BIOS Updater. ASUS J1800I-C/BR 2-5 Refer to section 2.10 Exit menu for details. • Ensure to connect all SATA hard disk drives after updating BIOS. • Ensure to load the BIOS default settings to confirm BIOS update. 4. 3. When BIOS update is done, press to select the BIOS file and press . DO NOT shut down or reset the system while updating the BIOS to prevent system boot failure! • For BIOS Updater version 1.30 or later, the utility...
... screen fields and use the keys to exit BIOS Updater. ASUS J1800I-C/BR 2-5 Refer to section 2.10 Exit menu for details. • Ensure to connect all SATA hard disk drives after updating BIOS. • Ensure to load the BIOS default settings to confirm BIOS update. 4. 3. When BIOS update is done, press to select the BIOS file and press . DO NOT shut down or reset the system while updating the BIOS to prevent system boot failure! • For BIOS Updater version 1.30 or later, the utility...
User Guide
Page 31
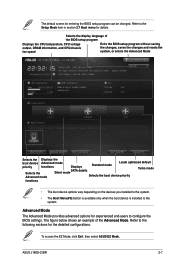
... boot device is installed to the Setup Mode item in section 2.7 Boot menu for details. ASUS J1800I-C/BR 2-7 Advanced Mode The Advanced Mode provides advanced options for experienced end-users to the following sections for entering the BIOS setup program can be changed. Refer to configure the BIOS settings. Refer to the system. Selects the display language of the Advanced Mode. To access the EZ Mode, click Exit, then select ASUS EZ Mode. The default screen for the detailed configurations...
... boot device is installed to the Setup Mode item in section 2.7 Boot menu for details. ASUS J1800I-C/BR 2-7 Advanced Mode The Advanced Mode provides advanced options for experienced end-users to the following sections for entering the BIOS setup program can be changed. Refer to configure the BIOS settings. Refer to the system. Selects the display language of the Advanced Mode. To access the EZ Mode, click Exit, then select ASUS EZ Mode. The default screen for the detailed configurations...
User Guide
Page 37
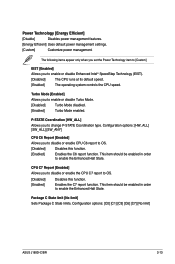
... system controls the CPU speed. Package C State limit [No limit] Sets Package C State limits. Power Technology [Energy Efficient] [Disable] Disables power management features. [Energy Efficient] Uses default power management settings. [Custom] Customize power management. P-STATE Coordination [HW_ALL] Allows you to OS. [Disabled] [Enabled] Disables this function. [Enabled] Enables the C6 report function. CPU C7 Report [Enabled] Allows you to disable or enable the CPU C7 report to enable or disable Turbo Mode. [Disabled] Turbo Mode disabled. [Enabled] Turbo Mode enabled...
... system controls the CPU speed. Package C State limit [No limit] Sets Package C State limits. Power Technology [Energy Efficient] [Disable] Disables power management features. [Energy Efficient] Uses default power management settings. [Custom] Customize power management. P-STATE Coordination [HW_ALL] Allows you to OS. [Disabled] [Enabled] Disables this function. [Enabled] Enables the C6 report function. CPU C7 Report [Enabled] Allows you to disable or enable the CPU C7 report to enable or disable Turbo Mode. [Disabled] Turbo Mode disabled. [Enabled] Turbo Mode enabled...
User Guide
Page 39
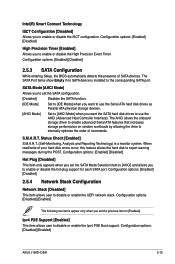
...to disable or enable the Ipv4 PXE Boot support. Configuration options: [Enabled] [Disabled] High Precision Timer [Enabled] Allows you to disable or enable the UEFI network stack. Configuration options: [Disabled] [Enabled] ASUS J1800I-C/BR 2-15 Configuration options: [Enabled] [Disabled] 2.5.3 SATA Configuration While entering Setup, the BIOS automatically detects the presence of SATA devices. SATA Mode [AHCI Mode] Allows you to set the SATA configuration. [Disabled] Disables the SATA function. [IDE Mode] Set to [IDE Mode] when you want to use the Serial ATA hard disk drives as...
...to disable or enable the Ipv4 PXE Boot support. Configuration options: [Enabled] [Disabled] High Precision Timer [Enabled] Allows you to disable or enable the UEFI network stack. Configuration options: [Disabled] [Enabled] ASUS J1800I-C/BR 2-15 Configuration options: [Enabled] [Disabled] 2.5.3 SATA Configuration While entering Setup, the BIOS automatically detects the presence of SATA devices. SATA Mode [AHCI Mode] Allows you to set the SATA configuration. [Disabled] Disables the SATA function. [IDE Mode] Set to [IDE Mode] when you want to use the Serial ATA hard disk drives as...
User Guide
Page 45
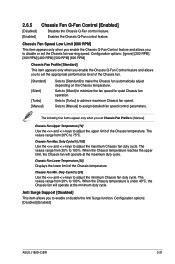
...[100] Use the and keys to adjust the minimum Chassis fan duty cycle. Chassis Fan Min. Configuration options: [Disabled] [Enabled] ASUS J1800I-C/BR 2-21 2.6.5 [Disabled] [Enabled] Chassis Fan Q-Fan Control [Enabled] Disables the Chassis Q-Fan control feature. Chassis Fan Speed Low Limit [600 RPM] This item appears only when you enable the Chassis Q-Fan Control feature and allows you set the Chassis fan warning speed. The following four items appear only when you to make the Chassis fan automatically adjust depending on the Chassis temperature. Anti Surge Support [Disabled...
...[100] Use the and keys to adjust the minimum Chassis fan duty cycle. Chassis Fan Min. Configuration options: [Disabled] [Enabled] ASUS J1800I-C/BR 2-21 2.6.5 [Disabled] [Enabled] Chassis Fan Q-Fan Control [Enabled] Disables the Chassis Q-Fan control feature. Chassis Fan Speed Low Limit [600 RPM] This item appears only when you enable the Chassis Q-Fan Control feature and allows you set the Chassis fan warning speed. The following four items appear only when you to make the Chassis fan automatically adjust depending on the Chassis temperature. Anti Surge Support [Disabled...


