
User Guide
Page 3
... About this guide iv Package contents vi H61M-CS specifications summary vi Chapter 1: Product introduction 1.1 Special features 1-1 1.2 Before you proceed 1-4 1.3 Motherboard overview 1-5 1.4 Central Processing Unit (CPU 1-7 1.5 System memory 1-11 1.6 Expansion slots 1-14 1.7 Jumpers 1-16 1.8 Connectors 1-17 1.9 Software support 1-26 Chapter 2: BIOS information 2.1 Managing and updating your BIOS 2-1 2.2 BIOS setup program 2-5 2.3 My Favorites 2-10 2.4 Main menu...
... About this guide iv Package contents vi H61M-CS specifications summary vi Chapter 1: Product introduction 1.1 Special features 1-1 1.2 Before you proceed 1-4 1.3 Motherboard overview 1-5 1.4 Central Processing Unit (CPU 1-7 1.5 System memory 1-11 1.6 Expansion slots 1-14 1.7 Jumpers 1-16 1.8 Connectors 1-17 1.9 Software support 1-26 Chapter 2: BIOS information 2.1 Managing and updating your BIOS 2-1 2.2 BIOS setup program 2-5 2.3 My Favorites 2-10 2.4 Main menu...

User Guide
Page 4
... new technology it may be exposed to moisture. • Place the product on the motherboard. • Chapter 2: BIOS information This chapter discusses changing system settings through the BIOS Setup menus. Detailed descriptions fo the BIOS parameters are unplugged. • Seek professional assistance before the signal cables are connected. Operation safety • Before installing...
... new technology it may be exposed to moisture. • Place the product on the motherboard. • Chapter 2: BIOS information This chapter discusses changing system settings through the BIOS Setup menus. Detailed descriptions fo the BIOS parameters are unplugged. • Seek professional assistance before the signal cables are connected. Operation safety • Before installing...

User Guide
Page 7
H61M-CS specifications summary ASUS unique features Rear panel ports Internal connectors/ jumpers BIOS features Manageability Support DVD Form factor ASUS Anti-Surge Protection ASUS UEFI BIOS (EZ Mode) ASUS MyLogo 2 ASUS EZ-Flash 2 ASUS Fan Xpert ASUS AI Charger ASUS Crash Free BIOS3 ASUS AI Suite II ASUS Network iControl ASUS Webstorage 1 x PS/2 keyboard port (purple) 1 x PS/2 mouse port (green) 1 x VGA port 4 x USB 2.0/1.1 ports 1 x LAN...
H61M-CS specifications summary ASUS unique features Rear panel ports Internal connectors/ jumpers BIOS features Manageability Support DVD Form factor ASUS Anti-Surge Protection ASUS UEFI BIOS (EZ Mode) ASUS MyLogo 2 ASUS EZ-Flash 2 ASUS Fan Xpert ASUS AI Charger ASUS Crash Free BIOS3 ASUS AI Suite II ASUS Network iControl ASUS Webstorage 1 x PS/2 keyboard port (purple) 1 x PS/2 mouse port (green) 1 x VGA port 4 x USB 2.0/1.1 ports 1 x LAN...
User Guide
Page 11
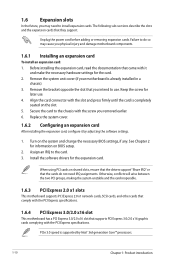
... DIMM_B1 (64bit, 240-pin module) VGA USBPW1-4 LGA1155 22.6cm(8.9in) USB34 LAN_USB12 AUDIO RTL 8111F CHA_FAN H61M-CS PCIEX16 Super I/O ALC 887 AAFP PCIEX1_1 BATTERY PCIEX1_2 USB56 USBPW5-8 Intel® H61 CLRTC SPEAKER 64Mb BIOS 11 1 10 9 8 Connectors/Jumpers/Slots/LED 1. CPU and chassis fan connectors (4-pin CPU_FAN, 4-pin CHA_FAN) 4. DDR3 DIMM... (24-pin EATXPWR, 4-pin ATX12V) 3. USB device wake-up (3-pin USBPW1-4, USBPW5-8) 2. Front panel audio connector (10-1 pin AAFP) SATA3G_3 SATA3G_1 SATA3G_4 SATA3G_2 EATXPWR 2 6 7 Page ASUS H61M-CS 1-3
... DIMM_B1 (64bit, 240-pin module) VGA USBPW1-4 LGA1155 22.6cm(8.9in) USB34 LAN_USB12 AUDIO RTL 8111F CHA_FAN H61M-CS PCIEX16 Super I/O ALC 887 AAFP PCIEX1_1 BATTERY PCIEX1_2 USB56 USBPW5-8 Intel® H61 CLRTC SPEAKER 64Mb BIOS 11 1 10 9 8 Connectors/Jumpers/Slots/LED 1. CPU and chassis fan connectors (4-pin CPU_FAN, 4-pin CHA_FAN) 4. DDR3 DIMM... (24-pin EATXPWR, 4-pin ATX12V) 3. USB device wake-up (3-pin USBPW1-4, USBPW5-8) 2. Front panel audio connector (10-1 pin AAFP) SATA3G_3 SATA3G_1 SATA3G_4 SATA3G_2 EATXPWR 2 6 7 Page ASUS H61M-CS 1-3
User Guide
Page 18
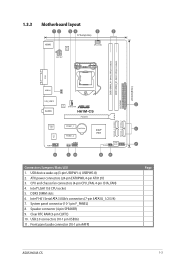
...later use . Unplug the power cord before adding or removing expansion cards. Install the software drivers for information on the system and change the necessary BIOS settings, if any. When using PCI cards on the slot. 5. Secure the card to the card. 3. See Chapter 2 for the expansion card.... Turn on BIOS setup. 2. Assign an IRQ to the chassis with it by Intel® 3rd generation Core™ processors. 1-10 Chapter 1: Product introduction PCIe 3.0 speed...
...later use . Unplug the power cord before adding or removing expansion cards. Install the software drivers for information on the system and change the necessary BIOS settings, if any. When using PCI cards on the slot. 5. Secure the card to the card. 3. See Chapter 2 for the expansion card.... Turn on BIOS setup. 2. Assign an IRQ to the chassis with it by Intel® 3rd generation Core™ processors. 1-10 Chapter 1: Product introduction PCIe 3.0 speed...

User Guide
Page 20
The onboard button cell battery powers the RAM data in CMOS. H61M-CS CLRTC 12 23 Normal (Default) H61M-CS Clear RTC RAM Clear RTC To erase the RTC RAM: 1. Keep the cap on CLRTC jumper default position. For system failure due to pins 2-3. 1.7 Jumpers ... the Real Time Clock (RTC) RAM in CMOS, which include system setup information such as system passwords. Hold down and reboot the system, then the BIOS automatically resets parameter settings to default values. 1-12 Chapter 1: Product introduction Plug the power cord and turn ON the computer. 4. Except when clearing the RTC...
The onboard button cell battery powers the RAM data in CMOS. H61M-CS CLRTC 12 23 Normal (Default) H61M-CS Clear RTC RAM Clear RTC To erase the RTC RAM: 1. Keep the cap on CLRTC jumper default position. For system failure due to pins 2-3. 1.7 Jumpers ... the Real Time Clock (RTC) RAM in CMOS, which include system setup information such as system passwords. Hold down and reboot the system, then the BIOS automatically resets parameter settings to default values. 1-12 Chapter 1: Product introduction Plug the power cord and turn ON the computer. 4. Except when clearing the RTC...

User Guide
Page 23
...module to this connector to avail of the front panel audio I/O module cable to this connector, set the Front Panel Type item in the BIOS setup to this connector. If you want to connect an AC'97 front panel audio module to [HD]. AGND NC SENSE1_RETUR SENSE2_RETUR AGND ...connector • We recommend that supports either HD Audio or legacy AC`97 audio standard. By default, this connector, set the item to [HD]. ASUS H61M-CS 1-15 Connect one end of the motherboard's high-definition audio capability. • If you want to connect a high-definition front panel audio module ...
...module to this connector to avail of the front panel audio I/O module cable to this connector, set the Front Panel Type item in the BIOS setup to this connector. If you want to connect an AC'97 front panel audio module to [HD]. AGND NC SENSE1_RETUR SENSE2_RETUR AGND ...connector • We recommend that supports either HD Audio or legacy AC`97 audio standard. By default, this connector, set the item to [HD]. ASUS H61M-CS 1-15 Connect one end of the motherboard's high-definition audio capability. • If you want to connect a high-definition front panel audio module ...
User Guide
Page 25
... version before using hot-plug and NCQ on Windows® XP. • To configure the SATA type in the BIOS to Serial ATA 3.0 Gb/s hard disk drives and optical drives via Serial ATA 3.0 Gb/s signal cables. Intel® H61 Serial ATA 3.0Gb/s connectors (7-pin SATA3G_1~4) These connectors connect to [AHCI]. ASUS H61M-CS 1-17
... version before using hot-plug and NCQ on Windows® XP. • To configure the SATA type in the BIOS to Serial ATA 3.0 Gb/s hard disk drives and optical drives via Serial ATA 3.0 Gb/s signal cables. Intel® H61 Serial ATA 3.0Gb/s connectors (7-pin SATA3G_1~4) These connectors connect to [AHCI]. ASUS H61M-CS 1-17
User Guide
Page 31
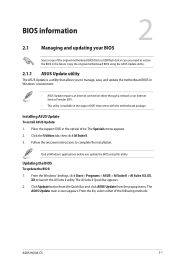
... flash disk in case you update the BIOS using the ASUS Update utility. 2.1.1 ASUS Update utility The ASUS Update is a utility that allows you to manage, save, and update the motherboard BIOS in Windows® environment. • ASUS Update requires an Internet connection either of the following methods: ASUS H61M-CS 2-1 The ASUS Update main screen appears. Copy the original...
... flash disk in case you update the BIOS using the ASUS Update utility. 2.1.1 ASUS Update utility The ASUS Update is a utility that allows you to manage, save, and update the motherboard BIOS in Windows® environment. • ASUS Update requires an Internet connection either of the following methods: ASUS H61M-CS 2-1 The ASUS Update main screen appears. Copy the original...

User Guide
Page 32
... system when the update process is capable of the BIOS setup program. Follow the onscreen instructions to complete the updating process. 2.1.2 ASUS EZ Flash 2 The ASUS EZ Flash 2 feature allows you wish to perform the BIOS update process. Select the ASUS FTP site nearest you start using EZ Flash 2: ... to enable it. 3. Updating from the Internet, then click Next. Select Update BIOS from the Internet a. Before you to the Folder Info field. 6. Select Update BIOS from the ASUS website at www. asus.com. Press to switch to avoid network traffic, then click Next. Enter the ...
... system when the update process is capable of the BIOS setup program. Follow the onscreen instructions to complete the updating process. 2.1.2 ASUS EZ Flash 2 The ASUS EZ Flash 2 feature allows you wish to perform the BIOS update process. Select the ASUS FTP site nearest you start using EZ Flash 2: ... to enable it. 3. Updating from the Internet, then click Next. Select Update BIOS from the Internet a. Before you to the Folder Info field. 6. Select Update BIOS from the ASUS website at www. asus.com. Press to switch to avoid network traffic, then click Next. Enter the ...
User Guide
Page 33
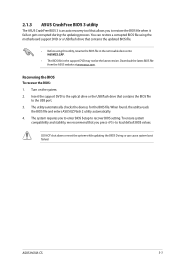
.... DO NOT shut down or reset the system while updating the BIOS! 2.1.3 ASUS CrashFree BIOS 3 utility The ASUS CrashFree BIOS 3 is an auto recovery tool that you press to load default BIOS values. Recovering the BIOS To recover the BIOS: 1. To ensure system compatibility and stability, we recommend that allows... contains the updated BIOS file. • Before using this utility, rename the BIOS file in the removable device into H61MCS.CAP. • The BIOS file in the support DVD may not be the latest version. Insert the support DVD to the USB port. 3. ASUS H61M-CS 2-3 You can ...
.... DO NOT shut down or reset the system while updating the BIOS! 2.1.3 ASUS CrashFree BIOS 3 utility The ASUS CrashFree BIOS 3 is an auto recovery tool that you press to load default BIOS values. Recovering the BIOS To recover the BIOS: 1. To ensure system compatibility and stability, we recommend that allows... contains the updated BIOS file. • Before using this utility, rename the BIOS file in the removable device into H61MCS.CAP. • The BIOS file in the support DVD may not be the latest version. Insert the support DVD to the USB port. 3. ASUS H61M-CS 2-3 You can ...

User Guide
Page 34
...the FreeDOS command prompt item by pressing the item number. 4. 2.1.4 ASUS BIOS Updater ASUS BIOS Updater allows you can use as a backup when the BIOS fails or gets corrupted during the updating process. Before updating BIOS 1. NTFS is not supported under DOS environment. Boot your computer. ...FreeDOS prompt, type d: and press to Drive D (USB flash drive). 2-4 Chapter 2: BIOS information asus.com and save the BIOS file and BIOS Updater to update BIOS in NTFS format. 3. When the ASUS Logo appears, press to the USB port. 2. The actual utility screen displays may not be...
...the FreeDOS command prompt item by pressing the item number. 4. 2.1.4 ASUS BIOS Updater ASUS BIOS Updater allows you can use as a backup when the BIOS fails or gets corrupted during the updating process. Before updating BIOS 1. NTFS is not supported under DOS environment. Boot your computer. ...FreeDOS prompt, type d: and press to Drive D (USB flash drive). 2-4 Chapter 2: BIOS information asus.com and save the BIOS file and BIOS Updater to update BIOS in NTFS format. 3. When the ASUS Logo appears, press to the USB port. 2. The actual utility screen displays may not be...
User Guide
Page 35
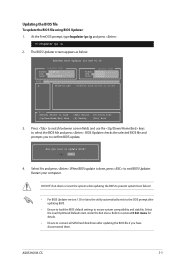
.... ASUS H61M-CS 2-5 BIOS Updater checks the selected BIOS file and prompts you have disconnected them. Select the Load Optimized Defaults item under the Exit menu. Updating the BIOS file To update the BIOS file using BIOS Updater: 1. When BIOS update is done, press to confirm BIOS update. 4. Refer to section 2.9 Exit menu for DOS V1.30 Current ROM BOARD: H61M-CS...
.... ASUS H61M-CS 2-5 BIOS Updater checks the selected BIOS file and prompts you have disconnected them. Select the Load Optimized Defaults item under the Exit menu. Updating the BIOS file To update the BIOS file using BIOS Updater: 1. When BIOS update is done, press to confirm BIOS update. 4. Refer to section 2.9 Exit menu for DOS V1.30 Current ROM BOARD: H61M-CS...

User Guide
Page 36
... startup: • Press during the Power-On Self Test (POST). 2.2 BIOS setup program Use the BIOS Setup program to erase the RTC RAM. Entering BIOS Setup at startup To enter BIOS Setup at www.asus.com to download the latest BIOS file for reference purposes only, and may not exactly match what you want... to use the mouse to control the BIOS setup program. • If the system becomes ...
... startup: • Press during the Power-On Self Test (POST). 2.2 BIOS setup program Use the BIOS Setup program to erase the RTC RAM. Entering BIOS Setup at startup To enter BIOS Setup at www.asus.com to download the latest BIOS file for reference purposes only, and may not exactly match what you want... to use the mouse to control the BIOS setup program. • If the system becomes ...
User Guide
Page 37
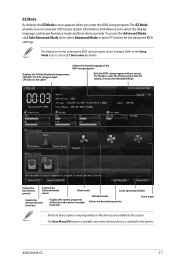
... language, system performance mode and boot device priority. ASUS H61M-CS 2-7 The EZ Mode provides you an overview of the selected mode on the right Selects the boot device priority hand side • The boot device options vary depending on the devices you enter the BIOS setup program. Selects the display language of the...
... language, system performance mode and boot device priority. ASUS H61M-CS 2-7 The EZ Mode provides you an overview of the selected mode on the right Selects the boot device priority hand side • The boot device options vary depending on the devices you enter the BIOS setup program. Selects the display language of the...

User Guide
Page 38
Advanced Mode The Advanced Mode provides advanced options for the detailed configurations. Refer to configure the BIOS settings. To access the EZ Mode, click Exit, then select ASUS EZ Mode. Back button Menu items Menu bar Configuration fields General help Submenu item Pop-up window Scroll bar Navigation keys Menu bar The menu... the fan settings For changing the system boot configuration For configuring options for special functions For selecting the exit options and loading default settings 2-8 Chapter 2: BIOS information
Advanced Mode The Advanced Mode provides advanced options for the detailed configurations. Refer to configure the BIOS settings. To access the EZ Mode, click Exit, then select ASUS EZ Mode. Back button Menu items Menu bar Configuration fields General help Submenu item Pop-up window Scroll bar Navigation keys Menu bar The menu... the fan settings For changing the system boot configuration For configuring options for special functions For selecting the exit options and loading default settings 2-8 Chapter 2: BIOS information

User Guide
Page 39
... fields show the values for the BIOS setup program. Submenu items A greater than sign (>) before each item on the screen. Pop-up window with the configuration options for that the item has a submenu. Navigation keys At the bottom right corner of the field opposite the item. ASUS H61M-CS 2-9 For example, selecting Main shows...
... fields show the values for the BIOS setup program. Submenu items A greater than sign (>) before each item on the screen. Pop-up window with the configuration options for that the item has a submenu. Navigation keys At the bottom right corner of the field opposite the item. ASUS H61M-CS 2-9 For example, selecting Main shows...

User Guide
Page 40
...basic system information, and allows you to set the system date, time, language, and security settings. 2.3.1 System Language [English] Allows you to choose the BIOS language version from the options. Configuration options: [English] [Français] [Español] [Deutsch 2.3.2 System Date [Day xx/xx/xxxx] ...The Security menu items allow you to change the system security settings. • If you an overview of the BIOS Setup program. The Main menu provides you have forgotten your BIOS password, erase the CMOS Real Time Clock (RTC) RAM to erase the RTC RAM. • The Administrator or...
...basic system information, and allows you to set the system date, time, language, and security settings. 2.3.1 System Language [English] Allows you to choose the BIOS language version from the options. Configuration options: [English] [Français] [Español] [Deutsch 2.3.2 System Date [Day xx/xx/xxxx] ...The Security menu items allow you to change the system security settings. • If you an overview of the BIOS Setup program. The Main menu provides you have forgotten your BIOS password, erase the CMOS Real Time Clock (RTC) RAM to erase the RTC RAM. • The Administrator or...

User Guide
Page 41
... the administrator password for accessing the system. From the Create New Password box, key in a password, then press . 3. ASUS H61M-CS 2-11 To clear the user password, follow the same steps as in the BIOS setup program. Otherwise, you clear the password, the User Password item on top of the screen shows the default...
... the administrator password for accessing the system. From the Create New Password box, key in a password, then press . 3. ASUS H61M-CS 2-11 To clear the user password, follow the same steps as in the BIOS setup program. Otherwise, you clear the password, the User Password item on top of the screen shows the default...
User Guide
Page 42
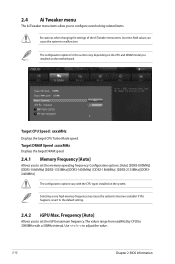
...] Allows you to 3000MHz with the CPU types installed on the system. The configuration options for this happens, revert to adjust the value. 2-12 Chapter 2: BIOS information
...] Allows you to 3000MHz with the CPU types installed on the system. The configuration options for this happens, revert to adjust the value. 2-12 Chapter 2: BIOS information


