H61M-C User's Manual
Page 11
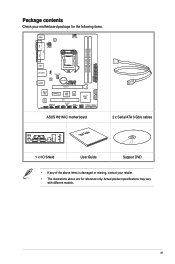
... Super I/O ALC 887 AAFP PCIEX1_1 ASM 64Mb 1083 BIOS PCI1 Intel® H61 USBPW5~10 SPDIF_OUT USB56 SB_PWR USB78 CLRTC USB910 SPEAKER F_PANEL SATA3G_4 SATA3G_3 ASUS H61M-C motherboard User Guide 2 x Serial ATA 3 Gb/s cables 1 x I/O Shield User Guide Support DVD • If any of the above items is damaged or missing, contact your...
... Super I/O ALC 887 AAFP PCIEX1_1 ASM 64Mb 1083 BIOS PCI1 Intel® H61 USBPW5~10 SPDIF_OUT USB56 SB_PWR USB78 CLRTC USB910 SPEAKER F_PANEL SATA3G_4 SATA3G_3 ASUS H61M-C motherboard User Guide 2 x Serial ATA 3 Gb/s cables 1 x I/O Shield User Guide Support DVD • If any of the above items is damaged or missing, contact your...

H61M-C User's Manual
Page 13
... to support the 1155 socket Intel® 3rd/2nd Generation Core™ i7 / Core™ i5 / Core™ i3, Pentium®, and Celeron® processors. ASUS H61M-C 1-1 This provides great graphics performance. Intel® 3rd/2nd generation Core™ i7 / Core™ i5 / Core™ i3, Pentium®, and Celeron® processors...
... to support the 1155 socket Intel® 3rd/2nd Generation Core™ i7 / Core™ i5 / Core™ i3, Pentium®, and Celeron® processors. ASUS H61M-C 1-1 This provides great graphics performance. Intel® 3rd/2nd generation Core™ i7 / Core™ i5 / Core™ i3, Pentium®, and Celeron® processors...
H61M-C User's Manual
Page 15
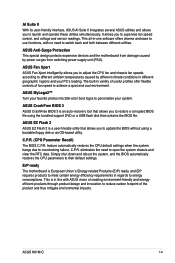
... to achieve a quiet and cool environment. This all-in-one software offers diverse and ease to use functions, with ASUS vision of creating environment-friendly and energyefficient products through product design and innovation to restore a corrupted BIOS file using a ...floppy disk or an OS-based utility. C.P.R. ErP ready The motherboard is in regards to switch back and forth between different utilities. ASUS H61M-C 1-3 ASUS MyLogo2™ Turn your system. eliminates the need to energy consumptions. C.P.R. (CPU Parameter Recall) The BIOS C.P.R. This is European...
... to achieve a quiet and cool environment. This all-in-one software offers diverse and ease to use functions, with ASUS vision of creating environment-friendly and energyefficient products through product design and innovation to restore a corrupted BIOS file using a ...floppy disk or an OS-based utility. C.P.R. ErP ready The motherboard is in regards to switch back and forth between different utilities. ASUS H61M-C 1-3 ASUS MyLogo2™ Turn your system. eliminates the need to energy consumptions. C.P.R. (CPU Parameter Recall) The BIOS C.P.R. This is European...
H61M-C User's Manual
Page 17
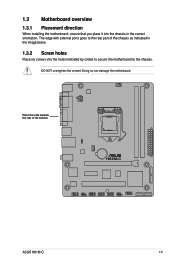
DO NOT overtighten the screws! The edge with external ports goes to the chassis. Place this side towards the rear of the chassis as indicated in the image below. 1.3.2 Screw holes Place six screws into the chassis in the correct orientation. 1.3 Motherboard overview 1.3.1 Placement direction When installing the motherboard, ensure that you place it into the holes indicated by circles to secure the motherboard to the rear part of the chassis H61M-C ASUS H61M-C 1-5 Doing so can damage the motherboard.
DO NOT overtighten the screws! The edge with external ports goes to the chassis. Place this side towards the rear of the chassis as indicated in the image below. 1.3.2 Screw holes Place six screws into the chassis in the correct orientation. 1.3 Motherboard overview 1.3.1 Placement direction When installing the motherboard, ensure that you place it into the holes indicated by circles to secure the motherboard to the rear part of the chassis H61M-C ASUS H61M-C 1-5 Doing so can damage the motherboard.
H61M-C User's Manual
Page 19
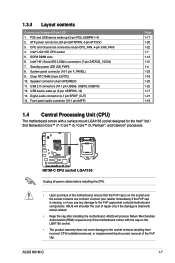
...® 3rd / 2nd Generation Core™ i7 / Core™ i5 / Core™ i3, Pentium®, and Celeron® processors. ASUS H61M-C 1-7 1.3.4 Layout contents Connectors/Jumpers/Slots/LED 1. Intel® H61 Serial ATA 3.0Gb/s connectors (7-pin SATA3G_1/2/3/4) 7. Contact your retailer immediately ... after installing the motherboard. DDR3 DIMM slots 6. USB device wake-up (3-pin PS2_USBPW1~4) 2. System panel connector (10-1 pin F_PANEL) 9. H61M-C H61M-C CPU socket LGA1155 Unplug all power cables before installing the CPU. • Upon purchase of the PnP cap. ATX power connectors (24-...
...® 3rd / 2nd Generation Core™ i7 / Core™ i5 / Core™ i3, Pentium®, and Celeron® processors. ASUS H61M-C 1-7 1.3.4 Layout contents Connectors/Jumpers/Slots/LED 1. Intel® H61 Serial ATA 3.0Gb/s connectors (7-pin SATA3G_1/2/3/4) 7. Contact your retailer immediately ... after installing the motherboard. DDR3 DIMM slots 6. USB device wake-up (3-pin PS2_USBPW1~4) 2. System panel connector (10-1 pin F_PANEL) 9. H61M-C H61M-C CPU socket LGA1155 Unplug all power cables before installing the CPU. • Upon purchase of the PnP cap. ATX power connectors (24-...
H61M-C User's Manual
Page 23
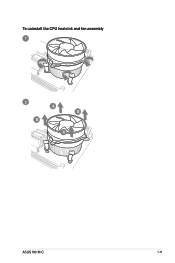
To uninstall the CPU heatsink and fan assembly 1 2 B A B A ASUS H61M-C 1-11
To uninstall the CPU heatsink and fan assembly 1 2 B A B A ASUS H61M-C 1-11

H61M-C User's Manual
Page 25
... manual memory frequency adjustment. • For system stability, use a more efficient memory cooling system to support a full memory load (2 DIMMs) or overclocking condition. 1.5.3 1 Installing a DIMM 2 3 ASUS H61M-C 1-13
... manual memory frequency adjustment. • For system stability, use a more efficient memory cooling system to support a full memory load (2 DIMMs) or overclocking condition. 1.5.3 1 Installing a DIMM 2 3 ASUS H61M-C 1-13
H61M-C User's Manual
Page 27
... the software drivers for this motherboard PCIEx16 PCIEx1_1 PCI 1 Realtek 8111F controller USB2.0 controller 1 USB2.0 controller 2 HD audio SATA controller 1 SATA controller 2 A B C D E shared - - - - shared - - - - - - - shared - - - - ASUS H61M-C 1-15 When using PCI cards on shared slots, ensure that the drivers support "Share IRQ" or that supports PCI Express 3.0/2.0 x16 graphic cards complying with...
... the software drivers for this motherboard PCIEx16 PCIEx1_1 PCI 1 Realtek 8111F controller USB2.0 controller 1 USB2.0 controller 2 HD audio SATA controller 1 SATA controller 2 A B C D E shared - - - - shared - - - - - - - shared - - - - ASUS H61M-C 1-15 When using PCI cards on shared slots, ensure that the drivers support "Share IRQ" or that supports PCI Express 3.0/2.0 x16 graphic cards complying with...

H61M-C User's Manual
Page 29
...jumper to +5V to wake up from S1 sleep mode (CPU stopped, DRAM refreshed, system running in sleep mode. PS2_USBPW1~4 12 23 H61M-C +5V +5VSB (Default) H61M-C PS2/USB device wake-up . • The total current consumed must NOT exceed the power supply capability (+5VSB) whether under normal ... that can provide 500mA on the +5VSB lead, and a corresponding setting in reduced power mode). 2. USBPW5~10 12 23 +5V +5VSB (Default) H61M-C USB device wake-up • The USB device wake-up the computer using the connected USB devices. This feature requires an ATX power supply that...
...jumper to +5V to wake up from S1 sleep mode (CPU stopped, DRAM refreshed, system running in sleep mode. PS2_USBPW1~4 12 23 H61M-C +5V +5VSB (Default) H61M-C PS2/USB device wake-up . • The total current consumed must NOT exceed the power supply capability (+5VSB) whether under normal ... that can provide 500mA on the +5VSB lead, and a corresponding setting in reduced power mode). 2. USBPW5~10 12 23 +5V +5VSB (Default) H61M-C USB device wake-up • The USB device wake-up the computer using the connected USB devices. This feature requires an ATX power supply that...
H61M-C User's Manual
Page 31
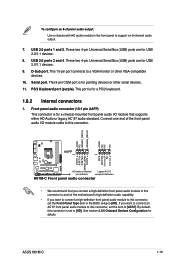
... AC`97 audio standard. This port is set the Front Panel Type item in the front panel to a VGA monitor or other serial devices. 11. ASUS H61M-C 1-19 USB 2.0 ports 1 and 2. These two 4-pin Universal Serial Bus (USB) ports are for a PS/2 keyboard. 1.8.2 Internal connectors 1. This 15...AAFP PIN 1 PIN 1 MIC2 MICPWR Line out_R NC Line out_L PORT1 L PORT1 R PORT2 R SENSE_SEND PORT2 L H61M-C HD-audio-compliant Legacy AC'97 pin definition compliant definition H61M-C Front panel audio connector • We recommend that you want to connect an AC'97 front panel audio module to...
... AC`97 audio standard. This port is set the Front Panel Type item in the front panel to a VGA monitor or other serial devices. 11. ASUS H61M-C 1-19 USB 2.0 ports 1 and 2. These two 4-pin Universal Serial Bus (USB) ports are for a PS/2 keyboard. 1.8.2 Internal connectors 1. This 15...AAFP PIN 1 PIN 1 MIC2 MICPWR Line out_R NC Line out_L PORT1 L PORT1 R PORT2 R SENSE_SEND PORT2 L H61M-C HD-audio-compliant Legacy AC'97 pin definition compliant definition H61M-C Front panel audio connector • We recommend that you want to connect an AC'97 front panel audio module to...
H61M-C User's Manual
Page 33
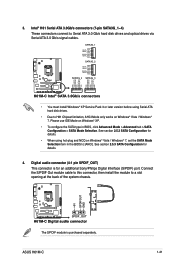
...When using Serial ATA hard disk drives. • Due to H61 Chipset limitation, AHCI Mode only works on Windows® Vista / Windows® 7. ASUS H61M-C 1-21 Connect the S/PDIF Out module cable to this connector, then install the module to [AHCI]. 3. Intel® H61 Serial ATA 3.0Gb/s... • To configure the SATA type in the BIOS to a slot opening at the back of the system chassis. +5V SPDIFOUT GND H61M-C SPDIF_OUT H61M-C Digital audio connector The S/PDIF module is for details. 4. See section 2.5.3 SATA Configuration for an additional Sony/Philips Digital Interface (S/PDIF...
...When using Serial ATA hard disk drives. • Due to H61 Chipset limitation, AHCI Mode only works on Windows® Vista / Windows® 7. ASUS H61M-C 1-21 Connect the S/PDIF Out module cable to this connector, then install the module to [AHCI]. 3. Intel® H61 Serial ATA 3.0Gb/s... • To configure the SATA type in the BIOS to a slot opening at the back of the system chassis. +5V SPDIFOUT GND H61M-C SPDIF_OUT H61M-C Digital audio connector The S/PDIF module is for details. 4. See section 2.5.3 SATA Configuration for an additional Sony/Philips Digital Interface (S/PDIF...

H61M-C User's Manual
Page 35
... power LED lights up or flashes when data is read from or written to this connector. F_PANEL +PWR_LED- PWR_BTN PLED+ PLEDPWR GND HD_LED+ HD_LED- RESET H61M-C System panel connector • System power LED (2-pin +PWR_LED-) This 2-pin connector is for the HDD Activity LED. Speaker connector (4-pin SPEAKER) The 4-pin ... connector is for the system power LED. Connect the chassis power LED cable to hear system beeps and warnings. +5V GND GND Speaker Out SPEAKER H61M-C PIN 1 H61M-C Speaker out connector ASUS H61M-C 1-23 The HDD LED lights up when you to this connector. 7.
... power LED lights up or flashes when data is read from or written to this connector. F_PANEL +PWR_LED- PWR_BTN PLED+ PLEDPWR GND HD_LED+ HD_LED- RESET H61M-C System panel connector • System power LED (2-pin +PWR_LED-) This 2-pin connector is for the HDD Activity LED. Speaker connector (4-pin SPEAKER) The 4-pin ... connector is for the system power LED. Connect the chassis power LED cable to hear system beeps and warnings. +5V GND GND Speaker Out SPEAKER H61M-C PIN 1 H61M-C Speaker out connector ASUS H61M-C 1-23 The HDD LED lights up when you to this connector. 7.
H61M-C User's Manual
Page 37
... version easily. To launch EZ Update, click EZ Update on the AI Suite 3 main menu bar. Copy the original motherboard BIOS using the ASUS Update utility. 2.1.1 EZ Update EZ Update is a utility that allows you to automatically update your motherboard's driver, software and firmware Click to .... BIOS information 2.1 Managing and updating your BIOS 2 Save a copy of the original motherboard BIOS file to a USB flash disk in the future. ASUS H61M-C 2-1 With this utlity, you need to restore the BIOS in case you can also manually update the saved BIOS and select a boot logo when ...
... version easily. To launch EZ Update, click EZ Update on the AI Suite 3 main menu bar. Copy the original motherboard BIOS using the ASUS Update utility. 2.1.1 EZ Update EZ Update is a utility that allows you to automatically update your motherboard's driver, software and firmware Click to .... BIOS information 2.1 Managing and updating your BIOS 2 Save a copy of the original motherboard BIOS file to a USB flash disk in the future. ASUS H61M-C 2-1 With this utlity, you need to restore the BIOS in case you can also manually update the saved BIOS and select a boot logo when ...
H61M-C User's Manual
Page 39
... them on the system. 2. When found, the utility reads the BIOS file and enters ASUS EZ Flash 2 utility automatically. 4. The system requires you to the USB port. 3. ASUS H61M-C 2-3 To ensure system compatibility and stability, we recommend that you can cause system boot ...failure! 2.1.4 ASUS BIOS Updater The ASUS BIOS Updater allows you to enter BIOS Setup to load default BIOS values...
... them on the system. 2. When found, the utility reads the BIOS file and enters ASUS EZ Flash 2 utility automatically. 4. The system requires you to the USB port. 3. ASUS H61M-C 2-3 To ensure system compatibility and stability, we recommend that you can cause system boot ...failure! 2.1.4 ASUS BIOS Updater The ASUS BIOS Updater allows you to enter BIOS Setup to load default BIOS values...

H61M-C User's Manual
Page 41
... the power button, reset button, or the ++ keys to force reset from a running operating system can cause damage to your screen. • Visit the ASUS website at startup: • Press during the Power-On Self Test (POST). See section 1.7 Jumpers for this motherboard. • Ensure that a USB mouse...Do this section are for reference purposes only, and may not exactly match what you do not press , POST continues with its parameters. ASUS H61M-C 2-5 The BIOS screens include navigation keys and brief online help to guide you failed to enter BIOS Setup using the BIOS Setup program.
... the power button, reset button, or the ++ keys to force reset from a running operating system can cause damage to your screen. • Visit the ASUS website at startup: • Press during the Power-On Self Test (POST). See section 1.7 Jumpers for this motherboard. • Ensure that a USB mouse...Do this section are for reference purposes only, and may not exactly match what you do not press , POST continues with its parameters. ASUS H61M-C 2-5 The BIOS screens include navigation keys and brief online help to guide you failed to enter BIOS Setup using the BIOS Setup program.
H61M-C User's Manual
Page 43
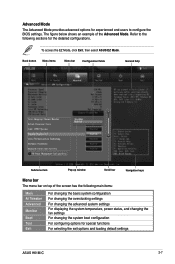
Advanced Mode The Advanced Mode provides advanced options for special functions For selecting the exit options and loading default settings ASUS H61M-C 2-7 Back button Menu items Menu bar Configuration fields General help Submenu item Pop-up window Scroll bar Navigation keys Menu bar The menu bar on ... end-users to the following sections for the detailed configurations. Refer to configure the BIOS settings. To access the EZ Mode, click Exit, then select ASUS EZ Mode.
Advanced Mode The Advanced Mode provides advanced options for special functions For selecting the exit options and loading default settings ASUS H61M-C 2-7 Back button Menu items Menu bar Configuration fields General help Submenu item Pop-up window Scroll bar Navigation keys Menu bar The menu bar on ... end-users to the following sections for the detailed configurations. Refer to configure the BIOS settings. To access the EZ Mode, click Exit, then select ASUS EZ Mode.

H61M-C User's Manual
Page 45
The Main menu provides you an overview of the BIOS Setup program. After you set a password, these items show the default Not Installed. ASUS H61M-C 2-9 Configuration options: [English] [Français] [Español] [Deutsch 2.3.2 System Date [Day xx/xx/xxxx] Allows you to set the system date. 2.3.3 System Time [...
The Main menu provides you an overview of the BIOS Setup program. After you set a password, these items show the default Not Installed. ASUS H61M-C 2-9 Configuration options: [English] [Français] [Español] [Deutsch 2.3.2 System Date [Day xx/xx/xxxx] Allows you to set the system date. 2.3.3 System Time [...

H61M-C User's Manual
Page 47
... Ai Tweaker menu items. Incorrect field values can cause the system to become unstable! Selecting a very high memory frequency may cause the system to malfunction. ASUS H61M-C 2-11
... Ai Tweaker menu items. Incorrect field values can cause the system to become unstable! Selecting a very high memory frequency may cause the system to malfunction. ASUS H61M-C 2-11

H61M-C User's Manual
Page 49
... field values can cause the system to boot even without support for the CPU and other system devices. Active Processor Cores [All] Allows you installed. ASUS H61M-C 2-13 2.5 Advanced menu The Advanced menu items allow you to cool down. [Disabled] Disables the CPU thermal monitor function. Be cautious when changing the settings...
... field values can cause the system to boot even without support for the CPU and other system devices. Active Processor Cores [All] Allows you installed. ASUS H61M-C 2-13 2.5 Advanced menu The Advanced menu items allow you to cool down. [Disabled] Disables the CPU thermal monitor function. Be cautious when changing the settings...
H61M-C User's Manual
Page 51
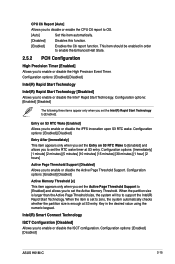
... to [Enabled] and allows you to support the Intel(R) Rapid Start Technology. When the partition size is enough at S3 entry. Configuration options: [Enabled] [Disabled] ASUS H61M-C 2-15 Configuration options: [Enabled] [Disabled] Intel(R) Rapid Start Technology Intel(R) Rapid Start Technology [Disabled] Allows you to enable or disable the High Precision Event Timer...
... to [Enabled] and allows you to support the Intel(R) Rapid Start Technology. When the partition size is enough at S3 entry. Configuration options: [Enabled] [Disabled] ASUS H61M-C 2-15 Configuration options: [Enabled] [Disabled] Intel(R) Rapid Start Technology Intel(R) Rapid Start Technology [Disabled] Allows you to enable or disable the High Precision Event Timer...


