
H61M-C User's Manual
Page 1
H61M-C Motherboard
H61M-C Motherboard
H61M-C User's Manual
Page 3
Contents Safety information...vi About this guide...vii H61M-C specifications summary ix Package contents...xi Chapter 1: Product introduction 1.1 Special features 1-1 1.1.1 Product highlights 1-1 1.1.2 ASUS Exclusive Features 1-2 1.2 Before you proceed 1-4 1.3 Motherboard overview 1-5 1.3.1 Placement direction 1-5 1.3.2 Screw holes 1-5 1.3.3 Motherboard layout 1-6 1.3.4 Layout contents 1-7 1.4 Central Processing Unit (CPU 1-7 1.4.1 CPU installation 1-8 1.4.2 CPU heatsink and fan assembly installation 1-10 1.5 System memory 1-12 1.5.1 Overview...
Contents Safety information...vi About this guide...vii H61M-C specifications summary ix Package contents...xi Chapter 1: Product introduction 1.1 Special features 1-1 1.1.1 Product highlights 1-1 1.1.2 ASUS Exclusive Features 1-2 1.2 Before you proceed 1-4 1.3 Motherboard overview 1-5 1.3.1 Placement direction 1-5 1.3.2 Screw holes 1-5 1.3.3 Motherboard layout 1-6 1.3.4 Layout contents 1-7 1.4 Central Processing Unit (CPU 1-7 1.4.1 CPU installation 1-8 1.4.2 CPU heatsink and fan assembly installation 1-10 1.5 System memory 1-12 1.5.1 Overview...
H61M-C User's Manual
Page 6
...are not sure about the voltage of the electrical outlet you add a device. • Before connecting or removing signal cables from the motherboard, ensure that came with the product, contact a qualified service technician or your area. Contact a qualified service technician or your dealer ... cables from connectors, slots, sockets and circuitry. • Avoid dust, humidity, and temperature extremes. Operation safety • Before installing the motherboard and adding devices on a stable surface. • If you detect any area where it may become wet. • Place the product...
...are not sure about the voltage of the electrical outlet you add a device. • Before connecting or removing signal cables from the motherboard, ensure that came with the product, contact a qualified service technician or your area. Contact a qualified service technician or your dealer ... cables from connectors, slots, sockets and circuitry. • Avoid dust, humidity, and temperature extremes. Operation safety • Before installing the motherboard and adding devices on a stable surface. • If you detect any area where it may become wet. • Place the product...
H61M-C User's Manual
Page 7
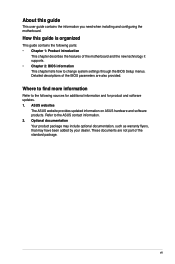
... parts: • Chapter 1: Product introduction This chapter describes the features of the motherboard and the new technology it supports. • Chapter 2: BIOS information This chapter tells how to the ASUS contact information. 2. ASUS websites The ASUS website provides updated information on ASUS hardware and software products. Refer to change system settings through the BIOS Setup...
... parts: • Chapter 1: Product introduction This chapter describes the features of the motherboard and the new technology it supports. • Chapter 2: BIOS information This chapter tells how to the ASUS contact information. 2. ASUS websites The ASUS website provides updated information on ASUS hardware and software products. Refer to change system settings through the BIOS Setup...
H61M-C User's Manual
Page 11
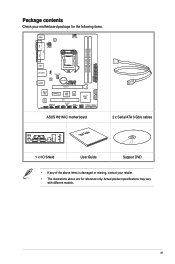
... Super I/O ALC 887 AAFP PCIEX1_1 ASM 64Mb 1083 BIOS PCI1 Intel® H61 USBPW5~10 SPDIF_OUT USB56 SB_PWR USB78 CLRTC USB910 SPEAKER F_PANEL SATA3G_4 SATA3G_3 ASUS H61M-C motherboard User Guide 2 x Serial ATA 3 Gb/s cables 1 x I/O Shield User Guide Support DVD • If any of the above items is damaged or missing, contact your retailer...
... Super I/O ALC 887 AAFP PCIEX1_1 ASM 64Mb 1083 BIOS PCI1 Intel® H61 USBPW5~10 SPDIF_OUT USB56 SB_PWR USB78 CLRTC USB910 SPEAKER F_PANEL SATA3G_4 SATA3G_3 ASUS H61M-C motherboard User Guide 2 x Serial ATA 3 Gb/s cables 1 x I/O Shield User Guide Support DVD • If any of the above items is damaged or missing, contact your retailer...

H61M-C User's Manual
Page 13
...174; 3rd/2nd Generation Core™ i7 / Core™ i5 / Core™ i3, Pentium®, and Celeron® processors This motherboard supports the Intel® 3rd/2nd generation Core™ i7 / Core™ i5 / Core™ i3, Pentium®, and Celeron&#...with dedicated chipsets, 2-channel (2 DIMMs) DDR3 memory, and 16 PCI Express 3.0/2.0 lanes. ASUS H61M-C 1-1 Dual-Channel DDR3 2200 (O.C.) / 2133 (O.C.) / 2000 (O.C.) / 1866 (O.C.) / 1600 / 1333 / 1066 MHz support The motherboard supports DDR3 memory that provide twice the performance of the latest 3D graphics, multimedia, and Internet...
...174; 3rd/2nd Generation Core™ i7 / Core™ i5 / Core™ i3, Pentium®, and Celeron® processors This motherboard supports the Intel® 3rd/2nd generation Core™ i7 / Core™ i5 / Core™ i3, Pentium®, and Celeron&#...with dedicated chipsets, 2-channel (2 DIMMs) DDR3 memory, and 16 PCI Express 3.0/2.0 lanes. ASUS H61M-C 1-1 Dual-Channel DDR3 2200 (O.C.) / 2133 (O.C.) / 2000 (O.C.) / 1866 (O.C.) / 1600 / 1333 / 1066 MHz support The motherboard supports DDR3 memory that provide twice the performance of the latest 3D graphics, multimedia, and Internet...

H61M-C User's Manual
Page 14
... front panel to provide efficient power management for advanced operating systems. 100% All High-quality Conductive Polymer Capacitors This motherboard uses all high-quality conductive polymer capacitors for most accessed information • ASUS DRAM SPD (Serial Presence Detect) information detecting faulty DIMMs, and helping with HD audio module in , Line-out, and...
... front panel to provide efficient power management for advanced operating systems. 100% All High-quality Conductive Polymer Capacitors This motherboard uses all high-quality conductive polymer capacitors for most accessed information • ASUS DRAM SPD (Serial Presence Detect) information detecting faulty DIMMs, and helping with HD audio module in , Line-out, and...
H61M-C User's Manual
Page 15
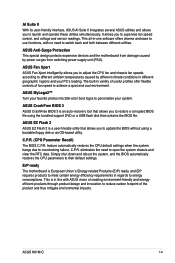
... and allows you to restore a corrupted BIOS file using a bootable floppy disk or an OS-based utility. ASUS H61M-C 1-3 ASUS Anti-Surge Protection This special design protects expensive devices and the motherboard from damage caused by different climate conditions in variety of useful profiles offer flexible controls of the product and thus mitigate environmental...
... and allows you to restore a corrupted BIOS file using a bootable floppy disk or an OS-based utility. ASUS H61M-C 1-3 ASUS Anti-Surge Protection This special design protects expensive devices and the motherboard from damage caused by different climate conditions in variety of useful profiles offer flexible controls of the product and thus mitigate environmental...

H61M-C User's Manual
Page 16
... sleep mode, or in any component, switch off mode. The illustration below shows the location of the following precautions before you install motherboard components or change any motherboard settings. • Unplug the power cord from the wall socket before touching any component. • Before handling components, use a .... Failure to do so may cause severe damage to indicate that the system is a reminder that lights up to the motherboard, peripherals, or components. H61M-C SB_PWR ON OFF Standby Power Powered Off H61M-C Onboard LED 1-4 Chapter 1: Product introduction
... sleep mode, or in any component, switch off mode. The illustration below shows the location of the following precautions before you install motherboard components or change any motherboard settings. • Unplug the power cord from the wall socket before touching any component. • Before handling components, use a .... Failure to do so may cause severe damage to indicate that the system is a reminder that lights up to the motherboard, peripherals, or components. H61M-C SB_PWR ON OFF Standby Power Powered Off H61M-C Onboard LED 1-4 Chapter 1: Product introduction
H61M-C User's Manual
Page 17
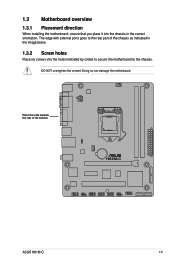
DO NOT overtighten the screws! Doing so can damage the motherboard. 1.3 Motherboard overview 1.3.1 Placement direction When installing the motherboard, ensure that you place it into the chassis in the image below. 1.3.2 Screw holes Place six screws into the holes indicated by circles to secure the motherboard to the rear part of the chassis H61M-C ASUS H61M-C 1-5 The edge with external ports goes to the chassis. Place this side towards the rear of the chassis as indicated in the correct orientation.
DO NOT overtighten the screws! Doing so can damage the motherboard. 1.3 Motherboard overview 1.3.1 Placement direction When installing the motherboard, ensure that you place it into the chassis in the image below. 1.3.2 Screw holes Place six screws into the holes indicated by circles to secure the motherboard to the rear part of the chassis H61M-C ASUS H61M-C 1-5 The edge with external ports goes to the chassis. Place this side towards the rear of the chassis as indicated in the correct orientation.

H61M-C User's Manual
Page 18
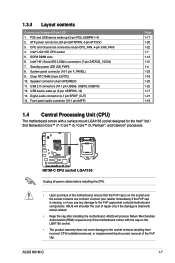
1.3.3 Motherboard layout 12 34 3 5 17.8cm(7.0in) KBMS RT 8876 CPU_FAN COM ATX12V DDR3 DIMM_A1 (64bit, 240-pin module) DDR3 DIMM_B1 (64bit, 240-pin module) LPT VGA LGA1155 USB34 22.9cm(9.0in) PS2_USBPW1~4 LAN_USB12 CHA_FAN EATXPWR RTL 8111F 2 BATTERY AUDIO H61M-C PCIEX16 SATA3G_2 SATA3G_1 Super I/O PCIEX1_1 ASM 64Mb 1083 BIOS 6 Intel® H61 ALC PCI1 887 SB_PWR 7 USBPW5~10 SPDIF_OUT USB56 USB78 CLRTC F_PANEL SATA3G_4 SATA3G_3 USB910 SPEAKER AAFP 14 13 12 11 10 9 8 6 1-6 Chapter 1: Product introduction
1.3.3 Motherboard layout 12 34 3 5 17.8cm(7.0in) KBMS RT 8876 CPU_FAN COM ATX12V DDR3 DIMM_A1 (64bit, 240-pin module) DDR3 DIMM_B1 (64bit, 240-pin module) LPT VGA LGA1155 USB34 22.9cm(9.0in) PS2_USBPW1~4 LAN_USB12 CHA_FAN EATXPWR RTL 8111F 2 BATTERY AUDIO H61M-C PCIEX16 SATA3G_2 SATA3G_1 Super I/O PCIEX1_1 ASM 64Mb 1083 BIOS 6 Intel® H61 ALC PCI1 887 SB_PWR 7 USBPW5~10 SPDIF_OUT USB56 USB78 CLRTC F_PANEL SATA3G_4 SATA3G_3 USB910 SPEAKER AAFP 14 13 12 11 10 9 8 6 1-6 Chapter 1: Product introduction
H61M-C User's Manual
Page 19
... resulting from incorrect CPU installation/removal, or misplacement/loss/incorrect removal of the motherboard, ensure that the PnP cap is shipment/ transit-related. • Keep the cap after installing the motherboard. Intel® H61 Serial ATA 3.0Gb/s connectors (7-pin SATA3G_1/2/3/4) 7. ASUS H61M-C 1-7 USB 2.0 connectors (10-1 pin USB56, USB78, USB910) 12. 1.3.4 Layout contents Connectors/Jumpers...
... resulting from incorrect CPU installation/removal, or misplacement/loss/incorrect removal of the motherboard, ensure that the PnP cap is shipment/ transit-related. • Keep the cap after installing the motherboard. Intel® H61 Serial ATA 3.0Gb/s connectors (7-pin SATA3G_1/2/3/4) 7. ASUS H61M-C 1-7 USB 2.0 connectors (10-1 pin USB56, USB78, USB910) 12. 1.3.4 Layout contents Connectors/Jumpers...
H61M-C User's Manual
Page 24
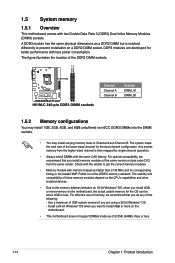
...H61M-C H61M-C 240-pin DDR3 DIMM sockets Channel Channel A Channel B Sockets DIMM_A1 DIMM_B1 1.5.2 Memory configurations You may install 1GB, 2GB, 4GB, and 8GB unbuffered non-ECC DDR3 DIMMs into the DIMM sockets. • You may install varying memory sizes in Channel A and Channel B. 1.5 System memory 1.5.1 Overview This motherboard...actual usable memory for the dual-channel configuration. Check with the retailer to the memory address limitation on the motherboard. • This motherboard does not support DIMMs made up of memory, we recommend that you install 4GB or more on 32-bit...
...H61M-C H61M-C 240-pin DDR3 DIMM sockets Channel Channel A Channel B Sockets DIMM_A1 DIMM_B1 1.5.2 Memory configurations You may install 1GB, 2GB, 4GB, and 8GB unbuffered non-ECC DDR3 DIMMs into the DIMM sockets. • You may install varying memory sizes in Channel A and Channel B. 1.5 System memory 1.5.1 Overview This motherboard...actual usable memory for the dual-channel configuration. Check with the retailer to the memory address limitation on the motherboard. • This motherboard does not support DIMMs made up of memory, we recommend that you install 4GB or more on 32-bit...

H61M-C User's Manual
Page 26
Unplug the power cord before adding or removing expansion cards. Remove the system unit cover (if your motherboard is completely seated on the slot. 5. Align the card connector with the screw you removed earlier. 6. Secure the card to ...the system cover. 1-14 Chapter 1: Product introduction To remove a DIMM B A A 1.6 Expansion slots In the future, you may cause you physical injury and damage motherboard components. 1.6.1 Installing an expansion card To install an expansion card: 1. Keep the screw for the card. 2. Before installing the expansion card, read the documentation that...
Unplug the power cord before adding or removing expansion cards. Remove the system unit cover (if your motherboard is completely seated on the slot. 5. Align the card connector with the screw you removed earlier. 6. Secure the card to ...the system cover. 1-14 Chapter 1: Product introduction To remove a DIMM B A A 1.6 Expansion slots In the future, you may cause you physical injury and damage motherboard components. 1.6.1 Installing an expansion card To install an expansion card: 1. Keep the screw for the card. 2. Before installing the expansion card, read the documentation that...
H61M-C User's Manual
Page 27
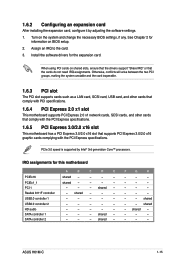
...cards that comply with PCI specifications. 1.6.4 PCI Express 2.0 x1 slot This motherboard supports PCI Express 2.0 x1 network cards, SCSI cards, and other cards that comply with the PCI Express specifications. PCIe 3.0 speed is supported by adjusting the software settings. 1. shared - - ASUS H61M-C 1-15 shared - - - - - - - 1.6.2 Configuring an...or that supports PCI Express 3.0/2.0 x16 graphic cards complying with the PCI Express specifications. 1.6.5 PCI Express 3.0/2.0 x16 slot This motherboard has a PCI Express 3.0/2.0 x16 slot that the cards do not need IRQ assignments.
...cards that comply with PCI specifications. 1.6.4 PCI Express 2.0 x1 slot This motherboard supports PCI Express 2.0 x1 network cards, SCSI cards, and other cards that comply with the PCI Express specifications. PCIe 3.0 speed is supported by adjusting the software settings. 1. shared - - ASUS H61M-C 1-15 shared - - - - - - - 1.6.2 Configuring an...or that supports PCI Express 3.0/2.0 x16 graphic cards complying with the PCI Express specifications. 1.6.5 PCI Express 3.0/2.0 x16 slot This motherboard has a PCI Express 3.0/2.0 x16 slot that the cards do not need IRQ assignments.
H61M-C User's Manual
Page 31
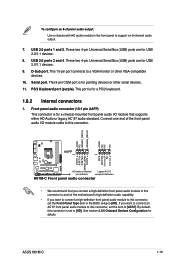
... connector to avail of the motherboard's high-definition audio capability. • If you want to connect a high-definition front panel audio module to this connector is for details. See section 2.5.6 Onboard Devices Configuration for a PS/2 keyboard. 1.8.2 Internal connectors 1. ASUS H61M-C 1-19 To configure an... PIN 1 MIC2 MICPWR Line out_R NC Line out_L PORT1 L PORT1 R PORT2 R SENSE_SEND PORT2 L H61M-C HD-audio-compliant Legacy AC'97 pin definition compliant definition H61M-C Front panel audio connector • We recommend that supports either HD Audio or legacy AC`97 audio...
... connector to avail of the motherboard's high-definition audio capability. • If you want to connect a high-definition front panel audio module to this connector is for details. See section 2.5.6 Onboard Devices Configuration for a PS/2 keyboard. 1.8.2 Internal connectors 1. ASUS H61M-C 1-19 To configure an... PIN 1 MIC2 MICPWR Line out_R NC Line out_L PORT1 L PORT1 R PORT2 R SENSE_SEND PORT2 L H61M-C HD-audio-compliant Legacy AC'97 pin definition compliant definition H61M-C Front panel audio connector • We recommend that supports either HD Audio or legacy AC`97 audio...

H61M-C User's Manual
Page 34
...+ GND H61M-C USB2.0 connectors Never connect a 1394 cable to the fan connectors. These USB connectors comply with USB 2.0 specification that the black wire of each cable matches the ground pin of maximum 2A (24 W) fan power. • Only the 4-pin CPU fan and 4-pin chassis fan support the ASUS Fan Xpert...to the fan connectors on the fan connectors! • The two fan connectors support fans of the connector. Do not place jumper caps on the motherboard, ensuring that supports up to a slot opening at the back of the system chassis. CPU_FAN CPU FAN PWM CPU FAN IN CPU FAN PWR ...
...+ GND H61M-C USB2.0 connectors Never connect a 1394 cable to the fan connectors. These USB connectors comply with USB 2.0 specification that the black wire of each cable matches the ground pin of maximum 2A (24 W) fan power. • Only the 4-pin CPU fan and 4-pin chassis fan support the ASUS Fan Xpert...to the fan connectors on the fan connectors! • The two fan connectors support fans of the connector. Do not place jumper caps on the motherboard, ensuring that supports up to a slot opening at the back of the system chassis. CPU_FAN CPU FAN PWM CPU FAN IN CPU FAN PWR ...
H61M-C User's Manual
Page 36
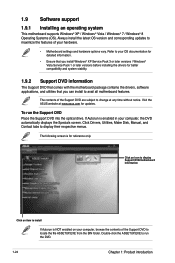
...at any time without notice. Refer to your hardware. • Motherboard settings and hardware options vary. The following screen is enabled in your computer, browse the contents of the Support DVD to change at www.asus.com for updates. The contents of your OS documentation for detailed... BIN folder. If Autorun is for better compatibility and system stability. 1.9.2 Support DVD information The Support DVD that comes with the motherboard package contains the drivers, software applications, and utilities that you can install to install If Autorun is NOT enabled on your computer,...
...at any time without notice. Refer to your hardware. • Motherboard settings and hardware options vary. The following screen is enabled in your computer, browse the contents of the Support DVD to change at www.asus.com for updates. The contents of your OS documentation for detailed... BIN folder. If Autorun is for better compatibility and system stability. 1.9.2 Support DVD information The Support DVD that comes with the motherboard package contains the drivers, software applications, and utilities that you can install to install If Autorun is NOT enabled on your computer,...
H61M-C User's Manual
Page 37
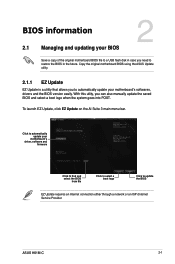
...Internet Service Provider. To launch EZ Update, click EZ Update on the AI Suite 3 main menu bar. ASUS H61M-C 2-1 Click to automatically update your BIOS 2 Save a copy of the original motherboard BIOS file to a USB flash disk in the future. With this utlity, you to restore the BIOS ...in case you need to automatically update your motherboard's softwares, drivers and the BIOS version easily. Copy the original motherboard BIOS using the ASUS Update utility. 2.1.1 EZ Update EZ Update is a utility that allows you can also manually update...
...Internet Service Provider. To launch EZ Update, click EZ Update on the AI Suite 3 main menu bar. ASUS H61M-C 2-1 Click to automatically update your BIOS 2 Save a copy of the original motherboard BIOS file to a USB flash disk in the future. With this utlity, you to restore the BIOS ...in case you need to automatically update your motherboard's softwares, drivers and the BIOS version easily. Copy the original motherboard BIOS using the ASUS Update utility. 2.1.1 EZ Update EZ Update is a utility that allows you can also manually update...

H61M-C User's Manual
Page 38
...the Folder Info field. 6. You can restore a corrupted BIOS file using the motherboard support DVD or a USB flash drive that allows you to restore the BIOS... shut down or reset the system while updating the BIOS to prevent system boot failure! 2.1.3 ASUS CrashFree BIOS 3 utility The ASUS CrashFree BIOS 3 is an auto recovery tool that contains the updated BIOS file. •...based utility. Press to switch to the Drive field. 4. Download the latest BIOS file from the ASUS website at www.asus.com. 2-2 Chapter 2: Getting started Insert the USB flash disk that contains the latest BIOS, and ...
...the Folder Info field. 6. You can restore a corrupted BIOS file using the motherboard support DVD or a USB flash drive that allows you to restore the BIOS... shut down or reset the system while updating the BIOS to prevent system boot failure! 2.1.3 ASUS CrashFree BIOS 3 utility The ASUS CrashFree BIOS 3 is an auto recovery tool that contains the updated BIOS file. •...based utility. Press to switch to the Drive field. 4. Download the latest BIOS file from the ASUS website at www.asus.com. 2-2 Chapter 2: Getting started Insert the USB flash disk that contains the latest BIOS, and ...


