H61M-A User's Manual
Page 14
...174; XP/Vista operating systems. ASUS DIGI+ VRM Digital Power Control: Digital Power Design for the CPU and iGPU All-new digital CPU power controls work perfectly together to its processor graphics (iGPU) voltages for hard drives larger than the traditional BIOS versions.... • F12 BIOS snapshot hotkey • F3 Shortcut for durability, improved lifespan, and enhanced thermal capacity. 1.1.2 ASUS Exclusive Features ASUS UEFI BIOS (EZ Mode) ASUS UEFI BIOS, a UEFI compliant architecture, offers the first mouse-controlled intuitive graphical BIOS interface that goes beyond the traditional...
...174; XP/Vista operating systems. ASUS DIGI+ VRM Digital Power Control: Digital Power Design for the CPU and iGPU All-new digital CPU power controls work perfectly together to its processor graphics (iGPU) voltages for hard drives larger than the traditional BIOS versions.... • F12 BIOS snapshot hotkey • F3 Shortcut for durability, improved lifespan, and enhanced thermal capacity. 1.1.2 ASUS Exclusive Features ASUS UEFI BIOS (EZ Mode) ASUS UEFI BIOS, a UEFI compliant architecture, offers the first mouse-controlled intuitive graphical BIOS interface that goes beyond the traditional...
H61M-A User's Manual
Page 36
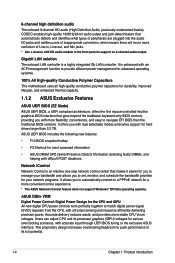
See section 2.5.3 SATA Configuration for Serial ATA hard disk drives and optical disc drives. SATA_4 GND RSATA_RXP2 RSATA_RXN2 GND RSATA_TXN2 RSATA_TXP2 GND GND RSATA_RXP1 RSATA_RXN1 GND RSATA_TXN1 RSATA_TXP1 GND H61M-PLUS SATA_3 H61M-PLUS ASMedia® 1061 SATA 6.0Gb/s connectors SATA_3~4 support SATA 6.0GB/s in the BIOS to [AHCI]. 3. ASMedia® 1061 Serial ATA 6.0 Gb... Serial ATA 6.0 Gb/s signal cables for details. 1-24 Chapter 1: Product introduction When using hot-plug and NCQ, set the type of the SATA connectors in H61M-PLUS only.
See section 2.5.3 SATA Configuration for Serial ATA hard disk drives and optical disc drives. SATA_4 GND RSATA_RXP2 RSATA_RXN2 GND RSATA_TXN2 RSATA_TXP2 GND GND RSATA_RXP1 RSATA_RXN1 GND RSATA_TXN1 RSATA_TXP1 GND H61M-PLUS SATA_3 H61M-PLUS ASMedia® 1061 SATA 6.0Gb/s connectors SATA_3~4 support SATA 6.0GB/s in the BIOS to [AHCI]. 3. ASMedia® 1061 Serial ATA 6.0 Gb... Serial ATA 6.0 Gb/s signal cables for details. 1-24 Chapter 1: Product introduction When using hot-plug and NCQ, set the type of the SATA connectors in H61M-PLUS only.
H61M-A User's Manual
Page 37
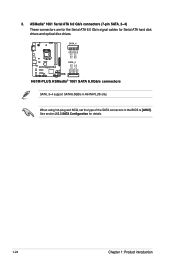
... SATA3G_2 H61M-PLUS Intel® SATA 3.0Gb/s connectors • You must install Windows® XP Service Pack 3 or later version before using hot-plug and NCQ on Windows® Vista / Windows® 7. See section 2.5.3 SATA Configuration for details. • When using Serial ATA hard disk drives. • Due to [AHCI].... section 2.5.3 SATA Configuration for details. Intel® H61 Serial ATA 3.0Gb/s connectors (7-pin SATA3G_1~2) These connectors connect to Serial ATA 3.0 Gb/s hard disk drives and optical drives via Serial ATA 3.0 Gb/s signal cables. ASUS H61M Series 1-25
... SATA3G_2 H61M-PLUS Intel® SATA 3.0Gb/s connectors • You must install Windows® XP Service Pack 3 or later version before using hot-plug and NCQ on Windows® Vista / Windows® 7. See section 2.5.3 SATA Configuration for details. • When using Serial ATA hard disk drives. • Due to [AHCI].... section 2.5.3 SATA Configuration for details. Intel® H61 Serial ATA 3.0Gb/s connectors (7-pin SATA3G_1~2) These connectors connect to Serial ATA 3.0 Gb/s hard disk drives and optical drives via Serial ATA 3.0 Gb/s signal cables. ASUS H61M Series 1-25
H61M-A User's Manual
Page 39
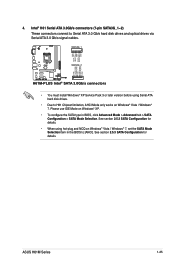
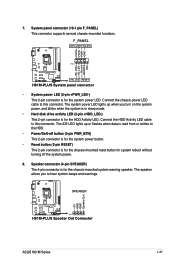
F_PANEL PWR LED PWR BTN PIN 1 H61M-PLUS +HD_LED RESET H61M-PLUS System panel connector • System power LED (2-pin +PWR_LED-) This 2-pin connector is for system reboot without turning off button (2-pin PWR_BTN) This 2-pin ... blinks when the system is in sleep mode. • Hard disk drive activity LED (2-pin +HDD_LED-) This 2-pin connector is read from or written to this connector. SPEAKER H61M-PLUS PIN 1 H61M-PLUS Speaker Out Connector +5V GND GND Speaker Out ASUS H61M Series 1-27 Connect the HDD Activity LED cable to hear system beeps...
F_PANEL PWR LED PWR BTN PIN 1 H61M-PLUS +HD_LED RESET H61M-PLUS System panel connector • System power LED (2-pin +PWR_LED-) This 2-pin connector is for system reboot without turning off button (2-pin PWR_BTN) This 2-pin ... blinks when the system is in sleep mode. • Hard disk drive activity LED (2-pin +HDD_LED-) This 2-pin connector is read from or written to this connector. SPEAKER H61M-PLUS PIN 1 H61M-PLUS Speaker Out Connector +5V GND GND Speaker Out ASUS H61M Series 1-27 Connect the HDD Activity LED cable to hear system beeps...
H61M-A User's Manual
Page 40
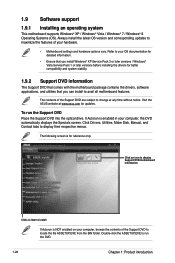
... the motherboard package contains the drivers, software applications, and utilities that you can install to display their respective menus. Visit the ASUS website at any time without notice. Always install the latest OS version and corresponding updates to maximize the features of the Support ...DVD are subject to run the Support DVD Place the Support DVD into the optical drive. The contents of your OS documentation for detailed information. • Ensure that you install Windows® XP Service Pack 3 or later...
... the motherboard package contains the drivers, software applications, and utilities that you can install to display their respective menus. Visit the ASUS website at any time without notice. Always install the latest OS version and corresponding updates to maximize the features of the Support ...DVD are subject to run the Support DVD Place the Support DVD into the optical drive. The contents of your OS documentation for detailed information. • Ensure that you install Windows® XP Service Pack 3 or later...
H61M-A User's Manual
Page 41
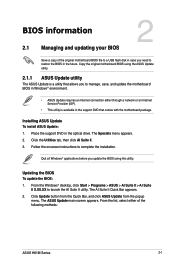
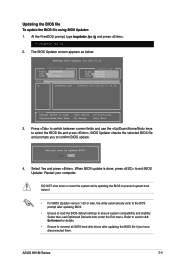
... ASUS > AI Suite II > AI Suite II X.XX.XX to restore the BIOS in the future. BIOS information 2.1 Managing and updating your BIOS 2 Save a copy of the following methods: ASUS H61M Series 2-1 Installing ASUS Update To install ASUS Update: 1. Place the support DVD in the optical drive.... The AI Suite II Quick Bar appears. 2. The ASUS Update main screen appears.
... ASUS > AI Suite II > AI Suite II X.XX.XX to restore the BIOS in the future. BIOS information 2.1 Managing and updating your BIOS 2 Save a copy of the following methods: ASUS H61M Series 2-1 Installing ASUS Update To install ASUS Update: 1. Place the support DVD in the optical drive.... The AI Suite II Quick Bar appears. 2. The ASUS Update main screen appears.
H61M-A User's Manual
Page 42
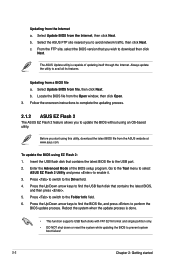
...download the latest BIOS file from the Open window, then click Open. 3. Press to switch to the Folder Info field. 6. Press to switch to the Drive field. 4. Reboot the system when the update process is capable of the BIOS setup program. b. c. Updating from the Internet, then click Next. Go ...file to download then click Next. Always update the utility to enable it. 3. Follow the onscreen instructions to complete the updating process. 2.1.2 ASUS EZ Flash 2 The ASUS EZ Flash 2 feature allows you wish to the USB port. 2. Press the Up/Down arrow keys to find the BIOS file, and press...
...download the latest BIOS file from the Open window, then click Open. 3. Press to switch to the Folder Info field. 6. Press to switch to the Drive field. 4. Reboot the system when the update process is capable of the BIOS setup program. b. c. Updating from the Internet, then click Next. Go ...file to download then click Next. Always update the utility to enable it. 3. Follow the onscreen instructions to complete the updating process. 2.1.2 ASUS EZ Flash 2 The ASUS EZ Flash 2 feature allows you wish to the USB port. 2. Press the Up/Down arrow keys to find the BIOS file, and press...
H61M-A User's Manual
Page 43
... requires you to restore the BIOS file when it fails or gets corrupted during the updating process. ASUS H61M Series 2-3 CAP (for H61M-A/USB3) or H61MA. Insert the support DVD to the optical drive or the USB flash drive that contains the BIOS file to load default BIOS values. When found, the utility reads the...
... requires you to restore the BIOS file when it fails or gets corrupted during the updating process. ASUS H61M Series 2-3 CAP (for H61M-A/USB3) or H61MA. Insert the support DVD to the optical drive or the USB flash drive that contains the BIOS file to load default BIOS values. When found, the utility reads the...

H61M-A User's Manual
Page 44
... Make Disk menu appears, select the FreeDOS command prompt item by pressing the item number. 4. Turn off the computer and disconnect all SATA hard disk drives (optional). When the ASUS Logo appears, press to the USB port. 2. At the FreeDOS prompt, type d: and press to switch the disk from the... ASUS website at http://support.asus.com and save the BIOS file and BIOS Updater to a hard disk drive or USB flash drive in FAT32/16 format and single partition. 2. The actual utility screen displays may not be same...
... Make Disk menu appears, select the FreeDOS command prompt item by pressing the item number. 4. Turn off the computer and disconnect all SATA hard disk drives (optional). When the ASUS Logo appears, press to the USB port. 2. At the FreeDOS prompt, type d: and press to switch the disk from the... ASUS website at http://support.asus.com and save the BIOS file and BIOS Updater to a hard disk drive or USB flash drive in FAT32/16 format and single partition. 2. The actual utility screen displays may not be same...
H61M-A User's Manual
Page 45
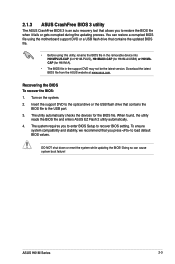
... 8390656 2013-01-10 17:30:48 Note [Enter] Select or Load [Up/Down/Home/End] Move [Tab] Switch [B] Backup [V] Drive Info [Esc] Exit 3. The BIOS Updater screen appears as below. ASUS H61M Series 2-5 BIOS Updater checks the selected BIOS file and prompts you have disconnected them. DO NOT shut down or reset... using BIOS Updater: 1. At the FreeDOS prompt, type bupdater /pc /g and press . 2. ASUSTek BIOS Updater for details. • Ensure to connect all SATA hard disk drives after updating BIOS. • Ensure to load the BIOS default settings to confirm BIOS update. 4.
... 8390656 2013-01-10 17:30:48 Note [Enter] Select or Load [Up/Down/Home/End] Move [Tab] Switch [B] Backup [V] Drive Info [Esc] Exit 3. The BIOS Updater screen appears as below. ASUS H61M Series 2-5 BIOS Updater checks the selected BIOS file and prompts you have disconnected them. DO NOT shut down or reset... using BIOS Updater: 1. At the FreeDOS prompt, type bupdater /pc /g and press . 2. ASUSTek BIOS Updater for details. • Ensure to connect all SATA hard disk drives after updating BIOS. • Ensure to load the BIOS default settings to confirm BIOS update. 4.
H61M-A User's Manual
Page 59
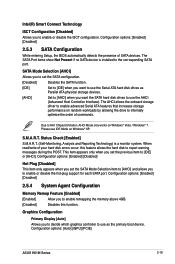
...advanced Serial ATA features that increases storage performance on Windows® Vista / Windows® 7. Configuration options: [Auto] [iGPU] [PCIE] ASUS H61M Series 2-19 SATA Mode Selection [AHCI] Allows you to set the SATA configuration. [Disabled] Disables the SATA function. [IDE] Set ... options: [Enabled] [Disabled] 2.5.4 System Agent Configuration Memory Remap Feature [Enabled] [Enabled] Allow you want the SATA hard disk drives to use IDE Mode on Windows® XP. Intel(R) Smart Connect Technology ISCT Configuration [Disabled] Allows you set the previous item ...
...advanced Serial ATA features that increases storage performance on Windows® Vista / Windows® 7. Configuration options: [Auto] [iGPU] [PCIE] ASUS H61M Series 2-19 SATA Mode Selection [AHCI] Allows you to set the SATA configuration. [Disabled] Disables the SATA function. [IDE] Set ... options: [Enabled] [Disabled] 2.5.4 System Agent Configuration Memory Remap Feature [Enabled] [Enabled] Allow you want the SATA hard disk drives to use IDE Mode on Windows® XP. Intel(R) Smart Connect Technology ISCT Configuration [Disabled] Allows you set the previous item ...


