User's Manual for English Edition
Page 30
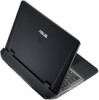
... controls the POST is used to boot from your Notebook PC before turning it will first run the BIOS Setup to set or modify the system configuration, press [F2] upon bootup to enter the BIOS Setup. The Power-On Self Test (POST) When you turn it will display a message on the screen when... you may adjust the brightness by using the BIOS Setup program. Powering ON the Notebook PC The Notebook PC's power-ON...
... controls the POST is used to boot from your Notebook PC before turning it will first run the BIOS Setup to set or modify the system configuration, press [F2] upon bootup to enter the BIOS Setup. The Power-On Self Test (POST) When you turn it will display a message on the screen when... you may adjust the brightness by using the BIOS Setup program. Powering ON the Notebook PC The Notebook PC's power-ON...

User's Manual for English Edition
Page 82
... Help F9: Optimized Defaults F10: Save ESC: Exit Version 2.01.1208. Copyright (C) 2010 American Megatrends, Inc. System BIOS Settings The BIOS screens in this section are for reference only. Aptio Setup Utility - Boot Option Priorities Boot Option #1 Boot Option #2 ...[P0: Hitachi HTS545...] [P1: Hitachi HTS545...] Hard Drive BBS Priorities CD/DVD ROM Drive BBS Priorities Delete Boot Option : Select Screen : Select Item Enter: Select +/-: Change Opt. Press [Enter...
... Help F9: Optimized Defaults F10: Save ESC: Exit Version 2.01.1208. Copyright (C) 2010 American Megatrends, Inc. System BIOS Settings The BIOS screens in this section are for reference only. Aptio Setup Utility - Boot Option Priorities Boot Option #1 Boot Option #2 ...[P0: Hitachi HTS545...] [P1: Hitachi HTS545...] Hard Drive BBS Priorities CD/DVD ROM Drive BBS Priorities Delete Boot Option : Select Screen : Select Item Enter: Select +/-: Change Opt. Press [Enter...

User's Manual for English Edition
Page 83
... password and press [Enter]. 4. Re-type to enter and configure the BIOS settings. Enter the current password and press [Enter]. 3. Leave the Create New Password field blank and press [Enter]. 4. The Administrator Password is only asked when you power on the Notebook PC (enter BIOS or OS). Notebook... User Password HDD Password Status : Set Master Password Set User Password I/O Interface Security NOT INSTALLED : Select Screen : Select Item Enter: Select +/-: Change Opt. Main Advanced Boot Security Save & Exit Password Description Set the system boot order. Leave the Confirm New...
... password and press [Enter]. 4. Re-type to enter and configure the BIOS settings. Enter the current password and press [Enter]. 3. Leave the Create New Password field blank and press [Enter]. 4. The Administrator Password is only asked when you power on the Notebook PC (enter BIOS or OS). Notebook... User Password HDD Password Status : Set Master Password Set User Password I/O Interface Security NOT INSTALLED : Select Screen : Select Item Enter: Select +/-: Change Opt. Main Advanced Boot Security Save & Exit Password Description Set the system boot order. Leave the Confirm New...
User's Manual for English Edition
Page 87
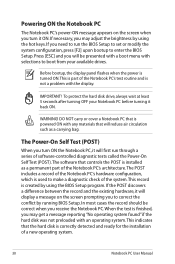
... Save Changes Discard Changes Restore Defaults Boot Override P0: ST9500420AS P1: HL-DT-STBDDVDRW CA21N Launch EFI Shell from filesystem device : Select Screen : Select Item Enter: Select +/-: Change Opt. Aptio Setup Utility - F1: General Help F9: Optimized Defaults F10: Save ESC: Exit Version 2.01.1208. Copyright (C) 2010 American Megatrends, Inc. Main... (C) 2010 American Megatrends, Inc. Notebook PC User Manual A-9 Save Changes If you want to keep your configuration settings, you must save changes before exiting the BIOS setup utility.
... Save Changes Discard Changes Restore Defaults Boot Override P0: ST9500420AS P1: HL-DT-STBDDVDRW CA21N Launch EFI Shell from filesystem device : Select Screen : Select Item Enter: Select +/-: Change Opt. Aptio Setup Utility - F1: General Help F9: Optimized Defaults F10: Save ESC: Exit Version 2.01.1208. Copyright (C) 2010 American Megatrends, Inc. Main... (C) 2010 American Megatrends, Inc. Notebook PC User Manual A-9 Save Changes If you want to keep your configuration settings, you must save changes before exiting the BIOS setup utility.

User's Manual for English Edition
Page 93
...Speaker Volume Internal Pointing Device [Static] [No] [4] [Enabled] Press ENTER to run the utility to the Notebook PC and power on the Exit page after updating (flashing) the BIOS. Follow the instructions shown. ASUS Tek. F1: General Help F9: Optimized Defaults F10: Save ESC: ...Platform Platform: G75VW Version: 100 Build Date: Feb 23 2011 New Platform Platform: Unkown Version: Unkown Build Date: Unkown FS0 FS1 [ ]: Switch [ ] : Choose [q] : Exit 5. You must Restore Defaults on the Notebook PC. 3. Locate the latest BIOS file and start updating (flashing) the BIOS. Intel (...
...Speaker Volume Internal Pointing Device [Static] [No] [4] [Enabled] Press ENTER to run the utility to the Notebook PC and power on the Exit page after updating (flashing) the BIOS. Follow the instructions shown. ASUS Tek. F1: General Help F9: Optimized Defaults F10: Save ESC: ...Platform Platform: G75VW Version: 100 Build Date: Feb 23 2011 New Platform Platform: Unkown Version: Unkown Build Date: Unkown FS0 FS1 [ ]: Switch [ ] : Choose [q] : Exit 5. You must Restore Defaults on the Notebook PC. 3. Locate the latest BIOS file and start updating (flashing) the BIOS. Intel (...

User's Manual for English Edition
Page 95
... F10: Save ESC: Exit Version 2.14.1219. Visit the ASUS website at www.asus.com for when entering Setup. On the Security screen, select I /O Interface Security [Enabled] NOT INSTALLED : Select Screen : Select Item Enter: Select +/-: Change Opt. Follow the onscreen instructions to Setup ... Exit Password Description Set Administrator Password. Recover Windows to entire HD with recovery DVD. 1. Using Recovery DVD (on bootup to enter BIOS setup. 2. If ONLY the Administrator's password is set , then this only limits access to complete the recovery process. Notebook PC...
... F10: Save ESC: Exit Version 2.14.1219. Visit the ASUS website at www.asus.com for when entering Setup. On the Security screen, select I /O Interface Security [Enabled] NOT INSTALLED : Select Screen : Select Item Enter: Select +/-: Change Opt. Follow the onscreen instructions to Setup ... Exit Password Description Set Administrator Password. Recover Windows to entire HD with recovery DVD. 1. Using Recovery DVD (on bootup to enter BIOS setup. 2. If ONLY the Administrator's password is set , then this only limits access to complete the recovery process. Notebook PC...

User's Manual for English Edition
Page 98
...Save & Exit POST Logo Type Start Easy Flash Play POST Sound Speaker Volume Internal Pointing Device Wake On Lid Open ASUS USB Charger+ in the BIOS Setup before creating RAID set(s) using SATA HDDs. RAID 1 (Data mirroring) copies and maintains an identical image of...SATA Configuration Intel(R) Rapid Start Technology Intel(R) Anti-Theft Technology Configuration USB Configuration Intel(R) Smart Connect Technology Network Stack : Select Screen : Select Item Enter: Select +/-: Change Opt. To do this: 1. Pres [F2] to the surviving drive as a single drive but at a sustained data transfer...
...Save & Exit POST Logo Type Start Easy Flash Play POST Sound Speaker Volume Internal Pointing Device Wake On Lid Open ASUS USB Charger+ in the BIOS Setup before creating RAID set(s) using SATA HDDs. RAID 1 (Data mirroring) copies and maintains an identical image of...SATA Configuration Intel(R) Rapid Start Technology Intel(R) Anti-Theft Technology Configuration USB Configuration Intel(R) Smart Connect Technology Network Stack : Select Screen : Select Item Enter: Select +/-: Change Opt. To do this: 1. Pres [F2] to the surviving drive as a single drive but at a sustained data transfer...
User's Manual for English Edition
Page 99
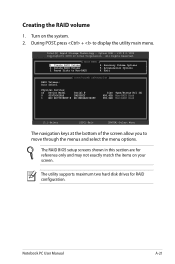
...Intel(R) Rapid Storage Technology - Notebook PC User Manual A-21 Creating the RAID volume 1. Delete RAID Volume 3. Acceleration Options 6. The RAID BIOS setup screens shown in this section are for RAID configuration. The utility supports maximum two hard disk drives for reference only and may not ...-8 WD-WXK1A8154499 Size Type/Status(Vol ID) 698.6GB Non-RAID Disk 698.6GB Non-RAID Disk [↑↓]-Select [ESC]-Exit [ENTER]-Select Menu The navigation keys at the bottom of the screen allow you to display the utility main menu. Recovery Volume Options 5. Turn...
...Intel(R) Rapid Storage Technology - Notebook PC User Manual A-21 Creating the RAID volume 1. Delete RAID Volume 3. Acceleration Options 6. The RAID BIOS setup screens shown in this section are for RAID configuration. The utility supports maximum two hard disk drives for reference only and may not ...-8 WD-WXK1A8154499 Size Type/Status(Vol ID) 698.6GB Non-RAID Disk 698.6GB Non-RAID Disk [↑↓]-Select [ESC]-Exit [ENTER]-Select Menu The navigation keys at the bottom of the screen allow you to display the utility main menu. Recovery Volume Options 5. Turn...

