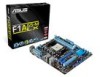
User Manual
Page 2
.... Product warranty or service will be registered trademarks or copyrights of reproduction and shipment, which will not be much obliged if you want to have it from http://support.asus.com/download; ASUS ASSUMES NO RESPONSIBILITY OR LIABILITY FOR ANY ERRORS OR INACCURACIES THAT MAY APPEAR IN THIS MANUAL, INCLUDING THE PRODUCTS AND SOFTWARE DESCRIBED IN IT. Offer...
.... Product warranty or service will be registered trademarks or copyrights of reproduction and shipment, which will not be much obliged if you want to have it from http://support.asus.com/download; ASUS ASSUMES NO RESPONSIBILITY OR LIABILITY FOR ANY ERRORS OR INACCURACIES THAT MAY APPEAR IN THIS MANUAL, INCLUDING THE PRODUCTS AND SOFTWARE DESCRIBED IN IT. Offer...
User Manual
Page 4
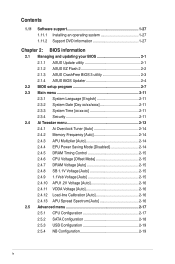
...updating your BIOS 2-1 2.1.1 ASUS Update utility 2-1 2.1.2 ASUS EZ Flash 2 2-2 2.1.3 ASUS CrashFree BIOS 3 utility 2-3 2.1.4 ASUS BIOS Updater 2-4 2.2 BIOS setup program 2-7 2.3 Main menu 2-11 2.3.1 System Language [English 2-11 2.3.2 System Date [Day xx/xx/xxxx 2-11 2.3.3 System Time [xx:xx:xx 2-11 2.3.4 Security 2-11 2.4 Ai Tweaker menu 2-13 2.4.1 Ai Overclock Tuner [Auto 2-14 2.4.2 Memory Frequency [Auto 2-14 2.4.3 APU Multiplier [Auto 2-14 2.4.4 EPU Power Saving Mode [Disabled 2-14 2.4.5 DRAM Timing Control 2-15 2.4.6 CPU Voltage [Offset Mode 2-15 2.4.7 DRAM Voltage [Auto...
...updating your BIOS 2-1 2.1.1 ASUS Update utility 2-1 2.1.2 ASUS EZ Flash 2 2-2 2.1.3 ASUS CrashFree BIOS 3 utility 2-3 2.1.4 ASUS BIOS Updater 2-4 2.2 BIOS setup program 2-7 2.3 Main menu 2-11 2.3.1 System Language [English 2-11 2.3.2 System Date [Day xx/xx/xxxx 2-11 2.3.3 System Time [xx:xx:xx 2-11 2.3.4 Security 2-11 2.4 Ai Tweaker menu 2-13 2.4.1 Ai Overclock Tuner [Auto 2-14 2.4.2 Memory Frequency [Auto 2-14 2.4.3 APU Multiplier [Auto 2-14 2.4.4 EPU Power Saving Mode [Disabled 2-14 2.4.5 DRAM Timing Control 2-15 2.4.6 CPU Voltage [Offset Mode 2-15 2.4.7 DRAM Voltage [Auto...
User Manual
Page 15
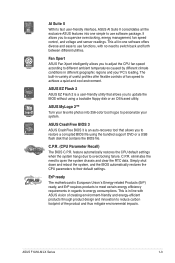
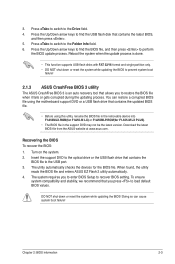
.... ASUS EZ Flash 2 ASUS EZ Flash 2 is an auto-recovery tool that contains the BIOS file. C.P.R. (CPU Parameter Recall) The BIOS C.P.R. ASUS F1A55-M LX Series 1-3 ASUS CrashFree BIOS 3 ASUS CrashFree BIOS 3 is a user-friendly utility that allows you to update the BIOS without using the bundled support DVD or a USB flash disk that allows you to supervise overclocking, energy management, fan speed control, and voltage and sensor readings. ErP ready The motherboard is in line with no need to open the system chassis and clear the...
.... ASUS EZ Flash 2 ASUS EZ Flash 2 is an auto-recovery tool that contains the BIOS file. C.P.R. (CPU Parameter Recall) The BIOS C.P.R. ASUS F1A55-M LX Series 1-3 ASUS CrashFree BIOS 3 ASUS CrashFree BIOS 3 is a user-friendly utility that allows you to update the BIOS without using the bundled support DVD or a USB flash disk that allows you to supervise overclocking, energy management, fan speed control, and voltage and sensor readings. ErP ready The motherboard is in line with no need to open the system chassis and clear the...
User Manual
Page 23
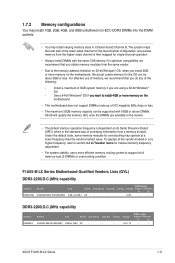
... Timing - Chip NO. - Voltage 1.5V-1.7V DIMM socket support (Optional) A* B* • • ASUS F1A55-M LX Series 1-11 Install a maximum of the lower-sized channel for overclocking may install varying memory sizes in the market. • The default memory operation frequency is then mapped for manual memory frequency adjustment. • For system stability, use of memory, we recommend that you install 4GB or more efficient memory cooling system to support a full memory load (2 DIMMs) or overclocking condition. 1.7.2 Memory configurations You may install 1GB, 2GB...
... Timing - Chip NO. - Voltage 1.5V-1.7V DIMM socket support (Optional) A* B* • • ASUS F1A55-M LX Series 1-11 Install a maximum of the lower-sized channel for overclocking may install varying memory sizes in the market. • The default memory operation frequency is then mapped for manual memory frequency adjustment. • For system stability, use of memory, we recommend that you install 4GB or more efficient memory cooling system to support a full memory load (2 DIMMs) or overclocking condition. 1.7.2 Memory configurations You may install 1GB, 2GB...
User Manual
Page 29
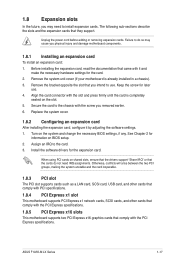
... network cards, SCSI cards, and other cards that comply with the PCI Express specifications. 1.8.5 PCI Express x16 slots This motherboard supports two PCI Express x16 graphics cards that comply with the slot and press firmly until the card is already installed in a chassis). 3. Unplug the power cord before adding or removing expansion cards. Align the card connector with the PCI Express specifications. Install the software drivers for information on the system and change the necessary BIOS settings, if any. Keep the screw for the card. 2. ASUS F1A55-M LX Series...
... network cards, SCSI cards, and other cards that comply with the PCI Express specifications. 1.8.5 PCI Express x16 slots This motherboard supports two PCI Express x16 graphics cards that comply with the slot and press firmly until the card is already installed in a chassis). 3. Unplug the power cord before adding or removing expansion cards. Align the card connector with the PCI Express specifications. Install the software drivers for information on the system and change the necessary BIOS settings, if any. Keep the screw for the card. 2. ASUS F1A55-M LX Series...
User Manual
Page 30
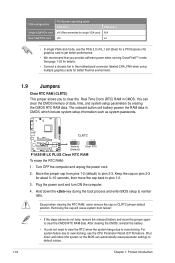
...; Connect a chassis fan to the motherboard connector labeled CHA_FAN when using multiple graphics cards for a PCI Express x16 graphics card to get better performance. • We recommend that you to overclocking. The onboard button cell battery powers the RAM data in CMOS. After clearing the CMOS, reinstall the battery. • You do not help, remove the onboard battery and move the cap back to overclocking, use the PCIe 2.0 x16_1 slot (blue) for better thermal environment. 1.9 Jumpers Clear RTC RAM (CLRTC) This jumper allows...
...; Connect a chassis fan to the motherboard connector labeled CHA_FAN when using multiple graphics cards for a PCI Express x16 graphics card to get better performance. • We recommend that you to overclocking. The onboard button cell battery powers the RAM data in CMOS. After clearing the CMOS, reinstall the battery. • You do not help, remove the onboard battery and move the cap back to overclocking, use the PCIe 2.0 x16_1 slot (blue) for better thermal environment. 1.9 Jumpers Clear RTC RAM (CLRTC) This jumper allows...
User Manual
Page 31
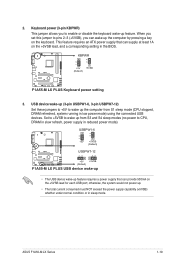
... S1 sleep mode (CPU stopped, DRAM refreshed, system running in sleep mode. Keyboard power (3-pin KBPWR) This jumper allows you to CPU, DRAM in slow refresh, power supply in the BIOS. KBPWR 12 23 F1A55-M LX PLUS +5V +5VSB (Default) F1A55-M LX PLUS Keyboard power setting 3. USB device wake-up (3-pin USBPW1-6, 3-pin USBPW7-12) Set these jumpers to +5V to pins 2-3 (+5VSB), you set this jumper to wake up the computer from S3 and S4 sleep modes (no power to enable or disable the keyboard wake-up feature requires a power supply that...
... S1 sleep mode (CPU stopped, DRAM refreshed, system running in sleep mode. Keyboard power (3-pin KBPWR) This jumper allows you to CPU, DRAM in slow refresh, power supply in the BIOS. KBPWR 12 23 F1A55-M LX PLUS +5V +5VSB (Default) F1A55-M LX PLUS Keyboard power setting 3. USB device wake-up (3-pin USBPW1-6, 3-pin USBPW7-12) Set these jumpers to +5V to pins 2-3 (+5VSB), you set this jumper to wake up the computer from S3 and S4 sleep modes (no power to enable or disable the keyboard wake-up feature requires a power supply that...
User Manual
Page 33
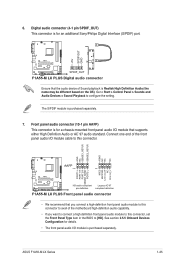
.... ASUS F1A55-M LX Series 1-21 USB 2.0 ports 1 and 2. DO NOT place jumper caps on the motherboard, ensuring that you install two VGA cards, we recommend that the black wire of each cable matches the ground pin of maximum 2A (24 W) fan power. • Only the CPU_FAN connector supports the ASUS Fan Xpert feature. • If you plug the rear chassis fan cable to the motherboard connector labeled CHA_FAN for a VGA monitor or other serial devices. 11. Video Graphics Adapter (VGA) port. To configure an 8-channel audio output: Use a chassis...
.... ASUS F1A55-M LX Series 1-21 USB 2.0 ports 1 and 2. DO NOT place jumper caps on the motherboard, ensuring that you install two VGA cards, we recommend that the black wire of each cable matches the ground pin of maximum 2A (24 W) fan power. • Only the CPU_FAN connector supports the ASUS Fan Xpert feature. • If you plug the rear chassis fan cable to the motherboard connector labeled CHA_FAN for a VGA monitor or other serial devices. 11. Video Graphics Adapter (VGA) port. To configure an 8-channel audio output: Use a chassis...
User Manual
Page 37
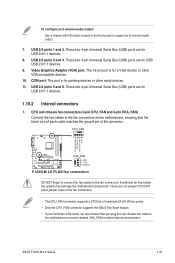
... panel audio module to configure the setting. See section 2.5.5 Onboard Devices Configuration for a chassis-mounted front panel audio I /O module cable to this connector, set the Front Panel Type item in the BIOS to [HD]. The S/PDIF module is Realtek High Definition Audio (the name may be different based on the OS). ASUS F1A55-M LX Series 1-25 Digital audio connector (4-1 pin SPDIF_OUT) This connector is purchased separately. Connect one end of Sound playback is purchased separately. 7. Go to Start > Control Panel > Sounds and Audio Devices > Sound...
... panel audio module to configure the setting. See section 2.5.5 Onboard Devices Configuration for a chassis-mounted front panel audio I /O module cable to this connector, set the Front Panel Type item in the BIOS to [HD]. The S/PDIF module is Realtek High Definition Audio (the name may be different based on the OS). ASUS F1A55-M LX Series 1-25 Digital audio connector (4-1 pin SPDIF_OUT) This connector is purchased separately. Connect one end of Sound playback is purchased separately. 7. Go to Start > Control Panel > Sounds and Audio Devices > Sound...
User Manual
Page 39
... at any time without notice. Click Drivers, Utilities, Make Disk, Manual, and Contact tabs to locate the file ASSETUP.EXE from the BIN folder. ASUS F1A55-M LX Series 1-27 The contents of the Support DVD are subject to run the Support DVD Place the Support DVD into the optical drive. To run the DVD. If Autorun is enabled in your OS documentation for detailed information. • Ensure that you...
... at any time without notice. Click Drivers, Utilities, Make Disk, Manual, and Contact tabs to locate the file ASSETUP.EXE from the BIN folder. ASUS F1A55-M LX Series 1-27 The contents of the Support DVD are subject to run the Support DVD Place the Support DVD into the optical drive. To run the DVD. If Autorun is enabled in your OS documentation for detailed information. • Ensure that you...
User Manual
Page 41
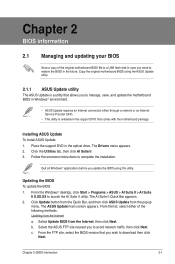
... the installation. The ASUS Update main screen appears. Place the support DVD in the support DVD that you need to avoid network traffic, then click Next. Updating the BIOS To update the BIOS: 1. b. From the FTP site, select the BIOS version that comes with the motherboard package. c. From the list, select either of the original motherboard BIOS file to a USB flash disk in case you wish to manage, save, and update the motherboard BIOS in Windows® environment. • ASUS Update...
... the installation. The ASUS Update main screen appears. Place the support DVD in the support DVD that you need to avoid network traffic, then click Next. Updating the BIOS To update the BIOS: 1. b. From the FTP site, select the BIOS version that comes with the motherboard package. c. From the list, select either of the original motherboard BIOS file to a USB flash disk in case you wish to manage, save, and update the motherboard BIOS in Windows® environment. • ASUS Update...
User Manual
Page 43
... system requires you to recover BIOS setting. You can cause system boot failure! The utility automatically checks the devices for F1A55-M LX PLUS). • The BIOS file in the removable device into F1A55MLX.ROM(for F1A55-M LX) or F1A55MLP.ROM(for the BIOS file. Press to switch to the Drive field. 4. Insert the support DVD to the optical drive or the USB flash drive that allows you to enter BIOS Setup to restore the BIOS file when it fails or gets...
... system requires you to recover BIOS setting. You can cause system boot failure! The utility automatically checks the devices for F1A55-M LX PLUS). • The BIOS file in the removable device into F1A55MLX.ROM(for F1A55-M LX) or F1A55MLP.ROM(for the BIOS file. Press to switch to the Drive field. 4. Insert the support DVD to the optical drive or the USB flash drive that allows you to enter BIOS Setup to restore the BIOS file when it fails or gets...
User Manual
Page 44
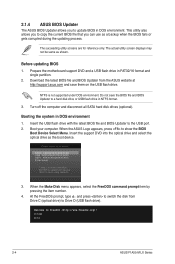
... to switch the disk from the ASUS website at http://support.asus.com and save the BIOS file and BIOS Updater to copy the current BIOS file that you to a hard disk drive or USB flash drive in DOS environment. The succeeding utility screens are for reference only. Download the latest BIOS file and BIOS Updater from Drive C (optical drive) to FreeDOS (http://www.freedos.org)! Turn off the computer and disconnect all SATA hard disk drives (optional). C:\>d: D:\> 2-4 ASUS F1A55-M LX Series Boot your computer. This utility also...
... to switch the disk from the ASUS website at http://support.asus.com and save the BIOS file and BIOS Updater to copy the current BIOS file that you to a hard disk drive or USB flash drive in DOS environment. The succeeding utility screens are for reference only. Download the latest BIOS file and BIOS Updater from Drive C (optical drive) to FreeDOS (http://www.freedos.org)! Turn off the computer and disconnect all SATA hard disk drives (optional). C:\>d: D:\> 2-4 ASUS F1A55-M LX Series Boot your computer. This utility also...
User Manual
Page 46
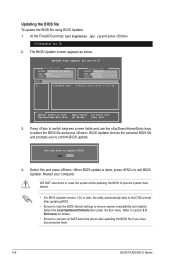
... press . Select the Load Optimized Defaults item under the Exit menu. Updating the BIOS file To update the BIOS file using BIOS Updater 1. At the FreeDOS prompt, type bupdater /pc /g and press . When BIOS update is done, press to connect all SATA hard disk drives after updating BIOS. • Ensure to load the BIOS default settings to update BIOS? Refer to section 2.9 Exit menu for DOS V1.07 Current ROM BOARD: F1A55-M LX PLUS VER: 0202 DATE: 08/03/2011 Update ROM BOARD: Unknown VER: Unknown...
... press . Select the Load Optimized Defaults item under the Exit menu. Updating the BIOS file To update the BIOS file using BIOS Updater 1. At the FreeDOS prompt, type bupdater /pc /g and press . When BIOS update is done, press to connect all SATA hard disk drives after updating BIOS. • Ensure to load the BIOS default settings to update BIOS? Refer to section 2.9 Exit menu for DOS V1.07 Current ROM BOARD: F1A55-M LX PLUS VER: 0202 DATE: 08/03/2011 Update ROM BOARD: Unknown VER: Unknown...
User Manual
Page 49
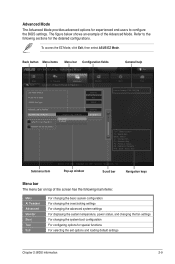
... Main Back Ai Tweaker Advanced Advanced\ Onboard Devices Configuration > Monitor HD Audio Device Enabled Front Panel Type HD SPDIF Out Type SPDIF Realtek LAN Controller Enabled Realtek PXE OPROM Realt ek PXE OPROM > Serial Port Configuration Disabled Enabled Disabled > Parallel Port Configuration Boot Tool Launch Realtek PXE OPROM →←: Select Screen ↑↓: Select Item Enter: Select +/-: Change Opt. Refer to configure the BIOS settings. Pop-up window Scroll bar Navigation keys Menu bar The menu bar on top of the Advanced Mode. Back button...
... Main Back Ai Tweaker Advanced Advanced\ Onboard Devices Configuration > Monitor HD Audio Device Enabled Front Panel Type HD SPDIF Out Type SPDIF Realtek LAN Controller Enabled Realtek PXE OPROM Realt ek PXE OPROM > Serial Port Configuration Disabled Enabled Disabled > Parallel Port Configuration Boot Tool Launch Realtek PXE OPROM →←: Select Screen ↑↓: Select Item Enter: Select +/-: Change Opt. Refer to configure the BIOS settings. Pop-up window Scroll bar Navigation keys Menu bar The menu bar on top of the Advanced Mode. Back button...
User Manual
Page 54
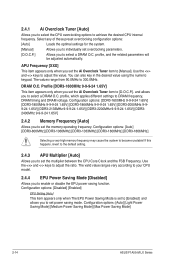
... you set overclocking parameters. [D.O.C.P.] Allows you to adjust the ratio. Configuration options: [Auto] [Light Power Saving Mode] [Medium Power Saving Mode] [Max Power Saving Mode] 2-14 ASUS F1A55-M LX Series 2.4.1 Ai Overclock Tuner [Auto] Allows you to select the CPU overclocking options to [Manual]. Select any of these preset overclocking configuration options: [Auto] Loads the optimal settings for the system. [Manual] Allows you to individually set the Ai Overclock Tuner item to achieve the desired CPU internal frequency. Use the and keys to select a DRAM...
... you set overclocking parameters. [D.O.C.P.] Allows you to adjust the ratio. Configuration options: [Auto] [Light Power Saving Mode] [Medium Power Saving Mode] [Max Power Saving Mode] 2-14 ASUS F1A55-M LX Series 2.4.1 Ai Overclock Tuner [Auto] Allows you to select the CPU overclocking options to [Manual]. Select any of these preset overclocking configuration options: [Auto] Loads the optimal settings for the system. [Manual] Allows you to individually set the Ai Overclock Tuner item to achieve the desired CPU internal frequency. Use the and keys to select a DRAM...
User Manual
Page 57
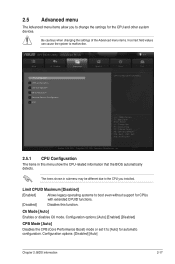
... detects. Be cautious when changing the settings of the Advanced menu items. Incorrect field values can cause the system to the CPU you to change the settings for automatic configuration. Advanced Mode Exit Main Ai Tweaker > CPU Configuration > SATA Configuration > USB Configuration > NB Configuration > Onboard Devices Configuration > APM Advanced Monitor Boot Tool CPU Configuration Parameters →←: Select Screen ↑↓: Select Item Enter: Select +/-: Change Opt. Configuration options: [Disabled] [Auto] Chapter 2: BIOS information 2-17 Copyright (C) 2011...
... detects. Be cautious when changing the settings of the Advanced menu items. Incorrect field values can cause the system to the CPU you to change the settings for automatic configuration. Advanced Mode Exit Main Ai Tweaker > CPU Configuration > SATA Configuration > USB Configuration > NB Configuration > Onboard Devices Configuration > APM Advanced Monitor Boot Tool CPU Configuration Parameters →←: Select Screen ↑↓: Select Item Enter: Select +/-: Change Opt. Configuration options: [Disabled] [Auto] Chapter 2: BIOS information 2-17 Copyright (C) 2011...
User Manual
Page 58
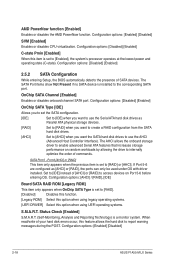
... channel SATA port. Configuration options: [AHCI] / [RAID], [IDE] Board SATA RAID ROM [Legacy ROM] This item only appears when OnChip SATA Type is set to report warning messages during the POST. Configuration options: [Disabled] [Enabled] 2.5.2 SATA Configuration While entering Setup, the BIOS automatically detects the presence of your hard disk errors occur, this option when using UEFI operating systems. S.M.A.R.T. The AHCI allows the onboard storage driver to use the AHCI (Advanced Host Controller Interface). Configuration options: [Enabled] [Disabled] 2-18 ASUS F1A55-M LX...
... channel SATA port. Configuration options: [AHCI] / [RAID], [IDE] Board SATA RAID ROM [Legacy ROM] This item only appears when OnChip SATA Type is set to report warning messages during the POST. Configuration options: [Disabled] [Enabled] 2.5.2 SATA Configuration While entering Setup, the BIOS automatically detects the presence of your hard disk errors occur, this option when using UEFI operating systems. S.M.A.R.T. The AHCI allows the onboard storage driver to use the AHCI (Advanced Host Controller Interface). Configuration options: [Enabled] [Disabled] 2-18 ASUS F1A55-M LX...

User Manual
Page 59
... Onboard Devices Configuration HD Audio Device [Enabled] [Enabled] Enables the High Definition Audio Controller. [Disabled] Disables the controller. The following two items appear only when you set the previous item to detect the presence of USB devices at startup. Chapter 2: BIOS information 2-19 Configuration options: [Disabled] [Enabled] Primary Video Device [PCIE / PCI Video] Selects the primary display device. Front Panel Type [HD] Allows you to set the front panel audio connector (AAFP) mode to legacy AC'97 or highdefinition audio depending on VGA devices�...
... Onboard Devices Configuration HD Audio Device [Enabled] [Enabled] Enables the High Definition Audio Controller. [Disabled] Disables the controller. The following two items appear only when you set the previous item to detect the presence of USB devices at startup. Chapter 2: BIOS information 2-19 Configuration options: [Disabled] [Enabled] Primary Video Device [PCIE / PCI Video] Selects the primary display device. Front Panel Type [HD] Allows you to set the front panel audio connector (AAFP) mode to legacy AC'97 or highdefinition audio depending on VGA devices�...
User Manual
Page 60
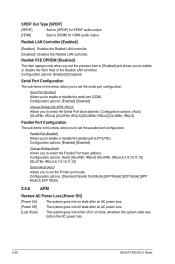
... power loss. 2-20 ASUS F1A55-M LX Series Serial Port [Enabled] Allows you to enable or disable the serial port (COM). IRQ=5,6,7,9,10,11,12] Device Mode [Auto] Allows you to set the previous item to [Enabled] and allows you to enable or disable the Rom Help of the Realtek LAN controller. Configuration options: [Enabled] [Disabled] Serial Port Configuration The sub-items in this menu allow you to set the serial port configuration. IRQ=3] Parallel Port Configuration The sub-items in this menu allow you to [HDMI] for SPDIF audio output. [HDMI] Sets...
... power loss. 2-20 ASUS F1A55-M LX Series Serial Port [Enabled] Allows you to enable or disable the serial port (COM). IRQ=5,6,7,9,10,11,12] Device Mode [Auto] Allows you to set the previous item to [Enabled] and allows you to enable or disable the Rom Help of the Realtek LAN controller. Configuration options: [Enabled] [Disabled] Serial Port Configuration The sub-items in this menu allow you to set the serial port configuration. IRQ=3] Parallel Port Configuration The sub-items in this menu allow you to [HDMI] for SPDIF audio output. [HDMI] Sets...


