
User Manual
Page 2
...10 Keyboard Usage...1-11 Special Function Keys 1-11 Tablet PC Mode...1-13 Quick System Standby 1-14 Chapter 2: Getting Started Powering on your Eee PC...2-2 First-time Startup...2-3 Desktop...2-4 Touch Panel Calibration...2-5 ASUS EeePC Tray Utility...2-6 Enabling and Disabling Devices 2-6 Adjusting the display resolution 2-7 Network Connection...2-8 Configuring a wireless network connection 2-8 Local Area Network 2-9 Browsing web pages 2-12 Chapter 3: Using the Eee PC ASUS Update...3-2 Updating the BIOS through the Internet 3-2 Updating the BIOS through a BIOS...
...10 Keyboard Usage...1-11 Special Function Keys 1-11 Tablet PC Mode...1-13 Quick System Standby 1-14 Chapter 2: Getting Started Powering on your Eee PC...2-2 First-time Startup...2-3 Desktop...2-4 Touch Panel Calibration...2-5 ASUS EeePC Tray Utility...2-6 Enabling and Disabling Devices 2-6 Adjusting the display resolution 2-7 Network Connection...2-8 Configuring a wireless network connection 2-8 Local Area Network 2-9 Browsing web pages 2-12 Chapter 3: Using the Eee PC ASUS Update...3-2 Updating the BIOS through the Internet 3-2 Updating the BIOS through a BIOS...
User Manual
Page 3
...11 Eee Tools...3-11 Touch Gate Mode 3-11 Touch Gate Mode...3-12 Using Touch Gate Mode 3-12 Changing Function Shortcuts 3-13 Switching to Widgets Mode 3-14 Microsoft® Office Trial...3-15 Chapter 4: Support DVD & System Recovery Support DVD information 4-2 Running the support DVD 4-2 Drivers menu...4-3 Utilities menu...4-3 Contact...4-3 Other information 4-3 System Recovery...4-4 Using the Support DVD 4-4 Boot Booster...4-6 Appendix Declarations and Safety Statements A-2 Copyright Information...A-11 Limitation of Liability...A-12 Service and Support...A-12 ASUS Eee PC...
...11 Eee Tools...3-11 Touch Gate Mode 3-11 Touch Gate Mode...3-12 Using Touch Gate Mode 3-12 Changing Function Shortcuts 3-13 Switching to Widgets Mode 3-14 Microsoft® Office Trial...3-15 Chapter 4: Support DVD & System Recovery Support DVD information 4-2 Running the support DVD 4-2 Drivers menu...4-3 Utilities menu...4-3 Contact...4-3 Other information 4-3 System Recovery...4-4 Using the Support DVD 4-4 Boot Booster...4-6 Appendix Declarations and Safety Statements A-2 Copyright Information...A-11 Limitation of Liability...A-12 Service and Support...A-12 ASUS Eee PC...
User Manual
Page 4
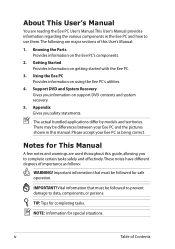
... correct. Support DVD and System Recovery Gives you information on using the Eee PC's utilities. 4. Vital information that must be followed for This Manual A few notes and warnings are used throughout this guide, allowing you safety statements. Appendix Gives you to use them.The following are major sections of Contents Notes for safe operation. Getting Started Provides information on the Eee PC's components. 2. Knowing the Parts Provides...
... correct. Support DVD and System Recovery Gives you information on using the Eee PC's utilities. 4. Vital information that must be followed for This Manual A few notes and warnings are used throughout this guide, allowing you safety statements. Appendix Gives you to use them.The following are major sections of Contents Notes for safe operation. Getting Started Provides information on the Eee PC's components. 2. Knowing the Parts Provides...
User Manual
Page 5
... NOT operate during electrical storms. SAFE TEMP: This Eee PC should only be used in this manual, refer all precautions and instructions. DO NOT leave the Eee PC on or near liquids, rain, or moisture. Do not use the modem during a gas leak. Seek servicing if the casing has been damaged. DO NOT place or drop objects on uneven or unstable work...
... NOT operate during electrical storms. SAFE TEMP: This Eee PC should only be used in this manual, refer all precautions and instructions. DO NOT leave the Eee PC on or near liquids, rain, or moisture. Do not use the modem during a gas leak. Seek servicing if the casing has been damaged. DO NOT place or drop objects on uneven or unstable work...
User Manual
Page 11
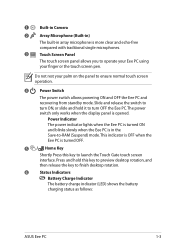
... the Eee PC. Power Indicator The power indicator lights when the Eee PC is turned ON and blinks slowly when the Eee PC is more clear and echo-free compared with traditional single microphones. 3 Touch Screen Panel The touch screen panel allows you to operate your Eee PC using your palm on the panel to ensure normal touch screen operation. 4 Power Switch The power switch allows powering ON and OFF the Eee PC and recovering from standby mode. Do not rest your finger or the touch screen pen. 1 Built-in Camera 2 Array Microphone...
... the Eee PC. Power Indicator The power indicator lights when the Eee PC is turned ON and blinks slowly when the Eee PC is more clear and echo-free compared with traditional single microphones. 3 Touch Screen Panel The touch screen panel allows you to operate your Eee PC using your palm on the panel to ensure normal touch screen operation. 4 Power Switch The power switch allows powering ON and OFF the Eee PC and recovering from standby mode. Do not rest your finger or the touch screen pen. 1 Built-in Camera 2 Array Microphone...
User Manual
Page 12
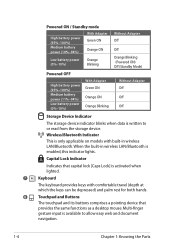
...-in wireless LAN/Bluetooth is activated when lighted. 7 Keyboard The keyboard provides keys with built-in wireless LAN/Bluetooth. Multi-finger gesture input is available to or read from the storage device. Capital Lock Indicator Indicates that provides the same functions as a desktop mouse. Powered ON / Standby mode High battery power (95%-100%) Medium battery power (10%-94%) With Adapter Green ON Orange ON Low battery power Orange (0%-10%) Blinking Without Adapter Off Off Orange Blinking (Powered ON) Off (Standby Mode) Powered...
...-in wireless LAN/Bluetooth is activated when lighted. 7 Keyboard The keyboard provides keys with built-in wireless LAN/Bluetooth. Multi-finger gesture input is available to or read from the storage device. Capital Lock Indicator Indicates that provides the same functions as a desktop mouse. Powered ON / Standby mode High battery power (95%-100%) Medium battery power (10%-94%) With Adapter Green ON Orange ON Low battery power Orange (0%-10%) Blinking Without Adapter Off Off Orange Blinking (Powered ON) Off (Standby Mode) Powered...
User Manual
Page 13
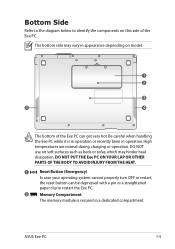
... in operation. ASUS Eee PC 1-5 DO NOT PUT THE Eee PC ON YOUR LAP OR OTHER PARTS OF THE BODY TO AVOID INJURY FROM THE HEAT. 1 Reset Button (Emergency) In case your operating system cannot properly turn OFF or restart, the reset button can be depressed with a pin or a straightened paper clip to identify the components on model. 1 2 3 4 4 The bottom of the Eee PC. DO NOT use...
... in operation. ASUS Eee PC 1-5 DO NOT PUT THE Eee PC ON YOUR LAP OR OTHER PARTS OF THE BODY TO AVOID INJURY FROM THE HEAT. 1 Reset Button (Emergency) In case your operating system cannot properly turn OFF or restart, the reset button can be depressed with a pin or a straightened paper clip to identify the components on model. 1 2 3 4 4 The bottom of the Eee PC. DO NOT use...
User Manual
Page 15
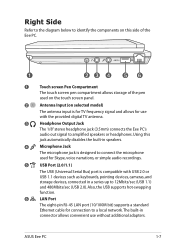
... as keyboards, pointing devices, cameras, and storage devices, connected in speakers. 4 Microphone Jack The microphone jack is designed to connect the microphone used for connection to a local network. Using this side of the Eee PC. 1 23 4 56 1 Touch screen Pen Compartment The touch screen pen compartment allows storage of the pen used on the touch screen panel. 2 Antenna Input (on this jack automatically disables the built-in a series up to 12Mbits/sec (USB 1.1) and 480Mbits/sec (USB 2.0). Also, the USB supports hot-swapping function. 6 LAN Port...
... as keyboards, pointing devices, cameras, and storage devices, connected in speakers. 4 Microphone Jack The microphone jack is designed to connect the microphone used for connection to a local network. Using this side of the Eee PC. 1 23 4 56 1 Touch screen Pen Compartment The touch screen pen compartment allows storage of the pen used on the touch screen panel. 2 Antenna Input (on this jack automatically disables the built-in a series up to 12Mbits/sec (USB 1.1) and 480Mbits/sec (USB 2.0). Also, the USB supports hot-swapping function. 6 LAN Port...
User Manual
Page 18
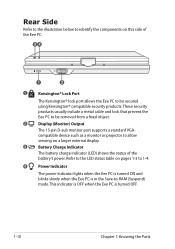
... Save-to-RAM (Suspend) mode. Refer to the LED status table on a larger external display. 3 Battery Charge Indicator The battery charge indicator (LED) shows the status of the Eee PC. 34 1 2 1 Kensington® Lock Port The Kensington® lock port allows the Eee PC to be removed from a fixed object. 2 Display (Monitor) Output The 15-pin D-sub monitor port supports a standard VGA- These security products usually include a metal cable and lock that prevent the Eee PC to be secured using Kensington®...
... Save-to-RAM (Suspend) mode. Refer to the LED status table on a larger external display. 3 Battery Charge Indicator The battery charge indicator (LED) shows the status of the Eee PC. 34 1 2 1 Kensington® Lock Port The Kensington® lock port allows the Eee PC to be removed from a fixed object. 2 Display (Monitor) Output The 15-pin D-sub monitor port supports a standard VGA- These security products usually include a metal cable and lock that prevent the Eee PC to be secured using Kensington®...
User Manual
Page 19
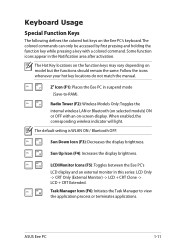
... your hot key locations do not match the manual. The default setting is WLAN ON / Bluetooth OFF. ASUS Eee PC 1-11 LCD/Monitor Icons (F5): Toggles between the Eee PC's LCD display and an external monitor in suspend mode (Save-to view the application process or terminates applications. When enabled, the corresponding wireless indicator will light. Some function icons appear in the Notification area after activation. Sun Down Icon (F3): Decreases the display brightness. Radio Tower (F2): Wireless Models...
... your hot key locations do not match the manual. The default setting is WLAN ON / Bluetooth OFF. ASUS Eee PC 1-11 LCD/Monitor Icons (F5): Toggles between the Eee PC's LCD display and an external monitor in suspend mode (Save-to view the application process or terminates applications. When enabled, the corresponding wireless indicator will light. Some function icons appear in the Notification area after activation. Sun Down Icon (F3): Decreases the display brightness. Radio Tower (F2): Wireless Models...
User Manual
Page 25
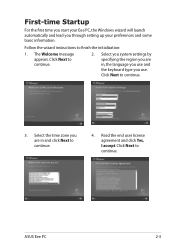
... the initialization: 1. Click Next to continue. ASUS Eee PC 2-3 Click Next to continue. 3. Read the end user license agreement and click Yes, I accept. The Welcome message appears. First-time Startup For the first time you start your Eee PC, the Windows wizard will launch automatically and lead you use and the keyboard type you through setting up your preferences and some basic information.
... the initialization: 1. Click Next to continue. ASUS Eee PC 2-3 Click Next to continue. 3. Read the end user license agreement and click Yes, I accept. The Welcome message appears. First-time Startup For the first time you start your Eee PC, the Windows wizard will launch automatically and lead you use and the keyboard type you through setting up your preferences and some basic information.
User Manual
Page 27
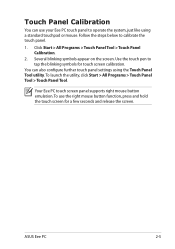
... Start > All Programs > Touch Panel Tool > Touch Panel Tool. ASUS Eee PC 2-5 Follow the steps below to tap the blinking symbols for a few seconds and release the screen. You can use the right mouse button function, press and hold the touch screen for touch screen calibration. Click Start > All Programs > Touch Panel Tool > Touch Panel Calibration. 2. Use the touch pen to calibrate the touch panel. 1. To use your Eee PC touch panel to operate the system, just like using the Touch Panel Tool utility. Your Eee PC touch screen panel supports right mouse button emulation...
... Start > All Programs > Touch Panel Tool > Touch Panel Tool. ASUS Eee PC 2-5 Follow the steps below to tap the blinking symbols for a few seconds and release the screen. You can use the right mouse button function, press and hold the touch screen for touch screen calibration. Click Start > All Programs > Touch Panel Tool > Touch Panel Calibration. 2. Use the touch pen to calibrate the touch panel. 1. To use your Eee PC touch panel to operate the system, just like using the Touch Panel Tool utility. Your Eee PC touch screen panel supports right mouse button emulation...
User Manual
Page 33
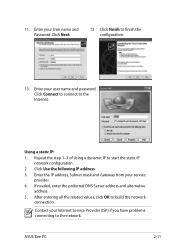
... mask and Gateway from your user name and password. Enter your service provider. 4. Contact your User name and Password. Using a static IP: 1. After entering all the related values, click OK to start the static IP network configuration. 2 Click Use the following IP address. 3. ASUS Eee PC 2-11 Repeat the step 1-3 of Using a dynamic IP to build the network connection. 11. Enter your Internet Service Provider (ISP) if you have problems connecting to the...
... mask and Gateway from your user name and password. Enter your service provider. 4. Contact your User name and Password. Using a static IP: 1. After entering all the related values, click OK to start the static IP network configuration. 2 Click Use the following IP address. 3. ASUS Eee PC 2-11 Repeat the step 1-3 of Using a dynamic IP to build the network connection. 11. Enter your Internet Service Provider (ISP) if you have problems connecting to the...
User Manual
Page 36
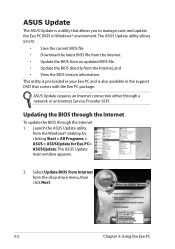
.... ASUS Update The ASUS Update is also available in the support DVD that allows you to manage, save, and update the Eee PC BIOS in your Eee PC and is a utility that comes with the Eee PC package. Select Update BIOS from Internet from the Windows® desktop by clicking Start > All Programs > ASUS > ASUSUpdate for Eee PC> ASUSUpdate. The ASUS Update main window appears. 2. Updating the BIOS through the Internet To update the BIOS through a network or an Internet Service Provider (ISP). The ASUS Update utility allows...
.... ASUS Update The ASUS Update is also available in the support DVD that allows you to manage, save, and update the Eee PC BIOS in your Eee PC and is a utility that comes with the Eee PC package. Select Update BIOS from Internet from the Windows® desktop by clicking Start > All Programs > ASUS > ASUSUpdate for Eee PC> ASUSUpdate. The ASUS Update main window appears. 2. Updating the BIOS through the Internet To update the BIOS through a network or an Internet Service Provider (ISP). The ASUS Update utility allows...
User Manual
Page 37
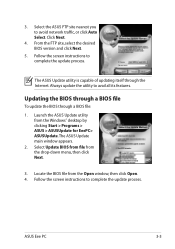
... clicking Start > Programs > ASUS > ASUSUpdate for EeePC> ASUSUpdate. ASUS Eee PC 3-3 Click Next. 4. Updating the BIOS through a BIOS file To update the BIOS through the Internet. Follow the screen instructions to avail all its features. 3. From the FTP site, select the desired BIOS version and click Next. 5. Always update the utility to complete the update process. The ASUS Update main window appears. 2. Locate the BIOS file from the Open window, then click Open. 4. The ASUS Update utility is...
... clicking Start > Programs > ASUS > ASUSUpdate for EeePC> ASUSUpdate. ASUS Eee PC 3-3 Click Next. 4. Updating the BIOS through a BIOS file To update the BIOS through the Internet. Follow the screen instructions to avail all its features. 3. From the FTP site, select the desired BIOS version and click Next. 5. Always update the utility to complete the update process. The ASUS Update main window appears. 2. Locate the BIOS file from the Open window, then click Open. 4. The ASUS Update utility is...
User Manual
Page 39
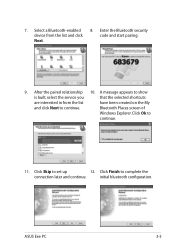
Enter the Bluetooth security device from the list have been created on the My and click Next to continue. Click Skip to complete the connection later and continue. Click Finish to set up 12. Next. 9. Bluetooth Places screen of Windows Explorer. Click Ok to show is built, select the service you that the selected shortcuts are interested in from the list and click code and start pairing. ASUS Eee PC 3-5 After the paired relationship 10. A message appears to continue. 11. initial bluetooth configuration. Select a Bluetooth-enabled 8. 7.
Enter the Bluetooth security device from the list have been created on the My and click Next to continue. Click Skip to complete the connection later and continue. Click Finish to set up 12. Next. 9. Bluetooth Places screen of Windows Explorer. Click Ok to show is built, select the service you that the selected shortcuts are interested in from the list and click code and start pairing. ASUS Eee PC 3-5 After the paired relationship 10. A message appears to continue. 11. initial bluetooth configuration. Select a Bluetooth-enabled 8. 7.
User Manual
Page 45
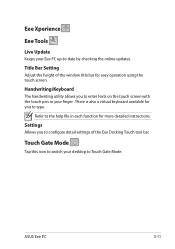
... switch your Eee PC up-to-date by checking the online updates. Settings Allows you to type. Refer to the help file in each function for easy operation using the touch screen. ASUS Eee PC 3-11 Eee Xperience Eee Tools Live Update Keeps your desktop to Touch Gate Mode. Title Bar Setting Adjust the height of the Eee Docking Touch tool bar. Handwriting/Keyboard The handwriting utility allows you to enter texts on the touch screen with the touch...
... switch your Eee PC up-to-date by checking the online updates. Settings Allows you to type. Refer to the help file in each function for easy operation using the touch screen. ASUS Eee PC 3-11 Eee Xperience Eee Tools Live Update Keeps your desktop to Touch Gate Mode. Title Bar Setting Adjust the height of the Eee Docking Touch tool bar. Handwriting/Keyboard The handwriting utility allows you to enter texts on the touch screen with the touch...
User Manual
Page 53
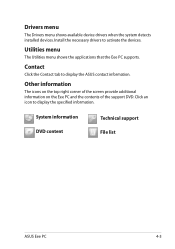
Utilities menu The Utilities menu shows the applications that the Eee PC supports. System information DVD content Technical support File list ASUS Eee PC 4-3 Drivers menu The Drivers menu shows available device drivers when the system detects installed devices. Click an icon to activate the devices. Install the necessary drivers to display the specified information. Other information The icons on the top right corner of the screen provide additional information on the Eee PC and the contents of the support DVD. Contact...
Utilities menu The Utilities menu shows the applications that the Eee PC supports. System information DVD content Technical support File list ASUS Eee PC 4-3 Drivers menu The Drivers menu shows available device drivers when the system detects installed devices. Click an icon to activate the devices. Install the necessary drivers to display the specified information. Other information The icons on the top right corner of the screen provide additional information on the Eee PC and the contents of the support DVD. Contact...
User Manual
Page 54
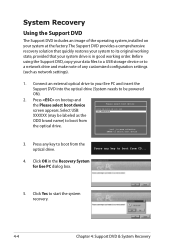
... using the Support DVD, copy your data files to a USB storage device or to a network drive and make note of the operating system, installed on bootup and the Please select boot device screen appears. Press on your system at the factory.The Support DVD provides a comprehensive recovery solution that quickly restores your system to its original working state, provided that your system drive is in the Recovery System for Eee PC dialog box. 5. Connect an external...
... using the Support DVD, copy your data files to a USB storage device or to a network drive and make note of the operating system, installed on bootup and the Please select boot device screen appears. Press on your system at the factory.The Support DVD provides a comprehensive recovery solution that quickly restores your system to its original working state, provided that your system drive is in the Recovery System for Eee PC dialog box. 5. Connect an external...

User Manual
Page 56
... enable Boot Booster after you change or system recovery. 4-6 Chapter 4: Support DVD & System Recovery Follow the instructions below to enter the BIOS setup. Press to [Disabled] Main BIOS SETUP UTILITY Advanced Security Boot Exit Boot Device Priority Boot Settings Configuration OnBoard LAN Boot ROM [Disabled] Boot Booster [Disabled] Specifies the Boot Device Priority sequence. However, you MUST disable this BIOS item before you complete hardware change any Eee PC components or perform system recovery (from USB flash disk, external optical drive or hidden partition...
... enable Boot Booster after you change or system recovery. 4-6 Chapter 4: Support DVD & System Recovery Follow the instructions below to enter the BIOS setup. Press to [Disabled] Main BIOS SETUP UTILITY Advanced Security Boot Exit Boot Device Priority Boot Settings Configuration OnBoard LAN Boot ROM [Disabled] Boot Booster [Disabled] Specifies the Boot Device Priority sequence. However, you MUST disable this BIOS item before you complete hardware change any Eee PC components or perform system recovery (from USB flash disk, external optical drive or hidden partition...


