User Manual
Page 2
......1-13 Multi-finger gesture input 1-13 Chapter 2: Getting Started Installing and uninstalling the battery pack 2-2 Powering on your Eee PC...2-4 First-time Startup...2-5 Desktop...2-7 Network Connection...2-8 Configuring a wireless network connection 2-8 Local Area Network 2-9 Browsing web pages 2-12 Chapter 3: Using the Eee PC ASUS Update...3-2 Updating the BIOS through the Internet 3-2 Updating the BIOS through a BIOS file...
......1-13 Multi-finger gesture input 1-13 Chapter 2: Getting Started Installing and uninstalling the battery pack 2-2 Powering on your Eee PC...2-4 First-time Startup...2-5 Desktop...2-7 Network Connection...2-8 Configuring a wireless network connection 2-8 Local Area Network 2-9 Browsing web pages 2-12 Chapter 3: Using the Eee PC ASUS Update...3-2 Updating the BIOS through the Internet 3-2 Updating the BIOS through a BIOS file...
User Manual
Page 7
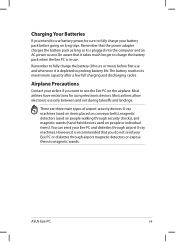
... airport X-ray machines. Remember to fully charge the battery (8 hours or more) before going on the airplane. Charging Your Batteries If you intend to use battery power, be sure to fully charge your battery pack before first use . ASUS Eee PC vii Be aware that it takes much longer to charge the battery pack when the Eee PC is in use and whenever it...
... airport X-ray machines. Remember to fully charge the battery (8 hours or more) before going on the airplane. Charging Your Batteries If you intend to use battery power, be sure to fully charge your battery pack before first use . ASUS Eee PC vii Be aware that it takes much longer to charge the battery pack when the Eee PC is in use and whenever it...

User Manual
Page 12
5 Status Indicators Battery Charge Indicator The battery charge indicator (LED) shows the battery charging status as follows: Powered ON High battery power (95%-100%) With Adapter Green ON Medium battery power (11%-94%) Orange ON Low battery power (0%-10%) Orange Blinking Without Adapter Off Off Orange Blinking Powered OFF With Adapter High battery power (95%-100%) Green ON Medium battery power (11...
5 Status Indicators Battery Charge Indicator The battery charge indicator (LED) shows the battery charging status as follows: Powered ON High battery power (95%-100%) With Adapter Green ON Medium battery power (11%-94%) Orange ON Low battery power (0%-10%) Orange Blinking Without Adapter Off Off Orange Blinking Powered OFF With Adapter High battery power (95%-100%) Green ON Medium battery power (11...
User Manual
Page 15
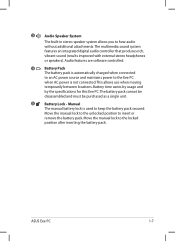
... by usage and by the specifications for this Eee PC.The battery pack cannot be disassembled and must be purchased as a single unit. 5 Battery Lock - ASUS Eee PC 1-7 Audio features are software controlled. 4 Battery Pack The battery pack is automatically charged when connected to an AC power source and maintains power to the Eee PC when AC power is used to hear...
... by usage and by the specifications for this Eee PC.The battery pack cannot be disassembled and must be purchased as a single unit. 5 Battery Lock - ASUS Eee PC 1-7 Audio features are software controlled. 4 Battery Pack The battery pack is automatically charged when connected to an AC power source and maintains power to the Eee PC when AC power is used to hear...
User Manual
Page 17
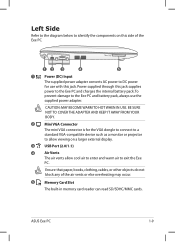
... TO HOT WHEN IN USE. ASUS Eee PC 1-9 BE SURE NOT TO COVER THE ADAPTER AND KEEP IT AWAY FROM YOUR BODY. 2 Mini VGA Connector The mini VGA connector is for use with this jack supplies power to the Eee PC and charges the internal battery pack.To prevent damage to exit the Eee PC. Power supplied through this...
... TO HOT WHEN IN USE. ASUS Eee PC 1-9 BE SURE NOT TO COVER THE ADAPTER AND KEEP IT AWAY FROM YOUR BODY. 2 Mini VGA Connector The mini VGA connector is for use with this jack supplies power to the Eee PC and charges the internal battery pack.To prevent damage to exit the Eee PC. Power supplied through this...

User Manual
Page 18
... other objects do not block any of the battery's power. Rear Side Refer to the diagram below to identify the components on pages 1-3 to 1-4. 2 Power Indicator The power indicator lights when the Eee PC is turned ON and blinks slowly when the Eee PC is turned OFF. 3 Air Vents The air... vents allow cool air to enter and warm air to the LED status table on this side of the Eee PC. 12 3 1 Battery Charge Indicator The battery charge indicator (LED) shows the status of the air vents or else overheating may occur. 1-10 Chapter 1: Knowing the Parts Refer to...
... other objects do not block any of the battery's power. Rear Side Refer to the diagram below to identify the components on pages 1-3 to 1-4. 2 Power Indicator The power indicator lights when the Eee PC is turned ON and blinks slowly when the Eee PC is turned OFF. 3 Air Vents The air... vents allow cool air to enter and warm air to the LED status table on this side of the Eee PC. 12 3 1 Battery Charge Indicator The battery charge indicator (LED) shows the status of the air vents or else overheating may occur. 1-10 Chapter 1: Knowing the Parts Refer to...
User Manual
Page 26
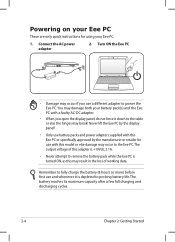
... working data. Never lift the Eee PC by the display panel! • Only use battery packs and power adapters supplied with this Eee PC or specifically approved by the manufacturer or retailer for using your Eee PC. 1. Remember to fully charge the battery (8 hours or more) before .... • Never attempt to remove the battery pack while the Eee PC is depleted to prolong battery life.The battery reaches its maximum capacity after a few full charging and discharging cycles. 2-4 Chapter 2: Getting Started Connect the AC power adapter 2. Turn ON the Eee PC 2 1 3 110V-220V • Damage...
... working data. Never lift the Eee PC by the display panel! • Only use battery packs and power adapters supplied with this Eee PC or specifically approved by the manufacturer or retailer for using your Eee PC. 1. Remember to fully charge the battery (8 hours or more) before .... • Never attempt to remove the battery pack while the Eee PC is depleted to prolong battery life.The battery reaches its maximum capacity after a few full charging and discharging cycles. 2-4 Chapter 2: Getting Started Connect the AC power adapter 2. Turn ON the Eee PC 2 1 3 110V-220V • Damage...


