User Manual
Page 2
... vi Charging Your Batteries vii Airplane Precautions vii Knowing the Parts Top Side...1-2 Bottom Side...1-5 Right Side...1-6 Left Side...1-7 Rear Side...1-8 Keyboard Usage...1-9 Touchpad Usage...1-11 Getting Started Powering on your Eee PC...2-2 First-time Startup...2-3 Desktop...2-4 ASUS EeePC Tray Utility...2-5 Enabling and Disabling Devices 2-5 Adjusting the display resolution 2-5 Network Connection...2-6 Configuring a wireless network connection 2-6 Local Area Network 2-7 Browsing web pages 2-10 Using the Eee PC ASUS Update...3-2 Updating the BIOS through the Internet 3-2 Updating...
... vi Charging Your Batteries vii Airplane Precautions vii Knowing the Parts Top Side...1-2 Bottom Side...1-5 Right Side...1-6 Left Side...1-7 Rear Side...1-8 Keyboard Usage...1-9 Touchpad Usage...1-11 Getting Started Powering on your Eee PC...2-2 First-time Startup...2-3 Desktop...2-4 ASUS EeePC Tray Utility...2-5 Enabling and Disabling Devices 2-5 Adjusting the display resolution 2-5 Network Connection...2-6 Configuring a wireless network connection 2-6 Local Area Network 2-7 Browsing web pages 2-10 Using the Eee PC ASUS Update...3-2 Updating the BIOS through the Internet 3-2 Updating...
User Manual
Page 3
Bluetooth Connection...3-4 Super Hybrid Engine...3-6 Super Hybrid Engine Modes 3-6 Microsoft® Office Trial...3-7 Support DVD & System Recovery Support DVD information 4-2 Running the support DVD 4-2 Drivers menu...4-3 Utilities menu...4-3 Contact...4-3 Other information 4-3 System Recovery...4-4 Using the Support DVD 4-4 Using Recovery Partition 4-5 Boot Booster...4-6 Appendix Declarations and Safety Statements A-2 Federal Communications Commission Statement A-2 FCC Radio Frequency (RF) Exposure Caution Statement A-3 Declaration of Conformity(R&TTE directive 1999/5/EC A-4 CE ...
Bluetooth Connection...3-4 Super Hybrid Engine...3-6 Super Hybrid Engine Modes 3-6 Microsoft® Office Trial...3-7 Support DVD & System Recovery Support DVD information 4-2 Running the support DVD 4-2 Drivers menu...4-3 Utilities menu...4-3 Contact...4-3 Other information 4-3 System Recovery...4-4 Using the Support DVD 4-4 Using Recovery Partition 4-5 Boot Booster...4-6 Appendix Declarations and Safety Statements A-2 Federal Communications Commission Statement A-2 FCC Radio Frequency (RF) Exposure Caution Statement A-3 Declaration of Conformity(R&TTE directive 1999/5/EC A-4 CE ...
User Manual
Page 4
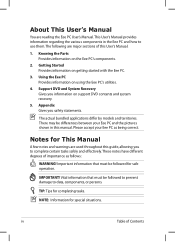
.... NOTE: Information for completing tasks. Notes for safe operation. The actual bundled applications differ by models and territories. About This User's Manual You are reading the Eee PC User's Manual.This User's Manual provides information regarding the various components in this manual. Knowing the Parts Provides information on using the Eee PC's utilities. 4. Getting Started Provides information on support DVD contents and system recovery. 5. Vital information that must be followed for...
.... NOTE: Information for completing tasks. Notes for safe operation. The actual bundled applications differ by models and territories. About This User's Manual You are reading the Eee PC User's Manual.This User's Manual provides information regarding the various components in this manual. Knowing the Parts Provides information on using the Eee PC's utilities. 4. Getting Started Provides information on support DVD contents and system recovery. 5. Vital information that must be followed for...

User Manual
Page 5
... or touch the display panel. DO NOT leave the Eee PC on top and do not shove any part of the body to or use strong solvents such as thinners, benzene, or other peripherals. DO NOT expose to prevent discomfort or injury from heat exposure. DO NOT operate during electrical storms. DO NOT carry or cover a Eee PC that is powered ON...
... or touch the display panel. DO NOT leave the Eee PC on top and do not shove any part of the body to or use strong solvents such as thinners, benzene, or other peripherals. DO NOT expose to prevent discomfort or injury from heat exposure. DO NOT operate during electrical storms. DO NOT carry or cover a Eee PC that is powered ON...
User Manual
Page 11
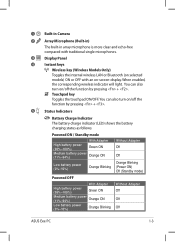
... Camera 2 Array Microphone (Built-in) The built-in array microphone is more clear and echo-free compared with traditional single microphones. 3 Display Panel 4 Instant keys Wireless key (Wireless Models Only) Toggles the internal wireless LAN or Bluetooth (on selected models) ON or OFF with an on /off the function by pressing + . You can also turn on/off the function by pressing + . 5 Status Indicators Battery Charge Indicator The battery charge indicator (LED) shows the battery charging status as follows: Powered ON / Standby mode With Adapter...
... Camera 2 Array Microphone (Built-in) The built-in array microphone is more clear and echo-free compared with traditional single microphones. 3 Display Panel 4 Instant keys Wireless key (Wireless Models Only) Toggles the internal wireless LAN or Bluetooth (on selected models) ON or OFF with an on /off the function by pressing + . You can also turn on/off the function by pressing + . 5 Status Indicators Battery Charge Indicator The battery charge indicator (LED) shows the battery charging status as follows: Powered ON / Standby mode With Adapter...
User Manual
Page 12
... Lock Indicator Indicates that provides the same functions as a desktop mouse. 1-4 Chapter 1: Knowing the Parts Power Indicator The power indicator lights when the Eee PC is turned ON and blinks slowly when the Eee PC is activated when lighted. 6 Power Switch The power switch allows powering ON and OFF the Eee PC and recovering from the disk drive. This indicator is OFF when the Eee PC is opened. The power switch only works when the display panel is turned OFF. 7 Keyboard The keyboard provides keys with built-in the Save-to-RAM (Suspend) mode...
... Lock Indicator Indicates that provides the same functions as a desktop mouse. 1-4 Chapter 1: Knowing the Parts Power Indicator The power indicator lights when the Eee PC is turned ON and blinks slowly when the Eee PC is activated when lighted. 6 Power Switch The power switch allows powering ON and OFF the Eee PC and recovering from the disk drive. This indicator is OFF when the Eee PC is opened. The power switch only works when the display panel is turned OFF. 7 Keyboard The keyboard provides keys with built-in the Save-to-RAM (Suspend) mode...
User Manual
Page 13
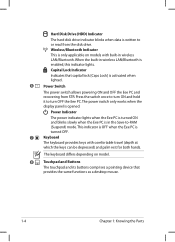
... properly turn OFF or restart, press the reset button for the installation of the Eee PC. Bottom Side Refer to the illustration below to identify the components on model. 1 2 3 The bottom of the Eee PC can get very hot. DO NOT use on soft surfaces such as beds or sofas, which may vary in operation. ASUS Eee PC 1-5 High temperatures are normal during charging or operation. The...
... properly turn OFF or restart, press the reset button for the installation of the Eee PC. Bottom Side Refer to the illustration below to identify the components on model. 1 2 3 The bottom of the Eee PC can get very hot. DO NOT use on soft surfaces such as beds or sofas, which may vary in operation. ASUS Eee PC 1-5 High temperatures are normal during charging or operation. The...
User Manual
Page 14
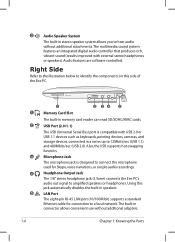
..., the USB supports hot-swapping function. Using this side of the Eee PC. 1 2 3 4 5 1-6 MMC. Headphone Output Jack The 1/8" stereo headphone jack (3.5mm) connects the Eee PC's audio out signal to 12Mbits/sec (USB 1.1) and 480Mbits/sec (USB 2.0). The multimedia sound system features an integrated digital audio controller that produces rich, vibrant sound (results improved with USB 2.0 or USB 1.1 devices such as keyboards, pointing devices, cameras, and storage devices, connected in memory card reader can read SD/SDHC/MMC cards. Audio features are software controlled.
..., the USB supports hot-swapping function. Using this side of the Eee PC. 1 2 3 4 5 1-6 MMC. Headphone Output Jack The 1/8" stereo headphone jack (3.5mm) connects the Eee PC's audio out signal to 12Mbits/sec (USB 1.1) and 480Mbits/sec (USB 2.0). The multimedia sound system features an integrated digital audio controller that produces rich, vibrant sound (results improved with USB 2.0 or USB 1.1 devices such as keyboards, pointing devices, cameras, and storage devices, connected in memory card reader can read SD/SDHC/MMC cards. Audio features are software controlled.
User Manual
Page 15
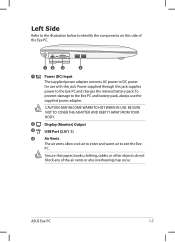
... HOT WHEN IN USE. BE SURE NOT TO COVER THE ADAPTER AND KEEP IT AWAY FROM YOUR BODY. 2 Display (Monitor) Output 3 USB Port (2.0/1.1) 4 Air Vents The air vents allow cool air to enter and warm air to the Eee PC and battery pack, always use with this jack supplies power to the Eee PC and charges the internal battery pack.To prevent damage to exit the Eee PC. Ensure that paper, books, clothing, cables...
... HOT WHEN IN USE. BE SURE NOT TO COVER THE ADAPTER AND KEEP IT AWAY FROM YOUR BODY. 2 Display (Monitor) Output 3 USB Port (2.0/1.1) 4 Air Vents The air vents allow cool air to enter and warm air to the Eee PC and battery pack, always use with this jack supplies power to the Eee PC and charges the internal battery pack.To prevent damage to exit the Eee PC. Ensure that paper, books, clothing, cables...
User Manual
Page 17
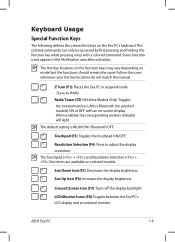
... adjust the display resolution. The Hot Key locations on the function keys may vary depending on selected models. Sun Down Icon (F5): Decreases the display brightness. ASUS Eee PC 1-9 Follow the icons whenever your hot key locations do not match the manual. Crossed Screen Icon (F7): Turns off the display backlight. Touchpad (F3): Toggles the touchpad ON/OFF. Sun Up Icon (F6): Increases the display brightness. LCD/Monitor Icons (F8): Toggles between the Eee PC's LCD display and an external monitor. The default setting...
... adjust the display resolution. The Hot Key locations on the function keys may vary depending on selected models. Sun Down Icon (F5): Decreases the display brightness. ASUS Eee PC 1-9 Follow the icons whenever your hot key locations do not match the manual. Crossed Screen Icon (F7): Turns off the display backlight. Touchpad (F3): Toggles the touchpad ON/OFF. Sun Up Icon (F6): Increases the display brightness. LCD/Monitor Icons (F8): Toggles between the Eee PC's LCD display and an external monitor. The default setting...
User Manual
Page 23
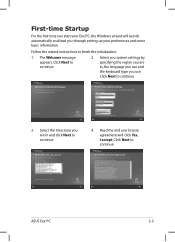
... the region you are in , the language you use and the keyboard type you use. Click Next to continue. 4. The Welcome message appears. Select the time zone you through setting up your preferences and some basic information. ASUS Eee PC 2-3 First-time Startup For the first time you start your Eee PC, the Windows wizard will launch automatically and lead you are in...
... the region you are in , the language you use and the keyboard type you use. Click Next to continue. 4. The Welcome message appears. Select the time zone you through setting up your preferences and some basic information. ASUS Eee PC 2-3 First-time Startup For the first time you start your Eee PC, the Windows wizard will launch automatically and lead you are in...
User Manual
Page 25
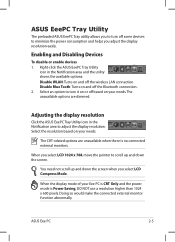
... minimize the power consumption and helps you select LCD Compress Mode. ASUS Eee PC 2-5 You need not scroll up and down the screen when you adjust the display resolution easily. Enabling and Disabling Devices To disable or enable devices 1. When you select LCD 1024 x 768, move the pointer to adjust the display resolution. Doing so would make the connected external monitor function abnormally. The unavailable options are unavailable when there is Power Saving, DO NOT use a resolution higher...
... minimize the power consumption and helps you select LCD Compress Mode. ASUS Eee PC 2-5 You need not scroll up and down the screen when you adjust the display resolution easily. Enabling and Disabling Devices To disable or enable devices 1. When you select LCD 1024 x 768, move the pointer to adjust the display resolution. Doing so would make the connected external monitor function abnormally. The unavailable options are unavailable when there is Power Saving, DO NOT use a resolution higher...

User Manual
Page 32
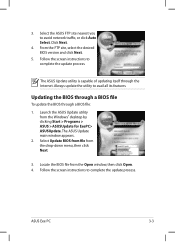
... BIOS through a network or an Internet Service Provider (ISP). The ASUS Update main window appears. 2. The ASUS Update utility allows you to manage, save, and update the Eee PC BIOS in the support DVD that allows you to: • Save the current BIOS file • Download the latest BIOS file from the Internet • Update the BIOS from an updated BIOS file • Update the BIOS directly from the Windows® desktop by clicking Start > All Programs > ASUS > ASUSUpdate for Eee PC...
... BIOS through a network or an Internet Service Provider (ISP). The ASUS Update main window appears. 2. The ASUS Update utility allows you to manage, save, and update the Eee PC BIOS in the support DVD that allows you to: • Save the current BIOS file • Download the latest BIOS file from the Internet • Update the BIOS from an updated BIOS file • Update the BIOS directly from the Windows® desktop by clicking Start > All Programs > ASUS > ASUSUpdate for Eee PC...
User Manual
Page 33
... Next. 5. Select Update BIOS from file from the Open window, then click Open. 4. Locate the BIOS file from the drop‑down menu, then click Next. 3. 3. Launch the ASUS Update utility from the Windows® desktop by clicking Start > Programs > ASUS > ASUSUpdate for EeePC> ASUSUpdate. Follow the screen instructions to complete the update process. Click Next. 4. The ASUS Update utility is capable of updating itself through a BIOS file: 1. ASUS Eee PC 3-3 Follow the screen instructions to complete...
... Next. 5. Select Update BIOS from file from the Open window, then click Open. 4. Locate the BIOS file from the drop‑down menu, then click Next. 3. 3. Launch the ASUS Update utility from the Windows® desktop by clicking Start > Programs > ASUS > ASUSUpdate for EeePC> ASUSUpdate. Follow the screen instructions to complete the update process. Click Next. 4. The ASUS Update utility is capable of updating itself through a BIOS file: 1. ASUS Eee PC 3-3 Follow the screen instructions to complete...
User Manual
Page 35
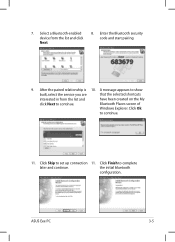
Click Skip to complete later and continue. Click Finish to set up connection 11. A message appears to show built, select the service you are that the selected shortcuts interested in from the list and click Next. 8. Bluetooth Places screen of Windows Explorer. ASUS Eee PC 3-5 7. After the paired relationship is 10. Select a Bluetooth-enabled device from the list and have been created on the My click Next to continue. 11. Enter the Bluetooth security code and start pairing. 9. Click Ok to continue. the initial bluetooth configuration.
Click Skip to complete later and continue. Click Finish to set up connection 11. A message appears to show built, select the service you are that the selected shortcuts interested in from the list and click Next. 8. Bluetooth Places screen of Windows Explorer. ASUS Eee PC 3-5 7. After the paired relationship is 10. Select a Bluetooth-enabled device from the list and have been created on the My click Next to continue. 11. Enter the Bluetooth security code and start pairing. 9. Click Ok to continue. the initial bluetooth configuration.
User Manual
Page 41
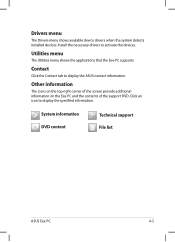
... device drivers when the system detects installed devices. Other information The icons on the top right corner of the screen provide additional information on the Eee PC and the contents of the support DVD. Contact Click the Contact tab to activate the devices. Utilities menu The Utilities menu shows the applications that the Eee PC supports. Click an icon to display the specified information. System information DVD content Technical support File list ASUS Eee PC...
... device drivers when the system detects installed devices. Other information The icons on the top right corner of the screen provide additional information on the Eee PC and the contents of the support DVD. Contact Click the Contact tab to activate the devices. Utilities menu The Utilities menu shows the applications that the Eee PC supports. Click an icon to display the specified information. System information DVD content Technical support File list ASUS Eee PC...

User Manual
Page 42
... Support DVD, copy your system drive is in the Recovery System for Eee PC dialog box. 5. Press any key to boot from CD... 4. Click Yes to a network drive and make note of the operating system, installed on bootup and the Please select boot device screen appears. Press on your system at the factory.The Support DVD provides a comprehensive recovery solution that quickly restores your system to its original working order. Select USB: XXXXXX (may be powered...
... Support DVD, copy your system drive is in the Recovery System for Eee PC dialog box. 5. Press any key to boot from CD... 4. Click Yes to a network drive and make note of the operating system, installed on bootup and the Please select boot device screen appears. Press on your system at the factory.The Support DVD provides a comprehensive recovery solution that quickly restores your system to its original working order. Select USB: XXXXXX (may be powered...

User Manual
Page 43
... end of this chapter for details. 2. After the system recovery is a space reserved on your hard disk drive used to back up your important data before your data during the system recovery. Refer to restart the Eee PC. Ensure to restore the operating system, drivers, and utilities installed on your system. 6. Using Recovery Partition About the Recovery Partition The Recovery Partition is completed, eject the the Support DVD from USB flash disk, external optical drive or hidden...
... end of this chapter for details. 2. After the system recovery is a space reserved on your hard disk drive used to back up your important data before your data during the system recovery. Refer to restart the Eee PC. Ensure to restore the operating system, drivers, and utilities installed on your system. 6. Using Recovery Partition About the Recovery Partition The Recovery Partition is completed, eject the the Support DVD from USB flash disk, external optical drive or hidden...
User Manual
Page 44
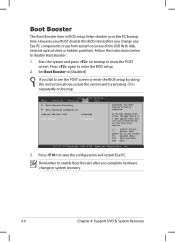
Start the system and press on bootup. Press to show the POST screen. Remember to enter the BIOS setup. 2. Press again to enable Boot Booster after you change or system recovery. 4-6 Chapter 4: Support DVD & System Recovery However, you MUST disable this BIOS item before you complete hardware change any Eee PC components or perform system recovery (from USB flash disk, external optical drive or hidden partition). Set Boot Booster to [Disabled] If you set the CD-ROM drive as the first boot device. ←...
Start the system and press on bootup. Press to show the POST screen. Remember to enter the BIOS setup. 2. Press again to enable Boot Booster after you change or system recovery. 4-6 Chapter 4: Support DVD & System Recovery However, you MUST disable this BIOS item before you complete hardware change any Eee PC components or perform system recovery (from USB flash disk, external optical drive or hidden partition). Set Boot Booster to [Disabled] If you set the CD-ROM drive as the first boot device. ←...
User Manual
Page 47
..., please avoid direct contact to Channels 1 through 11 in the 2.4GHz frequency by specified firmware controlled in the USA." Eee PC 1008HA Max. To maintain compliance with FCC radiation exposure limits set forth for satisfying RF exposure compliance. End users must follow the specific operating instructions for an uncontrolled environment. SAR Measurement (1g) AR5B95 (AW-NE785H) 802.11g: 0.053 W/kg...
..., please avoid direct contact to Channels 1 through 11 in the 2.4GHz frequency by specified firmware controlled in the USA." Eee PC 1008HA Max. To maintain compliance with FCC radiation exposure limits set forth for satisfying RF exposure compliance. End users must follow the specific operating instructions for an uncontrolled environment. SAR Measurement (1g) AR5B95 (AW-NE785H) 802.11g: 0.053 W/kg...


