
User Manual
Page 1
E4381 Eee PC User Manual Windows® XP Edition Eee PC 1003HAG 15G06Q128000
E4381 Eee PC User Manual Windows® XP Edition Eee PC 1003HAG 15G06Q128000

User Manual
Page 19
... Lk (Insert): Toggles the numeric keypad (number lock) ON and OFF. Scr Lk (Delete): Toggles the "Scroll Lock" ON and OFF. ASUS Eee PC 1-11 Volume Down Icon (F11): Decreases speaker volume. Windows icon: Displays the start menu. Allows you to use of a larger portion of the keyboard for number entering. Menu with pointer...
... Lk (Insert): Toggles the numeric keypad (number lock) ON and OFF. Scr Lk (Delete): Toggles the "Scroll Lock" ON and OFF. ASUS Eee PC 1-11 Volume Down Icon (F11): Decreases speaker volume. Windows icon: Displays the start menu. Allows you to use of a larger portion of the keyboard for number entering. Menu with pointer...

User Manual
Page 23
The Welcome message appears. Select you system settings by specifying the region you are in and click Next to continue. 3. ASUS Eee PC 2-3 Select the time zone you are 4. Click Next to continue. Read the end user license in , the language you use and the keyboard type you .... agreement and click Yes, I accept. Click Next to finish the initialization: 1. Click Next to continue. 2. First-time Startup For the first time you start your Eee PC, the Windows wizard will launch automatically and lead you use.
The Welcome message appears. Select you system settings by specifying the region you are in and click Next to continue. 3. ASUS Eee PC 2-3 Select the time zone you are 4. Click Next to continue. Read the end user license in , the language you use and the keyboard type you .... agreement and click Yes, I accept. Click Next to finish the initialization: 1. Click Next to continue. 2. First-time Startup For the first time you start your Eee PC, the Windows wizard will launch automatically and lead you use.

User Manual
Page 28
Click Internet Protocol 4. Right-click Local Area Connection and select Properties. 3. Click Obtain an IP address (TCP/IP) and click Properties. automatically and click OK. 2-8 Chapter 2: Getting Started Local Area Network To establish a wired network, follow the instructions below: Using a dynamic IP: 1. Right-click the network icon with a yellow warning triangle on the Windows® taskbar and select Open Network Connections. 2.
Click Internet Protocol 4. Right-click Local Area Connection and select Properties. 3. Click Obtain an IP address (TCP/IP) and click Properties. automatically and click OK. 2-8 Chapter 2: Getting Started Local Area Network To establish a wired network, follow the instructions below: Using a dynamic IP: 1. Right-click the network icon with a yellow warning triangle on the Windows® taskbar and select Open Network Connections. 2.
User Manual
Page 34
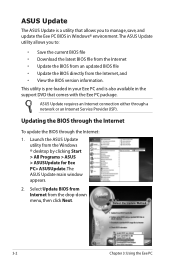
..., and update the Eee PC BIOS in your Eee PC and is a utility that comes with the Eee PC package. Launch the ASUS Update utility from the drop‑down menu, then click Next. 3-2 Chapter 3: Using the Eee PC Select Update BIOS from Internet from the Windows ® desktop by clicking Start > All Programs > ASUS > ASUSUpdate for Eee PC> ASUSUpdate. ASUS Update requires an...
..., and update the Eee PC BIOS in your Eee PC and is a utility that comes with the Eee PC package. Launch the ASUS Update utility from the drop‑down menu, then click Next. 3-2 Chapter 3: Using the Eee PC Select Update BIOS from Internet from the Windows ® desktop by clicking Start > All Programs > ASUS > ASUSUpdate for Eee PC> ASUSUpdate. ASUS Update requires an...
User Manual
Page 35
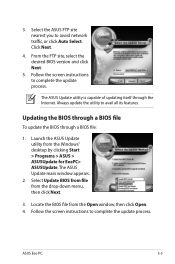
... process. Select Update BIOS from file from the Windows® desktop by clicking Start > Programs > ASUS > ASUSUpdate for EeePC> ASUSUpdate. Always update the utility to avoid network traffic, or click Auto Select. ASUS Eee PC 3-3 Launch the ASUS Update utility from the drop‑down menu, then... click Next. 3. Locate the BIOS file from the Open window, then click Open. 4. 3. Select the ASUS FTP site nearest you to avail all its features....
... process. Select Update BIOS from file from the Windows® desktop by clicking Start > Programs > ASUS > ASUSUpdate for EeePC> ASUSUpdate. Always update the utility to avoid network traffic, or click Auto Select. ASUS Eee PC 3-3 Launch the ASUS Update utility from the drop‑down menu, then... click Next. 3. Locate the BIOS file from the Open window, then click Open. 4. 3. Select the ASUS FTP site nearest you to avail all its features....


