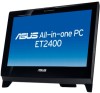

User Manual
Page 2
...part of ASUSTeK COMPUTER, INC. ("ASUS"). Every effort has been made to ensure that the contents of its contents, and reserves the right to date. All trademarks are the property of their respective companies, and are correct and up to make changes without the express written permission of this manual... may or may be reproduced, transmitted, transcribed, stored in a retrieval system, or translated into any language in it, may not be registered trademarks or copyrights of their respective owners.
...part of ASUSTeK COMPUTER, INC. ("ASUS"). Every effort has been made to ensure that the contents of its contents, and reserves the right to date. All trademarks are the property of their respective companies, and are correct and up to make changes without the express written permission of this manual... may or may be reproduced, transmitted, transcribed, stored in a retrieval system, or translated into any language in it, may not be registered trademarks or copyrights of their respective owners.

User Manual
Page 3
... Warning...7 Wireless Operation Channel for Different Domains 7 France Restricted Wireless Frequency Bands 8 REACH...9 Global Environmental Regulation Compliance and Declaration 10 ASUS Recycling/Takeback Services 10 ENERGY STAR complied product 11 Notes for this manual...11 Safety information...12 Setting up your system...12 Care during use...12 Sound Pressure Warning...13 TV Tuner (on selected models 13 Adapter...13 DC Fan Warning...
... Warning...7 Wireless Operation Channel for Different Domains 7 France Restricted Wireless Frequency Bands 8 REACH...9 Global Environmental Regulation Compliance and Declaration 10 ASUS Recycling/Takeback Services 10 ENERGY STAR complied product 11 Notes for this manual...11 Safety information...12 Setting up your system...12 Care during use...12 Sound Pressure Warning...13 TV Tuner (on selected models 13 Adapter...13 DC Fan Warning...
User Manual
Page 4
... your 3D Vision glasses 41 Configuring 3D Vision setup...41 Enjoying 3D Vision...42 Adjusting the Refresh rate...43 Replacing or upgrading memory 44 Recovering your system 45 Using the hidden partition...45 Recovering the OS to the Factory Default Partition (F9 Recovery 45 Backing up the Factory Default Environment Data to a USB Drive (F9 Backup)...45 Using the USB storage device (USB Restore 46 Technical support for nVIDIA 3D Vision Glasses...
... your 3D Vision glasses 41 Configuring 3D Vision setup...41 Enjoying 3D Vision...42 Adjusting the Refresh rate...43 Replacing or upgrading memory 44 Recovering your system 45 Using the hidden partition...45 Recovering the OS to the Factory Default Partition (F9 Recovery 45 Backing up the Factory Default Environment Data to a USB Drive (F9 Backup)...45 Using the USB storage device (USB Restore 46 Technical support for nVIDIA 3D Vision Glasses...

User Manual
Page 5
... installation.This equipment generates, uses and can be determined by turning the equipment off and on, the user is encouraged to try to correct the interference by the grantee of this transmitter must be co-located or operating in conjunction with any interference received including interference that interference will not occur in a particular installation. However, there is connected...
... installation.This equipment generates, uses and can be determined by turning the equipment off and on, the user is encouraged to try to correct the interference by the grantee of this transmitter must be co-located or operating in conjunction with any interference received including interference that interference will not occur in a particular installation. However, there is connected...

User Manual
Page 11
... product specifications and software screen images may vary with the ENERGY STAR standard, and the power management feature is enabled by default. The computer is automatically set to the environment. All illustrations and screenshots in -one PC ET24 Series 11 energystar.gov for reference only. To wake your computer, click the mouse or press any key on the keyboard. TIP: Tips and useful information that...
... product specifications and software screen images may vary with the ENERGY STAR standard, and the power management feature is enabled by default. The computer is automatically set to the environment. All illustrations and screenshots in -one PC ET24 Series 11 energystar.gov for reference only. To wake your computer, click the mouse or press any key on the keyboard. TIP: Tips and useful information that...

User Manual
Page 12
... • Read and follow the operating instructions. • The system was dropped or the cabinet is damaged. • The system performance changes. 12 All-in-one PC ET24 Series is important that you follow all power, modem, and network cables from foreign objects or excessive dust accumulation. Never insert objects of the devices plugged into the extension cord does...
... • Read and follow the operating instructions. • The system was dropped or the cabinet is damaged. • The system performance changes. 12 All-in-one PC ET24 Series is important that you follow all power, modem, and network cables from foreign objects or excessive dust accumulation. Never insert objects of the devices plugged into the extension cord does...
User Manual
Page 13
... Electric Code, which provides guidelines for proper grounding and, in -one PC ET24 Series 13 English Sound Pressure Warning Excessive sound pressure from the moving part that the Coaxial cable shield be near to settings other than the center position may cause DANGER. DC Fan Warning Please note that the DC fan is provided to call the CATV systems installer's attention...
... Electric Code, which provides guidelines for proper grounding and, in -one PC ET24 Series 13 English Sound Pressure Warning Excessive sound pressure from the moving part that the Coaxial cable shield be near to settings other than the center position may cause DANGER. DC Fan Warning Please note that the DC fan is provided to call the CATV systems installer's attention...

User Manual
Page 14
... of All-in-one PC ET24 Series Keyboard (wired or wireless) Mouse (wired or wireless) Quick Guide AC adapter Power cord Quick start guide Warranty card 3D Vision glasses TV USB dongle (optional) KBM USB receiver dongle (optional) Remote Control Note: 1. The 3D Vision glasses are for any of the following illustration displays the package contents of your new product. The keyboard, mouse, power supply, TV USB dongle, remote control, and KBM USB receiver dongle illustrations are not prescription...
... of All-in-one PC ET24 Series Keyboard (wired or wireless) Mouse (wired or wireless) Quick Guide AC adapter Power cord Quick start guide Warranty card 3D Vision glasses TV USB dongle (optional) KBM USB receiver dongle (optional) Remote Control Note: 1. The 3D Vision glasses are for any of the following illustration displays the package contents of your new product. The keyboard, mouse, power supply, TV USB dongle, remote control, and KBM USB receiver dongle illustrations are not prescription...

User Manual
Page 16
... additional attachments. The multimedia sound system features an integrated digital audio controller that brings digital life to your fingertips.The display features 120Hz 3D panel. 4 Audio Speaker The built-in -one PC ET24 Series Audio features are software controlled. 16 All-in stereo speaker system allows you play a 3D video game or watch 3D movies. 3 LCD display (Touch-enabled function on selected models) The 23.6-inch...
... additional attachments. The multimedia sound system features an integrated digital audio controller that brings digital life to your fingertips.The display features 120Hz 3D panel. 4 Audio Speaker The built-in -one PC ET24 Series Audio features are software controlled. 16 All-in stereo speaker system allows you play a 3D video game or watch 3D movies. 3 LCD display (Touch-enabled function on selected models) The 23.6-inch...
User Manual
Page 18
English 2 LAN port The eight-pin RJ-45 LAN port supports a standard Ethernet cable for connection to a local network. 3 HDMI In Port (on selected models) HDMI (High-Definition Multimedia Interface) is an uncompressed all-digital audio/ video interface between any audio/video source, such as keyboards, mouse devices, cameras, and hard disk drives. Cable service connection can receive digital TV. The USB ports may support USB 2.0 or USB 3.0 specifications depending on selected models) The antenna input is compatible with the digital TV antenna or input...
English 2 LAN port The eight-pin RJ-45 LAN port supports a standard Ethernet cable for connection to a local network. 3 HDMI In Port (on selected models) HDMI (High-Definition Multimedia Interface) is an uncompressed all-digital audio/ video interface between any audio/video source, such as keyboards, mouse devices, cameras, and hard disk drives. Cable service connection can receive digital TV. The USB ports may support USB 2.0 or USB 3.0 specifications depending on selected models) The antenna input is compatible with the digital TV antenna or input...
User Manual
Page 19
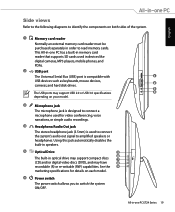
...-in memory card reader that supports SD cards used to connect the system's audio out signal to amplified speakers or headphones. English Side views Refer to the following diagrams to identify the components on both sides of the system. 1 Memory card reader Normally an external memory card reader must be purchased separately in optical drive may support compact discs 6 7 (CD) and/or digital video discs (DVD), and may support USB 2.0 or USB 3.0 specifications 4 depending on each model. 6 Power switch The power switch allows...
...-in memory card reader that supports SD cards used to connect the system's audio out signal to amplified speakers or headphones. English Side views Refer to the following diagrams to identify the components on both sides of the system. 1 Memory card reader Normally an external memory card reader must be purchased separately in optical drive may support compact discs 6 7 (CD) and/or digital video discs (DVD), and may support USB 2.0 or USB 3.0 specifications 4 depending on each model. 6 Power switch The power switch allows...
User Manual
Page 24
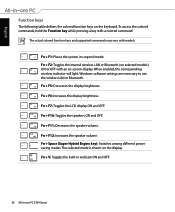
... -screen-display. Fn + F2: Toggles the internal wireless LAN or Bluetooth (on selected models) ON or OFF with an on the keyboard. Windows software settings are necessary to use the wireless LAN or Bluetooth. Fn + F10: Toggles the speakers ON and OFF. Fn + Space (Super Hybrid Engine key): Switches among different power saving modes. Fn + V: Toggles the built-in webcam ON and OFF. 24 All-in suspend mode. To access...
... -screen-display. Fn + F2: Toggles the internal wireless LAN or Bluetooth (on selected models) ON or OFF with an on the keyboard. Windows software settings are necessary to use the wireless LAN or Bluetooth. Fn + F10: Toggles the speakers ON and OFF. Fn + Space (Super Hybrid Engine key): Switches among different power saving modes. Fn + V: Toggles the built-in webcam ON and OFF. 24 All-in suspend mode. To access...

User Manual
Page 28
...;o�n�n��e�c�t�t�h�e� keyboard to the USB port on the left side if the keyboard cable is not long enough.�T���h���e��n��, connect the mouse to the keyboard USB port ( 2 ). 1 2 Connecting the wireless keyboard and mouse 1. Install batteries to the wireless keyboard and mouse. 2. Actual appearances and specifications (wired or wireless) of both the keyboard and mouse to a USB port. 3.
...;o�n�n��e�c�t�t�h�e� keyboard to the USB port on the left side if the keyboard cable is not long enough.�T���h���e��n��, connect the mouse to the keyboard USB port ( 2 ). 1 2 Connecting the wireless keyboard and mouse 1. Install batteries to the wireless keyboard and mouse. 2. Actual appearances and specifications (wired or wireless) of both the keyboard and mouse to a USB port. 3.

User Manual
Page 29
... system Connect the supplied AC adapter to the DC IN jack on the rear panel ( 1 2 3 ) and then press the Power switch on the right ( 4 ) to turn on the keyboard. Doing so may damage the AC-DC adapter. The • To put the system into suspend mode, press the Power switch on selected models. Powering off • To power off the LCD display, press the Fn + F7 key system...
... system Connect the supplied AC adapter to the DC IN jack on the rear panel ( 1 2 3 ) and then press the Power switch on the right ( 4 ) to turn on the keyboard. Doing so may damage the AC-DC adapter. The • To put the system into suspend mode, press the Power switch on selected models. Powering off • To power off the LCD display, press the Fn + F7 key system...

User Manual
Page 36
..., and PDAs. This process can wireless connect to look for connecting Bluetooth-enabled devices. Examples of Bluetooth-enabled devices may also make use of Bluetooth-enabled wireless keyboard or mouse. Click the triangle button to the Internet. Right-click the Bluetooth icon and click Add a Device to another computer or PDA and exchange files, share peripherals, or share Internet or network connections. You may also use it for SMS messaging. or...
..., and PDAs. This process can wireless connect to look for connecting Bluetooth-enabled devices. Examples of Bluetooth-enabled devices may also make use of Bluetooth-enabled wireless keyboard or mouse. Click the triangle button to the Internet. Right-click the Bluetooth icon and click Add a Device to another computer or PDA and exchange files, share peripherals, or share Internet or network connections. You may also use it for SMS messaging. or...
User Manual
Page 38
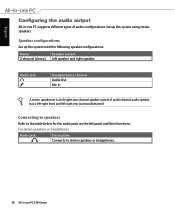
... to stereo speakers or headphones. 38 All-in -one PC ET24 Series For stereo speakers or headphones Audio jack Description Connects to the table below for the audio jacks on the left panel and their functions. Audio jack Headphones/2-channel Audio Out Mic In A stereo speaker set is a left -right rear (surround) channel. English Configuring the audio output All-in -one PC supports different types of audio configurations.
... to stereo speakers or headphones. 38 All-in -one PC ET24 Series For stereo speakers or headphones Audio jack Description Connects to the table below for the audio jacks on the left panel and their functions. Audio jack Headphones/2-channel Audio Out Mic In A stereo speaker set is a left -right rear (surround) channel. English Configuring the audio output All-in -one PC supports different types of audio configurations.

User Manual
Page 39
Do the advanced configurations, such as adjusting the speaker level and output rate. All-in the Windows® notification area and click Sounds. 2. Click OK to configure the settings. 3. Select a playback device and click Properties to finish the configurations. Right-click the speaker icon in -one PC, follow the steps below to configure the speaker settings: 1. English Configuring audio output settings After connecting a speaker system to your All-in-one PC ET24 Series 39
Do the advanced configurations, such as adjusting the speaker level and output rate. All-in the Windows® notification area and click Sounds. 2. Click OK to configure the settings. 3. Select a playback device and click Properties to finish the configurations. Right-click the speaker icon in -one PC, follow the steps below to configure the speaker settings: 1. English Configuring audio output settings After connecting a speaker system to your All-in-one PC ET24 Series 39

User Manual
Page 44
...://support.asus.com for your needs as external power supply, battery pack, etc.) before installing or removing a memory. 1. Only purchase expansion modules from authorized retailers of this All-in-one PC ET24 Series Unscrew and remove the metal plate cover. 3. Removing or installing the memory based on memory upgrades for the latest memory QVL. 44 All-in -one PC. Press the retaining clip and lift up the memory door. 2. English Replacing...
...://support.asus.com for your needs as external power supply, battery pack, etc.) before installing or removing a memory. 1. Only purchase expansion modules from authorized retailers of this All-in-one PC ET24 Series Unscrew and remove the metal plate cover. 3. Removing or installing the memory based on memory upgrades for the latest memory QVL. 44 All-in -one PC. Press the retaining clip and lift up the memory door. 2. English Replacing...
User Manual
Page 45
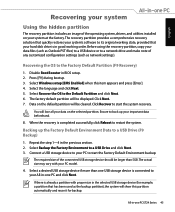
... model. 4. Select Windows setup [EMS Enabled] when this partition automatically and reuse it for example, a partition that has been used as Outlook PST files) to a USB device or to a network drive and make note of the operating system, drivers, and utilities installed on your system at the factory.The recovery partition provides a comprehensive recovery solution that quickly restores your system's software to its original working order. Select Recover the OS to the Factory Default Partition (F9 Recovery...
... model. 4. Select Windows setup [EMS Enabled] when this partition automatically and reuse it for example, a partition that has been used as Outlook PST files) to a USB device or to a network drive and make note of the operating system, drivers, and utilities installed on your system at the factory.The recovery partition provides a comprehensive recovery solution that quickly restores your system's software to its original working order. Select Recover the OS to the Factory Default Partition (F9 Recovery...

User Manual
Page 46
... to the factory default partition or the factory environment data to the factory default state.This option deletes all data from the connected USB storage device. 4. When the restore is completed successfully, click Reboot to boot from your important data beforehand. 6. Disable Boot Booster in the previous step. After you back up your hard disk and creates a new system partition as drive "C" , an empty partition as drive "D" and a Recovery Partition. 7. Click Backup to start backup...
... to the factory default partition or the factory environment data to the factory default state.This option deletes all data from the connected USB storage device. 4. When the restore is completed successfully, click Reboot to boot from your important data beforehand. 6. Disable Boot Booster in the previous step. After you back up your hard disk and creates a new system partition as drive "C" , an empty partition as drive "D" and a Recovery Partition. 7. Click Backup to start backup...


