

User Manual
Page 2
... to make changes without the express written permission of ASUSTeK COMPUTER, INC. ("ASUS"). Products and corporate names mentioned in any form or by any means, except documentation kept by the purchaser for identification purposes only. However, the manufacturer makes no guarantee regarding the accuracy of their respective owners. No part of this manual, including the products and software...
... to make changes without the express written permission of ASUSTeK COMPUTER, INC. ("ASUS"). Products and corporate names mentioned in any form or by any means, except documentation kept by the purchaser for identification purposes only. However, the manufacturer makes no guarantee regarding the accuracy of their respective owners. No part of this manual, including the products and software...

User Manual
Page 3
... PC 20 Placing on the desktop...20 Mounting to the wall...20 Setting up your EeeTop PC 22 Connecting the wired keyboard and mouse 22 Connecting the wireless keyboard and mouse 22 Powering on the system...23 Powering off...23 Calibrating the screen...24 Configuring a wireless connection 26 Configuring a wired connection 27 Configuring the audio output...31 Configuring audio output settings 32 SRS Premium Sound...33 Recovering your system 34 Using the hidden partition...34 Using the recovery DVD...36
... PC 20 Placing on the desktop...20 Mounting to the wall...20 Setting up your EeeTop PC 22 Connecting the wired keyboard and mouse 22 Connecting the wireless keyboard and mouse 22 Powering on the system...23 Powering off...23 Calibrating the screen...24 Configuring a wireless connection 26 Configuring a wired connection 27 Configuring the audio output...31 Configuring audio output settings 32 SRS Premium Sound...33 Recovering your system 34 Using the hidden partition...34 Using the recovery DVD...36

User Manual
Page 10
... you follow all power, modem, and network cables from foreign objects or excessive dust accumulation. Never insert objects of space around the system for information technology equipment. Ensure that the total ampere rating of the devices plugged into the ventilation openings. • Use this product near water or a heated source such as a radiator. • Set up your retailer...
... you follow all power, modem, and network cables from foreign objects or excessive dust accumulation. Never insert objects of space around the system for information technology equipment. Ensure that the total ampere rating of the devices plugged into the ventilation openings. • Use this product near water or a heated source such as a radiator. • Set up your retailer...
User Manual
Page 13
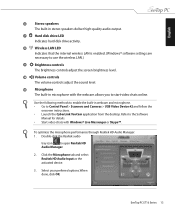
... audio tray icon to Control Panel > Scanners and Cameras > USB Video Device #2 and follow the onscreen instructions. • Launch the CyberLink YouCam application from the desktop. Select your preferred options. English 6 Stereo speakers The built-in stereo speakers deliver high-quality audio output. 7 Hard disk drive LED Indicates hard disk drive activity. 8 Wireless LAN LED Indicates that the internal wireless LAN is enabled. (Windows® software settings are necessary to use the wireless LAN.) 9 Brightness controls The brightness controls adjust the screen...
... audio tray icon to Control Panel > Scanners and Cameras > USB Video Device #2 and follow the onscreen instructions. • Launch the CyberLink YouCam application from the desktop. Select your preferred options. English 6 Stereo speakers The built-in stereo speakers deliver high-quality audio output. 7 Hard disk drive LED Indicates hard disk drive activity. 8 Wireless LAN LED Indicates that the internal wireless LAN is enabled. (Windows® software settings are necessary to use the wireless LAN.) 9 Brightness controls The brightness controls adjust the screen...

User Manual
Page 15
.... 6 Microphone jack The microphone jack is designed to connect a microphone used to connect the system's audio out signal to amplified speakers or headphones. English 4 USB port The Universal Serial Bus (USB) port is compatible with USB devices such as keyboards, mouse devices, cameras, and hard disk drives. 5 Power input (DC 19V) The supplied power adapter converts AC power to DC power for analog audio transfer. 8 Headphone/Audio Out jack The stereo headphone jack (3.5mm) is recommended...
.... 6 Microphone jack The microphone jack is designed to connect a microphone used to connect the system's audio out signal to amplified speakers or headphones. English 4 USB port The Universal Serial Bus (USB) port is compatible with USB devices such as keyboards, mouse devices, cameras, and hard disk drives. 5 Power input (DC 19V) The supplied power adapter converts AC power to DC power for analog audio transfer. 8 Headphone/Audio Out jack The stereo headphone jack (3.5mm) is recommended...

User Manual
Page 16
..., and PDAs. 2 USB port The Universal Serial Bus (USB) port is turned off the computer. • If you move the computer, the battery provides power for five minutes without AC power connected. • Batteries are consumables.To replace the battery, seek local technical support services or visit the ASUS website www.asus.com. English The EeeTop PC ET1603 model comes with USB devices such as keyboards, mouse devices, cameras, and hard disk drives. 1 2 16 EeeTop PC ET16 Series
..., and PDAs. 2 USB port The Universal Serial Bus (USB) port is turned off the computer. • If you move the computer, the battery provides power for five minutes without AC power connected. • Batteries are consumables.To replace the battery, seek local technical support services or visit the ASUS website www.asus.com. English The EeeTop PC ET1603 model comes with USB devices such as keyboards, mouse devices, cameras, and hard disk drives. 1 2 16 EeeTop PC ET16 Series

User Manual
Page 23
... system Connect the supplied AC adapter to the DC IN jack on the rear panel ( 1 2 3 ) and then press the Power switch on the front panel ( 4 ) to the OS, press the Power switch again, click the mouse, touch the display, or press any key on the keyboard. • To shut down the system completely, follow the normal Windows shutdown process or press and hold the Power switch for...
... system Connect the supplied AC adapter to the DC IN jack on the rear panel ( 1 2 3 ) and then press the Power switch on the front panel ( 4 ) to the OS, press the Power switch again, click the mouse, touch the display, or press any key on the keyboard. • To shut down the system completely, follow the normal Windows shutdown process or press and hold the Power switch for...

User Manual
Page 31
.... English Configuring the audio output EeeTop PC supports different types of audio configurations. Speaker configurations Set up the system using stereo speakers or a multi-channel audio speaker system. A subwoofer provides enhanced bass sounds.".1" indicates a subwoofer. Connecting to speakers Refer to the FRONT jack on the rear panel and their functions. A multi-channel audio speaker has a left-right front and left -right, two channel speaker system. EeeTop PC ET16 Series 31 SURROUND connects to...
.... English Configuring the audio output EeeTop PC supports different types of audio configurations. Speaker configurations Set up the system using stereo speakers or a multi-channel audio speaker system. A subwoofer provides enhanced bass sounds.".1" indicates a subwoofer. Connecting to speakers Refer to the FRONT jack on the rear panel and their functions. A multi-channel audio speaker has a left-right front and left -right, two channel speaker system. EeeTop PC ET16 Series 31 SURROUND connects to...

User Manual
Page 32
Click the Volume tab and then click Advanced to configure the speaker settings: 1. Click the Speakers tab. Right-click the volume icon on the Windows® notification area and click Adjust Audio Properties. 2. From the drop-down menu, select the speaker configuration you are using and click OK. 32 EeeTop PC ET16 Series English Configuring audio output settings After connecting a speaker system to your EeeTop PC, follow the steps below to configure the speaker settings. 3.
Click the Volume tab and then click Advanced to configure the speaker settings: 1. Click the Speakers tab. Right-click the volume icon on the Windows® notification area and click Adjust Audio Properties. 2. From the drop-down menu, select the speaker configuration you are using and click OK. 32 EeeTop PC ET16 Series English Configuring audio output settings After connecting a speaker system to your EeeTop PC, follow the steps below to configure the speaker settings. 3.

User Manual
Page 34
... the POST screen. Press again to save the configuration and restart EeeTop PC. Boot Device Priority Boot Settings Configuration Boot Settings Configuration Security Options Disabled Enabled ←→ Select Screen ↑↓ Select Item +- Recovering your system English Using the hidden partition The recovery partition includes an image of the operating system, drivers, and utilities installed on your system at the factory.The recovery partition provides a comprehensive recovery solution that quickly restores your system's software to its original working order.
... the POST screen. Press again to save the configuration and restart EeeTop PC. Boot Device Priority Boot Settings Configuration Boot Settings Configuration Security Options Disabled Enabled ←→ Select Screen ↑↓ Select Item +- Recovering your system English Using the hidden partition The recovery partition includes an image of the operating system, drivers, and utilities installed on your system at the factory.The recovery partition provides a comprehensive recovery solution that quickly restores your system's software to its original working order.
User Manual
Page 36
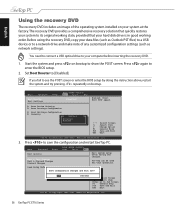
... show the POST screen. Start the system and press on bootup to save the configuration and restart EeeTop PC. F10 key can be used for this operation. English Using the recovery DVD The recovery DVD includes an image of any customized configuration settings (such as Outlook PST files) to a USB device or to enter the BIOS setup. 2. Main Advanced Boot Booster Boot Settings Power BIOS SETUP UTILITY Boot Tools Exit [Disabled] Enabled: Boost BIOS POST speed. Load Setup Defaults Save configuration changes and exit now...
... show the POST screen. Start the system and press on bootup to save the configuration and restart EeeTop PC. F10 key can be used for this operation. English Using the recovery DVD The recovery DVD includes an image of any customized configuration settings (such as Outlook PST files) to a USB device or to enter the BIOS setup. 2. Main Advanced Boot Booster Boot Settings Power BIOS SETUP UTILITY Boot Tools Exit [Disabled] Enabled: Boost BIOS POST speed. Load Setup Defaults Save configuration changes and exit now...
User Manual
Page 37
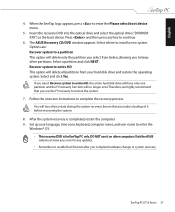
... your hard disk drive and restore the operating system. Press and then press any updates. • Remember to enter the Please select boot device menu. 5. Recover system to continue. 6. The ASUS Recovery CD/DVD window appears. EeeTop PC ET16 Series 37 Set up your data during the system recovery. Ensure that you complete hardware change or system recovery. When the EeeTop logo appears, press to enable Boot Booster after you use the F9 recovery...
... your hard disk drive and restore the operating system. Press and then press any updates. • Remember to enter the Please select boot device menu. 5. Recover system to continue. 6. The ASUS Recovery CD/DVD window appears. EeeTop PC ET16 Series 37 Set up your data during the system recovery. Ensure that you complete hardware change or system recovery. When the EeeTop logo appears, press to enable Boot Booster after you use the F9 recovery...

User Manual
Page 8
... ET16 Series is designed and tested to meet the latest standards of the devices plugged into the system. • The system does not function properly even if you follow all power, modem, and network cables from the power outlets before you use an abrasive cleaner or a coarse cloth when cleaning the screen. • If you encounter the following safety instructions. Never...
... ET16 Series is designed and tested to meet the latest standards of the devices plugged into the system. • The system does not function properly even if you follow all power, modem, and network cables from the power outlets before you use an abrasive cleaner or a coarse cloth when cleaning the screen. • If you encounter the following safety instructions. Never...

User Manual
Page 11
...options. English 6 Stereo speakers The built-in stereo speakers deliver high-quality audio output. 7 Hard disk drive LED Indicates hard disk drive activity. 8 Wireless LAN LED Indicates that the internal wireless LAN is enabled. (Windows® software settings are necessary to use the wireless LAN.) 9 Brightness controls The brightness controls adjust the screen brightness level. 10 Volume controls The volume controls adjust the sound level. 11 Microphone The built-in webcam and microphone. • Go to open Realtek HD Audio Manager. 2. Refer to start...
...options. English 6 Stereo speakers The built-in stereo speakers deliver high-quality audio output. 7 Hard disk drive LED Indicates hard disk drive activity. 8 Wireless LAN LED Indicates that the internal wireless LAN is enabled. (Windows® software settings are necessary to use the wireless LAN.) 9 Brightness controls The brightness controls adjust the screen brightness level. 10 Volume controls The volume controls adjust the sound level. 11 Microphone The built-in webcam and microphone. • Go to open Realtek HD Audio Manager. 2. Refer to start...

User Manual
Page 13
... stereo headphone jack (3.5mm) is used for video conferencing, voice narrations, or simple audio recordings. 7 Audio In jack Plug a 3.5mm mini-jack audio cable into this jack for use with USB devices such as keyboards, mouse devices, cameras, and hard disk drives. 5 Power input (DC 19V) The supplied power adapter converts AC power to the PC. To prevent damage to amplified speakers or headphones. Do not cover the adapter and keep it away from...
... stereo headphone jack (3.5mm) is used for video conferencing, voice narrations, or simple audio recordings. 7 Audio In jack Plug a 3.5mm mini-jack audio cable into this jack for use with USB devices such as keyboards, mouse devices, cameras, and hard disk drives. 5 Power input (DC 19V) The supplied power adapter converts AC power to the PC. To prevent damage to amplified speakers or headphones. Do not cover the adapter and keep it away from...

User Manual
Page 14
... side of the system. 1 Memory card reader The built-in memory card reader reads MMC/SD/MS/MS Pro cards used in five minutes. English The EeeTop PC ET1603 model comes with a battery that your computer is compatible with USB devices such as keyboards, mouse devices, cameras, and hard disk drives. 1 2 14 EeeTop PC ET16 Series Note the following diagram to disconnect the AC power, ensure that supports the Uninterruptible Power Supply (UPS) function.
... side of the system. 1 Memory card reader The built-in memory card reader reads MMC/SD/MS/MS Pro cards used in five minutes. English The EeeTop PC ET1603 model comes with a battery that your computer is compatible with USB devices such as keyboards, mouse devices, cameras, and hard disk drives. 1 2 14 EeeTop PC ET16 Series Note the following diagram to disconnect the AC power, ensure that supports the Uninterruptible Power Supply (UPS) function.

User Manual
Page 29
... rear (surround) speakers, a center speaker, and a subwoofer. A subwoofer provides enhanced bass sounds.".1" indicates a subwoofer. For instance, 5.1-channel refers to the SUB/CENTER jack on the rear panel and their functions. CENTER/BASS connects to a six-speaker mode and uses two front speakers (left-right), two rear (surround) speakers (left -right rear (surround) channel, and it may include a subwoofer and a center speaker. EeeTop PC ET16 Series 29 Speaker configurations Set up the system using stereo speakers...
... rear (surround) speakers, a center speaker, and a subwoofer. A subwoofer provides enhanced bass sounds.".1" indicates a subwoofer. For instance, 5.1-channel refers to the SUB/CENTER jack on the rear panel and their functions. CENTER/BASS connects to a six-speaker mode and uses two front speakers (left-right), two rear (surround) speakers (left -right rear (surround) channel, and it may include a subwoofer and a center speaker. EeeTop PC ET16 Series 29 Speaker configurations Set up the system using stereo speakers...

User Manual
Page 32
... Configuration Boot Settings Configuration Security Options Disabled Enabled ←→ Select Screen ↑↓ Select Item +- Press to enter the BIOS setup. 2. F10 key can be used for this operation. Main Advanced Exit Options Power Exit & Save Changes Exit & Discard Changes Discard Changes BIOS SETUP UTILITY Boot Tools Exit Exit system setup after saving the changes. Recovering your system English Using the hidden partition The recovery partition includes an image of the operating system, drivers, and utilities installed on your system at the factory...
... Configuration Boot Settings Configuration Security Options Disabled Enabled ←→ Select Screen ↑↓ Select Item +- Press to enter the BIOS setup. 2. F10 key can be used for this operation. Main Advanced Exit Options Power Exit & Save Changes Exit & Discard Changes Discard Changes BIOS SETUP UTILITY Boot Tools Exit Exit system setup after saving the changes. Recovering your system English Using the hidden partition The recovery partition includes an image of the operating system, drivers, and utilities installed on your system at the factory...

User Manual
Page 34
... Exit system setup after saving the changes. F10 key can be used for this operation. English Using the recovery DVD The recovery DVD includes an image of any customized configuration settings (such as network settings). Start the system and press on bootup to its original working state, provided that your data files (such as Outlook PST files) to a USB device or to enter the BIOS setup. 2. Boot Device Priority Boot Settings Configuration Boot Settings Configuration Security Options Disabled Enabled ←→ Select Screen ↑...
... Exit system setup after saving the changes. F10 key can be used for this operation. English Using the recovery DVD The recovery DVD includes an image of any customized configuration settings (such as network settings). Start the system and press on bootup to its original working state, provided that your data files (such as Outlook PST files) to a USB device or to enter the BIOS setup. 2. Boot Device Priority Boot Settings Configuration Boot Settings Configuration Security Options Disabled Enabled ←→ Select Screen ↑...

User Manual
Page 35
... any key to a partition This option will lose all partitions from your hard disk drive and restore the operating system. You will delete only the partition you select from below, allowing you select Recover system to keep other partitions. Insert the recovery DVD into the optical drive and select the optical drive ("DVDROM: XXX") as the boot device. Options are: Recover system to continue. 6. Follow the onscreen instructions to install a new system. Set up...
... any key to a partition This option will lose all partitions from your hard disk drive and restore the operating system. You will delete only the partition you select from below, allowing you select Recover system to keep other partitions. Insert the recovery DVD into the optical drive and select the optical drive ("DVDROM: XXX") as the boot device. Options are: Recover system to continue. 6. Follow the onscreen instructions to install a new system. Set up...


