User Manual
Page 3
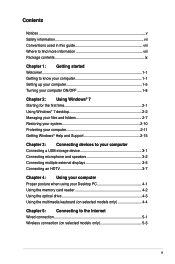
... the first time 2-1 Using Windows® 7 desktop 2-2 Managing your files and folders 2-7 Restoring your system 2-10 Protecting your computer 2-11 Getting Windows® Help and Support 2-15 Chapter 3: Connecting devices to your computer Connecting a USB storage device 3-1 Connecting microphone and speakers 3-2 Connecting multiple external displays 3-5 Connecting an HDTV 3-7 Chapter 4: Using your...
... the first time 2-1 Using Windows® 7 desktop 2-2 Managing your files and folders 2-7 Restoring your system 2-10 Protecting your computer 2-11 Getting Windows® Help and Support 2-15 Chapter 3: Connecting devices to your computer Connecting a USB storage device 3-1 Connecting microphone and speakers 3-2 Connecting multiple external displays 3-5 Connecting an HDTV 3-7 Chapter 4: Using your...
User Manual
Page 8
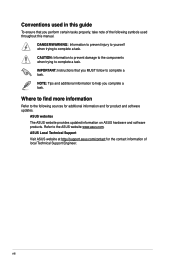
DANGER/WARNING: Information to prevent injury to yourself when trying to the ASUS website www.asus.com. Where to find more information Refer to the following symbols used in this guide To ensure that you ...for the contact information of local Technical Support Engineer. Conventions used throughout this manual. NOTE: Tips and additional information to complete a task. ASUS websites The ASUS website provides updated information on ASUS hardware and software products. ASUS Local Technical Support Visit ASUS website at http://support.asus.com/contact for product and software ...
DANGER/WARNING: Information to prevent injury to yourself when trying to the ASUS website www.asus.com. Where to find more information Refer to the following symbols used in this guide To ensure that you ...for the contact information of local Technical Support Engineer. Conventions used throughout this manual. NOTE: Tips and additional information to complete a task. ASUS websites The ASUS website provides updated information on ASUS hardware and software products. ASUS Local Technical Support Visit ASUS website at http://support.asus.com/contact for product and software ...

User Manual
Page 19
... Start menu gives you with more information about Windows® 7. For more information about Windows 7 through its Help and Support feature. Using Windows® 7 desktop Click the Start icon > Help and Support to obtain more details, refer to the section Pinning programs on the Start menu or taskbar on this chapter. 2-2 Chapter...
... Start menu gives you with more information about Windows® 7. For more information about Windows 7 through its Help and Support feature. Using Windows® 7 desktop Click the Start icon > Help and Support to obtain more details, refer to the section Pinning programs on the Start menu or taskbar on this chapter. 2-2 Chapter...
User Manual
Page 32
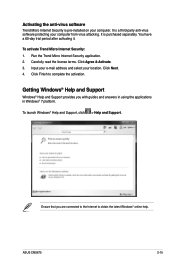
...Security application. 2. Carefully read the license terms. Click Agree & Activate. 3. To launch Windows® Help and Support, click > Help and Support. Click Finish to obtain the latest Windows® online help. Ensure that you with guides and answers in using the.... 4. To activate Trend Micro Internet Security: 1. Getting Windows® Help and Support Windows® Help and Support provides you are connected to the Internet to complete the activation. ASUS CM5675 2-15 Activating the anti-virus software Trend Micro Internet Security is purchased separately.
...Security application. 2. Carefully read the license terms. Click Agree & Activate. 3. To launch Windows® Help and Support, click > Help and Support. Click Finish to obtain the latest Windows® online help. Ensure that you with guides and answers in using the.... 4. To activate Trend Micro Internet Security: 1. Getting Windows® Help and Support Windows® Help and Support provides you are connected to the Internet to complete the activation. ASUS CM5675 2-15 Activating the anti-virus software Trend Micro Internet Security is purchased separately.
User Manual
Page 40
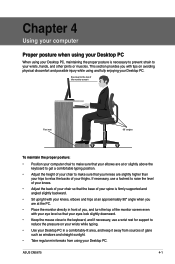
...PC. Chapter 4 Using your computer Proper posture when using your Desktop PC When using your Desktop PC, maintaining the proper posture is firmly supported and angled slightly backward. • Sit upright with your knees, elbows and hips at an approximately 90º angle when you are ...• Place the monitor directly in front of you with your eye level so that the base of your thighs. ASUS CM5675 4-1 If necessary, use a wrist rest for support to reduce the pressure on avoiding physical discomfort and possible injury while using your wrists, hands, and other joints or muscles...
...PC. Chapter 4 Using your computer Proper posture when using your Desktop PC When using your Desktop PC, maintaining the proper posture is firmly supported and angled slightly backward. • Sit upright with your knees, elbows and hips at an approximately 90º angle when you are ...• Place the monitor directly in front of you with your eye level so that the base of your thighs. ASUS CM5675 4-1 If necessary, use a wrist rest for support to reduce the pressure on avoiding physical discomfort and possible injury while using your wrists, hands, and other joints or muscles...
User Manual
Page 51
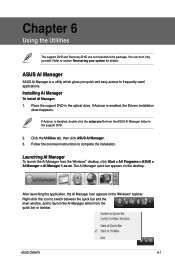
... You can burn it by yourself. Place the support DVD in the package. Follow the onscreen instructions to section Recovering your system for details. ASUS AI Manager ASUS AI Manager is disabled, double-click the setup.exe file from the ASUS AI Manager folder in the Windows® taskbar....Manager > AI Manager 1.xx.xx. Launching AI Manager To launch the AI Manager from the quick bar or taskbar. ASUS CM5675 6-1 Chapter 6 Using the Utilities The support DVD and Recovery DVD are not included in the optical drive. Refer to complete the installation. Right-click this icon ...
... You can burn it by yourself. Place the support DVD in the package. Follow the onscreen instructions to section Recovering your system for details. ASUS AI Manager ASUS AI Manager is disabled, double-click the setup.exe file from the ASUS AI Manager folder in the Windows® taskbar....Manager > AI Manager 1.xx.xx. Launching AI Manager To launch the AI Manager from the quick bar or taskbar. ASUS CM5675 6-1 Chapter 6 Using the Utilities The support DVD and Recovery DVD are not included in the optical drive. Refer to complete the installation. Right-click this icon ...
User Manual
Page 52
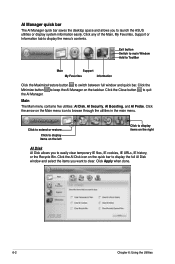
... to keep the AI Manager on the quick bar to display the full AI Disk window and select the items you want to launch the ASUS utilities or display system information easily. Click the Minimize button to display the menu's contents. Click Apply when done. 6-2 Chapter 6: Using the Utilities... Click the Close button to switch between full window and quick bar. Exit button Switch to main Window Add to ToolBar Main Support My Favorites Information Click the Maximize/restore button to quit the AI Manager. AI Manager quick bar The AI Manager quick bar saves the ...
... to keep the AI Manager on the quick bar to display the full AI Disk window and select the items you want to launch the ASUS utilities or display system information easily. Click the Minimize button to display the menu's contents. Click Apply when done. 6-2 Chapter 6: Using the Utilities... Click the Close button to switch between full window and quick bar. Exit button Switch to main Window Add to ToolBar Main Support My Favorites Information Click the Maximize/restore button to quit the AI Manager. AI Manager quick bar The AI Manager quick bar saves the ...
User Manual
Page 55
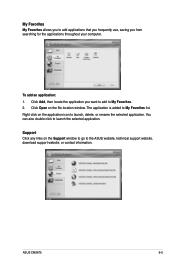
... on the file location window. Click Open on the application icon to My Favorites. 2. ASUS CM5675 6-5 Support Click any links on the Support window to go to My Favorites list. The application is added to the ASUS website, technical support website, download support website, or contact information. Click Add, then locate the application you from searching for...
... on the file location window. Click Open on the application icon to My Favorites. 2. ASUS CM5675 6-5 Support Click any links on the Support window to go to My Favorites list. The application is added to the ASUS website, technical support website, download support website, or contact information. Click Add, then locate the application you from searching for...
User Manual
Page 56
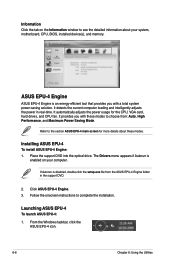
... : Auto, High Performance, and Maximum Power Saving Mode. From the Windows taskbar, click the ASUS EPU-4 icon. 6-6 Chapter 6: Using the Utilities Place the support DVD into the optical drive. Launching ASUS EPU-4 To launch ASUS EPU-4: 1. Installing ASUS EPU-4 To install ASUS EPU-4 Engine: 1. It automatically adjusts the power usage for more details about your computer...
... : Auto, High Performance, and Maximum Power Saving Mode. From the Windows taskbar, click the ASUS EPU-4 icon. 6-6 Chapter 6: Using the Utilities Place the support DVD into the optical drive. Launching ASUS EPU-4 To launch ASUS EPU-4: 1. Installing ASUS EPU-4 To install ASUS EPU-4 Engine: 1. It automatically adjusts the power usage for more details about your computer...
User Manual
Page 60
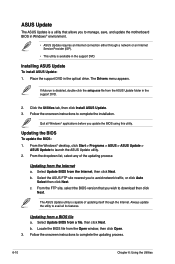
...any of updating itself through a network or an Internet Service Provider (ISP). • This utility is available in the support DVD. The ASUS Update utility is disabled, double-click the setup.exe file from a file, then click Next. Locate the BIOS file ... Start > Programs > ASUS > ASUS Update > ASUS Update to complete the updating process. 6-10 Chapter 6: Using the Utilities Installing ASUS Update To install ASUS Update: 1. Follow the onscreen instructions to launch the ASUS Update utility. 2. Place the support DVD in the support DVD. 2. ASUS Update The ASUS Update is a utility ...
...any of updating itself through a network or an Internet Service Provider (ISP). • This utility is available in the support DVD. The ASUS Update utility is disabled, double-click the setup.exe file from a file, then click Next. Locate the BIOS file ... Start > Programs > ASUS > ASUS Update > ASUS Update to complete the updating process. 6-10 Chapter 6: Using the Utilities Installing ASUS Update To install ASUS Update: 1. Follow the onscreen instructions to launch the ASUS Update utility. 2. Place the support DVD in the support DVD. 2. ASUS Update The ASUS Update is a utility ...
User Manual
Page 61
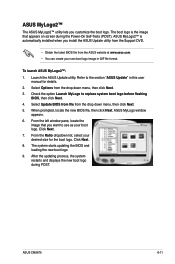
... logo during the Power‑On Self-Tests (POST). ASUS MyLogo2™ The ASUS MyLogo2™ utility lets you install the ASUS Update utility from the Support DVD. • Obtain the latest BIOS file from the ASUS website at www.asus.com. • You can create your own boot logo...down menu, then click Next. 3. Click Next. 7. Click Next. 8. The boot logo is automatically installed when you customize the boot logo. ASUS CM5675 6-11 When prompted, locate the new BIOS file, then click Next. From the Ratio dropdown list, select your boot logo. The system starts updating...
... logo during the Power‑On Self-Tests (POST). ASUS MyLogo2™ The ASUS MyLogo2™ utility lets you install the ASUS Update utility from the Support DVD. • Obtain the latest BIOS file from the ASUS website at www.asus.com. • You can create your own boot logo...down menu, then click Next. 3. Click Next. 7. Click Next. 8. The boot logo is automatically installed when you customize the boot logo. ASUS CM5675 6-11 When prompted, locate the new BIOS file, then click Next. From the Ratio dropdown list, select your boot logo. The system starts updating...
User Manual
Page 67
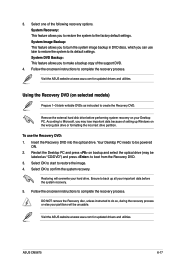
... backup in DVD discs, which you may be labeled as instructed to create the Recovery DVD. Visit the ASUS website at www.asus.com for updated drivers and utilities. ASUS CM5675 6-17 According to be unusable. Your Desktop PC needs to Microsoft, you can use the Recovery DVD:... recovery process or else your Desktop PC. Select OK to complete the recovery process. Visit the ASUS website at www.asus.com for updated drivers and utilities. 3. Select one of the support DVD. 4. System Recovery: This feature allows you to its default settings. System DVD Backup: ...
... backup in DVD discs, which you may be labeled as instructed to create the Recovery DVD. Visit the ASUS website at www.asus.com for updated drivers and utilities. ASUS CM5675 6-17 According to be unusable. Your Desktop PC needs to Microsoft, you can use the Recovery DVD:... recovery process or else your Desktop PC. Select OK to complete the recovery process. Visit the ASUS website at www.asus.com for updated drivers and utilities. 3. Select one of the support DVD. 4. System Recovery: This feature allows you to its default settings. System DVD Backup: ...


