User Manual
Page 10
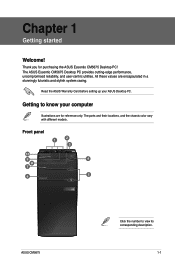
... their locations, and the chassis color vary with different models. All these values are for purchasing the ASUS Essentio CM5675 Desktop PC! Front panel 1 2 3 10 9 4 8 7 6 5 ASUS CM5675 Click the number to know your ASUS Desktop PC. Read the ASUS Warranty Card before setting up your computer Illustrations are encapsulated in a stunningly futuristic and stylish system casing...
... their locations, and the chassis color vary with different models. All these values are for purchasing the ASUS Essentio CM5675 Desktop PC! Front panel 1 2 3 10 9 4 8 7 6 5 ASUS CM5675 Click the number to know your ASUS Desktop PC. Read the ASUS Warranty Card before setting up your computer Illustrations are encapsulated in a stunningly futuristic and stylish system casing...
User Manual
Page 12
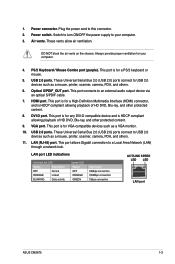
... ORANGE Linked BLINKING Data activity Speed LED Status OFF ORANGE GREEN Description 10Mbps connection 100Mbps connection 1Gbps connection ACT/LINK SPEED LED LED LAN port ASUS CM5675 1-3 Power switch. These vents allow air ventilation. This port connects to your computer. 4. VGA port. 1. Power connector. These Universal Serial Bus 2.0 (USB 2.0) ports connect to...
... ORANGE Linked BLINKING Data activity Speed LED Status OFF ORANGE GREEN Description 10Mbps connection 100Mbps connection 1Gbps connection ACT/LINK SPEED LED LED LAN port ASUS CM5675 1-3 Power switch. These vents allow air ventilation. This port connects to your computer. 4. VGA port. 1. Power connector. These Universal Serial Bus 2.0 (USB 2.0) ports connect to...
User Manual
Page 14
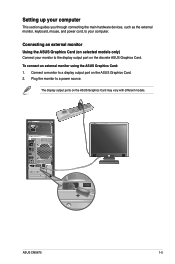
... models. Connecting an external monitor Using the ASUS Graphics Card (on selected models only) Connect your computer. Plug the monitor to a display output port on the ASUS Graphics Card. 2. ASUS CM5675 1-5 The display output ports on the discrete ASUS Graphics Card. To connect an external monitor using the ASUS Graphics Card: 1. Connect a monitor to a power source...
... models. Connecting an external monitor Using the ASUS Graphics Card (on selected models only) Connect your computer. Plug the monitor to a display output port on the ASUS Graphics Card. 2. ASUS CM5675 1-5 The display output ports on the discrete ASUS Graphics Card. To connect an external monitor using the ASUS Graphics Card: 1. Connect a monitor to a power source...
User Manual
Page 16
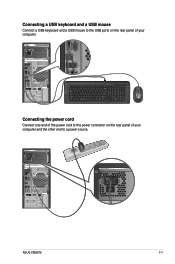
Connecting a USB keyboard and a USB mouse Connect a USB keyboard and a USB mouse to the USB ports on the rear panel of your computer and the other end to the power connector on the rear panel of your computer. C Connecting the power cord Connect one end of the power cord to a power source. ASUS CM5675 1-7
Connecting a USB keyboard and a USB mouse Connect a USB keyboard and a USB mouse to the USB ports on the rear panel of your computer and the other end to the power connector on the rear panel of your computer. C Connecting the power cord Connect one end of the power cord to a power source. ASUS CM5675 1-7
User Manual
Page 18
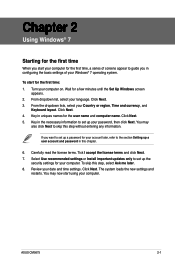
Click Next. 3. Review your language. ASUS CM5675 2-1 Key in this chapter. 6. The system loads the new settings and restarts. From dropdown list, select your date and time settings. From the dropdown lists, ...
Click Next. 3. Review your language. ASUS CM5675 2-1 Key in this chapter. 6. The system loads the new settings and restarts. From dropdown list, select your date and time settings. From the dropdown lists, ...
User Manual
Page 20
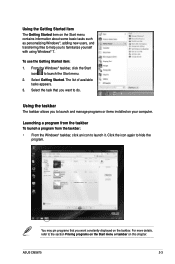
.... Launching a program from the taskbar To launch a program from the taskbar: • From the Windows® taskbar, click an icon to launch the Start menu. 2. ASUS CM5675 2-3
.... Launching a program from the taskbar To launch a program from the taskbar: • From the Windows® taskbar, click an icon to launch the Start menu. 2. ASUS CM5675 2-3
User Manual
Page 22
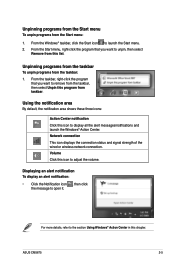
... connection This icon displays the connection status and signal strength of the wired or wireless network connection. Volume Click this icon to adjust the volume. ASUS CM5675 2-5 Unpinning programs from the taskbar To unpin programs from the Start menu: 1. Using the notification area By default, the notification area shows these three icons...
... connection This icon displays the connection status and signal strength of the wired or wireless network connection. Volume Click this icon to adjust the volume. ASUS CM5675 2-5 Unpinning programs from the taskbar To unpin programs from the Start menu: 1. Using the notification area By default, the notification area shows these three icons...
User Manual
Page 24
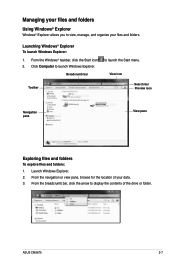
... Using Windows® Explorer Windows® Explorer allows you to view, manage, and organize your data. 3. From the Windows® taskbar, click the Start icon 2. ASUS CM5675 2-7
... Using Windows® Explorer Windows® Explorer allows you to view, manage, and organize your data. 3. From the Windows® taskbar, click the Start icon 2. ASUS CM5675 2-7
User Manual
Page 26
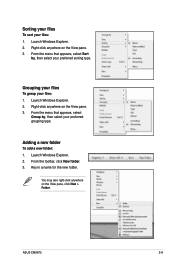
... also right-click anywhere on the View pane. 3. From the menu that appears, select Group by , then select your preferred grouping type. Launch Windows Explorer. 2. ASUS CM5675 2-9 Launch Windows Explorer. 2. Right-click anywhere on the View pane. 3. From the menu that appears, select Sort by , then select your preferred sorting type. From...
... also right-click anywhere on the View pane. 3. From the menu that appears, select Group by , then select your preferred grouping type. Launch Windows Explorer. 2. ASUS CM5675 2-9 Launch Windows Explorer. 2. Right-click anywhere on the View pane. 3. From the menu that appears, select Sort by , then select your preferred sorting type. From...
User Manual
Page 28
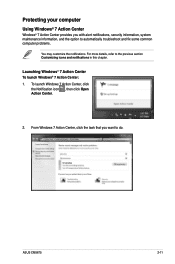
... task that you with alert notifications, security information, system maintenance information, and the option to the previous section Customizing icons and notifications in this chapter. ASUS CM5675 2-11
... task that you with alert notifications, security information, system maintenance information, and the option to the previous section Customizing icons and notifications in this chapter. ASUS CM5675 2-11
User Manual
Page 30
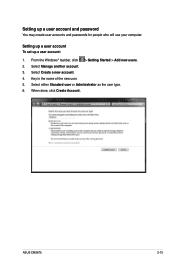
Setting up a user account To set up a user account and password You may create user accounts and passwords for people who will use your computer. Select either Standard user or Administrator as the user type. 6. From the Windows® taskbar, click > Getting Started > Add new users. 2. Key in the name of the new user. 5. Select Create a new account. 4. ASUS CM5675 2-13 Select Manage another account. 3. When done, click Create Account. Setting up a user account: 1.
Setting up a user account To set up a user account and password You may create user accounts and passwords for people who will use your computer. Select either Standard user or Administrator as the user type. 6. From the Windows® taskbar, click > Getting Started > Add new users. 2. Key in the name of the new user. 5. Select Create a new account. 4. ASUS CM5675 2-13 Select Manage another account. 3. When done, click Create Account. Setting up a user account: 1.
User Manual
Page 32
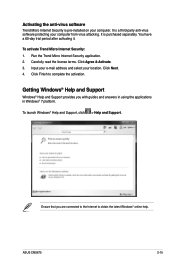
... connected to the Internet to complete the activation. It is a third-party anti-virus software protecting your computer. Run the Trend Micro Internet Security application. 2. ASUS CM5675 2-15 To activate Trend Micro Internet Security: 1. To launch Windows® Help and Support, click > Help and Support. Carefully read the license terms. Click Agree...
... connected to the Internet to complete the activation. It is a third-party anti-virus software protecting your computer. Run the Trend Micro Internet Security application. 2. ASUS CM5675 2-15 To activate Trend Micro Internet Security: 1. To launch Windows® Help and Support, click > Help and Support. Carefully read the license terms. Click Agree...
User Manual
Page 33
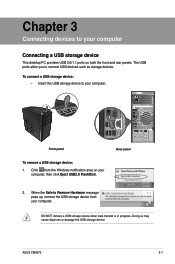
Front panel To remove a USB storage device: 1. DO NOT remove a USB storage device when data transfer is in progress. ASUS CM5675 3-1 Doing so may cause data loss or damage the USB storage device. Click from your computer. To connect a USB storage device: • Insert the USB ...
Front panel To remove a USB storage device: 1. DO NOT remove a USB storage device when data transfer is in progress. ASUS CM5675 3-1 Doing so may cause data loss or damage the USB storage device. Click from your computer. To connect a USB storage device: • Insert the USB ...
User Manual
Page 35
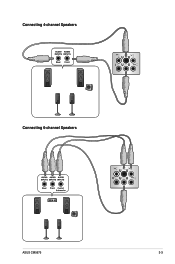
Connecting 4-channel Speakers Connecting 6-channel Speakers ASUS CM5675 3-3
Connecting 4-channel Speakers Connecting 6-channel Speakers ASUS CM5675 3-3
User Manual
Page 37
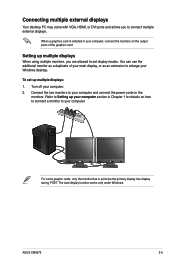
... your computer section in your computer, connect the monitors on how to connect a monitor to your computer and connect the power cords to your computer. ASUS CM5675 3-5 You can use the additional monitor as an extension to connect multiple external displays. When a graphics card is set display modes. To set up multiple...
... your computer section in your computer, connect the monitors on how to connect a monitor to your computer and connect the power cords to your computer. ASUS CM5675 3-5 You can use the additional monitor as an extension to connect multiple external displays. When a graphics card is set display modes. To set up multiple...

User Manual
Page 39
ASUS CM5675 3-7 The HDMI cable is purchased separately. • To get the best display performance, ensure that your computer. • You need an HDMI cable to connect the HDTV and the computer. Connecting an HDTV Connect a High Definition TV (HDTV) to the HDMI port of your HDMI cable is less than 15 meters.
ASUS CM5675 3-7 The HDMI cable is purchased separately. • To get the best display performance, ensure that your computer. • You need an HDMI cable to connect the HDTV and the computer. Connecting an HDTV Connect a High Definition TV (HDTV) to the HDMI port of your HDMI cable is less than 15 meters.
User Manual
Page 40
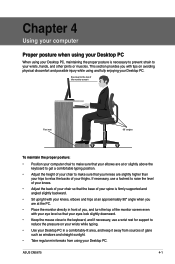
... back of your chair so that the base of your spine is necessary to prevent strain to your wrists, hands, and other joints or muscles. ASUS CM5675 4-1 If necessary, use a wrist rest for support to reduce the pressure on avoiding physical discomfort and possible injury while using and fully enjoying your Desktop...
... back of your chair so that the base of your spine is necessary to prevent strain to your wrists, hands, and other joints or muscles. ASUS CM5675 4-1 If necessary, use a wrist rest for support to reduce the pressure on avoiding physical discomfort and possible injury while using and fully enjoying your Desktop...

User Manual
Page 42
... eject button below the drive bay cover to close it . Place the disc to access the data on the Computer screen, and then click Eject. 2. ASUS CM5675 4-3 Select a program from the disc tray. Remove the disc from the AutoPlay window to access your computer, click Windows® 7 Start button on the taskbar...
... eject button below the drive bay cover to close it . Place the disc to access the data on the Computer screen, and then click Eject. 2. ASUS CM5675 4-3 Select a program from the disc tray. Remove the disc from the AutoPlay window to access your computer, click Windows® 7 Start button on the taskbar...
User Manual
Page 44
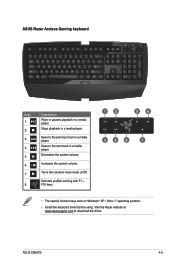
Increases the system volume. ASUS CM5675 4-5 Goes to the next track in a media player. Turns the volume's mute mode on Windows® XP / Vista / 7 operating systems. • Install the keyboard driver ... download the driver. Decreases the system volume. Switches profiles working with F1 ~ F10 keys. 12 56 34 8 7 • The special function keys work on /off. ASUS-Razer Arctosa Gaming keyboard Keys 1. 2. 3. 4. 5. 6. 7. 8.
Increases the system volume. ASUS CM5675 4-5 Goes to the next track in a media player. Turns the volume's mute mode on Windows® XP / Vista / 7 operating systems. • Install the keyboard driver ... download the driver. Decreases the system volume. Switches profiles working with F1 ~ F10 keys. 12 56 34 8 7 • The special function keys work on /off. ASUS-Razer Arctosa Gaming keyboard Keys 1. 2. 3. 4. 5. 6. 7. 8.
User Manual
Page 46
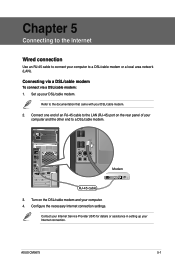
ASUS CM5675 5-1 Refer to the documentation that came with your computer to a DSL/cable modem or a local area network (LAN). Chapter 5 Connecting to the Internet Wired connection ...
ASUS CM5675 5-1 Refer to the documentation that came with your computer to a DSL/cable modem or a local area network (LAN). Chapter 5 Connecting to the Internet Wired connection ...


