
User Manual
Page 11
... 12 14 ASUS CG8270 11 The ASUS Essentio CG8270 Desktop PC provides cutting-edge performance, uncompromised reliability, and user-centric utilities. Chapter 1 Getting started Welcome! The ports and their locations, and the chassis color vary with different models. Thank you for reference only. Read the ASUS Warranty Card ...before setting up your computer Illustrations are encapsulated in a stunningly futuristic and stylish system casing. All these values are for purchasing the ASUS Essentio CG8270 Desktop PC! Getting to know...
... 12 14 ASUS CG8270 11 The ASUS Essentio CG8270 Desktop PC provides cutting-edge performance, uncompromised reliability, and user-centric utilities. Chapter 1 Getting started Welcome! The ports and their locations, and the chassis color vary with different models. Thank you for reference only. Read the ASUS Warranty Card ...before setting up your computer Illustrations are encapsulated in a stunningly futuristic and stylish system casing. All these values are for purchasing the ASUS Essentio CG8270 Desktop PC! Getting to know...

User Manual
Page 13
...: 110~120 / 220~240Vac, 6/3A, 50~60Hz. 2. ���P�o�w��e�r�s�w��it�c�h�. HDMI port. ASUS CG8270 13 This port is for any DVI-D compatible device and is HDCP compliant allowing playback of HD DVD, Blu-ray, and other protected content. 7. Switch...
...: 110~120 / 220~240Vac, 6/3A, 50~60Hz. 2. ���P�o�w��e�r�s�w��it�c�h�. HDMI port. ASUS CG8270 13 This port is for any DVI-D compatible device and is HDCP compliant allowing playback of HD DVD, Blu-ray, and other protected content. 7. Switch...
User Manual
Page 15
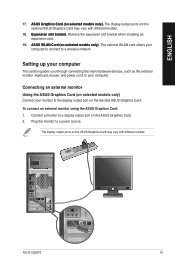
...as the external monitor, keyboard, mouse, and power cord, to your monitor to a display output port on this optional ASUS Graphics Card may vary with different models. 18. ��E��x�p�a�n�s�i�o�n��...;e�d��m��o�d�e�l�s�o��n�ly�)�. ASUS CG8270 15 The display output ports on the discrete ASUS Graphics Card. Remove the expansion slot bracket when installing an expansion card. 19. ��...
...as the external monitor, keyboard, mouse, and power cord, to your monitor to a display output port on this optional ASUS Graphics Card may vary with different models. 18. ��E��x�p�a�n�s�i�o�n��...;e�d��m��o�d�e�l�s�o��n�ly�)�. ASUS CG8270 15 The display output ports on the discrete ASUS Graphics Card. Remove the expansion slot bracket when installing an expansion card. 19. ��...
User Manual
Page 17
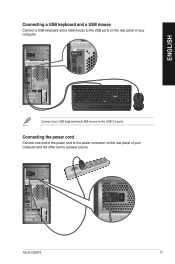
ENGLISH Connecting a USB keyboard and a USB mouse Connect a USB keyboard and a USB mouse to a power source. Connecting the power cord Connect one end of the power cord to the power connector on the rear panel of your computer and the other end to the USB ports on the rear panel of your USB keyboard and USB mouse to the USB 2.0 ports. ASUS CG8270 17 Connect your computer.
ENGLISH Connecting a USB keyboard and a USB mouse Connect a USB keyboard and a USB mouse to a power source. Connecting the power cord Connect one end of the power cord to the power connector on the rear panel of your computer and the other end to the USB ports on the rear panel of your USB keyboard and USB mouse to the USB 2.0 ports. ASUS CG8270 17 Connect your computer.
User Manual
Page 19
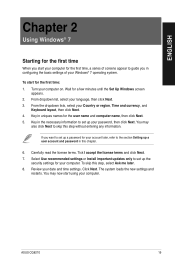
... of screens appear to guide you want to skip this step without entering any information. From the dropdown lists, select your language, then click Next. 3. ASUS CG8270 19 From dropdown list, select your Country or region, Time and currency, and Keyboard layout, then click Next. 4. You may now start using your date...
... of screens appear to guide you want to skip this step without entering any information. From the dropdown lists, select your language, then click Next. 3. ASUS CG8270 19 From dropdown list, select your Country or region, Time and currency, and Keyboard layout, then click Next. 4. You may now start using your date...
User Manual
Page 21
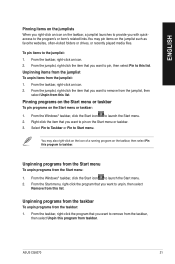
... on the icon of a running program on the taskbar, then select Pin this list. Unpinning items from the jumplist To unpin items from the jumplist: 1. ASUS CG8270 21 From the jumplist, right-click the item that you want to remove from the taskbar, then select Unpin this program from taskbar. ENGLISH Pinning...
... on the icon of a running program on the taskbar, then select Pin this list. Unpinning items from the jumplist To unpin items from the jumplist: 1. ASUS CG8270 21 From the jumplist, right-click the item that you want to remove from the taskbar, then select Unpin this program from taskbar. ENGLISH Pinning...

User Manual
Page 23
... toolbar, click the View icon . 4. Launch Windows Explorer. 2. Grouping your files To group your data. 3. From the navigation pane, select the location of your files: 1. ASUS CG8270 23 From the navigation or view pane, browse for the location of the drive or folder. You may also right-click anywhere on the View...
... toolbar, click the View icon . 4. Launch Windows Explorer. 2. Grouping your files To group your data. 3. From the navigation pane, select the location of your files: 1. ASUS CG8270 23 From the navigation or view pane, browse for the location of the drive or folder. You may also right-click anywhere on the View...
User Manual
Page 25
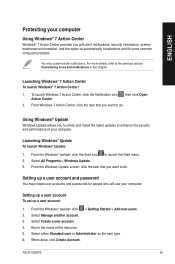
... launch Windows® Update: 1. From the Windows Update screen, click the task that you want to enhance the security and performance of the new user. 5. ASUS CG8270 25 To launch Windows 7 Action Center, click the Notification icon , then click Open Action Center. 2. From Windows 7 Action Center, click the task that you want...
... launch Windows® Update: 1. From the Windows Update screen, click the task that you want to enhance the security and performance of the new user. 5. ASUS CG8270 25 To launch Windows 7 Action Center, click the Notification icon , then click Open Action Center. 2. From Windows 7 Action Center, click the task that you want...
User Manual
Page 27
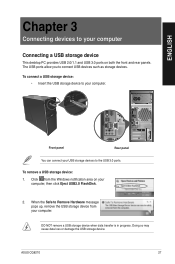
... front and rear panels. DO NOT remove a USB storage device when data transfer is in progress. To remove a USB storage device: 1. Click from your computer. ASUS CG8270 27 ENGLISH Chapter 3 Connecting devices to your computer Connecting a USB storage device This desktop PC provides USB 2.0/1.1 and USB 3.0 ports on your computer, then click...
... front and rear panels. DO NOT remove a USB storage device when data transfer is in progress. To remove a USB storage device: 1. Click from your computer. ASUS CG8270 27 ENGLISH Chapter 3 Connecting devices to your computer Connecting a USB storage device This desktop PC provides USB 2.0/1.1 and USB 3.0 ports on your computer, then click...
User Manual
Page 29
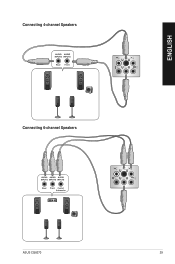
ENGLISH Connecting 4-channel Speakers Connecting 6-channel Speakers ASUS CG8270 29
ENGLISH Connecting 4-channel Speakers Connecting 6-channel Speakers ASUS CG8270 29
User Manual
Page 31
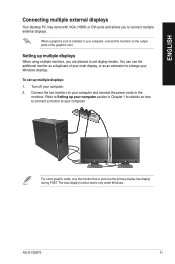
... the additional monitor as a duplicate of the graphics card. Refer to Setting up multiple displays When using multiple monitors, you to connect multiple external displays. ASUS CG8270 31 For some graphic cards, only the monitor that is installed in Chapter 1 for details on the output ports of your computer. The dual display...
... the additional monitor as a duplicate of the graphics card. Refer to Setting up multiple displays When using multiple monitors, you to connect multiple external displays. ASUS CG8270 31 For some graphic cards, only the monitor that is installed in Chapter 1 for details on the output ports of your computer. The dual display...
User Manual
Page 33
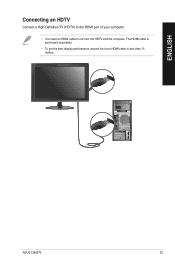
ENGLISH Connecting an HDTV Connect a High Definition TV (HDTV) to the HDMI port of your HDMI cable is purchased separately. • To get the best display performance, ensure that your computer. • You need an HDMI cable to connect the HDTV and the computer. The HDMI cable is less than 15 meters. ASUS CG8270 33
ENGLISH Connecting an HDTV Connect a High Definition TV (HDTV) to the HDMI port of your HDMI cable is purchased separately. • To get the best display performance, ensure that your computer. • You need an HDMI cable to connect the HDTV and the computer. The HDMI cable is less than 15 meters. ASUS CG8270 33
User Manual
Page 35
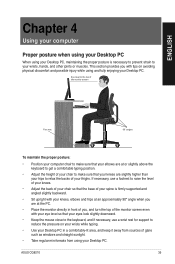
... that your knees are at an approximately 90º angle when you are slightly higher than your hips to relax the backs of your thighs. ASUS CG8270 35 This section provides you , and turn the top of the monitor screen even with tips on your wrists while typing. • Use your Desktop...
... that your knees are at an approximately 90º angle when you are slightly higher than your hips to relax the backs of your thighs. ASUS CG8270 35 This section provides you , and turn the top of the monitor screen even with tips on your wrists while typing. • Use your Desktop...
User Manual
Page 37
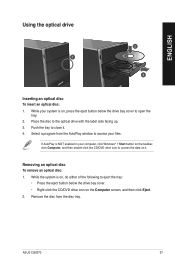
... to access your computer, click Windows® 7 Start button on , do either of the following to the optical drive with the label side facing up. 3. ASUS CG8270 37 While the system is on, press the eject button below the drive bay cover. • Right-click the CD/DVD drive icon on it . 4.
... to access your computer, click Windows® 7 Start button on , do either of the following to the optical drive with the label side facing up. 3. ASUS CG8270 37 While the system is on, press the eject button below the drive bay cover. • Right-click the CD/DVD drive icon on it . 4.
User Manual
Page 39
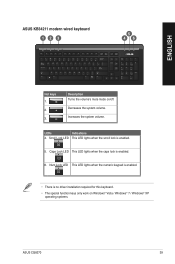
Description Turns the volume's mute mode on Windows® Vista / Windows® 7 / Windows® XP operating systems. ASUS CG8270 39 Num Lock LED This LED lights when the numeric keypad is enabled. • There is enabled. 6. Caps Lock LED This LED lights when ...the caps lock is no driver installation required for this keyboard. • The special function keys only work on /off. ASUS KB34211 modern wired keyboard 12 3 5 46 ENGLISH Hot keys 1. 2. 3. Increases the system volume. Decreases the system volume. Scroll Lock LED This LED lights when...
Description Turns the volume's mute mode on Windows® Vista / Windows® 7 / Windows® XP operating systems. ASUS CG8270 39 Num Lock LED This LED lights when the numeric keypad is enabled. • There is enabled. 6. Caps Lock LED This LED lights when ...the caps lock is no driver installation required for this keyboard. • The special function keys only work on /off. ASUS KB34211 modern wired keyboard 12 3 5 46 ENGLISH Hot keys 1. 2. 3. Increases the system volume. Decreases the system volume. Scroll Lock LED This LED lights when...
User Manual
Page 41
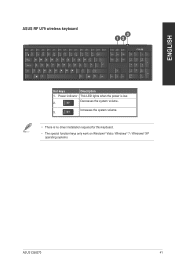
Description This LED lights when the power is no driver installation required for this keyboard. • The special function keys only work on Windows® Vista / Windows® 7 / Windows® XP operating systems. ASUS CG8270 41 Power indicator 2. Decreases the system volume. 3. ENGLISH ASUS RF U79 wireless keyboard 3 12 Hot keys 1. Increases the system volume. • There is low.
Description This LED lights when the power is no driver installation required for this keyboard. • The special function keys only work on Windows® Vista / Windows® 7 / Windows® XP operating systems. ASUS CG8270 41 Power indicator 2. Decreases the system volume. 3. ENGLISH ASUS RF U79 wireless keyboard 3 12 Hot keys 1. Increases the system volume. • There is low.
User Manual
Page 43
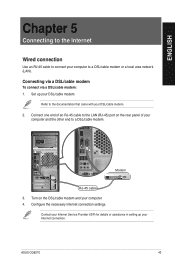
... your Internet Service Provider (ISP) for details or assistance in setting up your computer. 4. Connecting via a DSL/cable modem To connect via a DSL/cable modem: 1. ASUS CG8270 43 Modem RJ-45 cable 3. Configure the necessary Internet connection settings. Refer to the documentation that came with your computer to a DSL/cable modem or...
... your Internet Service Provider (ISP) for details or assistance in setting up your computer. 4. Connecting via a DSL/cable modem To connect via a DSL/cable modem: 1. ASUS CG8270 43 Modem RJ-45 cable 3. Configure the necessary Internet connection settings. Refer to the documentation that came with your computer to a DSL/cable modem or...

User Manual
Page 45
...Click the network icon networks. The connection status is established successfully. The wireless connection is displayed and the network icon displays the connected status. ASUS CG8270 45 To establish a wireless connection, you want to connect to the wireless network. 5. Wireless AP Modem • To increase the range... and sensitivity of the wireless radio signal, connect the external antennas to the antenna connectors on the ASUS WLAN Card. • Place the antennas on selected models only) Connect your computer is connecting to , then click Connect. 3.
...Click the network icon networks. The connection status is established successfully. The wireless connection is displayed and the network icon displays the connected status. ASUS CG8270 45 To establish a wireless connection, you want to connect to the wireless network. 5. Wireless AP Modem • To increase the range... and sensitivity of the wireless radio signal, connect the external antennas to the antenna connectors on the ASUS WLAN Card. • Place the antennas on selected models only) Connect your computer is connecting to , then click Connect. 3.
User Manual
Page 47
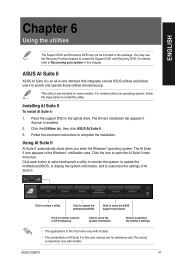
...Installing AI Suite II To install AI Suite II: 1. Click the Utilities tab, then click ASUS AI Suite II. 3. Click each button to select and launch a utility, to monitor the ... Click to select a utility Click to update the motherboard BIOS Click to show the ASUS support information Click to monitor sensors or CPU frequency Click to show the system information Click... to customize the interface settings • The applications in -one interface that integrates several ASUS utilities and allows users to launch and operate these utilities simultaneously. ENGLISH Chapter 6 Using ...
...Installing AI Suite II To install AI Suite II: 1. Click the Utilities tab, then click ASUS AI Suite II. 3. Click each button to select and launch a utility, to monitor the ... Click to select a utility Click to update the motherboard BIOS Click to show the ASUS support information Click to monitor sensors or CPU frequency Click to show the system information Click... to customize the interface settings • The applications in -one interface that integrates several ASUS utilities and allows users to launch and operate these utilities simultaneously. ENGLISH Chapter 6 Using ...
User Manual
Page 49
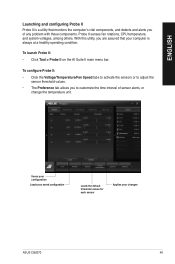
... threshold values. • The Preference tab allows you of sensor alerts, or change the temperature unit. With this utility, you are assured that your changes ASUS CG8270 49 Probe II senses fan rotations, CPU temperature, and system voltages, among others. To configure Probe II: • Click the Voltage/Temperature/Fan Speed tabs...
... threshold values. • The Preference tab allows you of sensor alerts, or change the temperature unit. With this utility, you are assured that your changes ASUS CG8270 49 Probe II senses fan rotations, CPU temperature, and system voltages, among others. To configure Probe II: • Click the Voltage/Temperature/Fan Speed tabs...


