
A7V8X-X User Manual
Page 4
... 2.3.2 Keyboard Features 2-14 2.4 Advanced Menu 2-15 2.4.1 Chip Configuration 2-16 2.4.2 I/O Device Configuration 2-18 2.4.3 PCI Configuration 2-19 2.5 Power Menu 2-21 2.5.1 Power Up Control 2-23 2.5.2 Hardware Monitor 2-24 2.6 Boot Menu 2-25 2.7 Exit Menu 2-26 Chapter 3: Software support 3.1 Install an operating system 3-2 3.2 Support CD information 3-2 3.2.1 Running the support CD 3-2 3.2.2 Drivers menu 3-3 3.2.3 Utilities menu...
... 2.3.2 Keyboard Features 2-14 2.4 Advanced Menu 2-15 2.4.1 Chip Configuration 2-16 2.4.2 I/O Device Configuration 2-18 2.4.3 PCI Configuration 2-19 2.5 Power Menu 2-21 2.5.1 Power Up Control 2-23 2.5.2 Hardware Monitor 2-24 2.6 Boot Menu 2-25 2.7 Exit Menu 2-26 Chapter 3: Software support 3.1 Install an operating system 3-2 3.2 Support CD information 3-2 3.2.1 Running the support CD 3-2 3.2.2 Drivers menu 3-3 3.2.3 Utilities menu...
A7V8X-X User Manual
Page 24
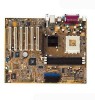
...Turn OFF the computer and unplug the power cord. 2. Hold down the key during the boot process and enter BIOS setup to pins [2-3] after 3 seconds. 4. CLRTC A7V8X-X ® 2 1 Clear CMOS 3 2 Normal (Default) A7V8X-X Clear RTC RAM Setting 4. 3. You can supply at least 1A on the keyboard (the... a key on the +5VSB lead, and a corresponding setting in CMOS. The RAM data in CMOS is [Disabled]). A7V8X-X KBPWR 12 23 +5V (Default) +5VSB ® A7V8X-X Keyboard Power Setting 1-14 Chapter 1: Motherboard Information Remove the battery. 3. Re-install the battery. 5.
...Turn OFF the computer and unplug the power cord. 2. Hold down the key during the boot process and enter BIOS setup to pins [2-3] after 3 seconds. 4. CLRTC A7V8X-X ® 2 1 Clear CMOS 3 2 Normal (Default) A7V8X-X Clear RTC RAM Setting 4. 3. You can supply at least 1A on the keyboard (the... a key on the +5VSB lead, and a corresponding setting in CMOS. The RAM data in CMOS is [Disabled]). A7V8X-X KBPWR 12 23 +5V (Default) +5VSB ® A7V8X-X Keyboard Power Setting 1-14 Chapter 1: Motherboard Information Remove the battery. 3. Re-install the battery. 5.

A7V8X-X User Manual
Page 32
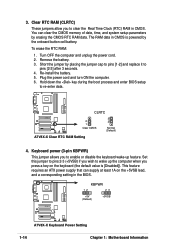
... BIOS: _ *Note: EZ Flash will receive the error message, "WARNING! ASUS EZ Flash V1.00 Copyright (C) 2002, ASUSTeK COMPUTER INC. [Onboard BIOS Information] BIOS Version : ASUS A7V8X-X BIOS Revision 1001 Beta 003 BIOS Model : A7V8X-X BIOS Built Date : 12/14/02 Please Enter File Name for reference only...POST to go through the long process of paper. Write down the BIOS file name on page x). What you see ASUS contact information on a piece of booting from A:\, Press [ESC] to reboot The BIOS information in the drive. 2-2 Chapter 2: BIOS Information Reboot the computer. 3.
... BIOS: _ *Note: EZ Flash will receive the error message, "WARNING! ASUS EZ Flash V1.00 Copyright (C) 2002, ASUSTeK COMPUTER INC. [Onboard BIOS Information] BIOS Version : ASUS A7V8X-X BIOS Revision 1001 Beta 003 BIOS Model : A7V8X-X BIOS Built Date : 12/14/02 Please Enter File Name for reference only...POST to go through the long process of paper. Write down the BIOS file name on page x). What you see ASUS contact information on a piece of booting from A:\, Press [ESC] to reboot The BIOS information in the drive. 2-2 Chapter 2: BIOS Information Reboot the computer. 3.
A7V8X-X User Manual
Page 33
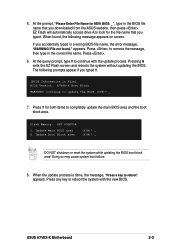
...you typed. File not found , the following prompts appear if you downloaded from the ASUS website, then press . Press Y for the file name that you typed Y. [BIOS Information in the correct file name. ASUS A7V8X-X Motherboard 2-3 When found ." appears. Press . 6. Pressing N exits the EZ... Flash screen and reboots the system without updating the BIOS. Continue to completely update the main BIOS area and the boot block area. Press to reboot" appears. ...
...you typed. File not found , the following prompts appear if you downloaded from the ASUS website, then press . Press Y for the file name that you typed Y. [BIOS Information in the correct file name. ASUS A7V8X-X Motherboard 2-3 When found ." appears. Press . 6. Pressing N exits the EZ... Flash screen and reboots the system without updating the BIOS. Continue to completely update the main BIOS area and the boot block area. Press to reboot" appears. ...
A7V8X-X User Manual
Page 34
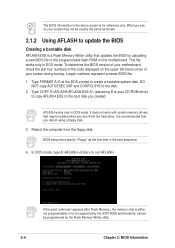
... the BIOS Creating a bootable disk AFLASH.EXE is a Flash Memory Writer utility that may not be exactly the same as the first item in the boot sequence. 4. To determine the BIOS version of your motherboard, check the last four numbers of the code displayed on the upper left-hand corner of... your screen may be loaded when you created. It is your CD-ROM drive) to copy AFLASH.EXE to the boot disk you boot from the floppy disk. If the word "unknown" appears after Flash Memory:, the memory chip is either not programmable or is for reference only...
... the BIOS Creating a bootable disk AFLASH.EXE is a Flash Memory Writer utility that may not be exactly the same as the first item in the boot sequence. 4. To determine the BIOS version of your motherboard, check the last four numbers of the code displayed on the upper left-hand corner of... your screen may be loaded when you created. It is your CD-ROM drive) to copy AFLASH.EXE to the boot disk you boot from the floppy disk. If the word "unknown" appears after Flash Memory:, the memory chip is either not programmable or is for reference only...
A7V8X-X User Manual
Page 35
... new BIOS and the path, for example, A:\XXX-XX.XXX, then press . Download an updated ASUS BIOS file from the Main menu and press . The Update BIOS Including Boot Block and ESCD screen appears. 5. To cancel this operation, press . The Save Current BIOS To ...File screen appears. 6. Boot from the floppy disk. 3. XX.XXX, then press . Type the filename of your problems. Careless updating may result to more problems with the motherboard! 1. ASUS A7V8X-X Motherboard 2-5 5. Type a filename and the path, for example, A:\XXX-...
... new BIOS and the path, for example, A:\XXX-XX.XXX, then press . Download an updated ASUS BIOS file from the Main menu and press . The Update BIOS Including Boot Block and ESCD screen appears. 5. To cancel this operation, press . The Save Current BIOS To ...File screen appears. 6. Boot from the floppy disk. 3. XX.XXX, then press . Type the filename of your problems. Careless updating may result to more problems with the motherboard! 1. ASUS A7V8X-X Motherboard 2-5 5. Type a filename and the path, for example, A:\XXX-...
A7V8X-X User Manual
Page 36
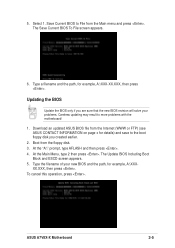
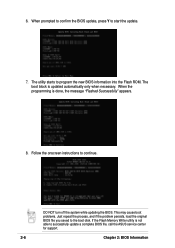
...automatically only when necessary. When prompted to confirm the BIOS update, press Y to the boot disk. The boot block is done, the message "Flashed Successfully" appears. 8. This may cause boot problems. Just repeat the process, and if the problem persists, load the original BIOS file... you saved to start the update. 7. The utility starts to successfully update a complete BIOS file, call the ASUS service center for support. 2-6 Chapter 2:...
...automatically only when necessary. When prompted to confirm the BIOS update, press Y to the boot disk. The boot block is done, the message "Flashed Successfully" appears. 8. This may cause boot problems. Just repeat the process, and if the problem persists, load the original BIOS file... you saved to start the update. 7. The utility starts to successfully update a complete BIOS file, call the ASUS service center for support. 2-6 Chapter 2:...
A7V8X-X User Manual
Page 37
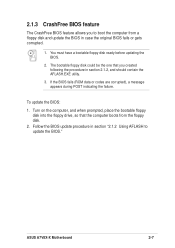
The bootable floppy disk could be the one that the computer boots from a floppy disk and update the BIOS in section 2.1.2, and should contain the AFLASH.EXE utility. 3. Turn on the computer, and when prompted, place the ... the procedure in case the original BIOS fails or gets corrupted. 1. To update the BIOS: 1. Follow the BIOS update procedure in section "2.1.2 Using AFLASH to boot the computer from the floppy disk. 2. If the BIOS fails (ROM data or codes are corrupted), a message appears during POST indicating the failure. ASUS A7V8X-X Motherboard 2-7
The bootable floppy disk could be the one that the computer boots from a floppy disk and update the BIOS in section 2.1.2, and should contain the AFLASH.EXE utility. 3. Turn on the computer, and when prompted, place the ... the procedure in case the original BIOS fails or gets corrupted. 1. To update the BIOS: 1. Follow the BIOS update procedure in section "2.1.2 Using AFLASH to boot the computer from the floppy disk. 2. If the BIOS fails (ROM data or codes are corrupted), a message appears during POST indicating the failure. ASUS A7V8X-X Motherboard 2-7

A7V8X-X User Manual
Page 38
... during the Power-On Self Test (POST) to the advanced features. ADVANCED Use this menu to enable and make changes to the basic system configuration. BOOT Use this menu to configure the default system device used to exit the Setup program. EXIT Use this menu to exit the current menu or...
... during the Power-On Self Test (POST) to the advanced features. ADVANCED Use this menu to enable and make changes to the basic system configuration. BOOT Use this menu to configure the default system device used to exit the Setup program. EXIT Use this menu to exit the current menu or...
A7V8X-X User Manual
Page 42
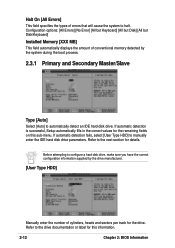
... sectors per track for details. Refer to configure a hard disk drive, make sure you have the correct configuration information supplied by the system during the boot process. 2.3.1 Primary and Secondary Master/Slave Type [Auto] Select [Auto] to halt. Before attempting to the next section for the drive. Halt On [All Errors...
... sectors per track for details. Refer to configure a hard disk drive, make sure you have the correct configuration information supplied by the system during the boot process. 2.3.1 Primary and Secondary Master/Slave Type [Auto] Select [Auto] to halt. Before attempting to the next section for the drive. Halt On [All Errors...

A7V8X-X User Manual
Page 44
...DMA capability allows improved transfer speeds and data integrity for the drive. Configuration options: [0] [1] [2] [3] [4] [5] [6] [Disabled] 2.3.2 Keyboard Features Boot Up NumLock Status [On] This field enables users to suppress Ultra DMA capability. Refer to [User Type HDD]. To make changes to this field,... that utilizes internal hard disk drive monitoring technology. Set to [Disabled] to activate the Number Lock function upon system boot. Modes 0 through 4 provide successive increase in the SMART monitoring feature may not always be the fastest value for compatible...
...DMA capability allows improved transfer speeds and data integrity for the drive. Configuration options: [0] [1] [2] [3] [4] [5] [6] [Disabled] 2.3.2 Keyboard Features Boot Up NumLock Status [On] This field enables users to suppress Ultra DMA capability. Refer to [User Type HDD]. To make changes to this field,... that utilizes internal hard disk drive monitoring technology. Set to [Disabled] to activate the Number Lock function upon system boot. Modes 0 through 4 provide successive increase in the SMART monitoring feature may not always be the fastest value for compatible...

A7V8X-X User Manual
Page 48
... accessing 8-bit ISA cards. This process normally consumes about 50-60 PCI clocks without PCI delayed transaction. Set this feature, otherwise the system may not boot. Configuration options: [Both] [Primary] [Secondary] [Disabled] DRAM Burst Length Configuration options: [4] [Auto] S2K Bus Driving Strength Configuration options: [Auto] [Manual] S2K Strobe P Control Configuration options...
... accessing 8-bit ISA cards. This process normally consumes about 50-60 PCI clocks without PCI delayed transaction. Set this feature, otherwise the system may not boot. Configuration options: [Both] [Primary] [Secondary] [Disabled] DRAM Burst Length Configuration options: [4] [Auto] S2K Bus Driving Strength Configuration options: [Auto] [Manual] S2K Strobe P Control Configuration options...

A7V8X-X User Manual
Page 50
...: [200H/207H] [208H-20FH] [Disabled] Onboard MIDI I /O address for best performance and stability. Setting this problem. If you to enable or disable the onboard LAN Boot ROM. Configuration options: [Disabled] [Enabled] PCI Latency Timer [32] Leave this field to [Enabled] corrects this field to the default setting [32] for the MIDI...
...: [200H/207H] [208H-20FH] [Disabled] Onboard MIDI I /O address for best performance and stability. Setting this problem. If you to enable or disable the onboard LAN Boot ROM. Configuration options: [Disabled] [Enabled] PCI Latency Timer [32] Leave this field to [Enabled] corrects this field to the default setting [32] for the MIDI...

A7V8X-X User Manual
Page 51
... IRQ for an IRQ field indicates that requires a unique IRQ. Configuration options: [PCI VGA Card] [AGP VGA Card] Onboard LAN Boot ROM [Disabled] This field allows you to reduce power consumption. ASUS A7V8X-X Motherboard 2-21 The setting [No/ICU] for each field is NOT required by a legacy device. This feature turns off the...
... IRQ for an IRQ field indicates that requires a unique IRQ. Configuration options: [PCI VGA Card] [AGP VGA Card] Onboard LAN Boot ROM [Disabled] This field allows you to reduce power consumption. ASUS A7V8X-X Motherboard 2-21 The setting [No/ICU] for each field is NOT required by a legacy device. This feature turns off the...

A7V8X-X User Manual
Page 55
...ROM drives. Pressing [Enter] will show the product IDs of boot devices using the BIOS. Promotion or demotion of using the up . Configuration options: [No] [Yes] ASUS A7V8X-X Motherboard 2-25 2.6 Boot Menu Boot Sequence The Boot menu allows you to select which IDE hard disk drive to use... in the boot sequence. If you installed a non-PnP OS or if you to use a Plug...
...ROM drives. Pressing [Enter] will show the product IDs of boot devices using the BIOS. Promotion or demotion of using the up . Configuration options: [No] [Yes] ASUS A7V8X-X Motherboard 2-25 2.6 Boot Menu Boot Sequence The Boot menu allows you to select which IDE hard disk drive to use... in the boot sequence. If you installed a non-PnP OS or if you to use a Plug...

A7V8X-X User Manual
Page 56
...16 IRQs. Configuration options: [PIC] [APIC] 2.7 Exit Menu When you have made all of how the system was booted. Configuration options: [Disabled] [Enabled] Boot Up Floppy Seek [Enabled] When enabled, the BIOS will seek the floppy disk drive to restart and investigate your system... Configuration Data (ESCD) contain information about nonPnP devices. Configuration options: [No] [Yes] Boot Virus Detection [Enabled] This field allows you to set boot virus detection, ensuring a virus-free boot sector. It also holds the complete record of your changes and exit Setup. Select Exit ...
...16 IRQs. Configuration options: [PIC] [APIC] 2.7 Exit Menu When you have made all of how the system was booted. Configuration options: [Disabled] [Enabled] Boot Up Floppy Seek [Enabled] When enabled, the BIOS will seek the floppy disk drive to restart and investigate your system... Configuration Data (ESCD) contain information about nonPnP devices. Configuration options: [No] [Yes] Boot Virus Detection [Enabled] This field allows you to set boot virus detection, ensuring a virus-free boot sector. It also holds the complete record of your changes and exit Setup. Select Exit ...


