Motherboard DIY Troubleshooting Guide
Page 5
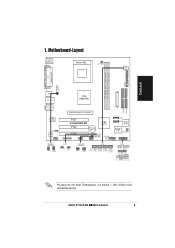
...:Line Out Below:Mic In Accelerated Graphics Port (AGP1) VIA VT6103 SPDIF AD1888 FP_AUDIO PCI1 A7V400-MX SE PCI2 CR2032 3V Lithium Cell CMOS Power VIA VT8237 PCI3 CLRTC USBPWR56 USBPWR78 SB_PWR AUX CD USB56 USB78 2Mbit ISA BIOS SATA2 SATA1 Super I/O CHA_FAN1 GAME PANEL USBPWR12 USBPWR34 2 1 +5V 3 2 +5VSB (Default) CLRTC 12 23 Clear... (Default) +5 V PLED +5V Ground Ground Speaker PANEL PLED SPEAKER HD_LED+ HD_LEDExtSMI# Ground PWRBIN Ground Reset Ground RESET HDLED PWRBTN SMI * Requires an ATX power supply. ASUS A7V400-MX SE-Motherboard 5
...:Line Out Below:Mic In Accelerated Graphics Port (AGP1) VIA VT6103 SPDIF AD1888 FP_AUDIO PCI1 A7V400-MX SE PCI2 CR2032 3V Lithium Cell CMOS Power VIA VT8237 PCI3 CLRTC USBPWR56 USBPWR78 SB_PWR AUX CD USB56 USB78 2Mbit ISA BIOS SATA2 SATA1 Super I/O CHA_FAN1 GAME PANEL USBPWR12 USBPWR34 2 1 +5V 3 2 +5VSB (Default) CLRTC 12 23 Clear... (Default) +5 V PLED +5V Ground Ground Speaker PANEL PLED SPEAKER HD_LED+ HD_LEDExtSMI# Ground PWRBIN Ground Reset Ground RESET HDLED PWRBTN SMI * Requires an ATX power supply. ASUS A7V400-MX SE-Motherboard 5
Motherboard DIY Troubleshooting Guide
Page 8
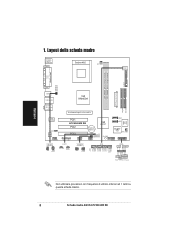
1. Italiano Non utilizzare processori con frequenze di utilizzo inferiori ad 1 GHz su questa scheda madre. 8 Scheda madre ASUS A7V400-MX SE Layout della scheda madre PS/2KBMS T: Mouse B: Keyboard COM1 Socket 462 CPU_FAN DSW FLOPPY DDR DIMM1 (64 bit,184-pin ...:Line Out Below:Mic In Accelerated Graphics Port (AGP1) VIA VT6103 SPDIF AD1888 FP_AUDIO PCI1 A7V400-MX SE PCI2 CR2032 3V Lithium Cell CMOS Power VIA VT8237 PCI3 CLRTC USBPWR56 USBPWR78 SB_PWR AUX CD USB56 USB78 2Mbit ISA BIOS SATA2 SATA1 Super I/O CHA_FAN1 GAME PANEL USBPWR12 USBPWR34 2 1 +5V 3 2 +5VSB...
1. Italiano Non utilizzare processori con frequenze di utilizzo inferiori ad 1 GHz su questa scheda madre. 8 Scheda madre ASUS A7V400-MX SE Layout della scheda madre PS/2KBMS T: Mouse B: Keyboard COM1 Socket 462 CPU_FAN DSW FLOPPY DDR DIMM1 (64 bit,184-pin ...:Line Out Below:Mic In Accelerated Graphics Port (AGP1) VIA VT6103 SPDIF AD1888 FP_AUDIO PCI1 A7V400-MX SE PCI2 CR2032 3V Lithium Cell CMOS Power VIA VT8237 PCI3 CLRTC USBPWR56 USBPWR78 SB_PWR AUX CD USB56 USB78 2Mbit ISA BIOS SATA2 SATA1 Super I/O CHA_FAN1 GAME PANEL USBPWR12 USBPWR34 2 1 +5V 3 2 +5VSB...
A7V400-MX SE user's manual for English version
Page 9
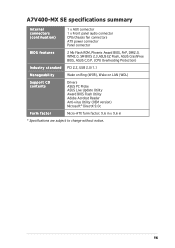
A7V400-MX SE specifications summary Internal connectors (continuation) 1 x AUX connector 1 x Front panel audio connector CPU/chassis fan connectors ATX power connector Panel connector BIOS features 2 Mb Flash ROM, Phoenix Award BIOS, PnP, DMI2.0, WfM2.0, SM BIOS 2.3,ASUS EZ Flash, ASUS CrashFree BIOS, ASUS C.O.P. (CPU Overheating Protection) I n d u s t r y s t a n d a r d PCI 2.2, USB 2.0/1.1 Manageability Wake on Ring (WOR), Wake on LAN (WOL) Support CD contents Drivers...
A7V400-MX SE specifications summary Internal connectors (continuation) 1 x AUX connector 1 x Front panel audio connector CPU/chassis fan connectors ATX power connector Panel connector BIOS features 2 Mb Flash ROM, Phoenix Award BIOS, PnP, DMI2.0, WfM2.0, SM BIOS 2.3,ASUS EZ Flash, ASUS CrashFree BIOS, ASUS C.O.P. (CPU Overheating Protection) I n d u s t r y s t a n d a r d PCI 2.2, USB 2.0/1.1 Manageability Wake on Ring (WOR), Wake on LAN (WOL) Support CD contents Drivers...
A7V400-MX SE user's manual for English version
Page 16
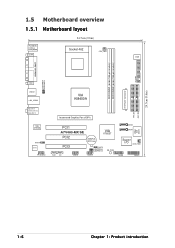
...:Line Out Below:Mic In VIA VT6103 SPDIF AD1888 FP_AUDIO Accelerated Graphics Port (AGP1) PCI1 A7V400-MX SE PCI2 CR2032 3V Lithium Cell CMOS Power VIA VT8237 PCI3 CLRTC USBPWR56 USBPWR78 SB_PWR AUX CD USB56 USB78 2Mbit ISA BIOS SATA2 SATA1 Super I/O CHA_FAN1 GAME PANEL ATX Power Connector PRI_IDE SEC_IDE 24.5cm (9.6in) 1-6 Chapter...
...:Line Out Below:Mic In VIA VT6103 SPDIF AD1888 FP_AUDIO Accelerated Graphics Port (AGP1) PCI1 A7V400-MX SE PCI2 CR2032 3V Lithium Cell CMOS Power VIA VT8237 PCI3 CLRTC USBPWR56 USBPWR78 SB_PWR AUX CD USB56 USB78 2Mbit ISA BIOS SATA2 SATA1 Super I/O CHA_FAN1 GAME PANEL ATX Power Connector PRI_IDE SEC_IDE 24.5cm (9.6in) 1-6 Chapter...

A7V400-MX SE user's manual for English version
Page 28
2. Turn OFF the computer and unplug the power cord. 2. Plug the power cord and turn ON the computer. 6. A7V400-MX SE CLRTC 12 23 Clear CMOS Normal A7V400-MX SE Clear RTC RAM (Default) 1-18 Chapter 1: Product introduction You can clear the CMOS memory of date, time, and system setup parameters by erasing the CMOS ... failure! Clear RTC RAM (CLRTC) This jumper allows you to pins 1-2. Remove the onboard battery. 3. Hold down the key during the boot process and enter BIOS setup to pins 2-3. 4.
2. Turn OFF the computer and unplug the power cord. 2. Plug the power cord and turn ON the computer. 6. A7V400-MX SE CLRTC 12 23 Clear CMOS Normal A7V400-MX SE Clear RTC RAM (Default) 1-18 Chapter 1: Product introduction You can clear the CMOS memory of date, time, and system setup parameters by erasing the CMOS ... failure! Clear RTC RAM (CLRTC) This jumper allows you to pins 1-2. Remove the onboard battery. 3. Hold down the key during the boot process and enter BIOS setup to pins 2-3. 4.
A7V400-MX SE user's manual for English version
Page 36
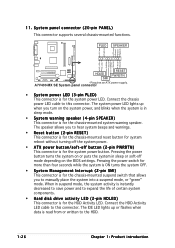
...seconds while the system is ON turns the system OFF. • System Management Interrupt (2-pin SMI) This connector is for the system power LED. A7V400-MX SE System panel connector • System power LED (3-pin PLED) This connector is for system reboot without turning off the system power. • ATX... power button/soft-off mode depending on the BIOS settings. Connect the HDD Activity LED cable to hear system beeps and warnings. • Reset button (2-pin RESET) This connector is for the...
...seconds while the system is ON turns the system OFF. • System Management Interrupt (2-pin SMI) This connector is for the system power LED. A7V400-MX SE System panel connector • System power LED (3-pin PLED) This connector is for system reboot without turning off the system power. • ATX... power button/soft-off mode depending on the BIOS settings. Connect the HDD Activity LED cable to hear system beeps and warnings. • Reset button (2-pin RESET) This connector is for the...
A7V400-MX SE user's manual for English version
Page 39
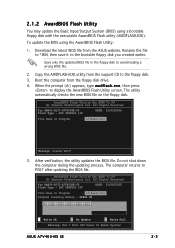
...: 01/06/2005 File Name to avoid loading a wrong BIOS file. 2. Download the latest BIOS file from the floppy disk drive. 4. ASUS A7V400-MX SE 2-3 Save only the updated BIOS file in the floppy disk to Program : a7v4se02.bin Message: Please Wait! 5. After verification, the utility updates the BIOS file. All Rights Reserved For KM400-8237-A7V400SE-00...
...: 01/06/2005 File Name to avoid loading a wrong BIOS file. 2. Download the latest BIOS file from the floppy disk drive. 4. ASUS A7V400-MX SE 2-3 Save only the updated BIOS file in the floppy disk to Program : a7v4se02.bin Message: Please Wait! 5. After verification, the utility updates the BIOS file. All Rights Reserved For KM400-8237-A7V400SE-00...
A7V400-MX SE user's manual for English version
Page 40
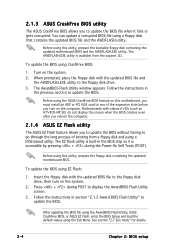
... the floppy disk with onboard VGA (such as A7V400-MX SE) do not display the screen when the BIOS crashes even after you reboot the computer. 2.1.4 ASUS EZ Flash utility The ASUS EZ Flash feature allows you to update the BIOS without having to update the BIOS. Press + during the Power-On Self Tests (POST). The AwardBIOS Flash...
... the floppy disk with onboard VGA (such as A7V400-MX SE) do not display the screen when the BIOS crashes even after you reboot the computer. 2.1.4 ASUS EZ Flash utility The ASUS EZ Flash feature allows you to update the BIOS without having to update the BIOS. Press + during the Power-On Self Tests (POST). The AwardBIOS Flash...
A7V400-MX SE user's manual for English version
Page 41
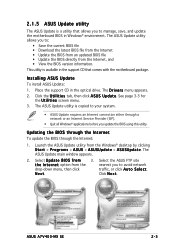
... to your system. • ASUS Update requires an Internet connection either through the Internet: 1. The D r i v e r s menu appears. 2. ASUS A7V400-MX SE 2-5 Select U p d a t e B I n t e r n e t option from the nearest you to: • Save the current BIOS file • Download the latest BIOS file from the Internet • Update the BIOS from an updated BIOS file • Update the BIOS directly from the Windows...
... to your system. • ASUS Update requires an Internet connection either through the Internet: 1. The D r i v e r s menu appears. 2. ASUS A7V400-MX SE 2-5 Select U p d a t e B I n t e r n e t option from the nearest you to: • Save the current BIOS file • Download the latest BIOS file from the Internet • Update the BIOS from an updated BIOS file • Update the BIOS directly from the Windows...
A7V400-MX SE user's manual for English version
Page 43
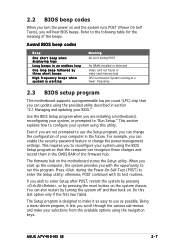
... during POST No DRAM installed or detected Video card not found or video card memory bad CPU overheated; Use the BIOS Setup program when you will hear BIOS beeps. The Setup program is working Meaning No error during the Power-On-Self-Test (POST) to enter the ...Setup utility; You can also restart by three short beeps High frequency beeps when system is designed to make your BIOS." Being a menu-driven program, it as possible. ASUS A7V400-MX SE 2-7 Refer to reconfigure your system using the provided utility described in the future. This requires you with its test...
... during POST No DRAM installed or detected Video card not found or video card memory bad CPU overheated; Use the BIOS Setup program when you will hear BIOS beeps. The Setup program is working Meaning No error during the Power-On-Self-Test (POST) to enter the ...Setup utility; You can also restart by three short beeps High frequency beeps when system is designed to make your BIOS." Being a menu-driven program, it as possible. ASUS A7V400-MX SE 2-7 Refer to reconfigure your system using the provided utility described in the future. This requires you with its test...
A7V400-MX SE user's manual for English version
Page 45
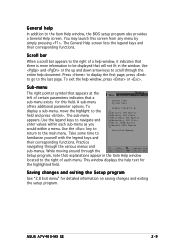
You may launch this field. To display a sub-menu, move the highlight to the Item Help window, the BIOS setup program also provides a General Help screen. Practice navigating through the F1 : Help ↑↓ : Select Ite ESC : Exit →← : Select Men...Legacy Diskette A: Primary IDE Master Primary IDE Slave Secondary IDE Master Secondary IDE Slave First SATA Master Second SATA Master would within each menu. ASUS A7V400-MX SE 2-9 Sub-menu The right pointer symbol that explanations appear in the window. The sub-menu appears. Take some time to the right of ...
You may launch this field. To display a sub-menu, move the highlight to the Item Help window, the BIOS setup program also provides a General Help screen. Practice navigating through the F1 : Help ↑↓ : Select Ite ESC : Exit →← : Select Men...Legacy Diskette A: Primary IDE Master Primary IDE Slave Secondary IDE Master Secondary IDE Slave First SATA Master Second SATA Master would within each menu. ASUS A7V400-MX SE 2-9 Sub-menu The right pointer symbol that explanations appear in the window. The sub-menu appears. Take some time to the right of ...
A7V400-MX SE user's manual for English version
Page 47
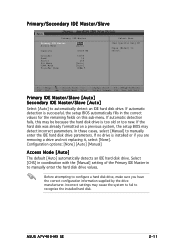
... the [Manual] setting of the Primary IDE Master in the correct values for the remaining fields on a previous system, the setup BIOS may be because the hard disk drive is installed or if you have the correct configuration information supplied by the drive manufacturer. F1 ...Secondary IDE Master/Slave [Auto] Select [Auto] to select. If the hard disk was already formatted on this may detect incorrect parameters. ASUS A7V400-MX SE 2-11 Primary/Secondary IDE Master/Slave Primary IDE Master Primary IDE Master Access Mode [Auto] [Auto] Capacity 40020 MB Cylinder Head Sector...
... the [Manual] setting of the Primary IDE Master in the correct values for the remaining fields on a previous system, the setup BIOS may be because the hard disk drive is installed or if you have the correct configuration information supplied by the drive manufacturer. F1 ...Secondary IDE Master/Slave [Auto] Select [Auto] to select. If the hard disk was already formatted on this may detect incorrect parameters. ASUS A7V400-MX SE 2-11 Primary/Secondary IDE Master/Slave Primary IDE Master Primary IDE Master Access Mode [Auto] [Auto] Capacity 40020 MB Cylinder Head Sector...

A7V400-MX SE user's manual for English version
Page 51
... by the BIOS. CPU Configuration CPU Type CPU Speed Cache RAM Current FSB Frequency AMD Athlon(tm) 750MHz 256K 100MHz Select Menu Item Specific Help F1 : Help ↑↓ : Select Item -/+ : Change Value F5 : Setup Defaults ESC : Exit →← : Select Menu Enter : Select Sub-menu F10 : Save and Exit ASUS A7V400-MX SE 2-15...
... by the BIOS. CPU Configuration CPU Type CPU Speed Cache RAM Current FSB Frequency AMD Athlon(tm) 750MHz 256K 100MHz Select Menu Item Specific Help F1 : Help ↑↓ : Select Item -/+ : Change Value F5 : Setup Defaults ESC : Exit →← : Select Menu Enter : Select Sub-menu F10 : Save and Exit ASUS A7V400-MX SE 2-15...
A7V400-MX SE user's manual for English version
Page 55
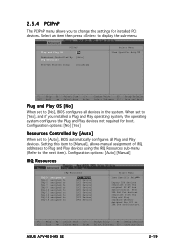
... Item -/+ : Change Value F5 : Setup Defaults ESC : Exit →← : Select Menu Enter : Select Sub-menu F10 : Save and Exit ASUS A7V400-MX SE 2-19 When set to display the sub-menu. Configuration options: [Auto] [Manual] IRQ Resources IRQ Resources IRQ-3 assigned to IRQ-4 assigned to IRQ-5 assigned...for devices compliant with the Plug and Play standard whether designed for installed PCI devices. Select an item then press to [No], BIOS configures all Plug and Play devices. PCIPnP Plug and Play OS [No] Resources Controlled By [Auto] IRQ Resources PCI/VGA Palette...
... Item -/+ : Change Value F5 : Setup Defaults ESC : Exit →← : Select Menu Enter : Select Sub-menu F10 : Save and Exit ASUS A7V400-MX SE 2-19 When set to display the sub-menu. Configuration options: [Auto] [Manual] IRQ Resources IRQ Resources IRQ-3 assigned to IRQ-4 assigned to IRQ-5 assigned...for devices compliant with the Plug and Play standard whether designed for installed PCI devices. Select an item then press to [No], BIOS configures all Plug and Play devices. PCIPnP Plug and Play OS [No] Resources Controlled By [Auto] IRQ Resources PCI/VGA Palette...

A7V400-MX SE user's manual for English version
Page 67
... the password before entering the BIOS setup or the operating system. If you forget your password, you did not set a Supervisor Password, anyone can clear it by the onboard button cell battery. Configuration options: [Setup] [System] ASUS A7V400-MX SE 2-31 Press any key to... indicate that the password has been cleared. 2. Password Check [Setup] Requires users to the configuration fields. If you can access the BIOS Setup. Select [System] to require the password before...
... the password before entering the BIOS setup or the operating system. If you forget your password, you did not set a Supervisor Password, anyone can clear it by the onboard button cell battery. Configuration options: [Setup] [System] ASUS A7V400-MX SE 2-31 Press any key to... indicate that the password has been cleared. 2. Password Check [Setup] Requires users to the configuration fields. If you can access the BIOS Setup. Select [System] to require the password before...


