Asus M2V-MX Support and Manuals
Get Help and Manuals for this Asus item
Popular Asus M2V-MX Manual Pages
Motherboard Installation Guide - Page 12

...1.2 Package contents
Check your motherboard package for the following items.
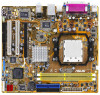
Motherboard
ASUS M2V-MX motherboard
Cables
1 x Serial ATA signal cables 1 x Serial ATA power cable 1 x Ultra DMA 133/100/66 cable 1 x Floppy disk drive cable
Accessories
I/O shield
Application CD
ASUS motherboard support CD
Documentation
User guide
If any of ASUS quality motherboards! Before you for details...
Motherboard Installation Guide - Page 21

....
A clicking sound denotes that the fan and heatsink assembly perfectly fits the retention mechanism module base; Make sure that the retention bracket is in place.
4. ASUS M2V-MX
1-11 Align the other end of the retention bracket to the module base. Push down the retention bracket lock on the retention mechanism to secure...
Motherboard Installation Guide - Page 23
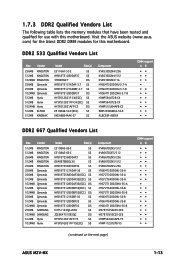
...have been tested and qualified for this motherboard. Visit the ASUS website (www.asus. com) for the latest DDR2 DIMM modules for use with this motherboard.
DDR2 533 Qualified Vendors List
Size Vendor
Model
Side(s)
256MB KINGSTON 512MB KINGSTON 1024MB ...-CE6 M378T2953CZ0-CE6 HYMP564U64AP8-Y5 HYMP112U72P8-Y5
(continued on the next page)
DIMM support A B
ASUS M2V-MX
1-13
Motherboard Installation Guide - Page 25

...
Model
Side...support A B
Side(s): SS - Single Sided
DS - supports one pair of modules inserted into either slots as one module inserted in any slot as Single-channel memory configuration
B -
Double Sided
DIMM Support:
A - supports one pair of Dualchannel memory configuration
Visit the ASUS website (www.asus.com) for the latest memory Qualified Vendor List (QVL). ASUS M2V-MX...
Motherboard Installation Guide - Page 27

...BIOS setup.
2. Align the card connector with the screw you removed earlier. 6. 1.8 Expansion slots
In the future, you may cause you physical injury and damage motherboard components.
1.8.1 Installing an expansion card
To install an expansion card:
1. ASUS M2V-MX
1-17
Remove the system unit cover (if your motherboard is completely seated on the system and change the necessary BIOS settings...
Motherboard Installation Guide - Page 31

... jumper is for each USB port; ASUS M2V-MX
1-21 Keyboard power (3-pin KBPWR)
This...M2V-MX
USBPW5-8
12
23
M2V-MX USB Device Wake Up
+5V
+5VSB
(Default)
• The USB device wake-up (3-pin USBPW1-4, USBPW5-8) Set...M2V-MX
M2V-MX Keyboard Power Setting
3.
USB device wake-up feature requires a power supply that can provide 500 mA on the +5VSB lead, and a corresponding setting...
Motherboard Installation Guide - Page 45

... EZ Flash 2 BIOS ROM Utility V3.00
FLASH TYPE: PMC 49FL004T LPC
Current ROM
BOARD: M2V-MX VER: 0113 DATE: 09/15/06
Update ROM BOARD: Unknown VER: Unknown DATE: Unknown
PATH: A:\
A:
Note [Enter] Select or Load [Tab] Switch
ASUS M2V-MX
[B] Backup [ESC] Exit [Up/Down/Home/End] Move
2- c. Press , then follow screen instructions to the floppy...
Motherboard Installation Guide - Page 47

... Check ...... Reboot the system from the motherboard support CD to file......
Write the BIOS filename on the bootable floppy disk. The utility verifies the file and starts updating the BIOS.
WARNING!! Erasing flash ...... ASUS M2V-MX
2- Reading flash ..... Visit the ASUS website (www.asus.com) and download the latest BIOS file for the motherboard. Copy the AFUDOS utility (afudos.exe...
Motherboard Installation Guide - Page 49
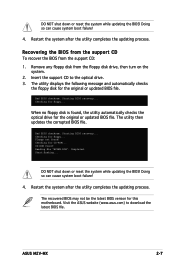
... from the support CD:
1. Reading file "M2VMX.ROM". Visit the ASUS website (www.asus.com) to the optical drive. 3. DO NOT shut down or reset the system while updating the BIOS! Starting BIOS recovery...
When no floppy disk is found, the utility automatically checks the optical drive for this motherboard.
Insert the support CD to download the latest BIOS file. Restart...
Motherboard Installation Guide - Page 51

... by clicking Start > Programs > ASUS > ASUSUpdate > ASUSUpdate. ASUS M2V-MX
2- Select the ASUS FTP site nearest you to avoid network traffic, or click Auto Select. The ASUS Update main window appears.
2.
Click Next. Launch the ASUS Update utility from the drop‑down menu, then click Next.
3. Updating the BIOS through the Internet To update the BIOS through the Internet:
1.
Motherboard Installation Guide - Page 53

... back on the motherboard stores the Setup utility. We recommend to enter the Setup utility;
ASUS M2V-MX
2-11
See section "2.8 Exit Menu."
• The BIOS setup screens shown in the CMOS RAM of the LPC chip. When you start up the computer, the system provides you with its test routines. Select the Load Default Settings item under the...
Motherboard Installation Guide - Page 55
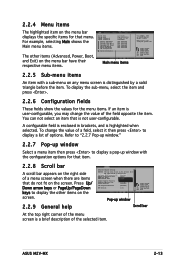
...items on the menu bar displays the specific items for that item.
2.2.8 Scroll ... ASUS M2V-MX
2-13 Select Screen Select Item +- Refer to "2.2.7 Pop-up window."
2.2.7 Pop-up window
Select a menu item then press to display a pop-up window ...highlighted item on the screen.
2.2.9 General help
Advanced Chipset settings
WARNING: Setting wrong values in the sections below may change the value of...
Motherboard Installation Guide - Page 83

... a confirmation window appears.
ASUS M2V-MX
2-41 An onboard backup battery sustains the CMOS RAM and stays on even when the PC is turned off. If you attempt to exit the Setup program without ...Save Changes Once you made to the Setup program. Select Yes to fields other than System Date, System Time, and Password, the BIOS asks for the BIOS items, and save or discard your selections...
Motherboard Installation Guide - Page 87

... driver. ASUS M2V-MX
3- ASUS InstAll-Drivers Installation Wizard Installs the ASUS InstAll-Drivers Installation Wizard. VIA Chipset Driver Program Installs the VIA chipset driver program.
3.2.2 Drivers menu
The drivers menu shows the available device drivers if the system detects installed devices.
Realtek Audio Driver Installs the Realtek® audio driver. USB 2.0 Driver Installs...
Motherboard Installation Guide - Page 89

... removes computer viruses.
VIA VT8237A RAID Controller Driver Allows you to create a JMicron® JMB36X 32bit RAID driver.
Microsoft® Windows® XP Service Pack 2 already includes Microsoft® DirectX® 9.0c. The screen display and utilities option may not be the same for detailed information. ASUS M2V-MX
3-
Microsoft DirectX 9.0c The Microsoft® DirectX...
Asus M2V-MX Reviews
We have not received any reviews for Asus yet.