Service Guide
Page 1
Service Source iBook G4 (14.1 LCD) October 22, 2003 © 2003 Apple Computer, Inc. All rights reserved.
Service Source iBook G4 (14.1 LCD) October 22, 2003 © 2003 Apple Computer, Inc. All rights reserved.

Service Guide
Page 3
General Information Overview To easily distinguish this computer from previous iBook models, note these characteristics: • "iBook G4" identifier on display bezel • Slot-load optical drive • Mac OS X version 10.3 operating system General Information iBook G4 (14.1 LCD) Take Apart - 2
General Information Overview To easily distinguish this computer from previous iBook models, note these characteristics: • "iBook G4" identifier on display bezel • Slot-load optical drive • Mac OS X version 10.3 operating system General Information iBook G4 (14.1 LCD) Take Apart - 2
Service Guide
Page 4
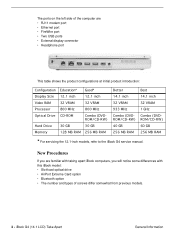
...; Slot-load optical drive • AirPort Extreme Card option • Bluetooth option • The number and types of the computer are familiar with taking apart iBook computers, you are • RJ11 modem port • Ethernet port • FireWire port • Two USB ports • External display connector • ...Combo (DVDROM/CD-RW) 40 GB 256 MB RAM Best 14.1 inch 32 VRAM 1 GHz Combo (DVDROM/CD-RW) 60 GB 256 MB RAM * For servicing the 12.1-inch models, refer to the iBook G4 service manual. iBook G4 (14.1 LCD) Take Apart General Information The ports on the left side of screws ...
...; Slot-load optical drive • AirPort Extreme Card option • Bluetooth option • The number and types of the computer are familiar with taking apart iBook computers, you are • RJ11 modem port • Ethernet port • FireWire port • Two USB ports • External display connector • ...Combo (DVDROM/CD-RW) 40 GB 256 MB RAM Best 14.1 inch 32 VRAM 1 GHz Combo (DVDROM/CD-RW) 60 GB 256 MB RAM * For servicing the 12.1-inch models, refer to the iBook G4 service manual. iBook G4 (14.1 LCD) Take Apart General Information The ports on the left side of screws ...
Service Guide
Page 5
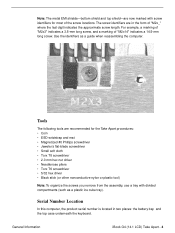
Use the identifiers as a plastic ice cube tray). General Information iBook G4 (14.1 LCD) Take Apart - 4 Note: The metal EMI shields-bottom shield and top shield-are now marked with divided compartments (such as a guide when reassembling ...
Use the identifiers as a plastic ice cube tray). General Information iBook G4 (14.1 LCD) Take Apart - 4 Note: The metal EMI shields-bottom shield and top shield-are now marked with divided compartments (such as a guide when reassembling ...
Service Guide
Page 6
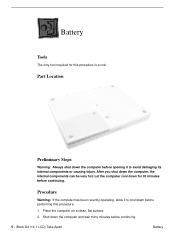
... computer on a clean, flat surface. 2. Let the computer cool down the computer before opening it to avoid damaging its internal components or causing injury. iBook G4 (14.1 LCD) Take Apart Battery Part Location Preliminary Steps Warning: Always shut down for this procedure. 1. Shut down the computer and wait thirty minutes before...
... computer on a clean, flat surface. 2. Let the computer cool down the computer before opening it to avoid damaging its internal components or causing injury. iBook G4 (14.1 LCD) Take Apart Battery Part Location Preliminary Steps Warning: Always shut down for this procedure. 1. Shut down the computer and wait thirty minutes before...
Service Guide
Page 7
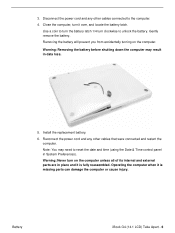
3. Gently remove the battery. Battery iBook G4 (14.1 LCD) Take Apart - 6 Close the computer, turn on the computer. Warning: Removing the battery before shutting down the computer may need to reset the ...
3. Gently remove the battery. Battery iBook G4 (14.1 LCD) Take Apart - 6 Close the computer, turn on the computer. Warning: Removing the battery before shutting down the computer may need to reset the ...

Service Guide
Page 8
iBook G4 (14.1 LCD) Take Apart Keyboard and RAM Shield Keyboard and RAM Shield Tools • #0 Phillips screwdriver • Jeweler's flat-blade screwdriver (if keyboard is locked) • Small soft cloth (if an optional AirPort Extreme Card is installed) Part Location Preliminary Steps Before you begin, remove the battery. 7 -
iBook G4 (14.1 LCD) Take Apart Keyboard and RAM Shield Keyboard and RAM Shield Tools • #0 Phillips screwdriver • Jeweler's flat-blade screwdriver (if keyboard is locked) • Small soft cloth (if an optional AirPort Extreme Card is installed) Part Location Preliminary Steps Before you begin, remove the battery. 7 -
Service Guide
Page 9
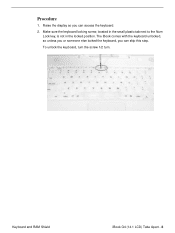
Raise the display so you can access the keyboard. 2. Make sure the keyboard locking screw, located in the small plastic tab next to the Num Lock key, is not in the locked position. Keyboard and RAM Shield iBook G4 (14.1 LCD) Take Apart - 8 To unlock the keyboard, turn the screw 1/2 turn. The iBook comes with the keyboard unlocked, so unless you or someone else locked the keyboard, you can skip this step. Procedure 1.
Raise the display so you can access the keyboard. 2. Make sure the keyboard locking screw, located in the small plastic tab next to the Num Lock key, is not in the locked position. Keyboard and RAM Shield iBook G4 (14.1 LCD) Take Apart - 8 To unlock the keyboard, turn the screw 1/2 turn. The iBook comes with the keyboard unlocked, so unless you or someone else locked the keyboard, you can skip this step. Procedure 1.
Service Guide
Page 10
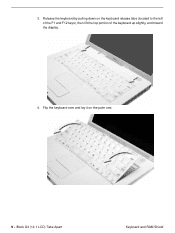
3. iBook G4 (14.1 LCD) Take Apart Keyboard and RAM Shield Release the keyboard by pulling down on the palm rest. 9 - Flip the keyboard over and lay it on the keyboard release tabs (located to the left of the F1 and F12 keys), then lift the top portion of the keyboard up slightly, and toward the display. 4.
3. iBook G4 (14.1 LCD) Take Apart Keyboard and RAM Shield Release the keyboard by pulling down on the palm rest. 9 - Flip the keyboard over and lay it on the keyboard release tabs (located to the left of the F1 and F12 keys), then lift the top portion of the keyboard up slightly, and toward the display. 4.
Service Guide
Page 11
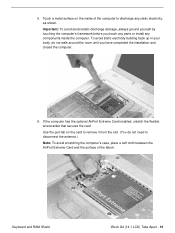
... electrostatic discharge damage, always ground yourself by touching the computer's framework before you have completed the installation and closed the computer. 6. Keyboard and RAM Shield iBook G4 (14.1 LCD) Take Apart - 10 If the computer has the optional AirPort Extreme Card installed, unlatch the flexible wire bracket that secures the card... until you touch any parts or install any static electricity, as shown. Touch a metal surface on the card to discharge any components inside of the iBook. 5.
... electrostatic discharge damage, always ground yourself by touching the computer's framework before you have completed the installation and closed the computer. 6. Keyboard and RAM Shield iBook G4 (14.1 LCD) Take Apart - 10 If the computer has the optional AirPort Extreme Card installed, unlatch the flexible wire bracket that secures the card... until you touch any parts or install any static electricity, as shown. Touch a metal surface on the card to discharge any components inside of the iBook. 5.
Service Guide
Page 12
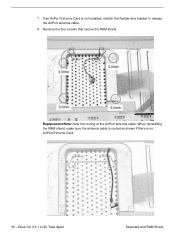
When reinstalling the RAM shield, make sure the antenna cable is routed as shown if there is not installed, unlatch the flexible wire bracket to release the AirPort antenna cable. 8. iBook G4 (14.1 LCD) Take Apart Keyboard and RAM Shield If an AirPort Extreme Card is no AirPort Extreme Card. 11 - 7. Replacement Note: Note the routing of the AirPort antenna cable. Remove the four screws that secure the RAM shield.
When reinstalling the RAM shield, make sure the antenna cable is routed as shown if there is not installed, unlatch the flexible wire bracket to release the AirPort antenna cable. 8. iBook G4 (14.1 LCD) Take Apart Keyboard and RAM Shield If an AirPort Extreme Card is no AirPort Extreme Card. 11 - 7. Replacement Note: Note the routing of the AirPort antenna cable. Remove the four screws that secure the RAM shield.
Service Guide
Page 13
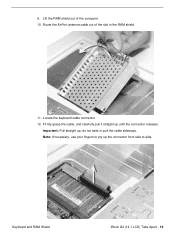
Locate the keyboard cable connector. 12. Note: If necessary, use your fingers to side. Firmly grasp the cable, and carefully pull it straight up the connector from side to pry up until the connector releases. do not twist or pull the cable sideways. Keyboard and RAM Shield iBook G4 (14.1 LCD) Take Apart - 12 Route the AirPort antenna cable out of the computer. 10. Lift the RAM shield out of the slot in the RAM shield. 11. 9. Important: Pull straight up;
Locate the keyboard cable connector. 12. Note: If necessary, use your fingers to side. Firmly grasp the cable, and carefully pull it straight up the connector from side to pry up until the connector releases. do not twist or pull the cable sideways. Keyboard and RAM Shield iBook G4 (14.1 LCD) Take Apart - 12 Route the AirPort antenna cable out of the computer. 10. Lift the RAM shield out of the slot in the RAM shield. 11. 9. Important: Pull straight up;
Service Guide
Page 14
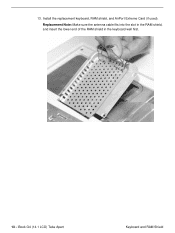
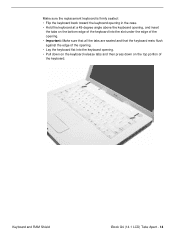
13. Install the replacement keyboard, RAM shield, and AirPort Extreme Card (if used). iBook G4 (14.1 LCD) Take Apart Keyboard and RAM Shield Replacement Note: Make sure the antenna cable fits into the slot in the RAM shield, and insert the lower end of the RAM shield in the keyboard well first. 13 -
13. Install the replacement keyboard, RAM shield, and AirPort Extreme Card (if used). iBook G4 (14.1 LCD) Take Apart Keyboard and RAM Shield Replacement Note: Make sure the antenna cable fits into the slot in the RAM shield, and insert the lower end of the RAM shield in the keyboard well first. 13 -
Service Guide
Page 15
... keyboard opening. • Pull down on the keyboard release tabs and then press down on the top portion of the keyboard. Keyboard and RAM Shield iBook G4 (14.1 LCD) Take Apart - 14
... keyboard opening. • Pull down on the keyboard release tabs and then press down on the top portion of the keyboard. Keyboard and RAM Shield iBook G4 (14.1 LCD) Take Apart - 14
Service Guide
Page 16
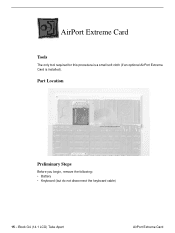
iBook G4 (14.1 LCD) Take Apart AirPort Extreme Card AirPort Extreme Card Tools The only tool required for this procedure is a small soft cloth (if an optional AirPort Extreme Card is installed). Part Location Preliminary Steps Before you begin, remove the following: • Battery • Keyboard (but do not disconnect the keyboard cable) 15 -
iBook G4 (14.1 LCD) Take Apart AirPort Extreme Card AirPort Extreme Card Tools The only tool required for this procedure is a small soft cloth (if an optional AirPort Extreme Card is installed). Part Location Preliminary Steps Before you begin, remove the following: • Battery • Keyboard (but do not disconnect the keyboard cable) 15 -
Service Guide
Page 17
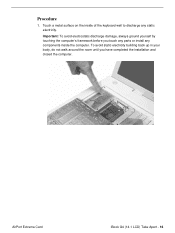
To avoid static electricity building back up in your body, do not walk around the room until you touch any parts or install any components inside of the keyboard well to discharge any static electricity. AirPort Extreme Card iBook G4 (14.1 LCD) Take Apart - 16 Procedure 1. Touch a metal surface on the inside the computer. Important: To avoid electrostatic discharge damage, always ground yourself by touching the computer's framework before you have completed the installation and closed the computer.
To avoid static electricity building back up in your body, do not walk around the room until you touch any parts or install any components inside of the keyboard well to discharge any static electricity. AirPort Extreme Card iBook G4 (14.1 LCD) Take Apart - 16 Procedure 1. Touch a metal surface on the inside the computer. Important: To avoid electrostatic discharge damage, always ground yourself by touching the computer's framework before you have completed the installation and closed the computer.
Service Guide
Page 18
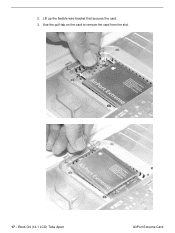
2. Use the pull-tab on the card to remove the card from the slot. 17 - iBook G4 (14.1 LCD) Take Apart AirPort Extreme Card Lift up the flexible wire bracket that secures the card. 3.
2. Use the pull-tab on the card to remove the card from the slot. 17 - iBook G4 (14.1 LCD) Take Apart AirPort Extreme Card Lift up the flexible wire bracket that secures the card. 3.

Service Guide
Page 20
Make sure the connector is to secure the AirPort Extreme Card in the RAM shield. Note: If no replacement AirPort Extreme Card is straight before inserting it into the slot. 6. Reassemble and test the computer. 19 - iBook G4 (14.1 LCD) Take Apart AirPort Extreme Card Install the replacement AirPort Extreme Card into the card. Plug the AirPort antenna cable connector into the slots in place by inserting its prongs into the port on the end of the replacement card. 5. Use the wire bracket to be installed, the antenna cable should be routed as shown. 7.
Make sure the connector is to secure the AirPort Extreme Card in the RAM shield. Note: If no replacement AirPort Extreme Card is straight before inserting it into the slot. 6. Reassemble and test the computer. 19 - iBook G4 (14.1 LCD) Take Apart AirPort Extreme Card Install the replacement AirPort Extreme Card into the card. Plug the AirPort antenna cable connector into the slots in place by inserting its prongs into the port on the end of the replacement card. 5. Use the wire bracket to be installed, the antenna cable should be routed as shown. 7.
Service Guide
Page 21
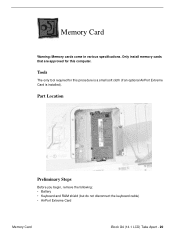
Part Location Preliminary Steps Before you begin, remove the following: • Battery • Keyboard and RAM shield (but do not disconnect the keyboard cable) • AirPort Extreme Card Memory Card iBook G4 (14.1 LCD) Take Apart - 20 Memory Card Warning: Memory cards come in various specifications. Tools The only tool required for this procedure is a small soft cloth (if an optional AirPort Extreme Card is installed). Only install memory cards that are approved for this computer.
Part Location Preliminary Steps Before you begin, remove the following: • Battery • Keyboard and RAM shield (but do not disconnect the keyboard cable) • AirPort Extreme Card Memory Card iBook G4 (14.1 LCD) Take Apart - 20 Memory Card Warning: Memory cards come in various specifications. Tools The only tool required for this procedure is a small soft cloth (if an optional AirPort Extreme Card is installed). Only install memory cards that are approved for this computer.
Service Guide
Page 22
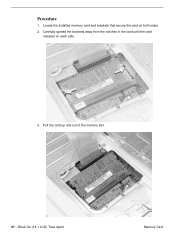
Pull the card up and out of the memory slot. 21 - Locate the installed memory card and brackets that secure the card on each side. 3. iBook G4 (14.1 LCD) Take Apart Memory Card Procedure 1. Carefully spread the brackets away from the notches in the card until the card releases on both sides. 2.
Pull the card up and out of the memory slot. 21 - Locate the installed memory card and brackets that secure the card on each side. 3. iBook G4 (14.1 LCD) Take Apart Memory Card Procedure 1. Carefully spread the brackets away from the notches in the card until the card releases on both sides. 2.


