
Service Guide
Page 4
..., refer to the iBook G4 service manual. This table shows the iBook G4 (14-inch Early 2004) configurations at initial product introduction: Configuration Education* Good* Display Size 12.1 inch 12.1 inch Video RAM 32 VRAM 32 VRAM Processor 800 MHz 800 MHz Optical Drive CD-ROM Combo (DVDROM/CD-RW) Hard Drive 30 GB 30 GB... Memory 128 MB RAM 256 MB RAM Better 14.1 inch 32 VRAM 933 MHz Combo (DVDROM/CD-RW) 40 GB 256 MB RAM Best 14.1 inch 32 VRAM 1 GHz Combo (DVDROM/CD-RW) 60 GB 256 MB RAM * For servicing the 12.1-inch models, refer to the iBook G4 ...
..., refer to the iBook G4 service manual. This table shows the iBook G4 (14-inch Early 2004) configurations at initial product introduction: Configuration Education* Good* Display Size 12.1 inch 12.1 inch Video RAM 32 VRAM 32 VRAM Processor 800 MHz 800 MHz Optical Drive CD-ROM Combo (DVDROM/CD-RW) Hard Drive 30 GB 30 GB... Memory 128 MB RAM 256 MB RAM Better 14.1 inch 32 VRAM 933 MHz Combo (DVDROM/CD-RW) 40 GB 256 MB RAM Best 14.1 inch 32 VRAM 1 GHz Combo (DVDROM/CD-RW) 60 GB 256 MB RAM * For servicing the 12.1-inch models, refer to the iBook G4 ...

Service Guide
Page 75
Part Location Preliminary Steps Before you remove from the computer, use a tray with divided compartments (such as a plastic ice cube tray). Hard Drive Tools • Soft cloth • #0 Phillips screwdriver • Black stick (or other nonconductive nylon or plastic tool) • Torx T8 screwdriver Note: To organize the screws you begin, remove the following: • Battery • Keyboard and RAM shield • AirPort Extreme Card • Memory card • Bottom case Hard Drive iBook G4 (14-inch) Take Apart - 74
Part Location Preliminary Steps Before you remove from the computer, use a tray with divided compartments (such as a plastic ice cube tray). Hard Drive Tools • Soft cloth • #0 Phillips screwdriver • Black stick (or other nonconductive nylon or plastic tool) • Torx T8 screwdriver Note: To organize the screws you begin, remove the following: • Battery • Keyboard and RAM shield • AirPort Extreme Card • Memory card • Bottom case Hard Drive iBook G4 (14-inch) Take Apart - 74

Service Guide
Page 76
With the computer on a soft cloth, note the location of the cable hanging free over a table edge. 75 - iBook G4 (14-inch) Take Apart Hard Drive • Bottom shield • DC-in board • Top case • Top shield Procedure 1. Important: To avoid pinching the cable, perform the remaining steps with the end of the hard drive and how the ribbon cable is routed. 2. Tilt up the computer assembly and disconnect the hard drive cable from the underside of the logic board. 3.
With the computer on a soft cloth, note the location of the cable hanging free over a table edge. 75 - iBook G4 (14-inch) Take Apart Hard Drive • Bottom shield • DC-in board • Top case • Top shield Procedure 1. Important: To avoid pinching the cable, perform the remaining steps with the end of the hard drive and how the ribbon cable is routed. 2. Tilt up the computer assembly and disconnect the hard drive cable from the underside of the logic board. 3.

Service Guide
Page 77
Warning: Handle the hard drive at the hard drive bracket. 5. Do not touch or press anywhere else on the drive. Remove the four identical screws at the sides only. Hard Drive iBook G4 (14-inch) Take Apart - 76 From the bracket side, tilt up the hard drive, and hold it by the sides of the drive. 4.
Warning: Handle the hard drive at the hard drive bracket. 5. Do not touch or press anywhere else on the drive. Remove the four identical screws at the sides only. Hard Drive iBook G4 (14-inch) Take Apart - 76 From the bracket side, tilt up the hard drive, and hold it by the sides of the drive. 4.

Service Guide
Page 78
Disconnect the hard drive brackets (with grommets attached) by pulling them straight off the drive. Note: When reassembling the computer, transfer both brackets (including the grommets) to the replacement hard drive so the grommets fit over the screw heads. 77 - iBook G4 (14-inch) Take Apart Hard Drive Route the end of the hard drive cable through the opening in the computer frame. 7. 6.
Disconnect the hard drive brackets (with grommets attached) by pulling them straight off the drive. Note: When reassembling the computer, transfer both brackets (including the grommets) to the replacement hard drive so the grommets fit over the screw heads. 77 - iBook G4 (14-inch) Take Apart Hard Drive Route the end of the hard drive cable through the opening in the computer frame. 7. 6.

Service Guide
Page 79
... and damaged. Do not touch or press anywhere else on the end of the hard drive, and transfer the screws to disconnect the ribbon cable from the ends of the hard drive. 9. Hard Drive iBook G4 (14-inch) Take Apart - 78 Warning: Handle the hard drive at the sides only. Remove the four black Torx T8 screws from the connector...
... and damaged. Do not touch or press anywhere else on the end of the hard drive, and transfer the screws to disconnect the ribbon cable from the ends of the hard drive. 9. Hard Drive iBook G4 (14-inch) Take Apart - 78 Warning: Handle the hard drive at the sides only. Remove the four black Torx T8 screws from the connector...

Service Guide
Page 102
With the computer on a soft cloth, note the routing of the thin, black microphone cable and the LVDS (low voltage data signal) cable. 2. Pull up the flexible tab to disconnect the LVDS cable from the logic board near the hard drive. 3. iBook G4 (14-inch) Take Apart Display Module Procedure 1. iBook G4 (14-inch) iBook G4 (14-inch Early 2004) 101 - Disconnect the microphone cable from the logic board.
With the computer on a soft cloth, note the routing of the thin, black microphone cable and the LVDS (low voltage data signal) cable. 2. Pull up the flexible tab to disconnect the LVDS cable from the logic board near the hard drive. 3. iBook G4 (14-inch) Take Apart Display Module Procedure 1. iBook G4 (14-inch) iBook G4 (14-inch Early 2004) 101 - Disconnect the microphone cable from the logic board.
Service Guide
Page 126
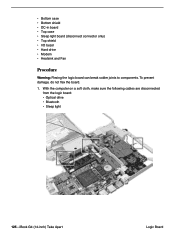
To prevent damage, do not flex the board. 1. With the computer on a soft cloth, make sure the following cables are disconnected from the logic board: • Optical drive • Bluetooth • Sleep light 125 - • Bottom case • Bottom shield • DC-in board • Top case • Sleep light board (disconnect connector only) • Top shield • I/O bezel • Hard drive • Modem • Heatsink and Fan Procedure Warning: Flexing the logic board can break solder joints to components. iBook G4 (14-inch) Take Apart Logic Board
To prevent damage, do not flex the board. 1. With the computer on a soft cloth, make sure the following cables are disconnected from the logic board: • Optical drive • Bluetooth • Sleep light 125 - • Bottom case • Bottom shield • DC-in board • Top case • Sleep light board (disconnect connector only) • Top shield • I/O bezel • Hard drive • Modem • Heatsink and Fan Procedure Warning: Flexing the logic board can break solder joints to components. iBook G4 (14-inch) Take Apart Logic Board

Service Guide
Page 130
iBook G4 (14-inch) Take Apart Frame Replacement Note: The frame includes two integral mylar stickers. Make sure the stickers are in place before reassembling the computer. 129 - • Battery transfer board • Top case • Sleep light board • Top shield • Display module • I/O bezel • RJ11 modem cable • Hard drive • Modem • Bluetooth • Optical drive • Display module • Heatsink and Fan • Logic board Procedure With all preliminary steps completed, the frame is the remaining part.
iBook G4 (14-inch) Take Apart Frame Replacement Note: The frame includes two integral mylar stickers. Make sure the stickers are in place before reassembling the computer. 129 - • Battery transfer board • Top case • Sleep light board • Top shield • Display module • I/O bezel • RJ11 modem cable • Hard drive • Modem • Bluetooth • Optical drive • Display module • Heatsink and Fan • Logic board Procedure With all preliminary steps completed, the frame is the remaining part.

Service Guide
Page 178
... see if the hard drive mounts on the desktop. 2. Replace hard drive cable. 8. Refer to four beeps) Hard Drive Hard drive will not initialize 1. Boot from a Mac OS system CD. 5. Replace hard drive. Important: If the computer is under warranty and data recovery is required, refer to the optical drive.) 5. Replace hard drive. Boot from the Mac OS X software install CD. iBook G4 (14-inch...
... see if the hard drive mounts on the desktop. 2. Replace hard drive cable. 8. Refer to four beeps) Hard Drive Hard drive will not initialize 1. Boot from a Mac OS system CD. 5. Replace hard drive. Important: If the computer is under warranty and data recovery is required, refer to the optical drive.) 5. Replace hard drive. Boot from the Mac OS X software install CD. iBook G4 (14-inch...

Service Guide
Page 180
... Mac OS X 10.3: Receiving faxes and connecting to the hard drive.) 6. Replace optical drive. Replace optical drive cable. (This is the same cable that does not work, hold Media Eject key at top right corner of keyboard. Replace optical drive. If that attaches to the Internet 25596: Mac OS X ... Base article 25746: Mac OS X 10.3: Fax doesn't send. Press and hold down Function (fn) key and Media Eject key. 6 - iBook G4 (14-inch) Troubleshooting Symptom Charts Try cleaning the disc. It may be using the disc. 2. Verify disc is being used. 2. Try known-good...
... Mac OS X 10.3: Receiving faxes and connecting to the hard drive.) 6. Replace optical drive. Replace optical drive cable. (This is the same cable that does not work, hold Media Eject key at top right corner of keyboard. Replace optical drive. If that attaches to the Internet 25596: Mac OS X ... Base article 25746: Mac OS X 10.3: Fax doesn't send. Press and hold down Function (fn) key and Media Eject key. 6 - iBook G4 (14-inch) Troubleshooting Symptom Charts Try cleaning the disc. It may be using the disc. 2. Verify disc is being used. 2. Try known-good...

Service Guide
Page 193
Main Exploded View: iBook G4 (14-inch) Keyboard 922-6189 Bluetooth Board 922-5764 RAM Shield 922-6173 I/O Bezel 922-6172 RJ-11 Modem Cable 922-6121 Logic Board 933 MHz 661-3105 1 GHz 661-2995 Hard Drive: 30 GB 661-2983 40 GB 661-2957 60 GB 661-2958 Dash Modem 661-2632 Modem Shield 922...-6257 Sleep Light Board 922-6187 Battery Transfer Board 922-6183 Bottom Case 922-6174 Flex Cable 922-6186 Bracket, Bracket, Flex Cable Hard Drive 922...
Main Exploded View: iBook G4 (14-inch) Keyboard 922-6189 Bluetooth Board 922-5764 RAM Shield 922-6173 I/O Bezel 922-6172 RJ-11 Modem Cable 922-6121 Logic Board 933 MHz 661-3105 1 GHz 661-2995 Hard Drive: 30 GB 661-2983 40 GB 661-2957 60 GB 661-2958 Dash Modem 661-2632 Modem Shield 922...-6257 Sleep Light Board 922-6187 Battery Transfer Board 922-6183 Bottom Case 922-6174 Flex Cable 922-6186 Bracket, Bracket, Flex Cable Hard Drive 922...

Service Guide
Page 195
...: iBook G4 (14-inch Early 2004) Keyboard 922-6189 Bluetooth Board 922-5764 922-6571 (Q6T) RAM Shield 922-6173 I/O Bezel 922-6172 RJ-11 Modem Cable 922-4815 Logic Board 1 GHz 661-3191 1.2 GH2 661-3344 Hard Drive: 30 GB 661-3250 40 GB 661-3249 60 GB 661-3247 Modem 922-6430 Hard Drive... 661-3328 Heatsink 922-6366 Fan 922-6367 Optical Drive: CD-ROM 661-3398 Combo 661-3394 SuperDrive 661-3396 Bracket, Side 922-6175 DC-In Board 922-6431 Bezel, Slot 922-6264 Sony 922-6265 Bottom EMI Shield 922-6258 Vent Cover 922-6180 Battery 661-3189 iBook G4 (14-inch) Views - 3
...: iBook G4 (14-inch Early 2004) Keyboard 922-6189 Bluetooth Board 922-5764 922-6571 (Q6T) RAM Shield 922-6173 I/O Bezel 922-6172 RJ-11 Modem Cable 922-4815 Logic Board 1 GHz 661-3191 1.2 GH2 661-3344 Hard Drive: 30 GB 661-3250 40 GB 661-3249 60 GB 661-3247 Modem 922-6430 Hard Drive... 661-3328 Heatsink 922-6366 Fan 922-6367 Optical Drive: CD-ROM 661-3398 Combo 661-3394 SuperDrive 661-3396 Bracket, Side 922-6175 DC-In Board 922-6431 Bezel, Slot 922-6264 Sony 922-6265 Bottom EMI Shield 922-6258 Vent Cover 922-6180 Battery 661-3189 iBook G4 (14-inch) Views - 3

