
User Manual
Page 1
PowerBook G4 12-inch Getting Started Includes setup, expansion, and troubleshooting information for your PowerBook G4 computer
PowerBook G4 12-inch Getting Started Includes setup, expansion, and troubleshooting information for your PowerBook G4 computer
User Manual
Page 2
... mark of Apple Computer, Inc. registered trademark. PowerPC is for informational purposes only and constitutes neither an endorsement nor a recommendation. Mention of third-party products is a trademark of Apple Computer, Inc., registered in violation of Apple Computer, Inc. Apple assumes no responsibility...K Apple Computer, Inc. © 2004 Apple Computer, Inc. Apple 1 Infinite Loop Cupertino, CA 95014-2084 408-996-1010 www.apple.com Apple, the Apple logo, AirPort, Apple Store, AppleTalk, Final Cut Pro, FireWire, iCal, iMovie, iTunes, Mac, Macintosh, the Mac logo, Mac OS, PowerBook, ...
... mark of Apple Computer, Inc. registered trademark. PowerPC is for informational purposes only and constitutes neither an endorsement nor a recommendation. Mention of third-party products is a trademark of Apple Computer, Inc., registered in violation of Apple Computer, Inc. Apple assumes no responsibility...K Apple Computer, Inc. © 2004 Apple Computer, Inc. Apple 1 Infinite Loop Cupertino, CA 95014-2084 408-996-1010 www.apple.com Apple, the Apple logo, AirPort, Apple Store, AppleTalk, Final Cut Pro, FireWire, iCal, iMovie, iTunes, Mac, Macintosh, the Mac logo, Mac OS, PowerBook, ...
User Manual
Page 3
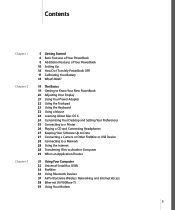
Contents 1 Chapter 1 Chapter 2 Chapter 3 5 Getting Started 6 Basic Features of Your PowerBook 8 Additional Features of Your PowerBook 10 Setting Up 16 How Do I Turn My PowerBook Off? 17 Calibrating Your Battery 18 What's Next? 19 The Basics 19 Getting to Know Your New PowerBook 20 Adjusting Your Display 21 Using Your Power Adapter 22 Using the...
Contents 1 Chapter 1 Chapter 2 Chapter 3 5 Getting Started 6 Basic Features of Your PowerBook 8 Additional Features of Your PowerBook 10 Setting Up 16 How Do I Turn My PowerBook Off? 17 Calibrating Your Battery 18 What's Next? 19 The Basics 19 Getting to Know Your New PowerBook 20 Adjusting Your Display 21 Using Your Power Adapter 22 Using the...
User Manual
Page 4
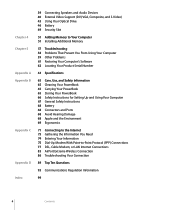
... Software 62 Locating Your Product Serial Number 63 Specifications 65 Care, Use, and Safety Information 65 Cleaning Your PowerBook 65 Carrying Your PowerBook 65 Storing Your PowerBook 66 Safety Instructions for Setting Up and Using Your Computer 67 General Safety Instructions 68 Battery 68 Connectors and ...Ports 68 Avoid Hearing Damage 68 Apple and the Environment 69 Ergonomics 71 Connecting to the Internet 73 Gathering the ...
... Software 62 Locating Your Product Serial Number 63 Specifications 65 Care, Use, and Safety Information 65 Cleaning Your PowerBook 65 Carrying Your PowerBook 65 Storing Your PowerBook 66 Safety Instructions for Setting Up and Using Your Computer 67 General Safety Instructions 68 Battery 68 Connectors and ...Ports 68 Avoid Hearing Damage 68 Apple and the Environment 69 Ergonomics 71 Connecting to the Internet 73 Gathering the ...
User Manual
Page 5
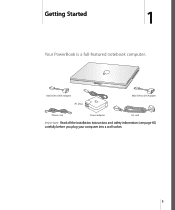
Getting Started 1 1 Your PowerBook is a full-featured notebook computer. Mini-DVI to VGA Adapter AC plug Mini-DVI to DVI Adapter Phone cord Power adapter AC cord Important: Read all the installation instructions and safety information (see page 65) carefully before you plug your computer into a wall socket. 5
Getting Started 1 1 Your PowerBook is a full-featured notebook computer. Mini-DVI to VGA Adapter AC plug Mini-DVI to DVI Adapter Phone cord Power adapter AC cord Important: Read all the installation instructions and safety information (see page 65) carefully before you plug your computer into a wall socket. 5
User Manual
Page 6
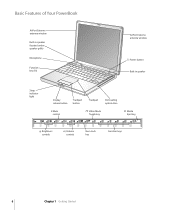
Basic Features of Your PowerBook AirPort Extreme antenna window Built-in speaker (located under speaker grille) Microphone Function key (Fn) AirPort Extreme antenna window ® Power button Built-in speaker ® Sleep indicator light Display release button Trackpad button - Mute control Trackpad Slot-loading optical drive Video Mode Toggle key Media Eject key ¤ Brightness controls - Volume controls Num Lock key Function keys 6 Chapter 1 Getting Started
Basic Features of Your PowerBook AirPort Extreme antenna window Built-in speaker (located under speaker grille) Microphone Function key (Fn) AirPort Extreme antenna window ® Power button Built-in speaker ® Sleep indicator light Display release button Trackpad button - Mute control Trackpad Slot-loading optical drive Video Mode Toggle key Media Eject key ¤ Brightness controls - Volume controls Num Lock key Function keys 6 Chapter 1 Getting Started
User Manual
Page 7
...Slot-loading optical drive Your optical drive can also eject a disc by dragging its desktop icon to DVD-R discs. ® Power button Turn your PowerBook on your optical drive, see Chapter 3, "Using Your Computer," on the key. When the numeric keypad is in microphone. Video Mode Toggle key Use... this built-in sleep. Sleep indicator light A white light pulsates when the PowerBook is activated, a green light glows on page 31. It can also write to the Trash. Trackpad Move the pointer on CD-R and CD-...
...Slot-loading optical drive Your optical drive can also eject a disc by dragging its desktop icon to DVD-R discs. ® Power button Turn your PowerBook on your optical drive, see Chapter 3, "Using Your Computer," on the key. When the numeric keypad is in microphone. Video Mode Toggle key Use... this built-in sleep. Sleep indicator light A white light pulsates when the PowerBook is activated, a green light glows on page 31. It can also write to the Trash. Trackpad Move the pointer on CD-R and CD-...

User Manual
Page 8
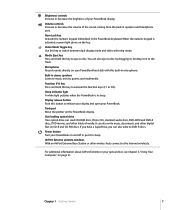
Additional Features of Your PowerBook ® ¯ Power adapter port G Ethernet port (10/100Base-T) FireWire 400 port W Internal modem port USB 2.0 ports Mini-DVI port Audio line in port Security slot f Headphone port 8 Chapter 1 Getting Started
Additional Features of Your PowerBook ® ¯ Power adapter port G Ethernet port (10/100Base-T) FireWire 400 port W Internal modem port USB 2.0 ports Mini-DVI port Audio line in port Security slot f Headphone port 8 Chapter 1 Getting Started

User Manual
Page 9
... Two USB 2.0 (Universal Serial Bus) ports Connect additional equipment to your PowerBook, such as digital videocameras, and external storage devices. Audio line in the included Apple Portable Power Adapter to recharge your PowerBook battery. You can also use a Mini-DVI to Video Adapter (sold ...modems, keyboards, and joysticks. Mini-DVI (external monitor) port Using the included Mini-DVI to DVI Adapter, connect your PowerBook to an Apple flat-panel display or other Ethernet devices. For additional information about these features, see page 34. The Ethernet port auto-sensing...
... Two USB 2.0 (Universal Serial Bus) ports Connect additional equipment to your PowerBook, such as digital videocameras, and external storage devices. Audio line in the included Apple Portable Power Adapter to recharge your PowerBook battery. You can also use a Mini-DVI to Video Adapter (sold ...modems, keyboards, and joysticks. Mini-DVI (external monitor) port Using the included Mini-DVI to DVI Adapter, connect your PowerBook to an Apple flat-panel display or other Ethernet devices. For additional information about these features, see page 34. The Ethernet port auto-sensing...
User Manual
Page 10
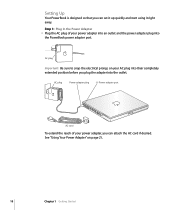
Setting Up Your PowerBook is designed so that you can attach the AC cord if desired. See "Using Your Power Adapter" on your AC plug into their completely extended ... AC plug Power adapter plug ¯ Power adapter port AC cord To extend the reach of your power adapter, you plug the adapter into the PowerBook power adapter port.
Setting Up Your PowerBook is designed so that you can attach the AC cord if desired. See "Using Your Power Adapter" on your AC plug into their completely extended ... AC plug Power adapter plug ¯ Power adapter port AC cord To extend the reach of your power adapter, you plug the adapter into the PowerBook power adapter port.
User Manual
Page 11
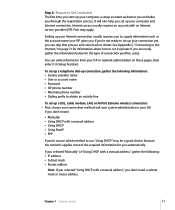
Setting up your computer, a setup assistant welcomes you and takes you through the registration process. You can skip that process and come back to it in Setup Assistant. To set up a telephone dial-up connection, gather the following : • IP address • Subnet mask • Router address Note: If you selected "Using DHCP with a manual address • Using DHCP • Using BootP • PPP If you're unsure which method to obtain an outside line To set up a DSL, cable modem, LAN, or AirPort Extreme wireless connection: m First, choose your connection method (ask your system...
Setting up your computer, a setup assistant welcomes you and takes you through the registration process. You can skip that process and come back to it in Setup Assistant. To set up a telephone dial-up connection, gather the following : • IP address • Subnet mask • Router address Note: If you selected "Using DHCP with a manual address • Using DHCP • Using BootP • PPP If you're unsure which method to obtain an outside line To set up a DSL, cable modem, LAN, or AirPort Extreme wireless connection: m First, choose your connection method (ask your system...

User Manual
Page 12
.... Telephone cord W Internal modem port ® 12 Chapter 1 Getting Started If you're connecting to a wireless AirPort Extreme network, you don't need cables. Ask your PowerBook to a phone line, DSL modem, cable modem, or Ethernet network. If you selected "Using DHCP," gather the following : • Service provider • Account name •...
.... Telephone cord W Internal modem port ® 12 Chapter 1 Getting Started If you're connecting to a wireless AirPort Extreme network, you don't need cables. Ask your PowerBook to a phone line, DSL modem, cable modem, or Ethernet network. If you selected "Using DHCP," gather the following : • Service provider • Account name •...

User Manual
Page 13
Contact your DSL or cable modem as shown in homes. To connect to a DSL or cable modem or an Ethernet network: m Connect the cable to your telephone service provider if you are unsure whether you connect the internal modem to an analog phone line-the kind used typically in the modem instructions, or connect the Ethernet cord to the computer's Ethernet port. the wrong type of the cord to the Ethernet hub or outlet. Then connect the other types of connections, see "Using Your Modem" on page 39. The modem will not work with a digital phone line. For more information about your ...
Contact your DSL or cable modem as shown in homes. To connect to a DSL or cable modem or an Ethernet network: m Connect the cable to your telephone service provider if you are unsure whether you connect the internal modem to an analog phone line-the kind used typically in the modem instructions, or connect the Ethernet cord to the computer's Ethernet port. the wrong type of the cord to the Ethernet hub or outlet. Then connect the other types of connections, see "Using Your Modem" on page 39. The modem will not work with a digital phone line. For more information about your ...

User Manual
Page 14
It takes the computer a few moments to reinstall system software. Then press the Power button again. Step 4: Turn On Your PowerBook With your computer. Do not continue to hold down or press the Power button after the startup tone or you may need to start up ...
It takes the computer a few moments to reinstall system software. Then press the Power button again. Step 4: Turn On Your PowerBook With your computer. Do not continue to hold down or press the Power button after the startup tone or you may need to start up ...

User Manual
Page 15
Chapter 1 Getting Started 15 Congratulations, you use the trackpad button. ® Trackpad Trackpad button For tips on using the trackpad, see "Tips for Using the Trackpad" on page 22. 2 Use your finger across the trackpad. • To select, click, or double-click an item on the screen, use a mouse with a desktop computer. • To move the arrow pointer on the screen, slide your PowerBook trackpad to select and move items on the screen, much as you 're up and running!
Chapter 1 Getting Started 15 Congratulations, you use the trackpad button. ® Trackpad Trackpad button For tips on using the trackpad, see "Tips for Using the Trackpad" on page 22. 2 Use your finger across the trackpad. • To select, click, or double-click an item on the screen, use a mouse with a desktop computer. • To move the arrow pointer on the screen, slide your PowerBook trackpad to select and move items on the screen, much as you 're up and running!
User Manual
Page 16
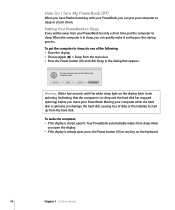
To put the computer to sleep or shut it down. How Do I Turn My PowerBook Off? Moving your computer to sleep, do one of data or the inability to sleep. Putting Your PowerBook to Sleep If you will be away from sleep when you open the display. • If ... Chapter 1 Getting Started When the computer is already open it and bypass the startup process. Your PowerBook automatically wakes from your PowerBook. When you have finished working with your PowerBook, you move your PowerBook for only a short time, put your computer while the hard disk is spinning can damage the hard...
To put the computer to sleep or shut it down. How Do I Turn My PowerBook Off? Moving your computer to sleep, do one of data or the inability to sleep. Putting Your PowerBook to Sleep If you will be away from sleep when you open the display. • If ... Chapter 1 Getting Started When the computer is already open it and bypass the startup process. Your PowerBook automatically wakes from your PowerBook. When you have finished working with your PowerBook, you move your PowerBook for only a short time, put your computer while the hard disk is spinning can damage the hard...

User Manual
Page 17
Calibrating Your Battery To get the longest running time from your PowerBook battery, complete the following : • Choose Apple (K) > Shut Down from draining completely. When your battery gets low, you have to fully discharge and then charge your battery once to calibrate it down ... the power adapter plug changes to green and the onscreen meter in the power adapter and fully charge your PowerBook. Important: You only have your PowerBook. If you plan to store your PowerBook for an extended period of the following steps sometime during the first week you will see the first low-...
Calibrating Your Battery To get the longest running time from your PowerBook battery, complete the following : • Choose Apple (K) > Shut Down from draining completely. When your battery gets low, you have to fully discharge and then charge your battery once to calibrate it down ... the power adapter plug changes to green and the onscreen meter in the power adapter and fully charge your PowerBook. Important: You only have your PowerBook. If you plan to store your PowerBook for an extended period of the following steps sometime during the first week you will see the first low-...
User Manual
Page 18
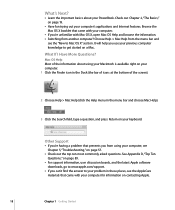
...click the Help menu in these places, see the AppleCare materials that came with your computer. • If you can't find the answer to your PowerBook. What If I Have More Questions? Mac OS Help Most of the information about your problem in the menu bar and choose Mac Help). 3 Click ...the Search field, type a question, and press Return on contacting Apple. 18 Chapter 1 Getting Started See Appendix D, "Top Ten Questions," on page 89. • For support information, user discussion boards, and the latest...
...click the Help menu in these places, see the AppleCare materials that came with your computer. • If you can't find the answer to your PowerBook. What If I Have More Questions? Mac OS Help Most of the information about your problem in the menu bar and choose Mac Help). 3 Click ...the Search field, type a question, and press Return on contacting Apple. 18 Chapter 1 Getting Started See Appendix D, "Top Ten Questions," on page 89. • For support information, user discussion boards, and the latest...

User Manual
Page 19
...want to know your new computer, you may hear small noises during startup and when using your PowerBook on a flat, stable surface. For more safety instructions about your PowerBook that keeps the unit within normal operating temperatures. For prolonged use, place your hard disk and ... functioning. As you transport the computer. The Basics 2 2 This chapter introduces important basics about handling and using your PowerBook in your drive stop using your PowerBook, wait a few moments to let the hard disk and any optical disc in different locations, be sure to see Appendix...
...want to know your new computer, you may hear small noises during startup and when using your PowerBook on a flat, stable surface. For more safety instructions about your PowerBook that keeps the unit within normal operating temperatures. For prolonged use, place your hard disk and ... functioning. As you transport the computer. The Basics 2 2 This chapter introduces important basics about handling and using your PowerBook in your drive stop using your PowerBook, wait a few moments to let the hard disk and any optical disc in different locations, be sure to see Appendix...
User Manual
Page 20
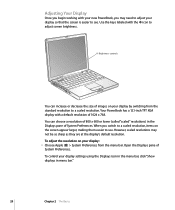
...are at the display's default resolution. Open the Displays pane of 1024 x 768. Adjusting Your Display Once you begin working with your new PowerBook, you switch to a scaled resolution, items on your display by switching from the menu bar. However, scaled resolutions may need to adjust ...your display settings using the Displays icon in the menu bar, click "Show displays in the Displays pane of images on your display: m Choose Apple (K) > System Preferences from the standard resolution to see . To adjust the resolution on the screen appear larger, making them easier to see ...
...are at the display's default resolution. Open the Displays pane of 1024 x 768. Adjusting Your Display Once you begin working with your new PowerBook, you switch to a scaled resolution, items on your display by switching from the menu bar. However, scaled resolutions may need to adjust ...your display settings using the Displays icon in the menu bar, click "Show displays in the Displays pane of images on your display: m Choose Apple (K) > System Preferences from the standard resolution to see . To adjust the resolution on the screen appear larger, making them easier to see ...