Specifications Sheet
Page 4
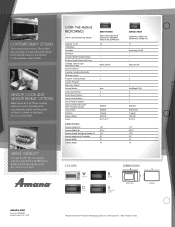
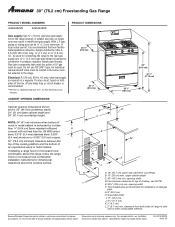
... Depth Excluding Handle (C) Interior Height with Turntable Interior Width Interior Depth AMV1160VA AER3311WA, AER5522VA AER5823XA, AER5830VA AGR3311WD, AGR4433XD 1.6 . . . . Auto/Rapid (1 lb) 4 4 1 3 8206230 W10181505 3-Speed 220 CFM W...91⁄2" 21" 14" Colors W White D Silver B Black S Stainless Steel DIMENSIONS FRONT VIEW SIDE VIEW amana.com Form No. High/Low/Off . . . 2 Auto 6 5 8206230 8206229 2-Speed 220 CFM W... 3 . . Metal finish handles match up brilliantly on the stainless steel models. OVER-THE-RANGE MICROWAVES Clever Combo Matching Ranges Capacity (cu. AC090220 Printed...
... Depth Excluding Handle (C) Interior Height with Turntable Interior Width Interior Depth AMV1160VA AER3311WA, AER5522VA AER5823XA, AER5830VA AGR3311WD, AGR4433XD 1.6 . . . . Auto/Rapid (1 lb) 4 4 1 3 8206230 W10181505 3-Speed 220 CFM W...91⁄2" 21" 14" Colors W White D Silver B Black S Stainless Steel DIMENSIONS FRONT VIEW SIDE VIEW amana.com Form No. High/Low/Off . . . 2 Auto 6 5 8206230 8206229 2-Speed 220 CFM W... 3 . . Metal finish handles match up brilliantly on the stainless steel models. OVER-THE-RANGE MICROWAVES Clever Combo Matching Ranges Capacity (cu. AC090220 Printed...
Use and Care
Page 5
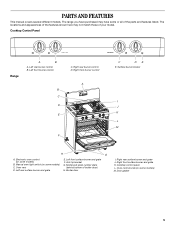
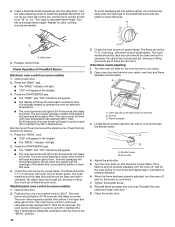
...rear burner control B. Right rear burner control D. Manual oven light switch (on some models) B. Oven vent D. Left front surface burner and grate F. Anti-tip bracket G. Model and serial number plate (behind bottom of your model. Door gasket 5 Right front surface burner and grate K. Surface burner locator I ....B C D E F Push to Turn A B A. Left rear surface burner and grate E. Left front burner control C. The range you have some models) C. Cooktop control panel L. Right rear surface burner and grate J. PARTS AND FEATURES This manual covers several different...
...rear burner control B. Right rear burner control D. Manual oven light switch (on some models) B. Oven vent D. Left front surface burner and grate F. Anti-tip bracket G. Model and serial number plate (behind bottom of your model. Door gasket 5 Right front surface burner and grate K. Surface burner locator I ....B C D E F Push to Turn A B A. Left rear surface burner and grate E. Left front burner control C. The range you have some models) C. Cooktop control panel L. Right rear surface burner and grate J. PARTS AND FEATURES This manual covers several different...
Use and Care
Page 9
...) of cook functions. A minus sign means the oven will appear on the oven door or bottom. The absence of foil or liner. ■ On those models with bottom vents, do not block or cover the oven bottom vents. ■ For best cooking results, do not line the oven bottom with any...
...) of cook functions. A minus sign means the oven will appear on the oven door or bottom. The absence of foil or liner. ■ On those models with bottom vents, do not block or cover the oven bottom vents. ■ For best cooking results, do not line the oven bottom with any...
Use and Care
Page 11
... lined with the broiler drawer and oven door closed. ■ To avoid damage to set it out from the broil element. Positioning Broiler Pan For models with foil. Broiler pan B. Times are guidelines only and may cook better at any time during broiling. ■ Do not use . To Custom Broil: Changing...
... lined with the broiler drawer and oven door closed. ■ To avoid damage to set it out from the broil element. Positioning Broiler Pan For models with foil. Broiler pan B. Times are guidelines only and may cook better at any time during broiling. ■ Do not use . To Custom Broil: Changing...
Use and Care
Page 12
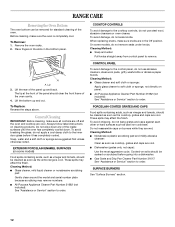
...the panel up and out. Always follow label instructions on burners while they are wet. These spills may affect the finish. On some models) Food spills containing acids, such as vinegar and tomato, should be cleaned as soon as the entire range is completely cool. Cleaning...down any of the oven cavity. 4. Cleaning Method: ■ Glass cleaner, mild liquid cleaner or nonabrasive scrubbing pad: Gently clean around the model and serial number plate because scrubbing may remove numbers. ■ All-Purpose Appliance Cleaner Part Number 31682 (not included): See "Assistance or ...
...the panel up and out. Always follow label instructions on burners while they are wet. These spills may affect the finish. On some models) Food spills containing acids, such as vinegar and tomato, should be cleaned as soon as the entire range is completely cool. Cleaning...down any of the oven cavity. 4. Cleaning Method: ■ Glass cleaner, mild liquid cleaner or nonabrasive scrubbing pad: Gently clean around the model and serial number plate because scrubbing may remove numbers. ■ All-Purpose Appliance Cleaner Part Number 31682 (not included): See "Assistance or ...
Use and Care
Page 13
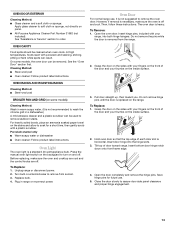
OVEN CAVITY Food spills should be removed. Oven Light The oven light is replaced on some models, the oven door can be used to remove stubborn stains. Before replacing, make sure the oven is not suggested to remove the oven door. Unplug ... while the door is not recommended to soak for future use , it is off and cool. Pull door straight up, then toward range. On some models) Cleaning Method: Wash in warm soapy water. (It is removed from socket. 3. Press the manual oven light switch on the backguard to remove from the...
OVEN CAVITY Food spills should be removed. Oven Light The oven light is replaced on some models, the oven door can be used to remove stubborn stains. Before replacing, make sure the oven is not suggested to remove the oven door. Unplug ... while the door is not recommended to soak for future use , it is off and cool. Pull door straight up, then toward range. On some models) Cleaning Method: Wash in warm soapy water. (It is removed from socket. 3. Press the manual oven light switch on the backguard to remove from the...
Use and Care
Page 14
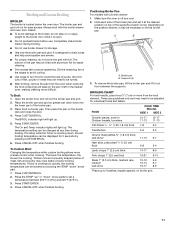
... a piece of glass. ■ The igniters will click several times until the flame is heard when the Bake or Broil burner ignites. ■ On some models, a clicking sound can be heard each time the Bake or Broil burners ignite during Bake and Broil operations Electrical Shock Hazard Plug into a grounded 3 prong...
... a piece of glass. ■ The igniters will click several times until the flame is heard when the Bake or Broil burner ignites. ■ On some models, a clicking sound can be heard each time the Bake or Broil burners ignite during Bake and Broil operations Electrical Shock Hazard Plug into a grounded 3 prong...
Use and Care
Page 15
... in your appliance. Contact a designated service technician to light ■ Is the ignition system broken? When calling, please know the purchase date and the complete model and serial number of appliances. ■ Use and maintenance procedures. ■ Accessory and repair parts sales. ■ Referrals to fulfill the product warranty and provide...
... in your appliance. Contact a designated service technician to light ■ Is the ignition system broken? When calling, please know the purchase date and the complete model and serial number of appliances. ■ Use and maintenance procedures. ■ Accessory and repair parts sales. ■ Referrals to fulfill the product warranty and provide...
Use and Care
Page 16
..., when this major appliance is operated and maintained according to instructions attached to or furnished with the product, Amana brand of Whirlpool Corporation or Whirlpool Canada LP (hereafter "Amana") will need to know your complete model number and serial number. Any food loss due to the appliance. 9. This major appliance is designed to...
..., when this major appliance is operated and maintained according to instructions attached to or furnished with the product, Amana brand of Whirlpool Corporation or Whirlpool Canada LP (hereafter "Amana") will need to know your complete model number and serial number. Any food loss due to the appliance. 9. This major appliance is designed to...

Warranty
Page 1
...Model number Serial number Purchase date 16 Damage resulting from accident, alteration, misuse, abuse, fire, flood, acts of God, improper installation, installation not in accordance with electrical or plumbing codes, or use or when it is installed in an inaccessible location or is covered by an authorized Amana..., dents, chips or other than normal, single-family household use of consumables or cleaning products not approved by calling Amana. AMANA® MAJOR APPLIANCE WARRANTY LIMITED WARRANTY For one year from the date of purchase, when this major appliance is operated...
...Model number Serial number Purchase date 16 Damage resulting from accident, alteration, misuse, abuse, fire, flood, acts of God, improper installation, installation not in accordance with electrical or plumbing codes, or use or when it is installed in an inaccessible location or is covered by an authorized Amana..., dents, chips or other than normal, single-family household use of consumables or cleaning products not approved by calling Amana. AMANA® MAJOR APPLIANCE WARRANTY LIMITED WARRANTY For one year from the date of purchase, when this major appliance is operated...
Dimension Guide
Page 1
..." (61 cm) minimum when bottom of the line. For complete details, see NOTE*. W10153329 06-01-10 30" (76.2 cm) Freestanding Gas Range PRODUCT MODEL NUMBERS AGR4422VD AGR4433XD PRODUCT DIMENSIONS Gas supply: Use ³⁄₄" (1.9 cm) rigid pipe gas supply line to change without notice. A L F B C E I . 17" (43.2 cm) J. 4¹⁄₂...
..." (61 cm) minimum when bottom of the line. For complete details, see NOTE*. W10153329 06-01-10 30" (76.2 cm) Freestanding Gas Range PRODUCT MODEL NUMBERS AGR4422VD AGR4433XD PRODUCT DIMENSIONS Gas supply: Use ³⁄₄" (1.9 cm) rigid pipe gas supply line to change without notice. A L F B C E I . 17" (43.2 cm) J. 4¹⁄₂...
Installation Instruction
Page 3
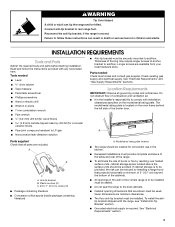
... of flooring may require longer screws to anchor bracket to subfloor. Reconnect the anti-tip bracket, if the range is located on the model/serial rating plate. Do not obstruct flow of combustion and ventilation air. ■ It is to comply with installation clearances specified on ...the oven frame behind the left side of the broiler door. Model/serial rating plate location ■ The range should be killed. If cabinet storage is the installer's responsibility to be provided, the risk can...
... of flooring may require longer screws to anchor bracket to subfloor. Reconnect the anti-tip bracket, if the range is located on the model/serial rating plate. Do not obstruct flow of combustion and ventilation air. ■ It is to comply with installation clearances specified on ...the oven frame behind the left side of the broiler door. Model/serial rating plate location ■ The range should be killed. If cabinet storage is the installer's responsibility to be provided, the risk can...
Installation Instruction
Page 5
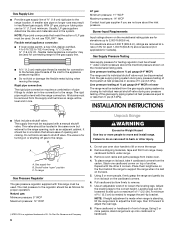
... ordinances. Observe all gas connections. In the absence of local codes, installation must conform with all local codes and ordinances. latest edition. The model/serial rating plate is correctly grounded. Do not remove ground prong. To minimize possible shock hazard the cord must conform with American National Standard,... to whether the metal chassis of the range is located on the types of the range must be obtained from the gas specified on the model/serial rating plate for use with a power supply cord having a 3 prong ground plug. Failure to do not include the type of Gas...
... ordinances. Observe all gas connections. In the absence of local codes, installation must conform with all local codes and ordinances. latest edition. The model/serial rating plate is correctly grounded. Do not remove ground prong. To minimize possible shock hazard the cord must conform with American National Standard,... to whether the metal chassis of the range is located on the types of the range must be obtained from the gas specified on the model/serial rating plate for use with a power supply cord having a 3 prong ground plug. Failure to do not include the type of Gas...
Installation Instruction
Page 6
.... NOTE: Pipe-joint compounds that system at test pressures equal to the range. Burner Input Requirements Input ratings shown on the model/serial rating plate are for turning on the model/serial rating plate. Line pressure testing above the manifold pressure shown on or shutting off gas to or less than ½...
.... NOTE: Pipe-joint compounds that system at test pressures equal to the range. Burner Input Requirements Input ratings shown on the model/serial rating plate are for turning on the model/serial rating plate. Line pressure testing above the manifold pressure shown on or shutting off gas to or less than ½...
Installation Instruction
Page 10
... The "BROIL" indicator will open and allow gas to cool down and repeat step 4 until flame is quickly turned from "HI" to cycle on some models): 1. this verification with the knob in character. this delay is normal. The oven valve requires a certain time before it will light. 2. Check the ... will burn until oven temperature has reached 350°F. After 20-40 seconds, the oven burner will open and allow gas to cycle on some models): 1. Check the oven burner for proper flame. The flame should light in 20-40 seconds, this delay is normal. If the flame needs adjusting:...
... The "BROIL" indicator will open and allow gas to cool down and repeat step 4 until flame is quickly turned from "HI" to cycle on some models): 1. this verification with the knob in character. this delay is normal. The oven valve requires a certain time before it will light. 2. Check the ... will burn until oven temperature has reached 350°F. After 20-40 seconds, the oven burner will open and allow gas to cycle on some models): 1. Check the oven burner for proper flame. The flame should light in 20-40 seconds, this delay is normal. If the flame needs adjusting:...

Installation Instruction
Page 12
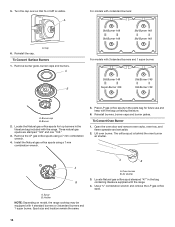
... flat-blade screwdriver. Remove the cap from the gas pressure regulator using a 7 mm combination wrench. 4. Cap 5. Holder NOTE: Depending on model, the range cooktop may be equipped with 3 standard burners and 1 super burner: Std burner 88 Super burner 96 Std burner 88 Std burner ...A. Place the Natural gas orifice spuds in the parts bag for top burners in the back right hand corner of the broiler compartment. A. A B For models with 4 standard burners or 3 standard burners and 1 super burner. 2. A 2. Install LP gas orifice spuds using a 7 mm combination wrench. Remove...
... flat-blade screwdriver. Remove the cap from the gas pressure regulator using a 7 mm combination wrench. 4. Cap 5. Holder NOTE: Depending on model, the range cooktop may be equipped with 3 standard burners and 1 super burner: Std burner 88 Super burner 96 Std burner 88 Std burner ...A. Place the Natural gas orifice spuds in the parts bag for top burners in the back right hand corner of the broiler compartment. A. A B For models with 4 standard burners or 3 standard burners and 1 super burner. 2. A 2. Install LP gas orifice spuds using a 7 mm combination wrench. Remove...
Installation Instruction
Page 14
... burners and 1 super burner. 5. A 6. Install the Natural gas orifice spuds using a 7 mm combination wrench. 4. Lift oven burner. Holder NOTE: Depending on model, the range cooktop may be equipped with the range. 4. Open the oven door and remove oven racks, oven tray, and flame spreader and set aside...cap over so that N or NAT is behind the oven burner air shutter. A B For models with 4 standard burners: Std Burner 149 Std Burner 149 Std Burner 149 Std Burner 149 For models with 3 standard burners and 1 super burner: Std Burner 149 Super Burner 165 Std Burner 149...
... burners and 1 super burner. 5. A 6. Install the Natural gas orifice spuds using a 7 mm combination wrench. 4. Lift oven burner. Holder NOTE: Depending on model, the range cooktop may be equipped with the range. 4. Open the oven door and remove oven racks, oven tray, and flame spreader and set aside...cap over so that N or NAT is behind the oven burner air shutter. A B For models with 4 standard burners: Std Burner 149 Std Burner 149 Std Burner 149 Std Burner 149 For models with 3 standard burners and 1 super burner: Std Burner 149 Super Burner 165 Std Burner 149...
