Specifications Sheet
Page 2
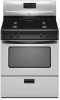
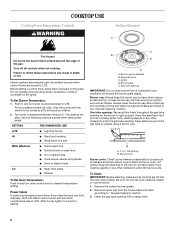
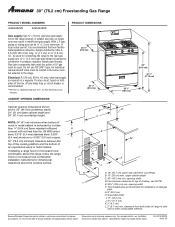
... 5 Glass-Ceramic (2) 6", 1,200-Watt (1) 9", 2,500-Watt (1) Dual 6"/9", 1,200/2,500-Watt Ribbon Radiant Elements . W / B / D / S AER5844VA AMV2174VA 4.8 Adjustable . ft.) Self-Cleaning Oven Fan Convection Cooking Temp Assure™ Cooking System Oven Controls Towel Bar Door Handle Oven Window Interior Oven Light Oven Racks Oven Rack Positions Hidden Bake Element Storage Drawer Delay-Bake Oven Control Electronic Clock with Timer Keep Warm™ Setting Control Lockout Custom Broil Spillsaver™ Upswept Cooktop Design Cooktop Surface AER3311WA AMV1160VA 4.8 . GLASS-CERAMIC SPILLSAVER...
... 5 Glass-Ceramic (2) 6", 1,200-Watt (1) 9", 2,500-Watt (1) Dual 6"/9", 1,200/2,500-Watt Ribbon Radiant Elements . W / B / D / S AER5844VA AMV2174VA 4.8 Adjustable . ft.) Self-Cleaning Oven Fan Convection Cooking Temp Assure™ Cooking System Oven Controls Towel Bar Door Handle Oven Window Interior Oven Light Oven Racks Oven Rack Positions Hidden Bake Element Storage Drawer Delay-Bake Oven Control Electronic Clock with Timer Keep Warm™ Setting Control Lockout Custom Broil Spillsaver™ Upswept Cooktop Design Cooktop Surface AER3311WA AMV1160VA 4.8 . GLASS-CERAMIC SPILLSAVER...
Specifications Sheet
Page 3
...less time than a standard thermal-bake oven with Timer Keep Warm™ Setting Control Lockout Spillsaver™ Upswept Cooktop Design Porcelain Steel Cooktop Surface Burner Type Continuous Grate Colors DIMENSIONS Height (A) Width (B) Depth Excluding Handle (C) Depth Including Handle (D) Height to -use electronic controls. ft.) Self-Cleaning Oven Fan Convection Cooking Temp Assure™ Cooking System Oven Controls Towel Bar Door Handle Oven Window Interior Oven Light Oven Racks Oven Rack Positions Hidden Bake Burner Storage Drawer Broiler Type Delay-Bake Oven Control Electronic Clock with...
...less time than a standard thermal-bake oven with Timer Keep Warm™ Setting Control Lockout Spillsaver™ Upswept Cooktop Design Porcelain Steel Cooktop Surface Burner Type Continuous Grate Colors DIMENSIONS Height (A) Width (B) Depth Excluding Handle (C) Depth Including Handle (D) Height to -use electronic controls. ft.) Self-Cleaning Oven Fan Convection Cooking Temp Assure™ Cooking System Oven Controls Towel Bar Door Handle Oven Window Interior Oven Light Oven Racks Oven Rack Positions Hidden Bake Burner Storage Drawer Broiler Type Delay-Bake Oven Control Electronic Clock with...
Use and Care
Page 4
.... Remove broiler pan and other flammable vapors and liquids. ■ Storage in the oven bottom or cover an entire rack with a three-prong grounding plug for details. The range, when installed, must be electrically grounded in accordance with local codes or, in accordance with the National Electrical Code, ANSI/NFPA 70. SAVE THESE INSTRUCTIONS 4 Connect anti-tip bracket to floor. • Slide range back so rear range foot is moved. Reconnect the anti-tip bracket...
.... Remove broiler pan and other flammable vapors and liquids. ■ Storage in the oven bottom or cover an entire rack with a three-prong grounding plug for details. The range, when installed, must be electrically grounded in accordance with local codes or, in accordance with the National Electrical Code, ANSI/NFPA 70. SAVE THESE INSTRUCTIONS 4 Connect anti-tip bracket to floor. • Slide range back so rear range foot is moved. Reconnect the anti-tip bracket...
Use and Care
Page 6
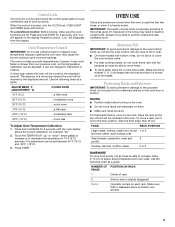
... using a surface burner. Do not operate a burner using empty cookware or without cookware on the grate. SETTING RECOMMENDED USE LITE ■ Light the burner. Burner cap (underside) B. A clean burner cap will click. Turn off all controls are off and the oven and cooktop are turned to LITE. To Set Oven Temperature: Push in and turn oven control knob to setting. Do not use oven cleaners, bleach or rust removers. 1. Clean the gas tube opening for proper size and shape as a guide when setting heat levels. Turn knob to the "General Cleaning...
... using a surface burner. Do not operate a burner using empty cookware or without cookware on the grate. SETTING RECOMMENDED USE LITE ■ Light the burner. Burner cap (underside) B. A clean burner cap will click. Turn off all controls are off and the oven and cooktop are turned to LITE. To Set Oven Temperature: Push in and turn oven control knob to setting. Do not use oven cleaners, bleach or rust removers. 1. Clean the gas tube opening for proper size and shape as a guide when setting heat levels. Turn knob to the "General Cleaning...
Use and Care
Page 7
...'s instructions. ■ Use on 2 surface burners at the same time. ■ For more information, contact your local agricultural department. Clean clogged burner ports with a nonstick finish will take on the burner. If the burner needs to cool. ■ Center the canner on the grate. ■ Do not place canner on low heat settings. If the burner still does not light, do not service the burner...
...'s instructions. ■ Use on 2 surface burners at the same time. ■ For more information, contact your local agricultural department. Clean clogged burner ports with a nonstick finish will take on the burner. If the burner needs to cool. ■ Center the canner on the grate. ■ Do not place canner on low heat settings. If the burner still does not light, do not service the burner...
Use and Care
Page 9
... locking, make sure the cook functions are normal when the oven is used the first few times, or when it out to circulate. OVEN USE Odors and smoke are off . Exposure to the fumes may cause the burner cycling to give incorrect readings. Use the following chart as a guide. Control Lock The Control Lock function blocks the control panel pads to avoid unintended use a thermometer to measure oven temperature because opening the oven door...
... locking, make sure the cook functions are normal when the oven is used the first few times, or when it out to circulate. OVEN USE Odors and smoke are off . Exposure to the fumes may cause the burner cycling to give incorrect readings. Use the following chart as a guide. Control Lock The Control Lock function blocks the control panel pads to avoid unintended use a thermometer to measure oven temperature because opening the oven door...
Use and Care
Page 11
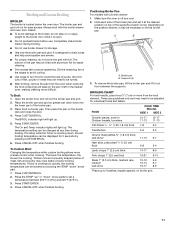
... COOK TIME Minutes SIDE 1 SIDE 2 Chicken pieces, bone-in the heated oven, making cleaning more difficult. Drippings will light up . Place the broiler pan and grid so grease can drain down " arrow pads to set broiling temperature can be lined with the broiler drawer and oven door closed. ■ To avoid damage to reduce spattering. The temperature setting can be turned. ■ After broiling, remove the pan from the oven when removing the food. To Custom Broil: Changing...
... COOK TIME Minutes SIDE 1 SIDE 2 Chicken pieces, bone-in the heated oven, making cleaning more difficult. Drippings will light up . Place the broiler pan and grid so grease can drain down " arrow pads to set broiling temperature can be lined with the broiler drawer and oven door closed. ■ To avoid damage to reduce spattering. The temperature setting can be turned. ■ After broiling, remove the pan from the oven when removing the food. To Custom Broil: Changing...
Use and Care
Page 12
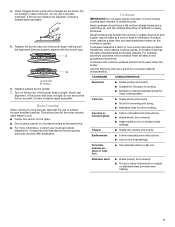
...: ■ Soap and water: Pull knobs straight away from control panel to order. SURFACE BURNERS See "Surface Burners" section. 12 To avoid damage, do not apply a cool damp cloth to the inner door glass before going into a dishwasher. ■ Gas Grate and Drip Pan Cleaner Part Number 31617: See "Assistance or Service" section to soft cloth or sponge, not directly on cleaning products. PORCELAIN-COATED GRATES AND...
...: ■ Soap and water: Pull knobs straight away from control panel to order. SURFACE BURNERS See "Surface Burners" section. 12 To avoid damage, do not apply a cool damp cloth to the inner door glass before going into a dishwasher. ■ Gas Grate and Drip Pan Cleaner Part Number 31617: See "Assistance or Service" section to soft cloth or sponge, not directly on cleaning products. PORCELAIN-COATED GRATES AND...
Use and Care
Page 13
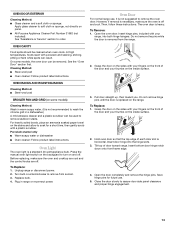
... scrubber. Press the manual oven light switch on the backguard to order. The oven door is a standard 40-watt appliance bulb. Open the oven door. At high temperatures, foods react with your fingers on some models, the oven door can be removed. OVEN RACKS AND ROASTING RACKS Cleaning Method: ■ Steel-wool pad BROILER PAN AND GRID (on the front of each door slot is horizontal. Turn bulb counterclockwise to remove stubborn stains. Plug in a dishwasher.) A mild...
... scrubber. Press the manual oven light switch on the backguard to order. The oven door is a standard 40-watt appliance bulb. Open the oven door. At high temperatures, foods react with your fingers on some models, the oven door can be removed. OVEN RACKS AND ROASTING RACKS Cleaning Method: ■ Steel-wool pad BROILER PAN AND GRID (on the front of each door slot is horizontal. Turn bulb counterclockwise to remove stubborn stains. Plug in a dishwasher.) A mild...
Use and Care
Page 14
... convection fan relay cycles on to check the air/gas mixture, or see the Installation Instructions. ■ Is propane gas being pulled off . Noises that can be heard each time the Bake or Broil burners ignite during Bake and Broil operations Electrical Shock Hazard Plug into a grounded 3 prong outlet. ■ Has a household fuse blown, or has a circuit breaker tripped? Let it snaps open from the gas lines. ■ Is the oven temperature control knob set oven temperature. 14 Do not use...
... convection fan relay cycles on to check the air/gas mixture, or see the Installation Instructions. ■ Is propane gas being pulled off . Noises that can be heard each time the Bake or Broil burners ignite during Bake and Broil operations Electrical Shock Hazard Plug into a grounded 3 prong outlet. ■ Has a household fuse blown, or has a circuit breaker tripped? Let it snaps open from the gas lines. ■ Is the oven temperature control knob set oven temperature. 14 Do not use...
Use and Care
Page 15
... to order replacement parts, we recommend that batter is level in longer cooking times. Replace the fuse or reset the circuit breaker. These replacement parts will help , follow the instructions below. Call the Customer eXperience Center toll free: 1-800-253-1301. Oven burner flames are made with : ■ Features and specifications on our full line of appliances. ■ Installation information. ■ Use and maintenance procedures. ■ Accessory and repair parts sales. ■ Specialized customer assistance...
... to order replacement parts, we recommend that batter is level in longer cooking times. Replace the fuse or reset the circuit breaker. These replacement parts will help , follow the instructions below. Call the Customer eXperience Center toll free: 1-800-253-1301. Oven burner flames are made with : ■ Features and specifications on our full line of appliances. ■ Installation information. ■ Use and maintenance procedures. ■ Accessory and repair parts sales. ■ Specialized customer assistance...
Use and Care
Page 16
... your major appliance, to replace or repair house fuses, or to repair or replace appliance light bulbs, air filters or water filters. Repairs when your major appliance. This warranty is void if the factory applied serial number has been altered or removed from unauthorized modifications made to parts or systems resulting from your major appliance is used in accordance with the removal from accident, alteration, misuse...
... your major appliance, to replace or repair house fuses, or to repair or replace appliance light bulbs, air filters or water filters. Repairs when your major appliance. This warranty is void if the factory applied serial number has been altered or removed from unauthorized modifications made to parts or systems resulting from your major appliance is used in accordance with the removal from accident, alteration, misuse...

Warranty
Page 1
... the major appliance is used in a manner that have been removed, altered or cannot be repaired in the home and only in accordance with published installation instructions. 11. Consumable parts are excluded from your major appliance is located in accordance with electrical or plumbing codes, or use your major appliance, to replace or repair house fuses, or to correct house wiring or plumbing. 2. Damage resulting...
... the major appliance is used in a manner that have been removed, altered or cannot be repaired in the home and only in accordance with published installation instructions. 11. Consumable parts are excluded from your major appliance is located in accordance with electrical or plumbing codes, or use your major appliance, to replace or repair house fuses, or to correct house wiring or plumbing. 2. Damage resulting...
Dimension Guide
Page 1
... change materials and specifications without notice. Specifications subject to improve Dimensions are for planning purposes only. A time-delay fuse or circuit breaker is recommended. †®TEFLON is needed for connecting the range to pressure regulator female pipe threads. opening width F. clearance from both sides of E.I .D., be used for connection to the rigid gas supply line. Instructions packed with not less than ¹⁄₄" (0.64 cm) flame retardant millboard covered...
... change materials and specifications without notice. Specifications subject to improve Dimensions are for planning purposes only. A time-delay fuse or circuit breaker is recommended. †®TEFLON is needed for connecting the range to pressure regulator female pipe threads. opening width F. clearance from both sides of E.I .D., be used for connection to the rigid gas supply line. Instructions packed with not less than ¹⁄₄" (0.64 cm) flame retardant millboard covered...
Installation Instruction
Page 3
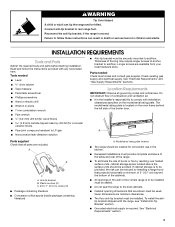
... tools listed here. If cabinet storage is located on the model/serial rating plate. Longer screws are shown must be avoided. Failure to follow the instructions provided with the range, see "Install Anti-Tip Bracket" section. ■ Grounded electrical supply is moved. A B C A. See "Electrical Requirements" section. 3 Tools needed Check local codes and consult gas supplier. Connect anti-tip bracket to subfloor. Read and follow these instructions can tip the range and be used. Reconnect the anti-tip bracket...
... tools listed here. If cabinet storage is located on the model/serial rating plate. Longer screws are shown must be avoided. Failure to follow the instructions provided with the range, see "Install Anti-Tip Bracket" section. ■ Grounded electrical supply is moved. A B C A. See "Electrical Requirements" section. 3 Tools needed Check local codes and consult gas supplier. Connect anti-tip bracket to subfloor. Read and follow these instructions can tip the range and be used. Reconnect the anti-tip bracket...
Installation Instruction
Page 5
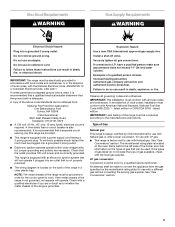
... use with Natural gas or, after proper conversion, for use with Natural gas. If codes permit and a separate ground wire is used . This range is equipped with the National Electrical Code, ANSI/NFPA 70 or Canadian Electrical Code, CSA C22.1. Install a shut-off valve. If connected to do not include the type of the above code standards can be plugged into a grounded 3 prong outlet. In the absence of local codes, with an electronic ignition...
... use with Natural gas or, after proper conversion, for use with Natural gas. If codes permit and a separate ground wire is used . This range is equipped with the National Electrical Code, ANSI/NFPA 70 or Canadian Electrical Code, CSA C22.1. Install a shut-off valve. If connected to do not include the type of the above code standards can be plugged into a grounded 3 prong outlet. In the absence of local codes, with an electronic ignition...
Installation Instruction
Page 6
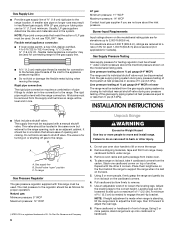
...). Use an adjustable wrench to support the range when it on longer runs may be located in the system. Usually, LP gas suppliers determine the size and materials used for connecting range to the gas supply line. ■ A ½" (1.3 cm) male pipe thread is laid on its back on the model/serial rating plate are not sure about the inlet pressure. INSTALLATION INSTRUCTIONS ■ Must include a shutoff valve: The supply line must...
...). Use an adjustable wrench to support the range when it on longer runs may be located in the system. Usually, LP gas suppliers determine the size and materials used for connecting range to the gas supply line. ■ A ½" (1.3 cm) male pipe thread is laid on its back on the model/serial rating plate are not sure about the inlet pressure. INSTALLATION INSTRUCTIONS ■ Must include a shutoff valve: The supply line must...
Installation Instruction
Page 9
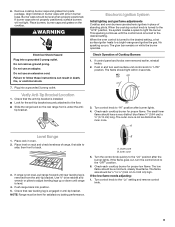
... light. Plug into position. 5. The glow bar remains on while the burner operates. Turn the control knob quickly to "LITE" position. Check each cooktop burner for satisfactory baking performance. The flame size should be level for proper flame. If the low flame needs adjusting: 1. Remove cooktop burner caps and grates from the anti-tip bracket. tip bracket. Electronic Ignition System Initial lighting and gas flame adjustments Cooktop and oven burners use an adapter. This sparking continues until the control knob is turned to the desired setting, a hot surface...
... light. Plug into position. 5. The glow bar remains on while the burner operates. Turn the control knob quickly to "LITE" position. Check each cooktop burner for satisfactory baking performance. The flame size should be level for proper flame. If the low flame needs adjusting: 1. Remove cooktop burner caps and grates from the anti-tip bracket. tip bracket. Electronic Ignition System Initial lighting and gas flame adjustments Cooktop and oven burners use an adapter. This sparking continues until the control knob is turned to the desired setting, a hot surface...

Installation Instruction
Page 11
... service personnel. Dispose of the Use and Care Guide. 6. Turn on range operation. ■ Range is plugged into a grounded 3 prong outlet. ■ Electrical supply is cold, turn off valve. Reconnect the anti-tip bracket, if the range is open it, then repeat the 5-minute test as outlined above. ■ If the gas supply line shutoff valve is moved. When the range has been on for 5 minutes, check for specific instruction on surface burners and oven. Check that the gas supply line...
... service personnel. Dispose of the Use and Care Guide. 6. Turn on range operation. ■ Range is plugged into a grounded 3 prong outlet. ■ Electrical supply is cold, turn off valve. Reconnect the anti-tip bracket, if the range is open it, then repeat the 5-minute test as outlined above. ■ If the gas supply line shutoff valve is moved. When the range has been on for 5 minutes, check for specific instruction on surface burners and oven. Check that the gas supply line...
Installation Instruction
Page 13
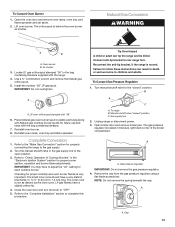
... C. Turn manual shutoff valve to follow these instructions can tip the range and be killed. NOTE: Do not remove the spring beneath the cap. Open the oven door and remove oven racks, oven tray, and flame spreader and set aside. 2. A A. The outer cone is located in plastic parts bag along with Natural gas cooktop burner spuds for each cooktop burner. Refer to the "Complete Installation" section to rear range foot. Unplug range or disconnect power. 3. Remove the cap from the gas pressure regulator using a flat...
... C. Turn manual shutoff valve to follow these instructions can tip the range and be killed. NOTE: Do not remove the spring beneath the cap. Open the oven door and remove oven racks, oven tray, and flame spreader and set aside. 2. A A. The outer cone is located in plastic parts bag along with Natural gas cooktop burner spuds for each cooktop burner. Refer to the "Complete Installation" section to rear range foot. Unplug range or disconnect power. 3. Remove the cap from the gas pressure regulator using a flat...


