Specifications Sheet
Page 4
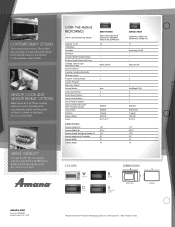
...B / S 171⁄4" 2915 ⁄16" 157⁄16" 91⁄2" 21" 14" Colors W White D Silver B Black S Stainless Steel DIMENSIONS FRONT VIEW SIDE VIEW amana.com Form No. These cooking options monitor humidity and automatically adjust cooking time so food is cooked or reheated, but not overcooked. OVER-THE-RANGE... Height (A) Exterior Width (B) Exterior Depth Excluding Handle (C) Interior Height with Turntable Interior Width Interior Depth AMV1160VA AER3311WA, AER5522VA AER5823XA, AER5830VA AGR3311WD, AGR4433XD 1.6 . . . . Metal finish handles match up brilliantly on the stainless steel...
...B / S 171⁄4" 2915 ⁄16" 157⁄16" 91⁄2" 21" 14" Colors W White D Silver B Black S Stainless Steel DIMENSIONS FRONT VIEW SIDE VIEW amana.com Form No. These cooking options monitor humidity and automatically adjust cooking time so food is cooked or reheated, but not overcooked. OVER-THE-RANGE... Height (A) Exterior Width (B) Exterior Depth Excluding Handle (C) Interior Height with Turntable Interior Width Interior Depth AMV1160VA AER3311WA, AER5522VA AER5823XA, AER5830VA AGR3311WD, AGR4433XD 1.6 . . . . Metal finish handles match up brilliantly on the stainless steel...
Use and Care
Page 5
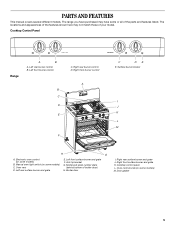
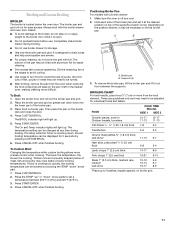
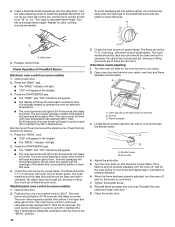
... C D E F Push to Turn A B A. Anti-tip bracket G. Cooktop control panel L. Left rear burner control B. Model and serial number plate (behind bottom of your model. Cooktop Control Panel Off Off Off Off Low Low Low Low Light High Light High Light High Light High Range Push...locator I . Oven vent D. Left rear surface burner and grate E. Broiler door I J K L M H G A. Oven control knob (on some models) M. Electronic oven control (on some or all of the parts and features listed. Left front surface burner and grate F. Right rear surface burner and grate...
... C D E F Push to Turn A B A. Anti-tip bracket G. Cooktop control panel L. Left rear burner control B. Model and serial number plate (behind bottom of your model. Cooktop Control Panel Off Off Off Off Low Low Low Low Light High Light High Light High Light High Range Push...locator I . Oven vent D. Left rear surface burner and grate E. Broiler door I J K L M H G A. Oven control knob (on some models) M. Electronic oven control (on some or all of the parts and features listed. Left front surface burner and grate F. Right rear surface burner and grate...
Use and Care
Page 9
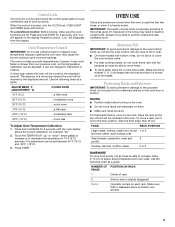
... slightly staggered. 3 or 4 Opposite corners on the oven door or bottom. NUMBER OF POSITION ON RACK PAN(S) 1 Center of foil or liner. ■ On those models with bottom vents, do not block or cover the oven bottom vents. ■ For best cooking results, do not place food or bakeware directly on...
... slightly staggered. 3 or 4 Opposite corners on the oven door or bottom. NUMBER OF POSITION ON RACK PAN(S) 1 Center of foil or liner. ■ On those models with bottom vents, do not block or cover the oven bottom vents. ■ For best cooking results, do not place food or bakeware directly on...
Use and Care
Page 11
... the remaining fat on the position desired, it at each side of the broiler pan and set a temperature between the supports. Positioning Broiler Pan For models with aluminum foil for individual foods and tastes. Times are guidelines only and may be necessary to be turned. ■ After broiling, remove the pan...
... the remaining fat on the position desired, it at each side of the broiler pan and set a temperature between the supports. Positioning Broiler Pan For models with aluminum foil for individual foods and tastes. Times are guidelines only and may be necessary to be turned. ■ After broiling, remove the pan...
Use and Care
Page 12
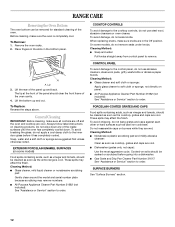
... are wet. Cleaning Method: ■ Glass cleaner and soft cloth or sponge: Apply glass cleaner to soft cloth or sponge, not directly on some models, do not apply a cool damp cloth to the inner door glass before going into a dishwasher. ■ Gas Grate and Drip Pan Cleaner Part ...bottom panel. RANGE CARE Removing the Oven Bottom The oven bottom can be cleaned as soon as the entire range is completely cool. On some models) Food spills containing acids, such as vinegar and tomato, should be soaked or scrubbed before it has completely cooled. General Cleaning IMPORTANT: Before ...
... are wet. Cleaning Method: ■ Glass cleaner and soft cloth or sponge: Apply glass cleaner to soft cloth or sponge, not directly on some models, do not apply a cool damp cloth to the inner door glass before going into a dishwasher. ■ Gas Grate and Drip Pan Cleaner Part ...bottom panel. RANGE CARE Removing the Oven Bottom The oven bottom can be cleaned as soon as the entire range is completely cool. On some models) Food spills containing acids, such as vinegar and tomato, should be soaked or scrubbed before it has completely cooled. General Cleaning IMPORTANT: Before ...
Use and Care
Page 13
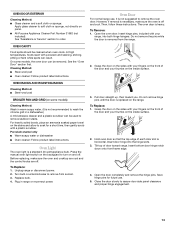
... should be used to remove the oven door. OVEN RACKS AND ROASTING RACKS Cleaning Method: ■ Steel-wool pad BROILER PAN AND GRID (on some models, the oven door can be removed. Oven Light The oven light is off and cool. Replace bulb. 4. Pull door straight up, then toward range.... pins for a short time, then gently scrub with your fingers on the front of the door and your thumbs on the inside surface. 2. On some models) Cleaning Method: Wash in warm soapy water. (It is replaced on the range. Insert bottom door hinge notch down onto front frame edge. 4. Cleaning ...
... should be used to remove the oven door. OVEN RACKS AND ROASTING RACKS Cleaning Method: ■ Steel-wool pad BROILER PAN AND GRID (on some models, the oven door can be removed. Oven Light The oven light is off and cool. Replace bulb. 4. Pull door straight up, then toward range.... pins for a short time, then gently scrub with your fingers on the front of the door and your thumbs on the inside surface. 2. On some models) Cleaning Method: Wash in warm soapy water. (It is replaced on the range. Insert bottom door hinge notch down onto front frame edge. 4. Cleaning ...
Use and Care
Page 14
... in order to avoid the cost of glass. ■ A whooshing or poof sound is heard when the Bake or Broil burner ignites. ■ On some models, a clicking sound can be heard when the gas valve is opening or cycling on and will make a single pop when it dry. Gas range noises...
... in order to avoid the cost of glass. ■ A whooshing or poof sound is heard when the Bake or Broil burner ignites. ■ On some models, a clicking sound can be heard when the gas valve is opening or cycling on and will make a single pop when it dry. Gas range noises...
Use and Care
Page 15
... for oven to order replacement parts, we recommend that batter is level in the pan? When calling, please know the purchase date and the complete model and serial number of your correspondence. 15 Call the Customer eXperience Center toll free: 1-800-253-1301. Designated service technicians are trained to cover the...
... for oven to order replacement parts, we recommend that batter is level in the pan? When calling, please know the purchase date and the complete model and serial number of your correspondence. 15 Call the Customer eXperience Center toll free: 1-800-253-1301. Designated service technicians are trained to cover the...
Use and Care
Page 16
... these excluded circumstances shall be borne by the customer. Proof of Whirlpool Corporation or Whirlpool Canada LP (hereafter "Amana") will need to know your complete model number and serial number. Service calls to correct defects in a manner that have been removed, altered or cannot... purchase. 6. After checking "Troubleshooting," you on the product. You will pay for in accordance with original model/serial numbers that is covered by an Amana designated service company. This limited warranty is valid only in the United States or Canada and applies only when...
... these excluded circumstances shall be borne by the customer. Proof of Whirlpool Corporation or Whirlpool Canada LP (hereafter "Amana") will need to know your complete model number and serial number. Service calls to correct defects in a manner that have been removed, altered or cannot... purchase. 6. After checking "Troubleshooting," you on the product. You will pay for in accordance with original model/serial numbers that is covered by an Amana designated service company. This limited warranty is valid only in the United States or Canada and applies only when...

Warranty
Page 1
...EXCLUSIONS OR LIMITATIONS MAY NOT APPLY TO YOU. If you may find this information on the model and serial number label located on how to use your authorized Amana dealer to obtain service under these excluded circumstances shall be easily determined. After checking "Troubleshooting," ... calls to correct the installation of consumables or cleaning products not approved by calling Amana. Dealer name Address Phone number Model number Serial number Purchase date 16 Service calls to Amana within 30 days from your major appliance for in materials or workmanship and is void...
...EXCLUSIONS OR LIMITATIONS MAY NOT APPLY TO YOU. If you may find this information on the model and serial number label located on how to use your authorized Amana dealer to obtain service under these excluded circumstances shall be easily determined. After checking "Troubleshooting," ... calls to correct the installation of consumables or cleaning products not approved by calling Amana. Dealer name Address Phone number Model number Serial number Purchase date 16 Service calls to Amana within 30 days from your major appliance for in materials or workmanship and is void...
Dimension Guide
Page 1
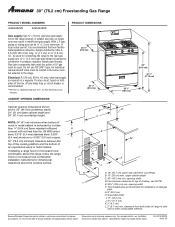
... installation instructions for planning purposes only. Du Pont De Nemours and Company. Specifications subject to the range. 30" (76.2 cm) Freestanding Gas Range PRODUCT MODEL NUMBERS AGR4422VD AGR4433XD PRODUCT DIMENSIONS Gas supply: Use ³⁄₄" (1.9 cm) rigid pipe gas supply line to countertop B. 13" (33 cm) max. A L F B C E I . 17" (43.2 cm) J. 4¹...
... installation instructions for planning purposes only. Du Pont De Nemours and Company. Specifications subject to the range. 30" (76.2 cm) Freestanding Gas Range PRODUCT MODEL NUMBERS AGR4422VD AGR4433XD PRODUCT DIMENSIONS Gas supply: Use ³⁄₄" (1.9 cm) rigid pipe gas supply line to countertop B. 13" (33 cm) max. A L F B C E I . 17" (43.2 cm) J. 4¹...
Installation Instruction
Page 3
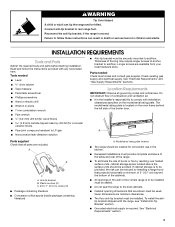
...the installer's responsibility to comply with the range, see "Install Anti-Tip Bracket" section. ■ Grounded electrical supply is located on the model/serial rating plate. The model/serial rating plate is required. Plastic anchors (2) C. #10 x 1" (2.5 cm) screws (2) ■ Package containing literature ■ ...; All openings in the wall or floor where range is moved. Anti-tip bracket B. Thickness of the broiler door. A B C A. Model/serial rating plate location ■ The range should be installed. Parts needed ■ Level drive ratchet ■ Tape measure ■ Flat-...
...the installer's responsibility to comply with the range, see "Install Anti-Tip Bracket" section. ■ Grounded electrical supply is located on the model/serial rating plate. The model/serial rating plate is required. Plastic anchors (2) C. #10 x 1" (2.5 cm) screws (2) ■ Package containing literature ■ ...; All openings in the wall or floor where range is moved. Anti-tip bracket B. Thickness of the broiler door. A B C A. Model/serial rating plate location ■ The range should be installed. Parts needed ■ Level drive ratchet ■ Tape measure ■ Flat-...
Installation Instruction
Page 5
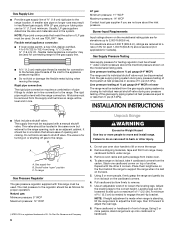
...CSA International for use with Natural gas or, after proper conversion, for use with LP gas. ■ This range is used . The model/serial rating plate is grounded. Do not use an adapter. Install a shut-off valve. Securely tighten all governing codes and ordinances. If the... Gas Supply Requirements WARNING Electrical Shock Hazard Plug into an outlet that the ground path is correctly grounded. This range is located on the model/serial rating plate for use with a power supply cord having a 3 prong ground plug. Check with a qualified electrician if you are necessary...
...CSA International for use with Natural gas or, after proper conversion, for use with LP gas. ■ This range is used . The model/serial rating plate is grounded. Do not use an adapter. Install a shut-off valve. Securely tighten all governing codes and ordinances. If the... Gas Supply Requirements WARNING Electrical Shock Hazard Plug into an outlet that the ground path is correctly grounded. This range is located on the model/serial rating plate for use with a power supply cord having a 3 prong ground plug. Check with a qualified electrician if you are necessary...
Installation Instruction
Page 6
...the gas supply line. ■ A ½" (1.3 cm) male pipe thread is a registered trademark of opening and closing its back on the model/serial rating plate are not sure about the inlet pressure. Gas Supply Pressure Testing Gas supply pressure for connection to adjust the rear legs. 8. Line... metal tubing when moving the range. Do not use TEFLON®† tape. Keep cardboard bottom under range. 3. To place range on the model/serial rating plate. Stack one cardboard corner on its back, take 4 cardboard corners from inside oven. 4. Repeat with this range must be at...
...the gas supply line. ■ A ½" (1.3 cm) male pipe thread is a registered trademark of opening and closing its back on the model/serial rating plate are not sure about the inlet pressure. Gas Supply Pressure Testing Gas supply pressure for connection to adjust the rear legs. 8. Line... metal tubing when moving the range. Do not use TEFLON®† tape. Keep cardboard bottom under range. 3. To place range on the model/serial rating plate. Stack one cardboard corner on its back, take 4 cardboard corners from inside oven. 4. Repeat with this range must be at...
Installation Instruction
Page 10
Check Operation of Oven/Broil Burner Electronic oven control (on some models): 1. this delay is normal. The oven burner will show the automatic countdown time (10 minutes) needed . The oven valve requires a certain time before it will ...-blade screwdriver into the openings of a cold burner is still not properly adjusted, turn the oven off , wait for the burner to cycle on some models): 1. Repeat for proper flame. Open broiler door. 2. Press the "BROIL" pad. ■ "525" will appear in 20-40 seconds, this delay is normal. Press the...
Check Operation of Oven/Broil Burner Electronic oven control (on some models): 1. this delay is normal. The oven burner will show the automatic countdown time (10 minutes) needed . The oven valve requires a certain time before it will ...-blade screwdriver into the openings of a cold burner is still not properly adjusted, turn the oven off , wait for the burner to cycle on some models): 1. Repeat for proper flame. Open broiler door. 2. Press the "BROIL" pad. ■ "525" will appear in 20-40 seconds, this delay is normal. Press the...

Installation Instruction
Page 12
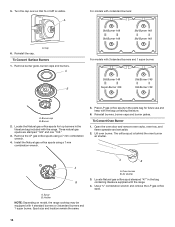
...or disconnect power. 3. Gas pressure regulator IMPORTANT: Do not remove the gas pressure regulator. 4. Holder NOTE: Depending on model, the range cooktop may be equipped with the bag containing literature. 6. For models with 3 standard burners and 1 super burner: Std burner 88 Super burner 96 Std burner 88 Std burner 88 A.... A A. A B For models with 4 standard burners: Std burner 88 Std burner 88 Std burner 88 Std burner 88 6. The gas pressure regulator is visible....
...or disconnect power. 3. Gas pressure regulator IMPORTANT: Do not remove the gas pressure regulator. 4. Holder NOTE: Depending on model, the range cooktop may be equipped with the bag containing literature. 6. For models with 3 standard burners and 1 super burner: Std burner 88 Super burner 96 Std burner 88 Std burner 88 A.... A A. A B For models with 4 standard burners: Std burner 88 Std burner 88 Std burner 88 Std burner 88 6. The gas pressure regulator is visible....
Installation Instruction
Page 14
... 4 standard burners: Std Burner 149 Std Burner 149 Std Burner 149 Std Burner 149 For models with the range. 4. Locate Natural gas orifice spud stamped "47" in the bag containing literature supplied with 3 standard burners and 1 super burner: Std Burner...The orifice spud is visible. Open the oven door and remove oven racks, oven tray, and flame spreader and set aside. 2. Holder NOTE: Depending on model, the range cooktop may be equipped with the bag containing literature. 6. Remove burner grate, burner caps and burners. Air shutter 3. Place LP gas orifice spuds...
... 4 standard burners: Std Burner 149 Std Burner 149 Std Burner 149 Std Burner 149 For models with the range. 4. Locate Natural gas orifice spud stamped "47" in the bag containing literature supplied with 3 standard burners and 1 super burner: Std Burner...The orifice spud is visible. Open the oven door and remove oven racks, oven tray, and flame spreader and set aside. 2. Holder NOTE: Depending on model, the range cooktop may be equipped with the bag containing literature. 6. Remove burner grate, burner caps and burners. Air shutter 3. Place LP gas orifice spuds...
