Owner's Manual (english)
Page 3
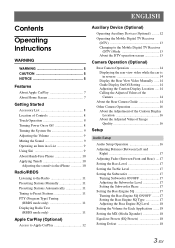
... Digital TV Receiver (DTV 13 Changing to the Mobile Digital TV Receiver (DTV) Mode 13 About the DTV operation screen 13 Camera Operation (Optional) Rear Camera Operation 14 Displaying the rear view video while the car is in reverse 14 Display the Rear View Video Manually ......14 Guide ...Display On/Off Setting 14 Adjusting the Caution Display Location .....14 Calling the Adjusted Values of the Camera 14 About the Rear Camera Guide 14 Other Camera Operation 16 About the Adjustment of the Caution Display Location 16 About the Adjusted Value of Image Quality 16 Setup ...
... Digital TV Receiver (DTV 13 Changing to the Mobile Digital TV Receiver (DTV) Mode 13 About the DTV operation screen 13 Camera Operation (Optional) Rear Camera Operation 14 Displaying the rear view video while the car is in reverse 14 Display the Rear View Video Manually ......14 Guide ...Display On/Off Setting 14 Adjusting the Caution Display Location .....14 Calling the Adjusted Values of the Camera 14 About the Rear Camera Guide 14 Other Camera Operation 16 About the Adjustment of the Caution Display Location 16 About the Adjusted Value of Image Quality 16 Setup ...
Owner's Manual (english)
Page 4
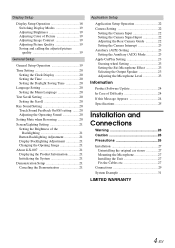
... the Opening Image 21 About iLX-007 21 Displaying the Product Information 21 Initializing the System 21 Demonstration Setup 21 Canceling the Demonstration 21 Application Setup Application Setup Operation 22 Camera Setting 22 Setting the Camera Input 22 Setting the Camera Signal Input 22 Adjusting the Rear Camera Guide 22 Setting the Camera Interrupt 23 Auxiliary (AUX...
... the Opening Image 21 About iLX-007 21 Displaying the Product Information 21 Initializing the System 21 Demonstration Setup 21 Canceling the Demonstration 21 Application Setup Application Setup Operation 22 Camera Setting 22 Setting the Camera Input 22 Setting the Camera Signal Input 22 Adjusting the Rear Camera Guide 22 Setting the Camera Interrupt 23 Auxiliary (AUX...
Owner's Manual (english)
Page 8
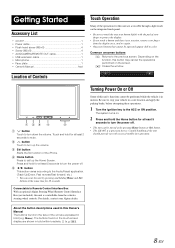
Getting Started Accessory List • iLX-007 1 • Power cable 1 • Flush head screw (M5×8 4 • Screw (M5×8 4 • AUX/CAMERA/REMOTE OUT cable 1 • USB extension cable 1 • Microphone 1 • Face plate 1 • Owner's Manual 1set Touch ...window. Location of the iPhone. Siri button Starts the Siri function of Controls button Touch to Remote Control Interface Box With an optional Alpine Steering Wheel Remote Control Interface Box (not included), this button may cancel the operations performed on the function, this unit is controllable...
Getting Started Accessory List • iLX-007 1 • Power cable 1 • Flush head screw (M5×8 4 • Screw (M5×8 4 • AUX/CAMERA/REMOTE OUT cable 1 • USB extension cable 1 • Microphone 1 • Face plate 1 • Owner's Manual 1set Touch ...window. Location of the iPhone. Siri button Starts the Siri function of Controls button Touch to Remote Control Interface Box With an optional Alpine Steering Wheel Remote Control Interface Box (not included), this button may cancel the operations performed on the function, this unit is controllable...
Owner's Manual (english)
Page 14
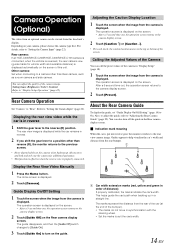
... properly calibrated, the marks indicate the car's width. Depending on the screen. • After a 5-second time-out, the operation screen returns to the camera display screen. 2 Touch [Caution ↑] or [Caution ↓]. • For each touch, the caution location moves to the top or bottom of ...Operation" (page 18). The Home screen is in reverse 1 Shift the gear lever to the previous screen. • Never depend solely on the camera when backing up in reverse. 2 If you shift the gear lever to a position other than reverse (R), the monitor returns to the reverse (R) ...
... properly calibrated, the marks indicate the car's width. Depending on the screen. • After a 5-second time-out, the operation screen returns to the camera display screen. 2 Touch [Caution ↑] or [Caution ↓]. • For each touch, the caution location moves to the top or bottom of ...Operation" (page 18). The Home screen is in reverse 1 Shift the gear lever to the previous screen. • Never depend solely on the camera when backing up in reverse. 2 If you shift the gear lever to a position other than reverse (R), the monitor returns to the reverse (R) ...

Owner's Manual (english)
Page 15
... is different from the rear bumper. In the following conditions, screen visibility may have a tint which is difficult to accurately estimate the distance to the camera or its field-of proximity. In the screen, positions A, B and C seem to B is an obstacle on the road surface. For example, ...the night, etc.). - When it may occur between the screen guidance and the actual road surface. (The illustrations represent a case when the camera is installed in the case of the car on the upward slope, it is a steep upward slope behind the car (example) Distance guidance ...
... is different from the rear bumper. In the following conditions, screen visibility may have a tint which is difficult to accurately estimate the distance to the camera or its field-of proximity. In the screen, positions A, B and C seem to B is an obstacle on the road surface. For example, ...the night, etc.). - When it may occur between the screen guidance and the actual road surface. (The illustrations represent a case when the camera is installed in the case of the car on the upward slope, it is a steep upward slope behind the car (example) Distance guidance ...
Owner's Manual (english)
Page 16
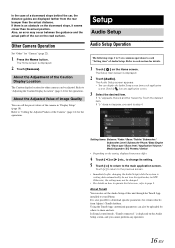
...slope, it seems closer than the actual distance. About the Adjustment of the Caution Display Location The Caution display location for certain vehicles from Alpine's TuneIt database. Setup Audio Setup Audio Setup Operation The following steps 1 to 5 are displayed farther from each application screen. If " "...Volume / Media Xpander / EQ Presets / Defeat • Depending on the road surface. It is also possible to download specific parameters for other cameras can also be uploaded for the operations. Refer to each section for details. 1 Touch [ ] on the Audio Setup screen, and you ...
...slope, it seems closer than the actual distance. About the Adjustment of the Caution Display Location The Caution display location for certain vehicles from Alpine's TuneIt database. Setup Audio Setup Audio Setup Operation The following steps 1 to 5 are displayed farther from each application screen. If " "...Volume / Media Xpander / EQ Presets / Defeat • Depending on the road surface. It is also possible to download specific parameters for other cameras can also be uploaded for the operations. Refer to each section for details. 1 Touch [ ] on the Audio Setup screen, and you ...
Owner's Manual (english)
Page 19
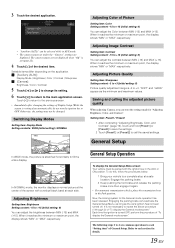
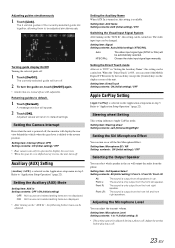
... common operations to +15 (Initial setting: 0) You can store the settings made for the General mode operation has been released. The camera names are displayed. Adjusting Image Contrast Setting item: Contrast Setting content: -15 to each section for details. 19-EN Setting item: ...between MIN (-15) and MAX (+15). Settable items differ depending on the application. [Auxiliary (AUX)]: Display Mode / Brightness / Color / Contrast / Sharpness [Camera]: Brightness / Color / Contrast 5 Touch [ ] or [ ] to change its setting. 6 Touch [ ] to return to call the saved settings. Otherwise,...
... common operations to +15 (Initial setting: 0) You can store the settings made for the General mode operation has been released. The camera names are displayed. Adjusting Image Contrast Setting item: Contrast Setting content: -15 to each section for details. 19-EN Setting item: ...between MIN (-15) and MAX (+15). Settable items differ depending on the application. [Auxiliary (AUX)]: Display Mode / Brightness / Color / Contrast / Sharpness [Camera]: Brightness / Color / Contrast 5 Touch [ ] or [ ] to change its setting. 6 Touch [ ] to return to call the saved settings. Otherwise,...
Owner's Manual (english)
Page 22
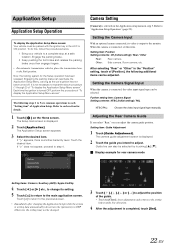
...Engaging the parking brake can also be changed. 3 Touch or [ ] to adjust the position of Application Setup. Setting the Camera Input With an optional camera connected, its setting. 5 Touch [ ] to return to repeat the above procedure (1 through 2) of "To display the ...Application Setup Menu screen". Setting item: Position Setting contents: Off (Initial setting) / Rear / Other Rear: Other: Rear camera Side camera, Room camera, etc. Setting item: Guide Adjustment 1 Touch [Guide Adjustment]. Guide line can reactivate the Application Setup Menu, as long as the ...
...Engaging the parking brake can also be changed. 3 Touch or [ ] to adjust the position of Application Setup. Setting the Camera Input With an optional camera connected, its setting. 5 Touch [ ] to return to repeat the above procedure (1 through 2) of "To display the ...Application Setup Menu screen". Setting item: Position Setting contents: Off (Initial setting) / Rear / Other Rear: Other: Rear camera Side camera, Room camera, etc. Setting item: Guide Adjustment 1 Touch [Guide Adjustment]. Guide line can reactivate the Application Setup Menu, as long as the ...
Owner's Manual (english)
Page 23
... to default. 1 Touch [Default]. ON: AUX source and related setting items are not displayed. Steering wheel Setting This setting influences Apple CarPlay mode. Setting the Camera Interrupt Even when the unit is shifted out of the unit. Setting item: Interrupt (Power OFF) Setting contents: ON (Initial setting) / OFF • Rear...
... to default. 1 Touch [Default]. ON: AUX source and related setting items are not displayed. Steering wheel Setting This setting influences Apple CarPlay mode. Setting the Camera Interrupt Even when the unit is shifted out of the unit. Setting item: Interrupt (Power OFF) Setting contents: ON (Initial setting) / OFF • Rear...
Owner's Manual (english)
Page 29
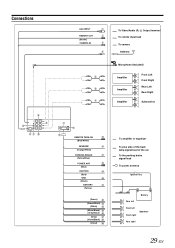
... To Video/Audio (R, L) Output terminal To remote input lead To camera Antenna Microphone (Included) Amplifier Amplifier Amplifier Front Left Front Right Rear Left Rear Right Subwoofers REMOTE TURN-ON (Blue/White) REVERSE (Orange/White) PARKING BRAKE (...
... To Video/Audio (R, L) Output terminal To remote input lead To camera Antenna Microphone (Included) Amplifier Amplifier Amplifier Front Left Front Right Rear Left Rear Right Subwoofers REMOTE TURN-ON (Blue/White) REVERSE (Orange/White) PARKING BRAKE (...
Owner's Manual (english)
Page 30
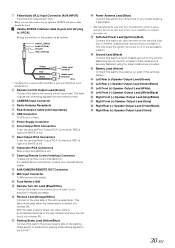
...Blue) Connect this lead properly wired, the video picture automatically switches to the +B terminal of your nearest Alpine dealer. Make sure the connection is put into reverse (R). Power Supply Connector Front Output RCA Connectors It can... the controlling signals from the remote control. Steering Remote Control Interface Connector To steering remote control interface box. AUX/CAMERA/REMOTE OUT Connector MIC Input Connector To Microphone (Included). Left Rear (+) Speaker Output Lead (Green) Left Rear ...is left . Battery Lead (Yellow) Connect this lead to the iLX-007.
...Blue) Connect this lead properly wired, the video picture automatically switches to the +B terminal of your nearest Alpine dealer. Make sure the connection is put into reverse (R). Power Supply Connector Front Output RCA Connectors It can... the controlling signals from the remote control. Steering Remote Control Interface Connector To steering remote control interface box. AUX/CAMERA/REMOTE OUT Connector MIC Input Connector To Microphone (Included). Left Rear (+) Speaker Output Lead (Green) Left Rear ...is left . Battery Lead (Yellow) Connect this lead to the iLX-007.
Owner's Manual (english)
Page 32
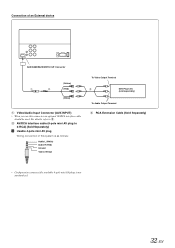
... to 2. 2 AV/RCA interface cable (4-pole mini AV plug to 3-RCA) (Sold Separately) Usable 4-pole mini AV plug Wiring convention of an External device AUX/CAMERA/REMOTE OUT Connector (Yellow) (Red) (White) 1 Video/Audio Input Connector (AUX INPUT) • When you use this system is as follows: Audio L (White...
... to 2. 2 AV/RCA interface cable (4-pole mini AV plug to 3-RCA) (Sold Separately) Usable 4-pole mini AV plug Wiring convention of an External device AUX/CAMERA/REMOTE OUT Connector (Yellow) (Red) (White) 1 Video/Audio Input Connector (AUX INPUT) • When you use this system is as follows: Audio L (White...
Owner's Manual (english)
Page 34
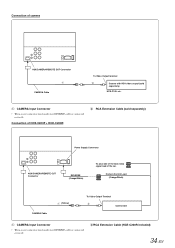
... used , make sure REVERSE cable is connected correctly. Connection of the car. Connection of camera AUX/CAMERA/REMOTE OUT Connector CAMERA Cable To Video Output terminal Camera with RCA video output (sold separately) Power Supply Connector AUX/CAMERA/REMOTE OUT Connector REVERSE (Orange/White) To plus side of the back lamp signal lead of HCE...
... used , make sure REVERSE cable is connected correctly. Connection of the car. Connection of camera AUX/CAMERA/REMOTE OUT Connector CAMERA Cable To Video Output terminal Camera with RCA video output (sold separately) Power Supply Connector AUX/CAMERA/REMOTE OUT Connector REVERSE (Orange/White) To plus side of the back lamp signal lead of HCE...

