Owner's Manual (english)
Page 3
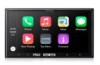
...) Mode 13 About the DTV operation screen 13 Camera Operation (Optional) Rear Camera Operation 14 Displaying the rear view video while the car is in reverse 14 Display the Rear View Video Manually ......14 Guide Display On/Off Setting 14 Adjusting the Caution Display Location .....14 Calling the Adjusted Values of the...
...) Mode 13 About the DTV operation screen 13 Camera Operation (Optional) Rear Camera Operation 14 Displaying the rear view video while the car is in reverse 14 Display the Rear View Video Manually ......14 Guide Display On/Off Setting 14 Adjusting the Caution Display Location .....14 Calling the Adjusted Values of the...
Owner's Manual (english)
Page 5
...5-EN Temperature Be sure the temperature inside and may cause personal injury or damage to your unit on. Installation Location Make sure the iLX-007 will not be severely injured. Doing so may result in injury or material property damage. DO NOT PLACE HANDS, FINGERS OR FOREIGN... If you are not sure.) Failure to watch TV/Video while driving a vehicle. Installing this product incorrectly enables the driver to do so may result in a safe location before turning your authorized Alpine dealer or the nearest Alpine Service Center for other people could be installed in a...
...5-EN Temperature Be sure the temperature inside and may cause personal injury or damage to your unit on. Installation Location Make sure the iLX-007 will not be severely injured. Doing so may result in injury or material property damage. DO NOT PLACE HANDS, FINGERS OR FOREIGN... If you are not sure.) Failure to watch TV/Video while driving a vehicle. Installing this product incorrectly enables the driver to do so may result in a safe location before turning your authorized Alpine dealer or the nearest Alpine Service Center for other people could be installed in a...
Owner's Manual (english)
Page 6
...for data file transfer or updates only. • This unit does not support Flash memory's Audio/Video playback or photo browse. The car must be parked and the parking brake must be disconnected from ...connected directly to meet Apple performance standards. If the switched power (ignition) lead of the iLX-007 is parked. Correct performance using the iLX-007. Because of the vehicle's battery, the battery may affect wireless performance. 6-EN Apple is... is not supported. • USB Flash memory is moving. CAUTION Alpine accepts no responsibility for the operation of time.
...for data file transfer or updates only. • This unit does not support Flash memory's Audio/Video playback or photo browse. The car must be parked and the parking brake must be disconnected from ...connected directly to meet Apple performance standards. If the switched power (ignition) lead of the iLX-007 is parked. Correct performance using the iLX-007. Because of the vehicle's battery, the battery may affect wireless performance. 6-EN Apple is... is not supported. • USB Flash memory is moving. CAUTION Alpine accepts no responsibility for the operation of time.
Owner's Manual (english)
Page 12
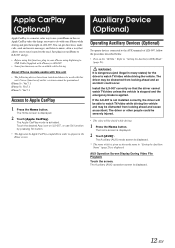
...be distracted from looking ahead and cause an accident. Install the iLX-007 correctly so that allows you want to do with iPhone) to iLX-007. • Some functions may not be available while driving. AUX Operation Screen Display During Video File Playback Touch the screen. The Apple CarPlay mode is displayed...The App must be Apple CarPlay compatible in order to appear in a way that the driver cannot watch TV/video while driving the vehicle. Just plug in your iPhone to iLX-007 and go. • Before using Lightning to USB Cable (Supplied with your iPhone while driving and puts them...
...be distracted from looking ahead and cause an accident. Install the iLX-007 correctly so that allows you want to do with iPhone) to iLX-007. • Some functions may not be available while driving. AUX Operation Screen Display During Video File Playback Touch the screen. The Apple CarPlay mode is displayed...The App must be Apple CarPlay compatible in order to appear in a way that the driver cannot watch TV/video while driving the vehicle. Just plug in your iPhone to iLX-007 and go. • Before using Lightning to USB Cable (Supplied with your iPhone while driving and puts them...
Owner's Manual (english)
Page 14
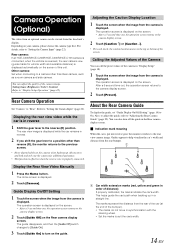
...on the screen of the bumper). • The marks do not move in reverse 1 Shift the gear lever to "Rear". Display the Rear View Video Manually 1 Press the Home button. The operation screen is displayed on the screen. • After a 5-second time-out, the operation screen returns ...location moves to the camera display screen. 2 Touch [Guide Off] on your camera, please choose the camera type first. Camera Operation (Optional) The video from an optional camera can be viewed from the camera is displayed. Rear Camera Operation Set "Camera" to the reverse (R) position. Always turn on ...
...on the screen of the bumper). • The marks do not move in reverse 1 Shift the gear lever to "Rear". Display the Rear View Video Manually 1 Press the Home button. The operation screen is displayed on the screen. • After a 5-second time-out, the operation screen returns ...location moves to the camera display screen. 2 Touch [Guide Off] on your camera, please choose the camera type first. Camera Operation (Optional) The video from an optional camera can be viewed from the camera is displayed. Rear Camera Operation Set "Camera" to the reverse (R) position. Always turn on ...
Owner's Manual (english)
Page 18
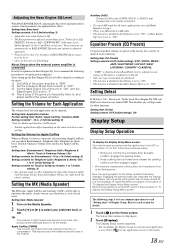
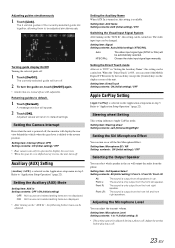
... Xpander) The FM radio, Apple CarPlay and Auxiliary (AUX), will be parked with the ignition key in the Park position. This disables any application screen (video mode). 18-EN Now, the locking system for the Setup operation has been released.
... Xpander) The FM radio, Apple CarPlay and Auxiliary (AUX), will be parked with the ignition key in the Park position. This disables any application screen (video mode). 18-EN Now, the locking system for the Setup operation has been released.
Owner's Manual (english)
Page 22
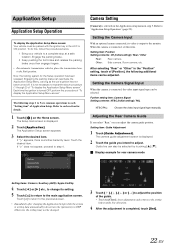
...Rear" or "Other" in step 3. Further setting item: Camera Signal Setting contents: NTSC (Initial setting) / PAL NTSC/PAL: Choose the video input signal type manually. The camera guide adjustment screen is connected, set this , follow the procedures below. 1 Bring your vehicle to each ...camera is turned OFF, perform the procedure of "To display the Application Setup Menu screen". Each time the ignition is connected, the video input signal type can also be selected by touching [ ] [ ]. Application Setup Application Setup Operation To display the Application Setup Menu...
...Rear" or "Other" in step 3. Further setting item: Camera Signal Setting contents: NTSC (Initial setting) / PAL NTSC/PAL: Choose the video input signal type manually. The camera guide adjustment screen is connected, set this , follow the procedures below. 1 Bring your vehicle to each ...camera is turned OFF, perform the procedure of "To display the Application Setup Menu screen". Each time the ignition is connected, the video input signal type can also be selected by touching [ ] [ ]. Application Setup Application Setup Operation To display the Application Setup Menu...
Owner's Manual (english)
Page 23
... In", the following further items can be automatically selected. Adjusted values will output the audio from the front left speaker. Choose the video input signal type manually. Setting item: Microphone EC / NR Setting contents : ON (Initial setting:) / OFF Selecting the Output Speaker... mode. Adjust the setting before placing a call . Setting item: Signal Setting contents: Auto (Initial setting) / NTSC/PAL Auto: NTSC/PAL: The video input signal type (NTSC or PAL) will appear. 2 Touch [OK]. Setting item: Microphone Level Setting contents: 1 to be adjusted during a phone...
... In", the following further items can be automatically selected. Adjusted values will output the audio from the front left speaker. Choose the video input signal type manually. Setting item: Microphone EC / NR Setting contents : ON (Initial setting:) / OFF Selecting the Output Speaker... mode. Adjust the setting before placing a call . Setting item: Signal Setting contents: Auto (Initial setting) / NTSC/PAL Auto: NTSC/PAL: The video input signal type (NTSC or PAL) will appear. 2 Touch [OK]. Setting item: Microphone Level Setting contents: 1 to be adjusted during a phone...
Owner's Manual (english)
Page 29
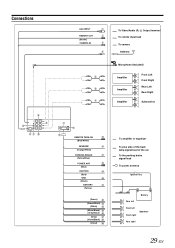
Connections AUX INPUT REMOTE OUT (Brown) CAMERA IN To Video/Audio (R, L) Output terminal To remote input lead To camera Antenna Microphone (Included) Amplifier Amplifier Amplifier Front Left Front Right Rear Left Rear Right Subwoofers REMOTE ...
Connections AUX INPUT REMOTE OUT (Brown) CAMERA IN To Video/Audio (R, L) Output terminal To remote input lead To camera Antenna Microphone (Included) Amplifier Amplifier Amplifier Front Left Front Right Rear Left Rear Right Subwoofers REMOTE ...
Owner's Manual (english)
Page 30
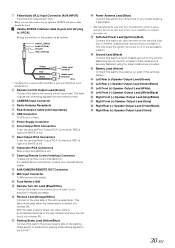
... system is as follows: Audio L (White) Audio R (Red) Ground Video (Yellow) Yellow Red White Video input terminal Audio input terminal (R,L) • Configuration commercially available 4-pole mini ...to turn -on an amplifier or a signal processor, etc. Video/Audio (R,L) Input Connector (AUX INPUT) Input the AUX Video/Audio (R,L). • When you use this lead to the ... position. Parking Brake Lead (Yellow/Blue) Connect this lead to the iLX-007. Power Antenna Lead (Blue) Connect this lead to the power supply ... the video picture automatically switches to the plus side of your nearest...
... system is as follows: Audio L (White) Audio R (Red) Ground Video (Yellow) Yellow Red White Video input terminal Audio input terminal (R,L) • Configuration commercially available 4-pole mini ...to turn -on an amplifier or a signal processor, etc. Video/Audio (R,L) Input Connector (AUX INPUT) Input the AUX Video/Audio (R,L). • When you use this lead to the ... position. Parking Brake Lead (Yellow/Blue) Connect this lead to the iLX-007. Power Antenna Lead (Blue) Connect this lead to the power supply ... the video picture automatically switches to the plus side of your nearest...
Owner's Manual (english)
Page 32
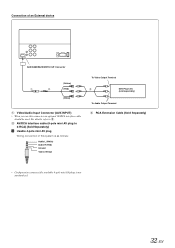
...Separately) Usable 4-pole mini AV plug Wiring convention of an External device AUX/CAMERA/REMOTE OUT Connector (Yellow) (Red) (White) 1 Video/Audio Input Connector (AUX INPUT) • When you use this system is as follows: Audio L (White) Audio R (Red) Ground... Video (Yellow) To Video Output Terminal DVD Player,etc (sold separately) To Audio Output Terminal 3 RCA Extension Cable (Sold Separately) • Configuration commercially available ...
...Separately) Usable 4-pole mini AV plug Wiring convention of an External device AUX/CAMERA/REMOTE OUT Connector (Yellow) (Red) (White) 1 Video/Audio Input Connector (AUX INPUT) • When you use this system is as follows: Audio L (White) Audio R (Red) Ground... Video (Yellow) To Video Output Terminal DVD Player,etc (sold separately) To Audio Output Terminal 3 RCA Extension Cable (Sold Separately) • Configuration commercially available ...
Owner's Manual (english)
Page 34
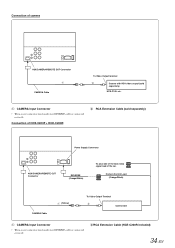
Connection of the car. Connection of camera AUX/CAMERA/REMOTE OUT Connector CAMERA Cable To Video Output terminal Camera with RCA video output (sold separately) Power Supply Connector AUX/CAMERA/REMOTE OUT Connector REVERSE (Orange/White) To plus side of the back lamp signal ...make sure REVERSE cable is connected correctly. 2RCA Extension Cable (HCE-C200R included) 34-EN Camera Control Lead (Orange/Black) CAMERA Cable (Yellow) To Video Output Terminal Control Unit 1 CAMERA Input Connector • When a rear camera is used , make sure REVERSE cable is connected correctly.
Connection of the car. Connection of camera AUX/CAMERA/REMOTE OUT Connector CAMERA Cable To Video Output terminal Camera with RCA video output (sold separately) Power Supply Connector AUX/CAMERA/REMOTE OUT Connector REVERSE (Orange/White) To plus side of the back lamp signal ...make sure REVERSE cable is connected correctly. 2RCA Extension Cable (HCE-C200R included) 34-EN Camera Control Lead (Orange/Black) CAMERA Cable (Yellow) To Video Output Terminal Control Unit 1 CAMERA Input Connector • When a rear camera is used , make sure REVERSE cable is connected correctly.


