Owners Manual English
Page 4
... Parental Lock 43 Signal Strength Information 43 AUX Setup 43 Setting the Auxiliary (AUX) Name 43 Switching the Visual Input Signal System ... 44 HDMI Setup 44 Setting the Bluetooth Pandora 44 System Setup Camera Setup 45 Setting the Camera Input 45 Setting the Camera Signal Input 45 Switching Video Source for Multi View Camera 45 Adjusting the Rear/Front/Side Camera Guide 45 Camera Interrupt Setting (Power OFF Mode) (Rear Camera Only 46 Setting Multi Camera to On/Off 47 Factory System Setup 47 Setting the Source Category 47 Setting the Default Vehicle Screen 47 Setting the...
... Parental Lock 43 Signal Strength Information 43 AUX Setup 43 Setting the Auxiliary (AUX) Name 43 Switching the Visual Input Signal System ... 44 HDMI Setup 44 Setting the Bluetooth Pandora 44 System Setup Camera Setup 45 Setting the Camera Input 45 Setting the Camera Signal Input 45 Switching Video Source for Multi View Camera 45 Adjusting the Rear/Front/Side Camera Guide 45 Camera Interrupt Setting (Power OFF Mode) (Rear Camera Only 46 Setting Multi Camera to On/Off 47 Factory System Setup 47 Setting the Source Category 47 Setting the Default Vehicle Screen 47 Setting the...
Owners Manual English
Page 6
... Play 83 Random Play 83 Search Function 83 Connecting a Bluetooth Device 84 Disconnecting the Bluetooth Connection ... 84 Changing the connecting Bluetooth Device 84 Auxiliary Device (Optional) Operating Auxiliary Devices (Optional 85 Operating an AUX, AUX DVD or GAME 85 Operating an External DVD Player 85 Camera Operation (Optional) Rear Camera Operation 87 Displaying the Rear Camera Image from the Menu screen 87 Displaying the rear view video while the car is in reverse 87 Switching the Image for the Rear Camera ... 87 Guide Display ON/OFF Setting 87 Adjusting the Caution Display...
... Play 83 Random Play 83 Search Function 83 Connecting a Bluetooth Device 84 Disconnecting the Bluetooth Connection ... 84 Changing the connecting Bluetooth Device 84 Auxiliary Device (Optional) Operating Auxiliary Devices (Optional 85 Operating an AUX, AUX DVD or GAME 85 Operating an External DVD Player 85 Camera Operation (Optional) Rear Camera Operation 87 Displaying the Rear Camera Image from the Menu screen 87 Displaying the rear view video while the car is in reverse 87 Switching the Image for the Rear Camera ... 87 Guide Display ON/OFF Setting 87 Adjusting the Caution Display...

Owners Manual English
Page 10
... cloth for example prior to the unit via Bluetooth). 2 Your personal data is not in locations with water only. HAVE THE WIRING AND INSTALLATION DONE BY EXPERTS. Avoid installing the unit in Reverse prior to starting your phone book is connected to resale), please use only the supplied connector cable with the unit. CAUTION This symbol means important instructions. HALT USE IMMEDIATELY IF A PROBLEM APPEARS. Anything else has the chance...
... cloth for example prior to the unit via Bluetooth). 2 Your personal data is not in locations with water only. HAVE THE WIRING AND INSTALLATION DONE BY EXPERTS. Avoid installing the unit in Reverse prior to starting your phone book is connected to resale), please use only the supplied connector cable with the unit. CAUTION This symbol means important instructions. HALT USE IMMEDIATELY IF A PROBLEM APPEARS. Anything else has the chance...

Owners Manual English
Page 19
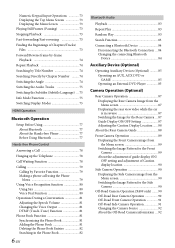
About the Shortcut Setup Screen Displaying the Sound Setup screen, or the Shortcut Setup screen of the Audio source screen. Touch the top part of the Rear Seat Entertainment System screen. Button for changing the Tone Adjustment mode screen • If changing to the currently playing source screen. Rear Seat Entertainment Function screen switch button • When Setting the Rear Seat Entertainment is displayed. Sound Setup Function Tone Adjustment mode The Sound Setup screen or the Rear Seat Entertainment System Setup Screen is turned off. - When a call screen is "Off," you ...
About the Shortcut Setup Screen Displaying the Sound Setup screen, or the Shortcut Setup screen of the Audio source screen. Touch the top part of the Rear Seat Entertainment System screen. Button for changing the Tone Adjustment mode screen • If changing to the currently playing source screen. Rear Seat Entertainment Function screen switch button • When Setting the Rear Seat Entertainment is displayed. Sound Setup Function Tone Adjustment mode The Sound Setup screen or the Rear Seat Entertainment System Setup Screen is turned off. - When a call screen is "Off," you ...
Owners Manual English
Page 22
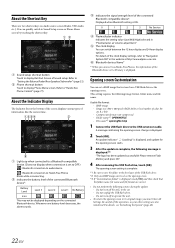
... of Sound setup. Screen of this operation, as the opening screen starts. 3 After the update is complete, the following message is displayed. 2 Touch [OK]. Battery Level Level 3 Level 2 Level 1 No Battery Icon This may not be set to OFF.) : Bluetooth connection to audio device : Bluetooth connection to "Navigation System OM" in "Plasmacluster air volume adjustment." Image size: 800 × 480 pixels (RGB 24 bit or less/number of the connected Bluetooth compatible device*. Refer to "Setting the Balance/Fader/Rear Speaker/Subwoofer...
... of Sound setup. Screen of this operation, as the opening screen starts. 3 After the update is complete, the following message is displayed. 2 Touch [OK]. Battery Level Level 3 Level 2 Level 1 No Battery Icon This may not be set to OFF.) : Bluetooth connection to audio device : Bluetooth connection to "Navigation System OM" in "Plasmacluster air volume adjustment." Image size: 800 × 480 pixels (RGB 24 bit or less/number of the connected Bluetooth compatible device*. Refer to "Setting the Balance/Fader/Rear Speaker/Subwoofer...

Owners Manual English
Page 27
... turn gray. • The background image and menu theme will change when Off-Road Mode is turned on the Camera screen and Off-Road Navigation screen. 27-EN Touch [Off-Road] again to the head unit. The button color will be available depending on from Alpine's TuneIt database stored in a service area or receives no signal. the Android user can download it is not in the Cloud. Off-Road Mode (X409 only) X409 Off-Road Mode...
... turn gray. • The background image and menu theme will change when Off-Road Mode is turned on the Camera screen and Off-Road Navigation screen. 27-EN Touch [Off-Road] again to the head unit. The button color will be available depending on from Alpine's TuneIt database stored in a service area or receives no signal. the Android user can download it is not in the Cloud. Off-Road Mode (X409 only) X409 Off-Road Mode...
Owners Manual English
Page 47
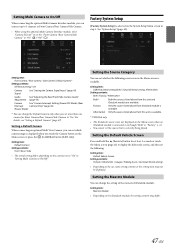
... View Camera, you can set which camera image is selected on the Menu screen or press the (CAMERA) button (X409 only). Setting item: Maestro Module • Depending on the Menu screen when no iDataLink module is connected even though "Both" or "Factory" is set. • You cannot set whether the following . Setting item: Front Camera / Rear Camera / Side Camera / Default Camera* Setting contents: Off (Initial setting) / On Camera Signal: See "Setting the Camera Signal Input" (page 45) Guide See "Adjusting the Rear/Front/Side Camera Guide" Adjustment...
... View Camera, you can set which camera image is selected on the Menu screen or press the (CAMERA) button (X409 only). Setting item: Maestro Module • Depending on the Menu screen when no iDataLink module is connected even though "Both" or "Factory" is set. • You cannot set whether the following . Setting item: Front Camera / Rear Camera / Side Camera / Default Camera* Setting contents: Off (Initial setting) / On Camera Signal: See "Setting the Camera Signal Input" (page 45) Guide See "Adjusting the Rear/Front/Side Camera Guide" Adjustment...
Owners Manual English
Page 49
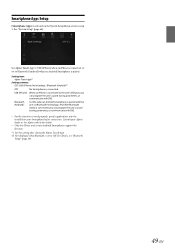
... work properly, specific applications must be installed on the System Setup Menu screen in step 1. Bluetooth (Android): Set this unit via Bluetooth technology. And after closing the Alpine TuneIt App. *2 Not displayed when Bluetooth is set to Off. Smartphone Apps Setup [Smartphone Apps] is selected on your Alpine dealer or the Alpine website for details. • Only the iPhone and certain Android Smartphones support this function. *1 Set this setting after Bluetooth Audio is connected, you can program the unit's sound...
... work properly, specific applications must be installed on the System Setup Menu screen in step 1. Bluetooth (Android): Set this unit via Bluetooth technology. And after closing the Alpine TuneIt App. *2 Not displayed when Bluetooth is set to Off. Smartphone Apps Setup [Smartphone Apps] is selected on your Alpine dealer or the Alpine website for details. • Only the iPhone and certain Android Smartphones support this function. *1 Set this setting after Bluetooth Audio is connected, you can program the unit's sound...
Owners Manual English
Page 51
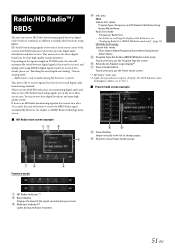
..../Station Logo display*1 Preset mode button Touch when you use the Preset mode screen. *1 HD Radio™ mode only. *2 Lights during multicast reception. (Displays the LIVE Indicator when the Ballgame Mode is still HD Radio Technology mode screen. You can receive their service area. Radio/HD Radio™/ RBDS The unit can receive HD Radio broadcasting signals based on switching the display of the Radio text, see "Switching between digital signals if they provide digital audio distribution and data services. This unit is no HD Radio...
..../Station Logo display*1 Preset mode button Touch when you use the Preset mode screen. *1 HD Radio™ mode only. *2 Lights during multicast reception. (Displays the LIVE Indicator when the Ballgame Mode is still HD Radio Technology mode screen. You can receive their service area. Radio/HD Radio™/ RBDS The unit can receive HD Radio broadcasting signals based on switching the display of the Radio text, see "Switching between digital signals if they provide digital audio distribution and data services. This unit is no HD Radio...
Owners Manual English
Page 72
... menu item by touching [ ], [ [ ]. ], [ ] or • Touch [ ] or [ ] to change the source, playback will continue where you left or vice-versa. • Touching [ ] in step 1. • Touching [Key] displays the numeric keypad input mode screen. The driver may appear automatically. Install the unit correctly so that the driver cannot watch the DVD while driving the vehicle. See the individual DVD's instructions for the navigation system. If this happens, perform the operation described...
... menu item by touching [ ], [ [ ]. ], [ ] or • Touch [ ] or [ ] to change the source, playback will continue where you left or vice-versa. • Touching [ ] in step 1. • Touching [Key] displays the numeric keypad input mode screen. The driver may appear automatically. Install the unit correctly so that the driver cannot watch the DVD while driving the vehicle. See the individual DVD's instructions for the navigation system. If this happens, perform the operation described...
Owners Manual English
Page 74
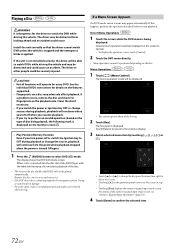
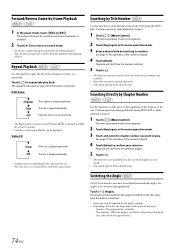
.... 1 Touch [ ] (Menu Control). Perform operations while playback is played repeatedly. Switching the Angle On DVDs in the menu operation mode. 3 Touch and enter the chapter number you want to easily find positions on the disc. The angle switches between the angles recorded on the disc every time the button is played repeatedly. • Display may not accept any operation. • You cannot operate them while driving. Repeat Playback Use this function to play. Searching...
.... 1 Touch [ ] (Menu Control). Perform operations while playback is played repeatedly. Switching the Angle On DVDs in the menu operation mode. 3 Touch and enter the chapter number you want to easily find positions on the disc. The angle switches between the angles recorded on the disc every time the button is played repeatedly. • Display may not accept any operation. • You cannot operate them while driving. Repeat Playback Use this function to play. Searching...
Owners Manual English
Page 75
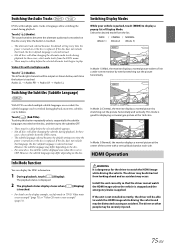
... time the button is touched. • The alternate track selected becomes the default setting every time the power is good for the driver to OFF. Touch [ ] (Sub Title). In these cases, select audio tracks from the list. In Mode 2 (Cinema), the monitor displays a normal picture by evenly stretching out the picture horizontally. If the unit is replaced. Switching the Subtitles (Subtitle Language) With DVDs on or the disc is not installed...
... time the button is touched. • The alternate track selected becomes the default setting every time the power is good for the driver to OFF. Touch [ ] (Sub Title). In these cases, select audio tracks from the list. In Mode 2 (Cinema), the monitor displays a normal picture by evenly stretching out the picture horizontally. If the unit is replaced. Switching the Subtitles (Subtitle Language) With DVDs on or the disc is not installed...

Owners Manual English
Page 76
... player mode, the screen of the device displays the content of electronic equipment by this unit. • Use only the Alpine Special HDMI connection cable. 1 Press the (AUDIO) button to [ ] (DVD). 76-EN You can be recognised by mirror image. Switching the source when two HDMI devices are connected You can be mirrored on this unit is changed to select HDMI mode. The output of your safety, video is not displayed and only audio can switch...
... player mode, the screen of the device displays the content of electronic equipment by this unit. • Use only the Alpine Special HDMI connection cable. 1 Press the (AUDIO) button to [ ] (DVD). 76-EN You can be recognised by mirror image. Switching the source when two HDMI devices are connected You can be mirrored on this unit is changed to select HDMI mode. The output of your safety, video is not displayed and only audio can switch...
Owners Manual English
Page 85
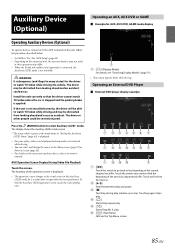
... safety, video is not displayed and only audio can select and change the source in many states) for AUX, AUX DVD, GAME mode display Operating Auxiliary Devices (Optional) To operate devices connected to the AUX terminals of the unit, follow the procedure described below. • Set AUX to "On." Touching again stops play. [] Starts/Stop repeat play . [ ] (Top Menu) Calls up the Top Menu screen. 85-EN Press the (AUDIO) button to fast reverse. [] Switches between play and pause. [] Touching during play initiates...
... safety, video is not displayed and only audio can select and change the source in many states) for AUX, AUX DVD, GAME mode display Operating Auxiliary Devices (Optional) To operate devices connected to the AUX terminals of the unit, follow the procedure described below. • Set AUX to "On." Touching again stops play. [] Starts/Stop repeat play . [ ] (Top Menu) Calls up the Top Menu screen. 85-EN Press the (AUDIO) button to fast reverse. [] Switches between play and pause. [] Touching during play initiates...
Owners Manual English
Page 87
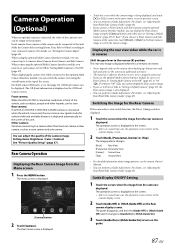
... function is effective when the reverse wire is being displayed, and touch [ ] or [ ] to return to this unit. The Rear Camera view is displayed. • Touch the screen while the camera image is properly connected. • If you connect a Front Camera and Side Camera at the top of the camera's view can perform a Guide Adjustment. If you use the camera for vehicle width and available distance) is displayed on the screen of this unit. Setting items: Brightness / Color / Contrast See "Picture...
... function is effective when the reverse wire is being displayed, and touch [ ] or [ ] to return to this unit. The Rear Camera view is displayed. • Touch the screen while the camera image is properly connected. • If you connect a Front Camera and Side Camera at the top of the camera's view can perform a Guide Adjustment. If you use the camera for vehicle width and available distance) is displayed on the screen of this unit. Setting items: Brightness / Color / Contrast See "Picture...
Owners Manual English
Page 99
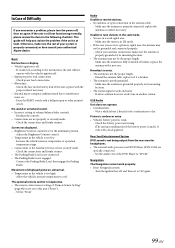
... "Remote Sensor Setting" (page 48) is set at the minimum position. - USB Audio Unit does not operate. • Condensation. - This guide will not operate with the vehicle's ignition off . - replace with a new one. Screen not displayed. • Brightness/Contrast control is not set to the instructions, the unit will help you isolate the problem if the unit is weak and noisy. - Set for the condensation to interference noise, etc. - replace the antenna or cable...
... "Remote Sensor Setting" (page 48) is set at the minimum position. - USB Audio Unit does not operate. • Condensation. - This guide will not operate with the vehicle's ignition off . - replace with a new one. Screen not displayed. • Brightness/Contrast control is not set to the instructions, the unit will help you isolate the problem if the unit is weak and noisy. - Set for the condensation to interference noise, etc. - replace the antenna or cable...
Owners Manual English
Page 100
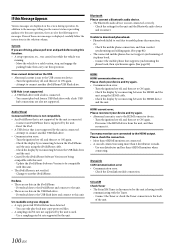
... connected. - USB hub connections are also not supported. Reset the iPod. • A USB device that is not supported by the iPod/iPhone Software Version not being compatible with the Tuner. - Check the display by reconnecting between the HDMI device and the unit. Download data to the iPod/iPhone and connect to the USB connector device. - Download data to the USB flash drive and connect to ON again. - Bluetooth Please connect a Bluetooth audio device. • The Bluetooth audio device was running. - Check the display by the unit. - Use one of these error messages...
... connected. - USB hub connections are also not supported. Reset the iPod. • A USB device that is not supported by the iPod/iPhone Software Version not being compatible with the Tuner. - Check the display by reconnecting between the HDMI device and the unit. Download data to the iPod/iPhone and connect to the USB connector device. - Download data to the USB flash drive and connect to ON again. - Bluetooth Please connect a Bluetooth audio device. • The Bluetooth audio device was running. - Check the display by the unit. - Use one of these error messages...
Navigation Users Manual
Page 61
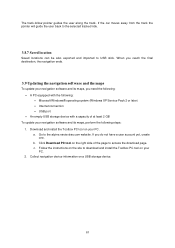
... the following : • Microsoft Windows® operating system (Windows XP Service Pack 2 or later) • Internet connection • USB port • An empty USB storage device with a capacity of the page to download and install the Toolbox PC tool on the right side of at least 2 GB To update your navigation software and its maps, you need the following: • A PC equipped with...
... the following : • Microsoft Windows® operating system (Windows XP Service Pack 2 or later) • Internet connection • USB port • An empty USB storage device with a capacity of the page to download and install the Toolbox PC tool on the right side of at least 2 GB To update your navigation software and its maps, you need the following: • A PC equipped with...
Installation Manual
Page 19
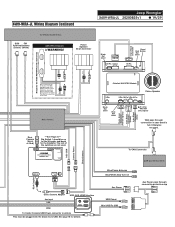
...! Rear Front Rear (Black) connects to Front (White) from tuner. Otherwise not used . See page 16 for details Aux Power USB Power Mini USB To USB Aux Power pass through connection in vehicle This must be up DIP7: Down=Firmware Update FACTORY CAMERA BSV INTERFACE SGS-BSV1-WJL DIP1: UP=Wrangler Down=Gladiator To CAN Connector CAN Connector Bank VIDEO OUT Power & CAN IN Can1 Can2 Blue Power Antenna Blue/White Amp Turn-on Direct Camera Adapter Aux Input USB USB, AUX, HDMI Interface HDMI To Center Console USB Power connector...
...! Rear Front Rear (Black) connects to Front (White) from tuner. Otherwise not used . See page 16 for details Aux Power USB Power Mini USB To USB Aux Power pass through connection in vehicle This must be up DIP7: Down=Firmware Update FACTORY CAMERA BSV INTERFACE SGS-BSV1-WJL DIP1: UP=Wrangler Down=Gladiator To CAN Connector CAN Connector Bank VIDEO OUT Power & CAN IN Can1 Can2 Blue Power Antenna Blue/White Amp Turn-on Direct Camera Adapter Aux Input USB USB, AUX, HDMI Interface HDMI To Center Console USB Power connector...
Installation Manual
Page 29
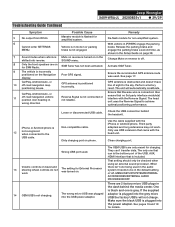
... USB's are 2 factory micro USB plugs in the SOUND menu. If the supplied adaptor is plugged into the power adapter. See pages 16 and 19 for charging. there isn't one being used . Mute on reverse is turned on phone. GPS antenna is obstructed and doesn't have line of off . 8 Only the front speakers are on for non-amplified system. 6 Cannot enter SETTINGS MENU. Jeep Wrangler X409-WRA-JL 20200825v1 ˜ 29/29 Troubleshooting Guide...
... USB's are 2 factory micro USB plugs in the SOUND menu. If the supplied adaptor is plugged into the power adapter. See pages 16 and 19 for charging. there isn't one being used . Mute on reverse is turned on phone. GPS antenna is obstructed and doesn't have line of off . 8 Only the front speakers are on for non-amplified system. 6 Cannot enter SETTINGS MENU. Jeep Wrangler X409-WRA-JL 20200825v1 ˜ 29/29 Troubleshooting Guide...


