
Owner's Manual
Page 4
DVD Setup DVD Setup Operation 21 Setting the Language 21 Setting the TV Screen 21 Setting the Country Code 22 Setting the Rating Level (Parental...the CD Play Mode 23 Setting the Video CD Play Mode 23 Setting the Pause Mode 23 Setting the Downmix Mode 23 Wireless Headphone Headphone Receivers 24 Operation 24 Battery Installation 24 Installation and Connections WARNING WARNING 25 CAUTION 25 PRECAUTIONS 25 Connections 26 Mount Side 27 ... Codes 30 In Case of Difficulty 32 System Indication 33 Accessories 34 Specifications 34 2-EN Book_PKG-RSE2.indb 2 4/8/06 2:16:59 AM
DVD Setup DVD Setup Operation 21 Setting the Language 21 Setting the TV Screen 21 Setting the Country Code 22 Setting the Rating Level (Parental...the CD Play Mode 23 Setting the Video CD Play Mode 23 Setting the Pause Mode 23 Setting the Downmix Mode 23 Wireless Headphone Headphone Receivers 24 Operation 24 Battery Installation 24 Installation and Connections WARNING WARNING 25 CAUTION 25 PRECAUTIONS 25 Connections 26 Mount Side 27 ... Codes 30 In Case of Difficulty 32 System Indication 33 Accessories 34 Specifications 34 2-EN Book_PKG-RSE2.indb 2 4/8/06 2:16:59 AM

Owner's Manual
Page 6
... not attempt to remove the wireless headphones from your Alpine dealer or the nearest Alpine Service Station for this will not scratch the disc or damage the player. Do not affix tape,...RSE2.indb 4 4/8/06 2:17:01 AM Also have problems, do not attempt to normal. • The LCD panel is off , a loud noise is over 99.99%. Using Wireless Headphones If ACC or the monitor...then insert the disc again. Installation Location Make sure the PKG-RSE2 will return to repair the unit yourself. If you turn the monitor off , a slight ghost of the product. Temperature Do ...
... not attempt to remove the wireless headphones from your Alpine dealer or the nearest Alpine Service Station for this will not scratch the disc or damage the player. Do not affix tape,...RSE2.indb 4 4/8/06 2:17:01 AM Also have problems, do not attempt to normal. • The LCD panel is off , a loud noise is over 99.99%. Using Wireless Headphones If ACC or the monitor...then insert the disc again. Installation Location Make sure the PKG-RSE2 will return to repair the unit yourself. If you turn the monitor off , a slight ghost of the product. Temperature Do ...
Owner's Manual
Page 10
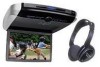
...If the ignition key is set to the proper frequency. In addition, an Infrared Wireless Headphone Transmitter is heard. To close, firmly press the LCD Monitor Panel back up into the housing until a click is located on . Front Control ... monitor main power is a universal remote control which works for the function buttons of the LCD panel. The FM transmitter function in DVD player and the power is on, Disc-In LED light turns on top of each device. (page 9) 7 3 1 2 6 8 I 5 B 4 A C 0 D K 9 N M J L V O R U P Q S W T X Y E G F H 8-EN Book_PKG-RSE2....
...If the ignition key is set to the proper frequency. In addition, an Infrared Wireless Headphone Transmitter is heard. To close, firmly press the LCD Monitor Panel back up into the housing until a click is located on . Front Control ... monitor main power is a universal remote control which works for the function buttons of the LCD panel. The FM transmitter function in DVD player and the power is on, Disc-In LED light turns on top of each device. (page 9) 7 3 1 2 6 8 I 5 B 4 A C 0 D K 9 N M J L V O R U P Q S W T X Y E G F H 8-EN Book_PKG-RSE2....

Owner's Manual
Page 13
... off automatically, when not operating more closely match the vehicle's interior lighting. Book_PKG-RSE2.indb 11 11-EN 4/8/06 2:17:11 AM SOURCE NAME For setting Dimmer level...LCD panel's backlighting is pressed. 1 Press AUX1 or AUX2. 2 Select one of Visual EQ 1 Press V EQ. Instant Change of following devices you proceed the above step with the remote control pointed toward the monitor, the device source name on the headphone...be controlled from Remote Control When you want to assign, TV/DVB-T/ISDB-T/DVD-HU/EXT-DVD. 3 Press MEMORY key to cycle through the OSD as AUTO, LOW ...
... off automatically, when not operating more closely match the vehicle's interior lighting. Book_PKG-RSE2.indb 11 11-EN 4/8/06 2:17:11 AM SOURCE NAME For setting Dimmer level...LCD panel's backlighting is pressed. 1 Press AUX1 or AUX2. 2 Select one of Visual EQ 1 Press V EQ. Instant Change of following devices you proceed the above step with the remote control pointed toward the monitor, the device source name on the headphone...be controlled from Remote Control When you want to assign, TV/DVB-T/ISDB-T/DVD-HU/EXT-DVD. 3 Press MEMORY key to cycle through the OSD as AUTO, LOW ...

Owner's Manual
Page 26
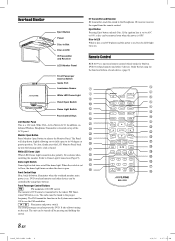
.... 1) Be sure the batteries are properly installed in the headphones. 2) Turn the headphones volume completely down before placing it on your ears and turning on the power. 3) Turn on the headphone power and adjust the headphone volume to a comfortable level (You can increase the audio ...source volume if needed). Battery Installation Place two AAA batteries into the battery compartment of the headphone(s), making sure that the battery polarity is correct. 24-EN Book_PKG-RSE2.indb 24 ...
.... 1) Be sure the batteries are properly installed in the headphones. 2) Turn the headphones volume completely down before placing it on your ears and turning on the power. 3) Turn on the headphone power and adjust the headphone volume to a comfortable level (You can increase the audio ...source volume if needed). Battery Installation Place two AAA batteries into the battery compartment of the headphone(s), making sure that the battery polarity is correct. 24-EN Book_PKG-RSE2.indb 24 ...
Owner's Manual
Page 36
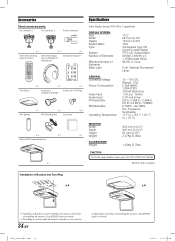
... side of player) Installation of Bracket and Trim Ring x 4 x 6 *1 Installation Bracket is used to your vehicles 34-EN ceiling shape at the time of installing the monitor. Book_PKG-RSE2.indb 34 4/8/06 2:17:51 AM AV Connector 1 AV Connector 2 Power Connector X 1 X 1 X 1 RUE-4159 Universal Remote Control SHS-N100 Single Source Wireless IR Headphone Installation...
... side of player) Installation of Bracket and Trim Ring x 4 x 6 *1 Installation Bracket is used to your vehicles 34-EN ceiling shape at the time of installing the monitor. Book_PKG-RSE2.indb 34 4/8/06 2:17:51 AM AV Connector 1 AV Connector 2 Power Connector X 1 X 1 X 1 RUE-4159 Universal Remote Control SHS-N100 Single Source Wireless IR Headphone Installation...


