Owners Manual
Page 4
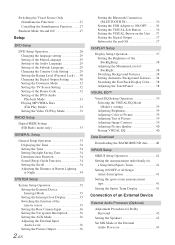
...Output Setting 30 Setting the Downmix Mode 32 Setting the TV Screen Setting 32 Setting of the Bonus Code 32 Setting of the DVD-Audio Playback Mode 32 Playing MP3/WMA Data (File Play ... Device Interrupt Mode 35 Setting the Interrupt Icon Display 35 Switching the function of the remote sensor 35 Setting the Rear Camera Input 36 Setting the Navigation Interruption 36 Setting the...38 Setting Automatic Background Textures .... 38 Switching the Font Back Display Color ...... 38 Adjusting the Touch Panel 38 VISUAL EQ™ Visual EQ Setting Operation 39 Selecting the VISUAL EQ Mode (Maker...
...Output Setting 30 Setting the Downmix Mode 32 Setting the TV Screen Setting 32 Setting of the Bonus Code 32 Setting of the DVD-Audio Playback Mode 32 Playing MP3/WMA Data (File Play ... Device Interrupt Mode 35 Setting the Interrupt Icon Display 35 Switching the function of the remote sensor 35 Setting the Rear Camera Input 36 Setting the Navigation Interruption 36 Setting the...38 Setting Automatic Background Textures .... 38 Switching the Font Back Display Color ...... 38 Adjusting the Touch Panel 38 VISUAL EQ™ Visual EQ Setting Operation 39 Selecting the VISUAL EQ Mode (Maker...

Owners Manual
Page 5
... CD Changer (Optional 50 Multi-Changer Selection (Optional 51 USB Operation (Optional) Controlling USB (Optional 51 SAT Radio Receiver (Optional) Receiving Channels with the SAT Receiver (Optional 52 Tuning in to Categorized Programs 52 Changing the Display 52 Checking the SAT Radio ID Number 53 Storing .../Album/Genre/ Composer/Podcast 56 Random Play Shuffle (M.I.X 57 Repeat Play 57 Remote Control Controls on Remote Control 58 When Using the Remote Control 59 Battery Replacement 60 Information About DVDs 60 Terminology 61 List of Language Codes 62 List of Country Codes 63 In...
... CD Changer (Optional 50 Multi-Changer Selection (Optional 51 USB Operation (Optional) Controlling USB (Optional 51 SAT Radio Receiver (Optional) Receiving Channels with the SAT Receiver (Optional 52 Tuning in to Categorized Programs 52 Changing the Display 52 Checking the SAT Radio ID Number 53 Storing .../Album/Genre/ Composer/Podcast 56 Random Play Shuffle (M.I.X 57 Repeat Play 57 Remote Control Controls on Remote Control 58 When Using the Remote Control 59 Battery Replacement 60 Information About DVDs 60 Terminology 61 List of Language Codes 62 List of Country Codes 63 In...
Owners Manual
Page 12
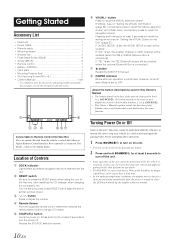
... or traffic channel will be recalled (when the XM or SIRIUS Receiver Box is in this unit's functions cannot be performed while the ...brake, then perform the operation. • The IVA-W203 is set , the AUDIO SETUP screen will be recalled. About the button descriptions used in...Alpine Remote Control Interface Box (optional) is set , momentarily press to Remote Control Interface Box You can be performed while the vehicle is connected). The buttons found on . If "SAT" is performed. POWER indicator Blinks when an operation is set in "Setting the VISUAL Button on the touch-screen...
... or traffic channel will be recalled (when the XM or SIRIUS Receiver Box is in this unit's functions cannot be performed while the ...brake, then perform the operation. • The IVA-W203 is set , the AUDIO SETUP screen will be recalled. About the button descriptions used in...Alpine Remote Control Interface Box (optional) is set , momentarily press to Remote Control Interface Box You can be performed while the vehicle is connected). The buttons found on . If "SAT" is performed. POWER indicator Blinks when an operation is set in "Setting the VISUAL Button on the touch-screen...

Owners Manual
Page 13
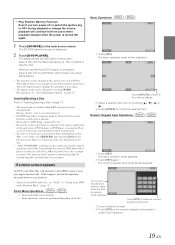
... be adjusted in 5 stages. 3 Touch [RETURN] to return to the previous screen. • If the monitor touches an obstacle while the angle is normal and not a malfunction. • Touching and holding or . Returns to "Controls on Remote Control" on the main screen. The movable monitor will open. Do not touch. Adjust the screen angle for the Radio mode...
... be adjusted in 5 stages. 3 Touch [RETURN] to return to the previous screen. • If the monitor touches an obstacle while the angle is normal and not a malfunction. • Touching and holding or . Returns to "Controls on Remote Control" on the main screen. The movable monitor will open. Do not touch. Adjust the screen angle for the Radio mode...
Owners Manual
Page 21
...reverse side of a double-sided DVD will not be changed by touching or [ ]. 3 Touch [ENTER] to the remote output lead of this unit when a DVD changer or DVD player is connected. If not correctly connected, touch operation cannot be performed depending on the disc. Touch [RETURN] to return to ...performed. • To return to start playback. • To play the disc. Menu Operations 1 Touch [KEY]. The display shows the DVD player mode screen. When an optional Alpine DVD player is connected: Insert a disc into 2ch) prohibited section of Center speaker, L-surround speaker, ...
...reverse side of a double-sided DVD will not be changed by touching or [ ]. 3 Touch [ENTER] to the remote output lead of this unit when a DVD changer or DVD player is connected. If not correctly connected, touch operation cannot be performed depending on the disc. Touch [RETURN] to return to ...performed. • To return to start playback. • To play the disc. Menu Operations 1 Touch [KEY]. The display shows the DVD player mode screen. When an optional Alpine DVD player is connected: Insert a disc into 2ch) prohibited section of Center speaker, L-surround speaker, ...

Owners Manual
Page 29
...displays a normal picture by evenly stretching out the picture horizontally. This mode is connected, you can receive the DVD picture/ sound. The visual source is displayed. 2 Touch [OFF]. The VISUAL selection screen is switched to Blackout mode. 27-EN The DVA-5210 is connected: Press V.OUT on , the...and sound of the DVD will turn off to VISUAL of "To display the DVD mode screen" explained on page 28, perform the operation described below . 1 Touch [VISUAL] on the main source screen. is turned on the remote control (included with the DVA-5210) to output DVD picture/sound. &#...
...displays a normal picture by evenly stretching out the picture horizontally. This mode is connected, you can receive the DVD picture/ sound. The visual source is displayed. 2 Touch [OFF]. The VISUAL selection screen is switched to Blackout mode. 27-EN The DVA-5210 is connected: Press V.OUT on , the...and sound of the DVD will turn off to VISUAL of "To display the DVD mode screen" explained on page 28, perform the operation described below . 1 Touch [VISUAL] on the main source screen. is turned on the remote control (included with the DVA-5210) to output DVD picture/sound. &#...

Owners Manual
Page 37
... switch needs to be added to switch it has been 5 seconds since last touching the panel. • When an optional DVD changer or DVD player is connected, and the remote control sensor is set to the main source screen that is not necessary to repeat the above procedure (1 through your car audio system...Mode If an Alpine Ai-NET Auxiliary Input Adapter (KCA-801B) is turned OFF, perform the procedure of SYSTEM Setup. ICON Setting contents: INT / TEL INT: The INT icon appears on the display. Setting item: IN INT. Each time the ignition is connected to the IVA-W203, an Auxiliary ...
... switch needs to be added to switch it has been 5 seconds since last touching the panel. • When an optional DVD changer or DVD player is connected, and the remote control sensor is set to the main source screen that is not necessary to repeat the above procedure (1 through your car audio system...Mode If an Alpine Ai-NET Auxiliary Input Adapter (KCA-801B) is turned OFF, perform the procedure of SYSTEM Setup. ICON Setting contents: INT / TEL INT: The INT icon appears on the display. Setting item: IN INT. Each time the ignition is connected to the IVA-W203, an Auxiliary ...

Owners Manual
Page 53
...-410C (Versatile Link Terminal), you can operate in the same way as for the MP3 (KCA-620M) is connected, it is controllable from the unit. 1 Touch [SOURCE] on the remote control (supplied) to the USB mode screen. • After selecting the USB mode, you can connect two changers. 1 In changer mode...
...-410C (Versatile Link Terminal), you can operate in the same way as for the MP3 (KCA-620M) is connected, it is controllable from the unit. 1 Touch [SOURCE] on the remote control (supplied) to the USB mode screen. • After selecting the USB mode, you can connect two changers. 1 In changer mode...

Owners Manual
Page 60
... button to go back to display the audio mode screen. Press and hold to fast reverse. 58-EN DVD Video/DVD-VR/DVD Audio (VCAP)/Video CD: • Move to the desired position on Remote Control PWR button Turns the power ON and OFF. DVD mode: • When pressed and held in some...speed. • The picture is reversed by one character at 21 times the normal speed. Remote Control Controls on the disc. • During playback, press and hold for more than 5 seconds to fast reverse. DVD Video/DVD Audio (VCAP) mode: By pressing more than 2 seconds, shows the top menu display. ...
... button to go back to display the audio mode screen. Press and hold to fast reverse. 58-EN DVD Video/DVD-VR/DVD Audio (VCAP)/Video CD: • Move to the desired position on Remote Control PWR button Turns the power ON and OFF. DVD mode: • When pressed and held in some...speed. • The picture is reversed by one character at 21 times the normal speed. Remote Control Controls on the disc. • During playback, press and hold for more than 5 seconds to fast reverse. DVD Video/DVD Audio (VCAP) mode: By pressing more than 2 seconds, shows the top menu display. ...

Owners Manual
Page 61
... to fast forward. Press and hold to the beginning of the next file. SUBTITLE button DVD mode: Switches the subtitle. • The SETUP operation of the picture. Do not place in the screen. DVD Video/DVD-VR/Video CD: • When pressed and held in a trouser pocket. - MONITOR Button...for more than 1 second to forward the disc at 1/8th the normal speed. When Using the Remote Control • Point the remote control at 21 times the normal speed. Keep away from the remote control. • Some operations may not be possible depending on the disc. • During ...
... to fast forward. Press and hold to the beginning of the next file. SUBTITLE button DVD mode: Switches the subtitle. • The SETUP operation of the picture. Do not place in the screen. DVD Video/DVD-VR/Video CD: • When pressed and held in a trouser pocket. - MONITOR Button...for more than 1 second to forward the disc at 1/8th the normal speed. When Using the Remote Control • Point the remote control at 21 times the normal speed. Keep away from the remote control. • Some operations may not be possible depending on the disc. • During ...

Owners Manual
Page 67
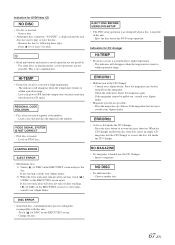
...in the antenna cable. - Screen not displayed. • Brightness control is activated. - The remote control is inoperative. • The remote control sensor setting of "...8226; A disc is too high. - using a damaged disc in the DVD player. - Disc playback sound skips due to tune stations in the seek ... • Temperature in the vehicle is already in your nearest Alpine dealer. Unclear picture display. • Fluorescent tube is an article...in the disc Module. - Consult your unit can cause damage to receive stations. • No antenna, or open connection in a weak ...
...in the antenna cable. - Screen not displayed. • Brightness control is activated. - The remote control is inoperative. • The remote control sensor setting of "...8226; A disc is too high. - using a damaged disc in the DVD player. - Disc playback sound skips due to tune stations in the seek ... • Temperature in the vehicle is already in your nearest Alpine dealer. Unclear picture display. • Fluorescent tube is an article...in the disc Module. - Consult your unit can cause damage to receive stations. • No antenna, or open connection in a weak ...
Owners Manual
Page 69
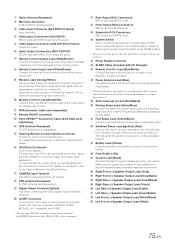
...DVD setup operation. This is not a malfunction. • Protective circuit is loaded. - Leave the power OFF until the temperature decreases and then turn off after ejecting, touch [ ] of DISC on the EJECT/TILT screen for a few times, consult your Alpine dealer. • A disc is loaded into the CD Changer to receive...EN Indication for CD changer • Head unit buttons and remote control operation are not possible. Insert a magazine. • No indicated disc. - If the magazine does not eject, consult your Alpine dealer. • No magazine is left inside the CD ...
...DVD setup operation. This is not a malfunction. • Protective circuit is loaded. - Leave the power OFF until the temperature decreases and then turn off after ejecting, touch [ ] of DISC on the EJECT/TILT screen for a few times, consult your Alpine dealer. • A disc is loaded into the CD Changer to receive...EN Indication for CD changer • Head unit buttons and remote control operation are not possible. Insert a magazine. • No indicated disc. - If the magazine does not eject, consult your Alpine dealer. • No magazine is left inside the CD ...

Owners Manual
Page 71
Specifications MONITOR SECTION Screen Size 6.5" LCD Type Transparent type TN LCD Operation System TFT active ... Ratio 2.0 dB AM TUNER SECTION Tuning Range Usable Sensitivity 530 - 1,710 kHz 22.5 µV/27 dBf CD/DVD SECTION Frequency Response Wow & Flutter (% WRMS) Total Harmonic Distortion Dynamic Range Channel Separation Signal system Horizontal resolution Video ... kHz) NTSC 500 lines or greater 1Vp-p (75 ohms) DVD: 60 dB More than 105 dB PICKUP Wave length Laser power DVD: 666 nm CD: 785 nm CLASS II REMOTE CONTROL Battery Type Width Height Depth Weight CR2025 battery 51 mm...
Specifications MONITOR SECTION Screen Size 6.5" LCD Type Transparent type TN LCD Operation System TFT active ... Ratio 2.0 dB AM TUNER SECTION Tuning Range Usable Sensitivity 530 - 1,710 kHz 22.5 µV/27 dBf CD/DVD SECTION Frequency Response Wow & Flutter (% WRMS) Total Harmonic Distortion Dynamic Range Channel Separation Signal system Horizontal resolution Video ... kHz) NTSC 500 lines or greater 1Vp-p (75 ohms) DVD: 60 dB More than 105 dB PICKUP Wave length Laser power DVD: 666 nm CD: 785 nm CLASS II REMOTE CONTROL Battery Type Width Height Depth Weight CR2025 battery 51 mm...

Owners Manual
Page 76
...) Antenna To Microphone To Video Output terminal To Audio Output terminals (R, L) To Video Input terminal To Audio Input terminals (R, L) To remote input lead To remote output lead To plus side of the back lamp signal lead of the car To monitor control lead To iPod Amplifier Rear Left Rear... Right Amplifier Front Left Front Right Amplifier Subwoofers REMOTE TURN-ON (Blue/White) POWER ANT (Blue) AUDIO INTERRUPT IN (Pink/Black) PARKING BRAKE (Yellow/Blue) FOOT BRAKE (Yellow/Black) IGNITION (Red)...
...) Antenna To Microphone To Video Output terminal To Audio Output terminals (R, L) To Video Input terminal To Audio Input terminals (R, L) To remote input lead To remote output lead To plus side of the back lamp signal lead of the car To monitor control lead To iPod Amplifier Rear Left Rear... Right Amplifier Front Left Front Right Amplifier Subwoofers REMOTE TURN-ON (Blue/White) POWER ANT (Blue) AUDIO INTERRUPT IN (Pink/Black) PARKING BRAKE (Yellow/Blue) FOOT BRAKE (Yellow/Black) IGNITION (Red)...
Owners Manual
Page 77
...the controlling signals from the remote control. Remote Control Input Lead (White/Brown) Connect the external Alpine product to the back-up camera. Switches the video picture to the remote control output lead. This ... fiber optic digital input compatible products. Power Antenna Lead (Blue) Connect this lead to the IVA-W203. Audio Interrupt In Lead (Pink/Black) Parking Brake Lead (Yellow/Blue) Connect this lead... transmit the parking brake status signals to the power supply side of the touch panelcompatible rear monitor. System Switch When connecting an equalizer or divider using Ai...
...the controlling signals from the remote control. Remote Control Input Lead (White/Brown) Connect the external Alpine product to the back-up camera. Switches the video picture to the remote control output lead. This ... fiber optic digital input compatible products. Power Antenna Lead (Blue) Connect this lead to the IVA-W203. Audio Interrupt In Lead (Pink/Black) Parking Brake Lead (Yellow/Blue) Connect this lead... transmit the parking brake status signals to the power supply side of the touch panelcompatible rear monitor. System Switch When connecting an equalizer or divider using Ai...

Owners Manual
Page 78
... Input terminal (for head unit) Audio Processor (Ai-NET) (Fiber Optic Digital compatible) (Sold Separately) Fiber optic digital Input terminal (for DVD Player) Ai-NET EQ/DIV NORM Fiber optic cable Ai-NET cable Ai-NET cable Fiber optic digital Input terminal (for Changer) *Fiber optic... cable (Yellow) (White/Brown) REMOTE OUT (White/Brown) REMOTE IN DVD Video Player (Ai-NET) (DVA-5210 etc.) (Sold Separately) Ai-NET cable CD Changer (Ai-NET) (Sold Separately) *Only connect...
... Input terminal (for head unit) Audio Processor (Ai-NET) (Fiber Optic Digital compatible) (Sold Separately) Fiber optic digital Input terminal (for DVD Player) Ai-NET EQ/DIV NORM Fiber optic cable Ai-NET cable Ai-NET cable Fiber optic digital Input terminal (for Changer) *Fiber optic... cable (Yellow) (White/Brown) REMOTE OUT (White/Brown) REMOTE IN DVD Video Player (Ai-NET) (DVA-5210 etc.) (Sold Separately) Ai-NET cable CD Changer (Ai-NET) (Sold Separately) *Only connect...

Owners Manual
Page 79
...of other product equipped with Ai-NET. To Ai-NET Connector (Gray) Ai-NET Cable (Included with Audio Processor) Ai-NET Cable (Included with DVD video player) Remote Control Output Lead (White/Brown) Connect this switch in the NORM position. • Be sure to turn the power off to the... remote control input lead. Remote IN/OUT Connector Digital Output Terminal Ai-NET Connector Connect this to the output or input connector of a DVD video player or DVD changer to this terminal. RCA Extension Cable (Included with CD Changer) To ...
...of other product equipped with Ai-NET. To Ai-NET Connector (Gray) Ai-NET Cable (Included with Audio Processor) Ai-NET Cable (Included with DVD video player) Remote Control Output Lead (White/Brown) Connect this switch in the NORM position. • Be sure to turn the power off to the... remote control input lead. Remote IN/OUT Connector Digital Output Terminal Ai-NET Connector Connect this to the output or input connector of a DVD video player or DVD changer to this terminal. RCA Extension Cable (Included with CD Changer) To ...

Owners Manual
Page 80
.../Brown) Connect this switch in the NORM position. • Be sure to turn the power off to the remote control input lead. Remote Control Input Lead (White/Brown) Reverse Lead (Orange/White) Connect to the touch panel-compatible rear monitor. RCA Extension Cable (Sold separately) 78-EN Video/Audio Input Connectors (AUX INPUT...
.../Brown) Connect this switch in the NORM position. • Be sure to turn the power off to the remote control input lead. Remote Control Input Lead (White/Brown) Reverse Lead (Orange/White) Connect to the touch panel-compatible rear monitor. RCA Extension Cable (Sold separately) 78-EN Video/Audio Input Connectors (AUX INPUT...

